Articles
All photos from the article
Experienced craftsmen can use even the simplest folding knives with a wooden handle to make various decorative crafts. However, a beginner should use a specialized tool for carving that will allow him to perform all basic operations without additional effort.
In our article we will tell you which knives can be used to process wood, and also provide recommendations for making and sharpening such tools yourself.
With the help of the simplest blade you can create real masterpieces
A little history
The preparation of logs for the winter, or products for everyday life, were widespread not only in Rus'. But time passed and people who had a desire for beauty in their souls and hearts quickly realized.
That wood is an excellent material on which you can depict your feelings or the events surrounding them. Each nation had its own special techniques for processing wood, which was related to the culture, worldview and worldview of the people themselves. The higher the cultural heritage, the better and higher quality the work of the masters.
In Rus', elements of carving were present in everyday life, which carried a ritual component. Household and kitchen utensils were always decorated with carved elements.
The patterns that were applied to the hut had the meaning of elements and natural phenomena. Or to attract light forces that were a symbol of fertility and longevity.
Today this craft continues to live, perhaps the tools have become a little more convenient and modern. Knives for wood carving were and are now quite diverse. Let's try to take a closer look at a modern woodworking workshop of a master.
What a beginner carver can't do without
A professional in a workshop will have his eyes wide open at the variety of tools. This endless, incomprehensible equipment throws you off balance, but the master himself can easily tell you in which case which tool is better to use.
For beginners, it is not recommended to buy the entire arsenal of tools. In fact, this is a “profitable business.” Almost like any other craft. At the initial stage, you can get by with the most universal knives. It also wouldn’t hurt to use several types of chisels, and first learn how to use them.
Once you feel your specific style and direction, you can purchase additional tools in the area where your “heart” lies closer. Knives for wood carving have a variety of shapes.
The only thing they have in common is a short blade that can withstand quite heavy loads. Accordingly, the shorter the wedge-shaped part, the less likely it is to break.
I would like to talk about some of the basic and most functional tools.
Knife-jamb
It happens that it is quite difficult to buy a knife and a joint separately. It is usually included in sets. But if you look hard enough, you can find this good helper. Its design is distinguished by an elongated blade with a straight cutting edge. Characterized by a large blade bevel angle. Blade width up to 2.5 cm, butt thickness 1.5-2.2 mm.
Knife-jamb for wood carving.
Many carving techniques involve a wood carving knife. It can be subjected to heavy loads and due to its large cutting surface, its application is quite wide. It is used for flat-relief cutting, as well as for volumetric cutting. They have two types of sharpening: single-bevel and double-bevel. A beginning carver is recommended to have at least 2-3 of these tools, with different widths of the cutting part and methods of sharpening.
Geometric thread cutters
The knife is called universal and for good reason. Structurally, it is similar to a jamb knife, but the blade is longer and there is a curved cutting edge. It is used both for giving the main shape to the canvas and for cutting small parts.
It is also indispensable in relief cutting. They are comfortable working with geometric cutting, roundings and curved parts on the canvas. This knife cutter is often compared to artistic writing on canvas.
Cutter knife for geometric wood carving.
Bogorodsk knife Tatyanka
The Bogorodsk knife for wood carving, popularly called “Tatyanka”, is one of the types of cutters. With this knife you can complete the entire work cycle. From rough material processing to the finest details.
The model is quite simple with a smooth cutting edge and a curved butt. The applied forces are transferred quite well to the cutting part. In any workshop, the Bogorodsk knife is one of the indispensable inhabitants.
Bogorodsk Tatyanka knife for wood carving.
Chisels for wood carving
The design of the chisel is quite simple: a wooden or plastic handle and a sharpened blade of various shapes. But the blades deserve special attention. They can be used for quite a lot of manipulations, chamfering, applying threaded ornaments, etc. In addition to geometric cutting, they can handle all other types of carving. They come in different types:
- for processing workpieces and cutting out simple recesses, a simple straight chisel is suitable;
- the purpose of this tool is the primary processing of the workpiece and for making grooves; an oblique chisel with an angle of 45° is suitable;
- an angle chisel is used to create V-shaped notches; its angle can be different, so the notches can be obtained at different angles;
- The semicircular shape of the tool plays a very important role; various ornaments are cut out with it, serifs are applied and used to prepare the part;
- Cranberry has a very interesting shape, it resembles a semicircular one. But its main difference is that the working surface is rounded along the end of the blade and along the rod;
- gravers are used for cutting grooves that have a mushroom-shaped handle and an oblique cutter, and so on.
Set of chisels for wood carving.
Perhaps it’s worth stopping at this point, since in fact there are still quite a lot of their varieties. We must not forget that each chisel still has its own different variations. The ones listed above can be called basic and any beginning master should have them in stock.
Other necessary tools
There may still be quite a lot of auxiliary tools. A mandatory attribute, a vice for holding a large workpiece, clamps are necessary when gluing. It all depends on the professionalism of the master, but such things as:
- a plane or rasp is needed; they can easily prepare the surface for further work;
- a small hatchet will allow you to prepare rough blanks;
- to cut the workpiece you need at least a hacksaw or electric saw;
- a set of patterns for transferring the image is also quite important;
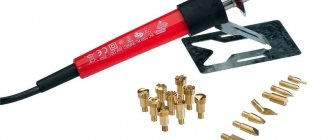
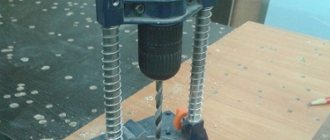
- electric or hand drill;
- You will need sanding paper of various grain sizes to complete the job.
For a beginner, these tools will be enough. There has already been quite a lot of it, but what to do with it? Let's paraphrase: “Art requires sacrifice,” which is especially suitable for our version. And don’t forget metal gloves with a leather apron, believe me, this is necessary.
Types of knife blades
A classic jamb knife can have blades of different widths, blade angles and a conveniently shaped handle for a specific type of work. The blade of the knife can be made in the form of a triangle (the flag knife is very popular) or have another shape.
The knife can have different sharpening options, smooth or sharp cutting edge shapes. Understanding which blade is needed depends on the specific type of work, the design being performed and the experience of the craftsman.
As in the case of a blunt knife, the prerequisites for the quality of a knife with any blade shape are the sharpness of the blade and the comfort of the handle. The attachment of the knife blade to the handle must be perfect and reliable.
Criterias of choice
Today, purchasing a tool is quite simple. Many stores provide a wide selection. But how can you avoid running into Chinese disposable products? This is a more complicated question.
It’s best to start by studying specialized forums and listening to the opinions of professionals. And it will be even better if you can find a real master and chat with him “live”.
But this is rare, so when purchasing a set or tool separately, do not hesitate to ask what grade of steel the product is and who the manufacturer is. Take a block of wood with you to the store and try on the spot how the tool will fit in your hand and what its cut will be like.
Price categories vary, but it is clear that a set of 10 items costing 300-400 rubles will not be normal. This means that saving is not worth it here.
Yes, the tool can be quite expensive, but again, a few items are enough for a novice master. And the rest can be purchased as your skill improves.
Work safety
- Durable and stable work table.
- Use of fasteners and clamps.
- Sufficient natural and artificial lighting.
- Use gloves, glasses, and a respirator when working with tools.
- It is forbidden to cut towards yourself.
- It is forbidden to clutter the desktop.
- Clean the workplace only with special brushes.
- The tool must be laid out and secured.
- The power tool must be in good working order and tested.
- If the power tool is connected to a three-phase network, it is necessary to equip it with grounding.
Sawdust and shavings should not come into contact with heating devices and heated surfaces. Heating oil or nitro coatings is allowed only on closed heat sources. The work area must be equipped with a complete first aid kit.
Tool sharpening
A lot depends on quality and correct sharpening. And the main thing is the quality of the work performed.
Sharpening a knife for wood carving.
As soon as the resistance of the material is felt during carving, the tool should be sharpened immediately:
- On a block with a large abrasive, at an angle of 15-24 degrees, using movements away from you, we create the correct cutting edge. As soon as you can feel the sharpness with your finger, you should switch to medium grain.
- And with the same movements, smoothly from ourselves, we continue sharpening. It is very important not to spoil the sharpening angle, keep the blade at one degree.
- Then we moisten the diamond block with plenty of water and continue to form the blade.
- It is better to perform editing on a leather belt using GOI Pata or a similar material.
That's all, you have a sharp knife in your hands, you can continue working.
Such manipulations must be performed regularly, starting from the first point. But do not lose the sharpening angle of the knife or other tool being sharpened.
Wood surface and sanding
Depending on the item being manufactured, one or another surface treatment is required. A shelf or rack for the kitchen, a table or bedside table for the bedroom requires a perfectly flat and smooth surface. A toy figurine, panel or box does not need sanding, but a drawing made with a chisel cannot be sanded at all.
Cutting wood with a knife and shaping the surface with a chisel does not require preliminary sanding, and once the work is completed, the surface simply cannot be sanded.
In the creative process of wood cutting, the idea often arises: not to cut out what you want, but to refine a natural solution. When a fancy piece of wood (a branch, a stump, a trunk) falls into the hands of a craftsman, the idea arises of adding to it rather than cutting it out.
How to make it yourself
There are all sorts of situations, someone doesn’t have enough money for an instrument, or maybe someone likes to do handicrafts in terms of instruments. In any case, I would like to tell you step by step how to make a jamb knife yourself. Let's start in order. What you will need for this:
- unnecessary wooden block;
- for the cutting part, take a metal cutter;
- paper or cardboard;
- epoxy resin or a good glue of similar composition.
These were the parts of the future knife that were listed. You will definitely need a tool, there isn’t much of it, to be honest. But you can’t do without it either:
- vice for holding parts;
- Angle grinder, easier to say “grinder”;
- chisels with a round or semicircular profile;
- drill;
- hacksaw.
Once all the materials and tools are collected, you can begin making a knife for wood carving.
Handmade wood carving knife.
Note that there is nothing wrong with this; a homemade knife can be many times more convenient than a purchased one. So we craft without a twinge of conscience:
- First of all, of course, we make templates; sketches can be found on the Internet, there are plenty of them. We make templates from cardboard, then transfer them to our blanks. We immediately do the same procedure for the handle. We choose the shape of the blade (blade) to taste. But if we are making a knife in a jamb, then it is better to take the shape in the form of a braid as a basis.
- Having transferred the shapes to the material, we begin to cut them out. As for the handle, it’s not a difficult task; we use a hacksaw to make a rough blank and use chisels to adjust it to fit the hand. We check by touch how it fits in your hand, if you think it’s good enough, the final step will be grinding. Cutting out the cutting part will be more difficult. The work will be a piece of jewelry; you need to use a grinder to cut everything exactly according to the template. When this part is ready, we move on to the next stage.
- Everything here is banal and simple, we drill a hole in the handle for the shank of the cutting part, a little larger in diameter. We collect everything, look at it and check that everything is satisfactory. Using epoxy resin, fix the blade in the handle and leave it at room temperature for a day. The resin will completely harden and turn into stone.
- The final step is to soak the handle in a layer of oil or fat to absorb into the wood. This will prevent future delamination. And accordingly sharpen the blade itself under the blade. How to do this was written above.
This was one of several hundred methods for making a blade yourself. The cutting part is made from various old unnecessary, but most importantly durable pieces of metal. And files are in use, and blades of various saws, etc. This is whoever has what.
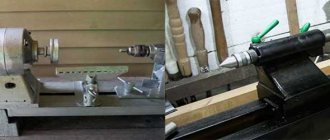
We make a chisel-jamb and a Bogorodsk knife at home from the canvas of an old hacksaw for wood
I found an old hacksaw for wood one day on the balcony and decided to use it to make myself a “starter” set for a carver: a hatchet knife, a jamb knife, a Bogorodsk knife.
The steel in a hacksaw can be called “anyhow,” but I don’t have a special tool, any saw blades or machines to automate the metal cutting process.
Therefore, I use a marker to mark the shape of the desired cutters, and I’m going to cut the wood with a hacksaw with a hacksaw for metal, because I had a supply of blades:
From the starting material - a metal ruler, a hacksaw for wood, an old kitchen knife:
5 canvases were killed, at different times around 3 pm (after work, like a respectable neighbor, she made noise only until 9 pm), with grief, sawed in half:
- Notches, creases - everything is subsequently removed using a proper stone (for me it’s more like a dead block - kitchen knives used to be sharpened with it) and coarse sandpaper.
- I'm trying to sharpen it at an angle, as the masters advised, who sharpens on a machine - without handles for now. It’s inconvenient and the angle is off:
Even from a phone photo, deep scratches in the metal are visible during the first rough sharpening:
- The blank for the Bogorodsk knife
is formed with files and cleaned of rust: - And now I need to make handles.
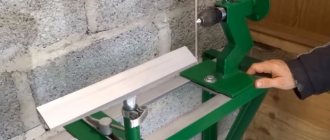
To do this, I take a piece of board and cut the bars along the fibers: - I cut out a recess using a stencil of a metal sheet (this is where my grandfather’s old chisels came in handy, I used them to select fibers):
- Coat the inside of the recess with glue (I used transparent Titan Wild), place a metal blank and also coat the other half of the piece of wood with glue:
I used a little too much glue, a lot leaked out, I had to wrap it in newspaper and tape on top. In a good way, this would need to be clamped in a vice, but I don’t have one either and I work in a city apartment in the kitchen.
- Preparation for a knife-jamb:
- I also coat it with glue:
- Coat the second half of the wooden block with glue and tie it with electrical tape for strength, leaving it to dry completely:
- I don’t have a plane, so I hammer an old steel knife, cutting off the excess wood from the handle, also along the grain:
- The result is a rough pen like this:
- A little effort to wrap things up:
- A bunch of shavings from 3 handles:
And here is such a small knife-jamb
and
a pocket hacksaw for wood
are ready! You can leave the handles like that (just a little sanding), you can soak them in oil, paint them with something, and do whatever you want. The hacksaw still needs to be sharpened a little, there is a set of teeth here.
Of course, this is more like a hacksaw for drywall, because in reality it is impossible to cut something cleanly with it - it leaves too large “teeth”. The ideal is to go to the dacha, cut down small branches on trees or trim the stems of burdocks and sunflowers in the garden.
The handles can be left untreated; they will fit comfortably in your hand without slipping. In extreme cases, you can soak it in linseed oil and wipe dry.
Did you like my post?
Click on the advertising banner on this site. It’s free and not difficult for you, but for me it’s an honest income from the blog and a pleasant addition to the enthusiasm for a cup of coffee