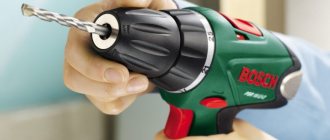
An engraver, or bur machine, is a very necessary and useful thing for those who like to carve wood, stone, metal, and so on. But the engraver is good for more than just carving. It can also be very helpful when assembling or repairing something miniature, in order to cut out the necessary part from metal or plastic that cannot be cut with scissors. You can also use it to polish minerals or just beautiful stones. There are a huge variety of attachments for an engraver: saw blades, grinding discs, stones of various grain sizes, brushes (both simple and metal), felt discs, various cutters for wood and glass, and also, of course, drills.
Buying such an expensive thing as an engraver is only half the battle (however, making it yourself is also not a tricky matter). During the entire period of use, it is also advisable to update and replenish existing stocks of drills, cutters and other attachments, which are also not cheap. In any case, they (for some reason!) cost more than consumables and attachments for the same standard-sized tool. But you don’t have to buy them all - some attachments can be made quite easily yourself. Of course, such complex tools as a wood cutter, drill or diamond gimlet for engraving on glass are unlikely to be made, but, for example, small saws for cutting wood and plastic, grinding and felt discs can be easily made with your own hands.
Even if you have no skills. I think that every person can cut out the correct circle drawn with a compass on a workpiece with scissors. In addition, some consumables cannot be found in regular stores selling similar goods. You have to order and wait a long time for them to arrive, and whether they will come at all... And even if they do come, it is not a fact that they will be of high quality and reliable. The sanding discs I recently received in the mail were so fragile that one of them broke with a little pressure... In general, if you want something done well, do it yourself! Today we will look at several options for making a more durable tool yourself.
Packaging and equipment
The Dremel comes in its original packaging, which has a picture of the tool itself and some advertising information. The main characteristics are drawn on the side of the box
The other side of the box has the same print.
On the second side there is a description of accessories. At the top, only the name is large src=”https://pic.mysku-st.ru/uploads/pictures/04/62/56/2017/11/06/b14c2a.jpg” class=”aligncenter” width=”800″ height =»534″[/img] The box contains a set of 30 different abrasive attachments. The set is closed with a plastic transparent lid, each nozzle sits in its own place
Here's a closer look at the nozzles. Everyone will find something suitable for themselves.
The length of each attachment is about 45 mm. The kit includes a convenient attachment for vertical milling, with adjustable immersion distance into the material. They gave us safety glasses as a gift. And then in a bag, in bulk, they gave us a lot of accessories for the home handyman. All this scattered Cutting discs
Collets of different sizes, Spare brushes Polishing felt wheels and original nozzle + special nozzle for attaching the wheels Large set of sanding wheels of two sizes and special nozzles for them Includes 2 keys for tightening the nozzles in the chuck
Attachment for installing cutting wheels. Brush attachments
Various roller cutter options
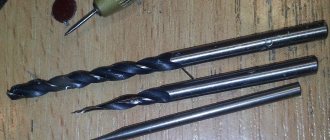
2 drills
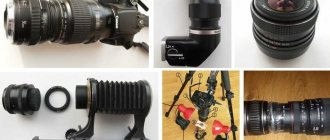
The most pleasant accessory for me is the flexible shaft.
It allows you to work without straining, holding it just like a pen.
Appearance Dremel Made in bright red color.
The sticker shows the model. There is a special black skirt to comfortably hold the Dremel tip. Here is a sticker with the characteristics. The Dremel has a power of 180W and reaches up to 30,000 rpm.
— Here is the speed controller
There is a special bracket for hanging the Dremel when working with a flexible shaft. A metal “button” for tightening the attachments in the chuck. European plug To replace the brushes, you don’t have to disassemble the Dremel, there are 2 special compartments for hot replacement, you just need to unscrew the 2 caps on the sides
Homemade attachments / cutters / consumables for engravers, drills and drills
The article will touch upon the topic of how to make consumables with your own hands. It's no secret that Chinese nozzles are of very low quality, while branded ones are overpriced. So in some cases it will be more profitable to do it yourself. Under the cut you will see my homemade attachments and also interesting solutions from the Internet .
- Abrasive attachments
- Petal circle for engraver
- Original sandpaper on a rubber drum does not last long, so you need to find an alternative solution. Cut out a circle of small diameter from plywood:
Let's give it a more even shape:
Making cuts with a hacksaw for metal:
We glue sandpaper into the resulting slots using epoxy resin:
We get:
Flap wheel for drill
The nozzle has a larger diameter. To prevent a “spread” as in the previous version, when gluing, the sandpaper must be tightened with an elastic band. This occurs because the base of the fabric absorbs the resin from the cut and becomes rough.
Finished nozzle:
- The advantage of flap wheels is that they last an order of magnitude longer than regular sandpaper on a drum of the same diameter.
- Emery for a drill from rollers from a tape recorder
- Older reel-to-reel tape recorders have large rubber rollers with a metal sleeve. We place a bolt on the bushing and glue sandpaper onto the rubber:
- Cutting wheels for engraver
- The topic is quite common, but I’ll still tell you for the sake of completeness.
- We take a thin cutting disc for an angle grinder, a compass with two needles, an awl, and unnecessary scissors:
1) We draw circles with a compass (you shouldn’t make too large circles, it’s inconvenient to work with them. The optimal size is slightly smaller than a standard circle) Make sure that the center of the circle is in the middle of one of the squares of the reinforcing mesh.
2) Use scissors to cut the disk into sectors, and then cut out the circles themselves located in the sectors. Metal scissors are suitable for this work, but ordinary stationery scissors can also be used, but this makes them more dull, so we take those scissors that we don’t mind.
3) Using light rotational movements of the awl, we begin to make a hole alternately on both sides. The diameter of the hole must be equal to the diameter of the screw. If the hole is any larger, it will break.
- 4) Grind the circle at low speed on an unnecessary sharpening stone:
- And we get reinforced cutting wheels:
Making such circles is much cheaper than buying them. They also last longer than purchased non-reinforced circles.
Decorative sanding attachment
A self-tapping screw without a head is screwed into the cork, and a washer is glued to the base. The chuck's jaws will rest against the washer and prevent the screw from being screwed in deeper.
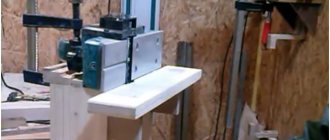
- It is most convenient to use this attachment on a drilling machine. Instead of a self-tapping screw, you can screw a felt attachment into the cork:
- Drill polishing attachment
Another fairly common topic. The felt from the felt boot is clamped with a bolt with wide washers. Polishing paste, such as GOI paste, is applied to the felt.
- The following are a few examples of abrasive attachments taken from the Internet.
- Sanding drum for drill
- Sanding drum for engraver
On a lathe, a metal drum is turned with a slot into which the edge of the najak is tucked, and it is wrapped around the drum. Fixation occurs with an elastic band. The same structure can be made from plywood, as shown in the previous version.
- Grinding cylinders for engraver
- Comrade Marshall suggests making cylinders this way, I quote:
- In order to make this type of consumable, we will need: a durable, but as thin as possible fabric (preferably cotton), sandpaper of the required grain size, and most importantly, a tube of suitable diameter, on which the cylinders will be placed during gluing.
So, we take the fabric and cut it into long strips 12 mm wide. Then we cut these strips to the size of the diameter of the tube with an overlap of about 1-1.5 cm, pull them tightly onto the tube (so that they do not dangle) and glue our pieces directly on the tube using regular PVA.
The next task is a little more complicated: you need to correctly make a stencil, according to which the skins themselves will be cut out in the future. The stencil is shown in the picture on the right under the tube. We do this: take and cut off a piece of skin the same width as the fabric, but 1 cm longer. We apply it on top of the glued fabric and mark the place where the two ends of the skins should meet.
After this, we carry out the necessary geometric actions: from the point of the proper junction we draw a line across the skin, from the other end of the skin, at the same distance, we do the same, after which we draw diagonals in the resulting rectangles and cut off pieces of skin along these diagonals.
Now, when you place your stencil on top of the fabric glued to the tube, you get an accurate diagonal connection of the ends of the sandpaper. Now you have a stencil that you can trace with a pen along the outline on the back of the sandpaper.
Disassembly
Exploitation
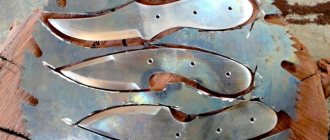
In order to show the “abilities” of the Dremel, you can come up with a lot of scenarios. I have 2 cats “on the farm”, or rather a cat and a male cat, since we live in the private sector, they are left to their own devices and roam freely. If the cat is not yet particularly active, then the cat is a real CAT. It may take a week, come back thin but happy. And so that during these spree times his mistress would not add gray hair, I decided to try to make a sign for the collar, on which the nickname and our phone number would be written, if someone finds this beast when he goes crazy from hormones and cannot return home, they will call “his family.” In general, there was already an attempt at such signs, I ordered them from an advertising agency, they were made of plastic and they swore that they were of high quality... These are the ones But in fact, they lasted no more than a week and were lost and chewed up.
I got very high quality stainless steel strips, 1mm thick. But the trouble is, I tried to drill a hole, and... I couldn’t do it, 5 dead drills, from different manufacturers and 0 effect. I thought that a fiasco awaited me here too. But the Dremel pleased me. Loaded the cutting disc and let's cut