More and more people in megacities prefer to travel by electric transport - electric scooters, electric bicycles, electric scooters or other modern vehicles. And more and more often you can see completely original vehicles made by craftsmen with their own hands.
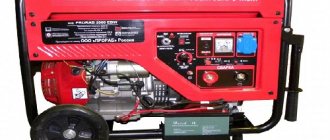
It’s easy to buy a ready-made electric scooter, but if you want to realize creative ideas, you can make an electric scooter yourself. This is exactly what an engineer from Thailand, Joseph Memmel, did when he decided to use solar panels as an energy source for his homemade scooter. The inventor used a monocrystalline solar battery of 180 watts and a voltage of 24 volts. With a standard 48 volt 20 ampere-hour battery and a 500 W motor, the scooter travels about 40 km at a speed of 25-30 km/h.
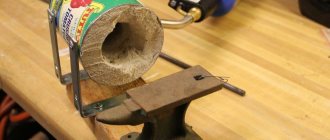
Homemade electric scooter from a starter - Metals, equipment, instructions
You can increasingly see electric vehicles on the roads. Moreover, we are not talking about Tesla cars or other electric models, but about modern two- and three-wheeled vehicles that help you move along city streets and off-road. The electric scooter remains the most popular.
Is it difficult to make an electric scooter yourself?
Traveling by means of two-wheeled vehicles with an electric motor is becoming increasingly popular not only due to the environmental component and savings, but mostly because of the ability to assemble such a vehicle yourself in your garage.
So, before we begin assembling such a unit, it is worth noting that this is only advisable if it is really possible to somehow improve the stock design or settings. In other cases, it is best to purchase a ready-made unit.
Step by step solution
Often, when assembling it yourself, the owner already has some kind of starter kit, which will later be redone. That is why it is necessary to decide on the model of the scooter that will be “modernized”.
- You need to determine the power for yourself and then build on that.
- Much attention must be paid to the battery. It must have satisfactory capacity and voltage.
- You also need to look for a suitable controller.
- First you need to attach the controller, battery and engine to the frame, and then connect them to each other.
- Now you need to charge the battery from the electrical network and conduct a test run of the system.
What is needed to assemble an electric scooter?
If you decide to assemble an electric scooter with your own hands, the most important thing is the selection of the engine and battery, since this vehicle runs on electric power.
The choice of one or another engine with a battery directly affects the maximum speed and mileage:
- If you take lead batteries, you can save a lot, but they are heavy and this must be taken into account.
- A more expensive alternative is lithium phosphate batteries, which are lighter.
- It is best to place the battery under the frame, where in addition to it the controller and alarm will be located. You need to leave at least some space under the seat for luggage.
- It is necessary to understand that assembling an electric scooter with your own hands necessarily involves welding work. If the necessary equipment, tools and skills are not available, then such an undertaking can be much more expensive than a finished electric model.
- But in any case, in the long run it will pay off due to the electric motor, which is much cheaper to refuel.
Set of ready-made components
It is very important to install the electric motor correctly. This is one of the most important points during scooter assembly.
It is very important to minimize the sound it will make (it's not the roar of a Ford Mustang). This can be done due to the absence of a commutator and brushes.
Often it is placed on the rear wheel, the rotation of which occurs thanks to an electrical circuit that supplies a push to the front one.
It is necessary to look for the necessary components for your electric scooter as responsibly as possible.
You can buy an electric motor and battery along with the necessary connectors separately, or you can take the path of least resistance and buy a ready-made kit.
Despite the fact that this one will cost more, you can immediately buy a set with a controller and a motor wheel, a charger and a set of hydraulic brakes.
Advantages and disadvantages
For many years now, some European countries have been actively fighting for the environment, so they have banned gasoline scooters. Electric analogues certainly have some advantages in this case:
- Much more modern design.
- The efficiency is much higher.
- There is no need for frequent repairs of the power unit.
- Easy to find spare parts.
- There is virtually no noise when driving.
- Easier to charge.
But they are not without drawbacks in terms of driving range on a single charge. However, for trips around the city this is the best option.
Will such a homemade product be safe?
From the point of view of risks to life - absolutely safe, from the point of view of the wallet - not everything is so simple, because if you don’t understand basic electrics at the level of plus to plus, and minus to minus, then you can burn not only the controller boards, but also the electric motor
The best thing that can happen if assembled incorrectly is that the homemade electric scooter simply won’t move. If you can’t wait to make such a vehicle yourself, it’s better to enlist the help of smart friends who can digest the frame and connect the system correctly.
DIY electric scooter from a screwdriver
» Screwdriver » DIY electric scooter from a screwdriver
There are a lot of interesting videos on the Internet, and while watching videos on YouTube once again, I came across a review of the RAZOR electric scooter. I wondered how popular this type of transport is. After surfing the Internet, it turned out that this is a very common thing.
Later, while relaxing on the Azov Sea in the city of Yeysk, I saw with my own eyes an industrial Chinese electric scooter with wide wheels with brake discs. Apparently those with large batteries and the charge lasts for 40 km. I was amazed by the powerful frame. A kind of small moped))))). The price of scooters is captivating. From 12,000 for a scooter with an electric motor power of 350W.
But I didn’t stop there and found several articles on homemade electric scooters. I really liked the idea of a homemade electric scooter from a screwdriver and decided to create my own scooter from plywood. And I used some kind of Austrian screwdriver. It was a cordless drill/screwdriver with an impact and a 24V battery. I got it for free.
Of course, it was scary at first, I had doubts whether the engine power would be enough to carry my 78 kg of live weight))), but it turned out to be so much that I couldn’t hold the scooter even when resting on the asphalt, the wheels began to slip. I started making this miracle by assessing the size of the scooter by eye, placing my daughter’s children’s toys on the floor.
Then I decided on the size of the wheels of the future scooter. As far as I remember, 140mm in diameter.
I ran to the “Everything for the Garden” store and bought 2 wheels for 180 rubles each. Then I glued together several A4 sheets to mark the parts in real scale.
On it I laid out the wheels, drew the base and depicted the entire scooter in profile, life-size. Then from it I transferred images of individual parts to other sheets and glued them onto plywood.
And I cut out the details directly from them.
My design also includes 40x50 timber. It serves to strengthen the platform on which a person stands. Since the scooter is made of 8mm thick plywood, the platform is very long and carries a decent amount of weight. And besides, it lies flat, without reinforcement it will break even under a baby. It still sags a little at the edges to this day.
There are plans to eliminate this, but at the time of writing, these are just plans. The timber was tested for strength in a barbaric way. He cut me the length I needed, placed one edge on the threshold of the bathroom, and the other on the floor. It turned out to be 2 support points on the sides. The middle was completely in the air. I took my little daughter and together we jumped as best we could in the middle of the beam.
Not only did it survive, but it didn’t even crunch. The steering wheel is made of a tube presumably of titanium origin, since aluminum and duralumin do not have such strength. At the end of the handle under the right hand there is a variable resistor responsible for the speed of the scooter. A small board with a k561la7 microcircuit is soldered to the resistor at the back.
I have a home-made shim implemented on it and it’s all located right in the steering wheel. But I used a 60A IGBT power transistor, since 3 IRFZ44Z field switches failed immediately)))). You will probably think that I forgot to install a reverse surge diode in parallel with the motor, but you would be mistaken if you think so.
I can only guess that the transistors were knocked out due to direct voltage surges, since these field devices are only designed for 40 volts. It's difficult to shock them, I paralleled them. But I had a good IGBT, because it is designed for 600V. But one day, after gasping on the sand, it struck.
At first I was perplexed, how did this happen? Could he really not withstand the current? But everything turned out to be more banal. My motor is not protected by anything, and a protective diode is soldered to its terminals. And then I noticed that this bastard had fallen off with one leg of the engine.
I decided not only to move it to the board (for greater reliability, so that it would not fall off anymore), but also to change the control to a push-button one. After all, as practice has shown, it is not convenient to twist the gas while driving, this is not a motorcycle. Although maybe I just made an inconvenient gasulka. But the push-button one is more original and functional; I’ll attach dynamic braking to it.
And in the future, create an on-board computer. After all, the MK will already be ready. Yes, yes, it is he who will be entrusted with controlling the IGBT transistor based on signals from the buttons. And also close the transistor before turning on the dynamic braking relay. I want to use a car relay; they have a fairly high switching current and are affordable.
In general, I only program PIC microcontrollers, but I have long wanted to try my hand at AVR. So the idea came to my mind to use the AT90S1200 I had lying around. Moreover, this is already an antique item. But at the time of writing, these are only plans. For now I will describe everything that is now.
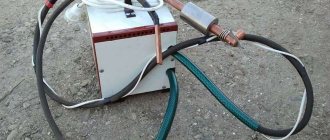
I bought the batteries one-on-one with an uninterruptible power supply for 7A/H and 12V. Two pieces cost me 1400 rubles. These batteries are gel batteries. At one time, I read a lot about them before purchasing. The main selection criterion was that they can be charged at home without fear of harmful fumes.
My homemade charger for a car battery turned out to be useful, because it is also automatic, and gel batteries really don’t like overcharging. I charge them with a current of 500mA. I have never ridden with fully charged batteries. But presumably they will be enough for 40 minutes of intense driving.
I won’t say anything specific about the mileage either, but it is clearly less than we would like))). 10 kilometers is the limit. It’s a pity my smartphone died, at least check with GPS how fast it’s going. While riding, I noticed that the front wheel takes very large impacts even from small bumps in the road.
Apparently this is due to the fact that you have to stand closer to the steering wheel, since batteries take up a lot of space in the back. So I wanted to move them to the front, let them hang out there, and almost the entire weight of the rider falls on the rear wheel. Fortunately, I bought wheels with a safety margin and 100 kg per wheel is its rated load. Compared to the front wheel, the rear wheel easily overcomes obstacles and is mounted much more rigidly in my design. Well, now a few photos and videos: Assembly process Fitting and manufacturing And here is the test. True, I’m filming a kid who asked me for a ride, but he’s apparently afraid to drive fast, so he never got up to maximum speed: Only registered and authorized users can leave comments.
DIY electric bike scooter (photo+video)
In 1914, Henry Ford and Thomas Edison tried to create an electric car. And, apparently, they made a couple of experimental samples that could travel up to 160 km on one charge. But the workshop burned down, and Ford returned to the internal combustion engine. And now, almost a hundred years have passed...
The idea of an electric bicycle or scooter has been in my mind for a long time (I don’t know what is more in the device: a bicycle or a scooter, so we will call it that). But how to implement this idea? Of course, you can buy any of those produced by industry, but over the past 5-6 years they have not even thought of getting cheaper.
A more or less decent bike or scooter with electric drive costs from 27,000 rubles, and the ones I like generally cost about 40 thousand.
Against the background of a fairly good used scooter worth 17,000 rubles. The price of the electric bike seems inadequate. I kept hoping that bikes would start to get cheaper. But one year passed, then another, and prices still did not become acceptable.
And suddenly the issue began to resolve itself. In the last days of the New Year holidays, a friend called me and said that he would come to me and bring me an electric mini-moped that was not fully assembled. In the afternoon, a friend showed up with a bunch of components and an unfinished device like an “electric stool.” There is one more piece of furniture in my room.
The story of the “stool” turned out to be interesting. Six months earlier, a friend also had the desire to have an electric moped. But those who were ready to buy did not - it was expensive. On avito.ru he came across an advertisement for the sale of an unfinished moped and some other electrical accessories. When buying, a friend saw a not very attractive picture: the frame was rusty in places, but the engine was on it.
All this had to be brought to fruition by investing money. The seller, who wanted to empty the garage as soon as possible, immediately agreed to sell everything in bulk for only 4,500 rubles. So a friend became the owner of three DIY kits.
Reference by topic: Do-it-yourself tracked all-terrain vehicle
Before coming to me, he managed to find the missing components in different parts of Moscow and paint the frame. All that remained was to screw on the footpegs, install the disc brake and connect the regulator.
In the first modification, it was planned to install a ski (skateboard) instead of the front wheel. In one day, the two of us (this is a big word, I only held a screwdriver and sometimes handed over the tool) managed to screw on the footpegs, install the ski, disc brake and cut out a protective casing for the batteries.
Work continued on the next day off. Dmitry brought three batteries from a computer uninterruptible power supply with a capacity of 12 Ah. They fit very comfortably underfoot. They are secured in the casing with foam plugs.
The second approach to creating a moped was done over the weekend, all that was left was to simply connect the regulator and test the homemade product.
But no matter how hard we tried, the electric bike’s engine would not start. We tried combinations of two different regulators and different throttle handles. To no avail! The problem was resolved only by mid-March, when a friend bought a new Chinese regulator unit.
It turned out to be more powerful and was equipped with a throttle handle. When purchasing, the seller gave full advice on how to connect it correctly.
And, lo and behold, Dmitry connected the regulator in 10 minutes, it worked perfectly even with the old gas handle. I just felt sorry for the old regulator - apparently, our experiments led to us burning it.
Connecting the new regulator is shown in photos 1 and 2.
Reference by topic: Do-it-yourself homemade snowmobile scooter
The disc brake from a children's ATV looks solid (photo 3). To attach it, it was enough to make one 06 mm hole in the frame and place the brake disc on a cylindrical key.
They did not put on the upper casing - the regulator, temporarily taped to the front, was in the way (photo 4). The rims are 4 inches in size - from a children's ATV; the tubes and tires are from a go-kart. Two running boards for an electric moped scooter were made from one running board of an off-road vehicle.
The first trip took place at the end of March, but there was a snowstorm and the asphalt was covered with snow. The first test drive showed that the mini-snowmobile lacked either engine power or grip on the snow. When equipped with a ski, he could not even ride on a path made of trampled snow... The rear wheel sank or skidded.
After replacing the ski with a wheel, the moped ran briskly through the snow. And the ski was not useful (photo 5).
The speed is low, but the power is felt (photo 6). I drove around the yard a couple of times. The feeling is pleasant. If the moped started to skid, then I put my leg out as an additional ski (photo 7).
The second trip “to the field” took place in mid-April, when the snow melted a little and the paths dried out. The regulator was moved under the electric motor, and all equipment was covered with a protective casing.
The wheels were replaced with narrow tires with a summer tread pattern (photo 8).
It is convenient to transport the “miracle of technology” in the back seat of a car (photo 9).
The second test race took place at a nearby stadium. The well-loaded electric bike ran great on the asphalt path.
Reference by topic: DIY snowmobile
Even without visible effort, he overcame small obstacles.
An attempt to drive through the mud that remained after the snow showed that there was not enough power for such movement.
I made a couple of laps around the stadium, but I didn’t speed up too much, since I was driving on a pedestrian path. It was good to ride through the spring puddles! Passersby looked at me strangely.
“Wild people, they’ve never seen an electric train,” I thought. And when I arrived, I realized that a significant part of the splashes from under the drive wheel had settled on my back.
The only thing our electric scooter was missing was a rear fender (photo 10).
Test drives can be viewed online:
Electric Scooter Bicycle Features:
Motor - commutator, 250-350 W Regulator - commutator 36 V, 500 W Battery - 36 V, 12 Ah (three batteries connected in series) Maximum speed with a load of 80 kg - 20 km/h (forecast)
Weight - 30 kg
The regulator was purchased here - motorboard.ru, and the disc brake and rims from a children's ATV here - mike-motors.ru
PS That's what I don't understand. Half of China's population has been riding electric bicycles for at least ten years.
And in Moscow, I have the feeling that there are fewer electric bicycles (scooters, scooters) than, say, Cayenne or I wonder why? "Maybachov".
©Author famous on the Internet master Y. CHUDOTWORKER, Moscow
Below are other entries on the topic “How to do it yourself - for a homeowner!”
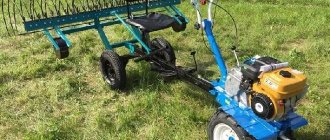
- Do-it-yourself scooter trailer cart How to make a comfortable cart for…
- DIY LED night light How to make your own night light...
- How to put skis on a stroller with your own hands Do-it-yourself stroller on skis In winter...
- DIY zipper bracelet (PHOTO + STEP-BY-STEP DESCRIPTION) HOW TO MAKE A BRACELET FROM REGULAR…
- Stable folding trestles for the workshop with your own hands - photo and drawing Folding trestles for the workshop with your own...
- DIY ceramic tile lamp (photo+diagram) DIY ceramic tile night light…
- DIY chair made from cans Chair made from cans for the terrace I saw…
DIY electric motorcycle
Translated by alexlevchenko92 for mozgochiny.ru
Hi all! I want to share with you a story about how to make an electric motorcycle with your own hands .
This project started with a moped found on the side of the road. Although it was not in working order, the frame was fine.
Deciding to use all the parts and combine them with a mountain bike to build a powerful electric motorcycle .
I decided to use a mountain bike with 20 inch wheels, all because the wheel size and low profile tires meet the requirements of a small internal combustion engine motorcycle.
Step 1: Materials Needed
Step 3: Disassembly and installation of the plug
The scooter frame was in excellent shape with no rust or damage. bicycle was purchased for the donor . All parts were dismantled and labeled.
Since the scooter frame uses large diameter pipes (for the front fork), I had to modify the fastening system in order to be able to install the front fork from a bicycle.
Luckily everything fit very tightly, so a little JB Weld and some studs will ensure the new fork works well.
Step 4: Extend the rear axle
We'll use some steel angles and a threaded rod to create an extended rear axle that can accommodate the rear wheel.
All these operations are necessary in order to make the project at home without additional tools; I needed to make everything without welding . The metal structure turned out to be excellent.
It was easy to mount it to the frame and install mounting hardware for other parts.
Step 5: Build the body and casing
I know, I know, it's all made of wood. Initially, the idea was to design the frame entirely from steel and aluminum, but once it was decided to use a Razor frame and avoid welding, the plan changed on its own. Steel was used for all structural elements, and the cosmetic structure is created from wood.
This saved me a lot of time and prevented me from adding weight to the bike. Essentially, the wooden structure is mounted on the chassis so that the bike is strong.
There are quite a few attachment points on the Razor frame where plastic scooter panels were installed, so I needed to create a design that would utilize the remaining attachments.
The protective casing and headlight were created using a piece of PVC pipe with a diameter of 15.5 - 16 cm , cut in half. Cut the corners in the pipe using a large band saw. We make holes in the casing for batteries and wires; the cover was installed on hinges. We cut sections of facing plywood to create grooves.
Step 6: Mode/Form Body Panels
Initially, it was problematic to decide how to cover the body. I didn’t want to use wood, so while spending time in hardware stores, I came across a roll of aluminum sheet (usually used for roofing). Aluminum was quite thin and cheap, ideal for the project.
I started creating panels from a sheet of Whatman . After all the shapes and curves were formed, I repeated the design on aluminum, and then cut everything out using tin snips. Then wrap the aluminum panel around the frame.
The finishing process took a long time. Finally, after cutting out all the panels and bending them, drill holes for mounting screws.
I wanted the body to look like vintage airplane panels, so I drilled parallel rows of holes along the edges of each piece of aluminum.
Step 7: Paint
Once the panels were installed and drilled, I removed them along with the front fork and rear support. Painted the entire frame, panels and tank gloss black . This was the best color to hide the unsightly seams between the panels.
3 coats of paint and 2 coats of clear were used . Paint the wood dashboard cherry and coat it with high-gloss polyurethane. Once everything is dry, reassemble the motorcycle by adding insulation in the casing. We change the seat upholstery from the original white to caramel.
Installed lights, stand, engine and running boards. Also installed a speedometer.
Step 8: Wiring, Transmission Housing
First we solder the electrical connectors for all the wires. Then connecting 4 batteries in series with 30A controller.
All because I was using 48V system with 12V lights and because I didn't want to buy a DC/DC converter, I connected the lights to a series of up to two batteries. They draw so little current that it doesn't affect power while riding.
In the future, if I change the batteries to a lithium battery, the design will have to be modified. The 48V lithium battery will help increase your mileage.
The engine that was purchased, according to the advertisement, produced 3000 rpm, but for the project there was a need
to increase the gear ratio.
If the engine didn't spin 6 times faster than the wheel in first gear, there would be a risk of burning it out. At the same time, I still wanted to use the ability to freewheel and change gears. It was decided to install a second freewheel sprocket on the frame.
Thus, the engine went from 11 teeth to 34 gear teeth, which then went to 14 teeth, and then to the rear wheel.
Mechanical losses are high, but the system will not allow high torque and deformation at low speed to make irreparable changes to the motorcycle system, and also makes it possible to change gears. For the starter, drill a hole in the dashboard.
After all this the motorcycle was ready.
Step 9: Finishing the Project
Since completion the bike has developed some flaws that need to be replaced, but as it stands the bike runs very well. The riding position is quite low, with a seat height of 66 cm , but can be adjusted by changing the length of the threaded rear support rod.
The motorcycle can reach a speed of about 40 km/h in first gear on level ground, with a top speed of 64 km/h. Driving range 16 km . He weighs about 45 kg .
Thank you all for your attention. Happy homemade crafts !
Asynchronous motor
Asynchronous ones are quite large and heavy; in this case we use a 750-watt one, which gives high efficiency and very powerful acceleration.
It is best to use bicycles with a high frame; by the way, if you have not yet decided on a frame, you can contact us, a bicycle rental company, and choose the size and shape that suits you.
In terms of speed, it will be inferior to motor wheels of similar power. But it will cost much less.
For assembly you will need:
- drive unit;
— controller;
- batteries.
Operating procedure:
1. We start by dismantling the sprockets on the carriage , remove the pedals and connecting rods - they will not be needed with this arrangement;
2. Then you need to make a drive mounting bracket.
The easiest way is if the base is steel, then you can set and weld a couple of profiles from a steel angle, for example.
Holes for the selected engine are marked and drilled in them.
Instead of welded brackets, you can make removable ones that will be held in place like clamps;
3. In this case, batteries are needed with a capacity of 12Ah and a voltage of 24V.
Several smaller ones can be connected in series;
4. Batteries weigh a lot, so they will also need brackets .
It’s worth choosing batteries so that they fit inside the frame, it’s more compact;
5. The easiest way to install the controller is closer to the batteries so as not to pull wires through the entire structure.
You can buy a small bag and secure it tightly, and put a control device inside;
6. Then the electrician: the wires are soldered, the charging connector is soldered.
We insulate unprotected areas with electrical tape or heat shrink.
If it is not possible to completely hide the wires, it is worth laying them in a cable channel to protect them from moisture and dirt.
Let's get acquainted with electric scooters. Expensive toy or cheap vehicle?
Residents of Minsk have stopped looking at people rushing past on a hoverboard as if they were aliens. Segways and electric scooters won’t surprise anyone today either. Urban electric transport, ahead of the necessary amendments to traffic regulations, is joining our lives.
And if mass motorization came to Belarus from the western side, then individual electric vehicles come mainly from China. Not long ago, Rossel electric scooters began to be imported to Belarus. Prices for various models vary from 2120 to 3400 rubles. Frankly speaking, it's not cheap for a toy.
Or is this already a full-fledged vehicle? What are the characteristics? Where to ride it? How long does it take to charge? How to store? There are many questions. We will try to give as many answers as possible.
We took two models for the test. The first is the most popular Rossel Urban. In the photos it is a black scooter with two seats. The second model is Rossel Band. This is the most expensive option, available only in a 1-seat version.
If you suddenly know the Rossel brand, but you can’t remember where you saw it, don’t rack your brains - the company specializes in the production of mini-tractors, which are also popular in Belarus. However, we are not interested in agricultural machinery today.
Let's take a look at what kind of electric scooters they offer us for the price of a not-so-rusty Ford Escort.
Rossel Band – 3400 BYN
Let's start with the expensive model. The scooter looks very impressive. A massive fork, wide wheels, bright red fenders... At the front, attention is drawn to the round headlight, on the body of which two dragons are placed. There are turn signals (front and rear).
The model we tested does not have rear view mirrors. In fact, they are included in the kit - we just didn’t have time to attach them. The scooter arrives in Belarus disassembled, but the selling company delivers the model to the client already assembled.
Delivery within the Republic of Belarus, by the way, is free.
Looks like a toy Harley
With its distinctive fork angle and near-vertical riding position, the Band looks like a toy Harley-Davidson.
The scooter has damping elements on the front wheel and the only seat (the rear wheel does not have a shock absorber). There are full-fledged lighting equipment and a sound signal.
The turn signals do not make any sound - you can forget and drive with the light flashing the whole way. The signal is loud - the village dogs are scared and the tractor drivers look unkindly.
There is an alarm
In order to ride, you need to “start” the scooter using a key (there are two included). There is an alarm system that, by locking the wheels and starting to beep throughout the entire area, will prevent a thief from driving away a 60-kilogram car.
When you turn the ignition key (let's call it that), the dashboard lights up, on which the main indicators are displayed: speed, odometer, battery charge indicator. The right handle controls the gas.
The electric model starts off briskly and picks up speed faster than most 50cc scooters.
The speedometer showed 78 km/h!
There are three riding modes. I is the slowest, III is the fastest. According to the passport, the maximum speed of the Band is 50 km/h. But even in the slowest mode you can accelerate to 55 km/h (according to the speedometer). In the third “gear” the speedometer on the straight line showed 78 km/h.
Impressive? Don't rush to order - the speedometer has a huge error. When the Band shows 50 km/h, the actual speed (according to GPS) is 29 km/h. When the speedometer shows 70 km/h, the real speed is 44 km/h. In general, the scooter goes its 50 km/h.
Although it is possible to accelerate to such speed only on a straight line and without a headwind.
The model has a rear-wheel drive - an electric motor (power 1500 W) is located directly in the wheel. The Band has disc brakes and an energy recovery system. The 20 Ah battery is hidden in the footrest. It is not removable - you will have to store the scooter in a place where there is an outlet. The battery charges in approximately six hours.
According to official data, the model’s power reserve is 100 km. Here the error is probably even greater than that of the speedometer: the scooter will only travel 50 km in ideal conditions with many descents and a tailwind. Over 10 km of travel, two of the six bars of the charge indicator on the on-board computer disappeared.
In a word, it’s not worth going to Molodechno from Minsk.
The general impression of the electric scooter can be formulated in one word - “China”. There are a lot of rattling elements, a sound signal plug that falls off when you turn the steering wheel, and uneven joints of most parts.
For $1,700 at the exchange rate, you can buy a used motorcycle or scooter, which is more suitable for use in our conditions.
We’ll talk about where and how to ride an electric scooter at the end of the article, but now a few words about another model - Urban.
Rossel Urban — 2552 BYN
This scooter does not look so pretentious, and here is exactly the case when modesty adorns. You don’t expect super performance from the Urban model, and in the end you get even more than you expected. Perhaps the main difference from the Band is the presence of two chairs. Agree, this is an important characteristic for such a vehicle, which is intended more for entertaining rides.
Maximum speed - about 30 km/h
The motor here is one and a half times less powerful - 1000 W. The scooter is about that much slower. The manufacturer optimistically declares the same 50 km/h in the Urban characteristics, and on the speedometer you can get exactly these same 50 km/h. And even more. But the real maximum speed is about 25-30 km/h.
The numbers on the speedometer of this model are even more deceitful than those of the first. The Urban's on-board computer display has several colors, but it looks more “cheap” than the “Band” one. There are also three driving modes, but for a mysterious reason, III is the slowest mode, and I is the fastest.
Maybe they made a mistake at the factory? Other differences include the absence of front turn signals.
Removable battery
The battery here is the same, but unlike the Band, you can get it - you can take it home to charge. At the same time, you shouldn’t store your scooter outside - bad weather, thieves and hooligans can damage it or even deprive you of an expensive item. Ideal if there is a garage with an outlet. But a barn will do too. As a last resort, you can drive the Rossel into a bike rack - the main thing is that the neighbors don’t fight because it’s “oversized.”
Ready electric bike
The easiest and most reliable way to buy a ready-made electric bike is to get acquainted with the 3 most popular ones at the moment:
— Eltreco FS-900 26;
— HOVERBOT CB-4 X-Rider;
— WELT Rockfall 1.0 E-drive.
WELT Rockfall 1.0 E-drive
This is a 2022 model, costing 50-55 thousand - the most affordable option of those being considered. Class: mountain, cross-country.
The battery is 13 Ah, the sizes are varied, you can buy for riders from 150 cm or more.
The stock tires are quite grippy, even when driving on rough terrain. Among the shortcomings are weak brakes.
Eltreco FS-900
Double suspension from the budget price category - only 65 thousand. Class: cross-country, launch year: 2022.
It has a fairly capacious battery that can pull the rider up to 50 km.
Charging time – up to 6 hours. The backlight is integrated, and the front light is powered by a battery, and the rear light is powered by a small solar panel. Some users complain that the rear shock absorber is stiff, but it is not difficult to replace.