Wood is easy to process. Using simple tools, you can create things of amazing beauty and functionality.
Separately, it is worth noting products that have the shape of rotation figures: tool handles, staircase balusters, kitchen utensils. To make them, an ax or chisel is not enough; you need a lathe.
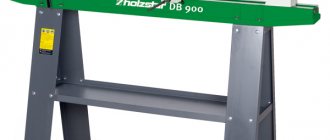
Buying such a device is not a problem, but a good machine is expensive. It’s not difficult to acquire such a useful tool and save money, because you can make a wood lathe with your own hands.
Why is it needed and how does it work?
A lathe is designed for the manufacture of wooden products that have a cylindrical or similar shape. This is an indispensable thing when renovating a country house with a wooden staircase, a carved porch, but not only.
If you have some experience, a turning tool will allow you not only to save on purchased decorative elements, but also to earn money, because handmade wooden products are highly valued.
Whether such a machine is needed in a home workshop is up to the master to decide.
Of course, if you need several handles for chisels, it is easier to buy them, but if you want to make an all-wood staircase, then a set of balusters will cost a very large sum. It is much cheaper to make them yourself. By the way, you don’t even have to spend money on buying equipment - a simple machine can be made in your own workshop using scrap materials.
The operating principle of a wood lathe is not particularly complicated. The cylindrical workpiece is fixed along the axis of rotation. Torque is transmitted to it. By bringing various cutters or grinding tools to the workpiece, it is given the desired shape.
Main parts of lathe:
- a frame on which all components are fixed;
- electric drive;
- headstock;
- tailstock;
- handyman
For ease of operation, schemes for changing the rotation speed are used. In professional equipment, this is a real gearbox, a system of gears that allows you to regulate speed within a very wide range. This is difficult; it is enough to equip a homemade wood lathe with a belt drive with several pulleys of different diameters.
Goblet turning
When making a cup, a wooden block is hammered into the chuck and screwed onto the spindle.
The blank is ground and given the rough shape of a cup. Then they begin to grind out the internal cavity. To do this, place the tool rest across the guides of the bed and move it towards the end, and turn the semicircular chisel with the groove downwards and, placing it slightly obliquely, press from left to right from the center of rotation. This results in a rather deep depression (recess), which is finally bored out with recesses-hooks of the appropriate shape. The cavities and holes being machined are checked with a bore gauge. When turning, you must ensure that the internal recess is smooth and the walls are of uniform thickness. Turning a cup: a - general view, b - section
After recessing the internal cavity, the external processing of the cup is performed. The thinnest parts of the product, such as the leg, are ground at the end of the work.
Manufacturing of the bed
The bed is a frame that combines all parts of the machine into a single whole. The strength of the structure as a whole depends on its reliability, therefore the best material for the frame is a steel angle. You can also use a rectangular profile pipe.
First of all, the dimensions of the future unit are outlined. This indicator largely depends on what specific products the machine is needed for. The average bed size of a home lathe is 80 cm. Using a grinder with a metal circle, cut two identical workpieces.
Laying wooden blocks, the angles with the shelves up and inward, are laid on a flat surface, their upper edges should create an ideal plane. The same distance is maintained between them, approximately 5 cm. To orient them correctly, use a strip of appropriate thickness.
The longitudinal parts of the base are fixed with clamps. Cross members are made from the same square. There are three of them. Two are attached to the edges of the structure, the third, which is a support for the headstock, is approximately twenty centimeters from the left edge. The exact dimensions depend on the type of motor used and the parameters of the pulley that could be found.
All that remains is to weld the frame into a single whole. The seam must be reliable and of high quality; it can be welded manually or using an automatic machine.
It is important to immediately decide how the machine will be used. Desktop installation or production of a stand-alone unit is possible. In the second option, it is necessary to provide legs. They can be made from the same square, or they can be cut from timber of suitable thickness. The use of wooden legs will allow you to save on material, in addition, the machine can be made collapsible.
Turning a Russian nesting doll
First, the outer side of the lower part of the base is machined, then the internal cavity, a transition is made to put on the upper part, and the workpiece is cut off.
The upper part of the toy is first machined from the outside. Then they bore out the internal cavity and grind a ledge along the diameter of the machined lower part of the nesting doll.
Turning a Russian nesting doll: a - turning the cylinder, b - marking and turning the outer surface, c - boring the internal cavity and turning the ledge, d - cutting off the base of the toy, e - marking and turning the upper part of the toy, f - boring the internal cavity and turning the ledge, g—adjustment and turning in assembly, h—cutting of the product, i—jutton product
The lower part of the toy is put on top. After adjusting them, a mark is made on the surface of the toy. A carved nesting doll always closes well in only one position. Once assembled, the toy is finally turned, finished and primed for subsequent painting. When making a family of nesting dolls, inserted one into another, the smallest one is turned out first. In this case, the internal cavities of subsequent nesting dolls are machined to match the size of the previous one. It should be borne in mind that the connector location for all nesting dolls of this family must be in the same plane.
Electric motor for machine
The basis of the lathe drive is the engine. When choosing this unit, it is important to pay attention to its main characteristic – power. For a home machine, models with a power from 1200 to 2000 W are suitable. The type of connection is important; there are single-phase and three-phase motors.
In a low-power table lathe, you can use a motor from a washing machine. It is unlikely to cope with the processing of large workpieces, but it will help produce small decorative elements and kitchen utensils.
Direct drive or belt drive
There are several ways to transfer rotation to the workpiece. The simplest is direct drive. In this case, the workpiece is attached directly to the motor shaft. A distinctive feature of this design is its simplicity. With all this, direct drive has a number of significant disadvantages.
First of all, a direct drive machine does not allow you to adjust the rotation speed, which is critical when working with hard material. It is also worth considering the load on the electric motor, especially when working with large workpieces. No matter how well it is centered, it cannot do without vibration. Motor bearings are not designed to withstand longitudinal loads and will often fail.
To protect the engine from damage and provide the ability to adjust the speed of rotation of the workpiece, it is worth considering a belt drive. In this case, the engine is located away from the axis of rotation of the workpiece, and torque is transmitted through pulleys. Using pulley blocks of different diameters, it is easy to change the speed within a fairly wide range.
It is advisable to equip a machine for your home with pulleys with three or more grooves, which will allow you to process wood of any species with equal success, and, if necessary, work with soft alloys.
Headstock and tailstock
The workpiece being processed is clamped between two devices called the headstock and tailstock. Rotation from the engine is transmitted to the front one, which is why it is a more complex unit.
Structurally, the headstock of a homemade lathe is a metal U-shaped structure, between the side faces of which a shaft and one or more pulleys are mounted on bearings. The body of this unit can be made of thick steel; bolts of sufficient length are suitable for assembling it into a single whole.
An important part of the headstock, as well as the machine as a whole, is the shaft, a spindle with three or four pins designed to fix the workpiece. This shaft is passed through the bearing of one of the cheeks of the U-shaped housing, then pulleys are mounted on it. To fasten them, a key or a means for fixing cylindrical parts is used, the second cheek is put on last, and the structure is securely tightened with bolts.
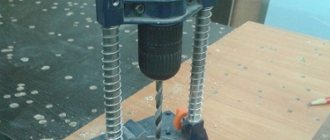
The tailstock's job is to support the long workpiece while allowing it to rotate freely. You can buy a ready-made part from a factory machine, or you can use a powerful electric drill chuck mounted on a square of suitable length. A shaft with a pointed end is clamped into the cartridge itself.
The headstock and tailstock are installed on the bed. It is important to understand that the axes of rotation of both shafts must completely coincide. Otherwise, breakage of the workpiece, failure of the machine, and possibly injury to the turner are likely.
Master class: making a segment vase “Greek motif”
The whole process of segmental turning on a lathe has long been known to those who are interested in it, and has been worked out. But nevertheless, I want to talk about it.
Having seen enough on foreign sites how the local craftsmen create all sorts of turning-segmentary miracles, I decided to create something similar. To tell the truth, we have enough of the same craftsmen, but unfortunately, not all of them share their skills. there is not enough time, or desire, or desire, or maybe they are embarrassed. But I (even though I am a shy person by nature) decided to show how I did it.
To manufacture this type of product, and indeed for segmental turning, you need tree species that are contrasting in color. In our northern regions, the choice of such trees is not rich. Birch, bird cherry, aspen, alder, conifers. But I had dry birch suvel, as well as one block of overseas chocolate Che tree, and supplies of veneer of various types of wood. I immediately excluded spruce, pine and larch from the list due to the coarseness of the layers and inexpressive color. Alder, due to its softness too. What remains are bird cherry, birch, souvel, veneer and Che wood. Well, this Che has very hard and heavy wood! But how beautiful! Just like chocolate.
And so, I decided to make a vase with Greek ornaments from all this “wealth”. Having drawn a project for the future vase and using one wonderful program, which on one of the sites, one wonderful Moldavian master Mihai Apostol kindly provided for free use, calculating the sizes of the segments of the future vases, I got down to business.
First, I cut out the round bottom of the future vase and glued it to a piece of round wood left over from previous turning works. This was so that there would be something to clamp the future product into the lathe chuck.
Having run the material to the size, thickness, on a surface planer and setting the desired angle, using a simple device for a circular saw, I sawed the segments
There were 240 of them!
And many hours of painstaking work began to assemble these “puzzles.”
For the ornament I used birch souvel and the same chocolate tree
Then he began assembling larger segments. To do this, it was necessary to polish the edges of each segment. The appearance of the future product depends on the accuracy of the corners. By the way, when assembling the Greek ornament, each glued pair had to be sanded.
Then all the rings were glued together in positions tightened with clamps. Although Titebond is a strong glue, to be on the safe side I left it to dry for a day so that these rings would not fly apart during turning on the machine.
The next stage is sanding again, but this time on planes. Oh, my poor fingers. They got it from the impact of sandpaper (((
Then half of the future “pie” was glued together, clamped in a clamp. And again for a day.
And into the machine, for preliminary processing on the outside, and most importantly on the inside, because then it will be difficult to get to the inside. The narrow neck was supposed to be made for the vase.
The next step was to glue the ring with the ornament, right on the machine, pressing it with the tailstock. And again boring inside, using a homemade lunette. (For those who don’t know, this is a large metal ring, with wheels from rollers inside). A very necessary device for turning internal cavities, protecting the part rotating in the lathe from flying out of the chuck, and your own body from all sorts of unpleasant and accidents.
Having turned the ring with the ornament, we glue the second part of the “pie”, previously glued from the remaining rings, and also grind it first on the outside, and then on the inside.
It’s with internal sampling that the most intense torment begins. You sharpen, after all, almost blindly! It often happened that this final work, sampling the insides of vases, ruined the whole thing. Ruining all the work, materials and time to nothing. But here it comes to the rescue a laser pointer aligned with the incisor. In the photo you can see a red glowing spot on the left side of the neck. This is just from the pointer. Although this does not always save you from failure. My devices are all completely homemade and imperfect
And here it is, this long-awaited miracle!
And the other day, this beauty found its owner, which cannot but make me happy.
There were other works before this, but not with such a large number of details, and they also found their connoisseurs.
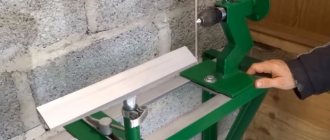
Tool support: tool rest
A tool rest is a table on which the tool rests during operation. In principle, it can have any configuration, the master can choose, the main criterion is convenience. One of the best options for a tool rest is a trapezoidal turntable made of thick steel, mounted on a platform that allows you to move it in all directions. It will allow you to process any workpieces and produce products of various sizes and shapes.
The simplest tool for turning work is a square welded to the base. The height of its upper edge must correspond to the level of the axis of the headstocks.
Barrel turning
To manufacture a barrel with a lid, a single-center turning method is used, that is, the workpiece is mounted in a cantilever on the headstock spindle. The workpiece is turned into a cylinder, then its free end is processed and a recess is made in it according to the drawing or sample.
When the recess is made, its edge is bored to fit the rebate of the narthex. The diameter of the groove is made equal to the diameter of the internal cavity of the barrel; the diameter of the rebate of the rebate should be equal to half the thickness of the processed wall of the barrel. The height of the fold depends on the size of the barrel. Typically, the depth of the rebate of the narthex is 5-8 mm.
Barrel turning
Having finished processing the inner part of the lid, perform an approximate turning of its outer surface, leaving 1-2 mm for finishing. Then the lid is cut off from the workpiece and they begin to groove the internal cavity, trimming the end of the workpiece. When the barrel cavity is ready, grind the outer surface, leaving 1-2 mm for finishing, and begin to groove the rebate of the rebate on the barrel. To do this, measure its height from the outer edge, equal to the height of the lid fold, and make an undercut using an acute angle of a straight chisel.
To ensure a tight rebate, the walls of the barrel and lid folds must be cylindrical, and the height of the barrel fold must be 0.2-0.3 mm lower than the lid fold.
To ensure that the lid fits onto the barrel frame without scuffing the fibers, a small chamfer is made on its outer edge. Then the lid is placed on the barrel frame and together their outer diameters are adjusted to the required dimensions. The invisibility of the narthex is often achieved by making grooves on the outer surface of the barrel that imitate hoops.
The manufactured barrel is cut off from the workpiece. For decoration, the barrel is often made from mixed wood.
Sequence of turning a barrel: selecting a workpiece, inserting a ground end into the chuck, rounding, trimming the end, marking, external turning of the lid (primary), internal turning of the lid, external turning of the lid (secondary) and cutting it off, trimming the end after cutting, turning the barrel (primary ), internal turning of the barrel, turning of the folds, turning of the folds along the lid, finishing turning of the barrel together with the lid, sanding, varnishing, cutting the barrel from the workpiece.
Wood cutters
Cutters are used as cutting tools for a lathe. You can buy such a tool at almost any hardware store. Individual cutters and entire sets are available for sale.
If there is no store nearby, but you have the opportunity and desire, you can make the necessary tool yourself. To do this, you will need a metal-cutting machine, as well as a sheet of tool steel; it can be replaced with an old tool. A high-quality turning tool can be obtained, for example, from an old Soviet file.
Mini machine for small jobs
Often there is a need to turn several small wooden parts, in this case it is not at all necessary to make a full-fledged machine; you can get by with a mini-wood lathe. Its production does not require much labor and will not take much time.
The design of such a machine is extremely simple. A motor from an old tape recorder, powered from an external power supply, is ideal as an electrical component. The bed of the mini-machine will be a piece of board of the required length.
The engine must be secured. Of course, a belt drive is not suitable for a small machine; the workpiece will have to be mounted on the motor shaft. The best device for this is a faceplate. The drive housing is a U-shaped plate, in the center of which a hole is drilled for the shaft. The engine in the housing is mounted on the frame using self-tapping screws.
The main part of the machine is ready, all that remains is to make the tailstock. Its body is made of a block of suitable size. A hole for the shaft is drilled in it exactly at the height of the engine; a dowel-nail of suitable length is used as it. The headstock is attached with glue and several screws.
Using a power source with the ability to adjust the output voltage, you can create a machine with variable rotation speed. It is convenient to regulate the speed using the foot control pedal. The design of this device can be very diverse, it all depends on the available parts.
Turning a box
The box is assembled from three parts: the box itself, the lid and the lid button. First, the lid is turned out and a hole for the button is drilled in the center, then the box and the button are sharpened; Moreover, the inner part of the lid is finally turned, and the outer part is only rough.
Turning a box
The lid is cut off and the box itself begins to be turned. A lid is roughly put on the turned box and the top is ground clean. The finished parts are glued together, the product is dried and finished.