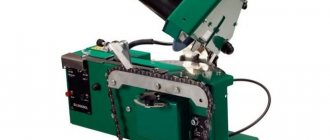
The duration of high-quality cutting of the knife tip is directly dependent on the methods of operation and methods of sharpening the blade. Yes, there are self-sharpening options, but in 90% of cases such a name is more of a marketing ploy than reality.
In today's article we will tell you how to make a sharpener with your own hands. Drawings with instructions will be included, and therefore, even beginners in handling garage equipment should not have any difficulties in assembling the device.
How to determine the correct sharpening angle
There is a wide variety of knives. There are more than two dozen types of kitchen cutting tools alone: steak knife, boning knife, chef knife, bread knife, hatchet, santoku and many others.
There are also special knives for hunting, fishing, repair, etc. And they all need to be sharpened according to the rules. The sharpening angle is the main criterion and it must be taken into account, otherwise there is a possibility of bending, distorting the knife and rendering it unusable.
- The optimal angle for straight razors is 10-12°. It's a fairly small angle, but it's enough to cut short, fine hair. If you try to cut something else with it, the razor will quickly become dull.
- fillet knife – 10-15°. This is also a fine sharpening - for convenient slicing of soft meat.
- a knife used to cut other products should be sharpened at an angle of 17-20°.
- 20-25° is the optimal angle for a hunting knife (for bones, wood, tin cans)
- The sharpening limit for machetes and other heavy cutting objects is 50°. Chopping food with them is a difficult task, but they do an excellent job with vines and trunks.
- in order to chop and cut hard materials - bone, bamboo, hard wood, splitting coconut and other manipulations - you need 45-55 degrees.
- if the knife is used as an ax (chopping wood, game, cutting straw, etc.) - 35-40 degrees.
- for using a knife as a scalpel (cutting veins, removing skin) - also 40 degrees.
There are also blades that require different sharpening on different parts of the blade.
Basically, the difficulty of making a sharpener with your own hands lies precisely in the ability to adjust the desired angle. Thoughtful drawings of such a sharpener will help in its design.
Why do knives get dull?
In order to ensure long and comfortable work with a knife after sharpening, first of all try to answer the question, “Why do knives become dull?” Why is it necessary to sharpen the knife again some time after sharpening, and sometimes to completely sharpen the knife again?
The reason for the loss of sharpness by the cutting edge of any tool is this: when working, the cutting edge of a knife or any other tool is exposed to the smallest abrasive particles of the material being cut.
Such particles are found in any material, be it stone, wood, or food.
Even soft vegetables and fruits contain such particles. There may just be more or less of them, but they will definitely be there. Their size, sharpness and quantity only determine the speed at which the instrument will become dull.
Stone abrasiveness
Sharpening stones have different gradations of grit. The larger the grain, the less abrasive. If the grain is fine, the numbers will be higher.
- From 200 to 300 grit is rare and is not used for sharpening knives.
- 350 grit is a rough stone (can be referred to as “coarse”). Used for profiling very dull blades. However, such graininess can damage the blade.
- 400-500 grit – medium roughness. Little used abrasiveness. There are no or almost no such stones.
- 600-700 grit – fine grinding. The best option for sharpening many types of cutting devices. This is the most common level of abrasiveness of whetstones.
- 1000-1200 grit—the finest grinding (extra fine). This type of stone is used to bring the work to perfection and acts as a polish. After processing with such a stone, the blade shines like a mirror.
Price for Lansky sharpeners
The price of a Lansky sharpener depends on the configuration:
- Standard costs about 4,000 rubles;
- Universal – 5000-5300 rub.;
- Deluxe – 5500-6000 rub.;
- Natural Arkansas - 6000 rub.;
- Professional – 6200-6500 rub.;
- Standard Diamond - from 8,000 rubles;
- Deluxe Diamond – 10,000 rub.
Pocket sharpening devices are cheaper - 800-3000 rubles. The price for stones is approximately the same.
We recommend reading about knife sharpening options. From the article you will learn about how and what is the best way to sharpen knives, sharpening and grinding machines, and types of sharpening. And here is more information about how to maintain the sharpening angle of a knife.
There are many reviews about Lansky's systems, some enthusiastic and some more restrained. You need to get used to the design, then sharpening a knife with its help will not be difficult. And for this you do not need to make a lot of physical effort; the features of the system allow you to do without it.
Whetstone material
In addition to the size of the grains, special stones also differ in the material from which they are made.
Note!
- DIY induction heater ♨️ - reviews of the best manufacturing options. Varieties of homemade device designs + step-by-step master class (160 photos)
- Do-it-yourself Gauss cannon: TOP-130 photos of the best ways to create it yourself. Design features + master class for beginners
- DIY clamps - a step-by-step master class for beginners. Schemes for manufacturing different designs + 170 photos
There are bars:
- natural
- ceramic
- diamond
Which to choose? It's all about taste, ease of use and, again, the purpose of the bar. Natural ones (for example, slate) must be moistened with water before sharpening the knife.
So, during the sharpening process, a certain abrasive mass will be released from the block. It will contribute to better sharpening of the blade. However, natural stones are almost never low-grain and wear out faster than ceramic and diamond.
For ease of use of the latter, instead of an abrasive mass, you can use a soap composition or honing oil (specialized oil).
Lansky sharpener: instructions on how to sharpen and use
There are instructions for the Lansky sharpener, but you need to learn how to use the system:
- In advance, tape is glued to the middle of the butt of the knife, which will protect the steel from damage and make the fastening more durable.
- The bolts on the clamp are slightly unscrewed, a blade is inserted between them and tightened again until it stops.
- The edge of the blade that will be sharpened is drawn with a marker to better see where the stone should move.
- The corner of the guide rod is inserted into the groove on the bar and clamped with a screw (the lower plane of the bar and the long pin should be located on the same line).
- The structure itself with the knife already attached is held in the hand, but you can also fix it on the edge of the table.
- The guide is inserted into the groove of the vertical plane corresponding to the desired sharpening angle.
- The block is moved along the blade from the base to the tip.
If the knife is very dull, you should first work with a rough stone. As the blade sharpens, you need to change the grit to a finer one, and at the end, sand the edge with the softest stone.
Is shape important?
You can get used to and adapt to any sharpening stone. You just need to try several options and choose the most convenient one in a particular case.
As for the shape: the most popular one is an oblong brick. At the same time, it is very good if the length of such a brick is greater than the size of the sharpening blade. This makes the process easier and faster. If the stone is round, oval or square, then you will have to move the blade along it much more often. In this case, there is a high probability of breaking the angle and ruining the knife.
Note!
- Do-it-yourself electric scooter - a master class with step-by-step instructions for doing it yourself. Tips and simple patterns for beginners + the best photo reviews
- DIY rocking chair: TOP-120 photos of the best manufacturing options. Master class on creating a rocking chair at home
- Smokehouse from a gas cylinder - the best master class on making a homemade smokehouse with step-by-step photo diagrams for beginners
It is very convenient to use if one sharpening bar has both coarser and finer grain sides - this is an ideal option for many types of household knives.
How to sharpen a knife in extreme conditions
It happens that you urgently need to sharpen a knife. But there is no sharpening stone at hand. The following tips will help you:
- the blade can be sharpened on the corner of a concrete step in the entrance, you just need to rinse it;
- find a stone on the street that looks more or less smooth;
- The knife can be sharpened on the edge of a ceramic plate or cup from the reverse side.
Here are three useful tips. They really work, of course you can’t achieve razor sharpness using these methods, but they really work.
Varieties of homemade devices
Homemade knife sharpeners have a number of pros and cons:
A device made of two triangular wooden blocks. These blocks need to be placed parallel and fastened with screws. The sharpening brick is fixed between these two base bars and, if necessary, it can be rotated, changing the sharpening angle.
However, if such a design is used for a long time, the retaining elements will weaken and setting and maintaining the desired degree will become problematic.
The base is made of any convenient material (wood, metal, plastic). Here you need to install a movable element for changing angles and a fixing element for the sharpening stone. The grinder's actions must be vertical. The inconvenience of this structure is that it must be held by hand on the surface, or secured with something.
It can also be a beam attached to an improvised railcar. Sharpening is done by moving back and forth. The angle is controlled by the ratio of the height of the bar and the working base. The entire structure must be secured to a fixed surface.
Note!
- Do-it-yourself compressor: TOP-130 photo reviews of finished compressors. Step-by-step instructions + diagrams and drawings
- Do-it-yourself wind generator: TOP-170 photo reviews of finished devices. Detailed DIY instructions for beginners
Do-it-yourself spot welding - the best master class on making homemade spot welding with step-by-step photo diagrams of do-it-yourself work
These are just some of the options for such devices. There are others that require a lot of effort, time and skill.
The simplest knife sharpener at home
As mentioned above, one of the most important qualities of a good sharpener is the ability to set or maintain the desired degree between the cutting plate and the block.
This instruction, which tells how to make a knife sharpener, suggests making a machine with the following principle: a well-fixed knife is sharpened strictly at a set angle with replaceable sharpening stones of the required abrasiveness.
Characteristics of the Lansky sharpener: type, dimensions, options
Lansky sharpener can be in the form of:
- Set. It includes several bars of varying degrees of grain and parts, with the help of which the knife is fixed motionless, and the stone sharpens it at a certain angle. The latter is done thanks to guide rods.
- Small format instrument. These are pocket sharpeners with grooves for the blade, plastic or rubber shells for ease of use. You can take them with you to the forest or fishing.
- Bar or stone. They come in different shapes, but the working surface is always flat. It may only contain a narrow groove for sharpening a fishing hook.
Lansky sharpener kit
The dimensions of the Lansky sharpener depend on the type of product:
- The most cumbersome are systems with several stones. The bars themselves are small and narrow. But to use them, you need to secure the knife holder, fix the tool itself in it and use one of the pins to preset the angle. That is, the design is approximately 15 cm high, 25 cm long, 5-7 cm wide. The system is stored in a small suitcase measuring approximately 12x25 cm.
- Portable and pocket sharpeners have a length of 10-15 cm, a width of 5-7 cm. For some, the latter figure is even smaller - 2.5 cm. These are, for example, multishapers in the form of a ceramic pin with plastic stops.
- The bars and stones are 7.6-15 cm long, 2.5-7 cm wide, 2-5 cm thick. If the product is made in the form of a washer, its diameter can be 7-10 cm.
Mechanical
The Lansky mechanical sharpener comes in several versions:
| Name | Content | Photo |
| Standard | This kit includes 3 bars with abrasiveness of 120, 280 and 600 grit, that is, coarse, medium hard and soft | |
| Universal | They contain 4 bars, including the same ones that are included in the Standard set, but there is also a device for knives with a serrated blade. The abrasiveness of the latter is 500 grit | |
| Professional | In addition to the bars included in the Universal kit, there is also an ultra-smooth 1000 grit abrasive | |
| Deluxe | The set includes hard, medium, soft and ultra-soft bars | |
| Deluxe Diamond | Contains bars with abrasiveness of 70, 120, 280 and 600 grit | |
| Natural Arkansas | The included bars are made of natural Arkansas stone, their abrasiveness is 300, 650 and 1200 grit | |
| Standard Diamond | Contains 3 medium to soft grit diamond stones |
In addition to the most important components, which, in fact, come into contact with the blade to make it sharper, each kit contains auxiliary ones:
- a blade vice with holes that allow you to maintain the desired sharpening angle for each knife;
- 3 metal rods, bent with the letter G, which are needed to set the direction of movement of the block and maintain the tilt;
- special oil for cleaning the surface of sharpening stones from metal chips.
We recommend reading the recommendations for choosing whetstones. From the article you will learn about what a sharpening stone is, their types, the best stones for sharpening, and how to make it yourself. And here is more information about the options for handles for knives.
Lansky's pocket sharpener is also not a single copy, there are quite a few of them:
- Universal multishaper . It has a ceramic sharpener for regular and serrated blades, as well as for fish hooks. There are green restrictive elements on the edges.
- Portable multishaper . Its size is only 76 mm, but with the help of the device you can sharpen knives with a regular, serrated and combined blade. The tool's stops are red.
- Blademedic PS-MED01 . This is a device with improved functionality, as it has 4 working surfaces with abrasiveness of 400 and 1000 grit. The sharpener materials are tungsten carbide and ceramics. The device can sharpen straight and serrated blades with teeth of different sizes.
- Quadsharp Qsharp . This pocket-sized device can work with knives that have different sharpening angles - 17, 20, 25 and 30 degrees. It has 4 slots, as well as a ceramic surface for grinding the serrated blade.
- C-Sharp Ceramic . The sharpener is also suitable for processing blades at an angle of 17, 20, 25 and 30 degrees. The main material of the working plates is 600 grit ceramic. The surface intended for grinding the serrated blade is made from it - 800 grit. Therefore, with the C-Sharp Ceramic it is possible to sharpen a knife faster than with the previous device.
- Sharp'n Cut . This portable sharpener sharpens knives at a 22.5-degree angle. It has 1 working surface made of tungsten carbide, abrasiveness 600 grit. There is also a ceramic blade that can be used to cut paper.
- Hammerhead Sharpener & Opener HH01 . The tool has 2 sharpening surfaces - hard carbide and grinding ceramic. It is suitable for straight and serrated blades. The sharpener also has a bottle opener.
- Quick Fix Camo LCSTC-CG . This tool is designed to quickly sharpen a straight knife blade. It, as in the previous case, has two working surfaces made of different materials - a rougher one and a softer one. There is a second version of the device - Quick Fix LCSTC, it is simpler and cheaper.
- Serrated Knife LSKNF . This is a tool for sharpening serrated blades. But it can also be used for straight cuts, if the knife is a kitchen knife.
- Tungsten Carbide LSTCS . The sharpener is designed for blades with an angle of 22.5-45 degrees. It has a single sharpening element made of tungsten carbide, that is, hard.
- Deluxe Quick Edge Camo LSTCN-CG . The tool is similar to the previous one, but it has a more comfortable rubberized handle.
Lansky pocket sharpeners
1 of 4
Lansky Tungsten Carbide LSTCS
Lansky Sharp'n Cut
Lansky Quadsharp
Lansky Blademedic PS-MED01
Bar
The Lansky block can also come in several versions:
- Diamond Bench Stone . This is a series of diamond-coated stones. There is a sharpening stone with an abrasiveness of 600 grit, that is, quite soft. It's called LDB6F. The medium-hard bar is called LDB6M, and the grain size is 280 grit. There is also a stone with an abrasiveness of 1000 grit. All of these devices have a rubber base and a plastic body, which makes use very convenient. Each size is 150X50 mm.
- Soft Arkansas Hard Arkansas . These are natural sharpening stones. There are 2 types of softer ones - Soft, and hard ones - Hard, the grain size of which is approximately 1200 grit. Each device has a backing made of plastic and rubber layers. The dimensions are approximately the same as the previous group of stones.
Diamond Pocket Stone Pocket Stone LSAPS Diamond Bench Stone Soft Arkansas Hard Arkansas
- Double-sided . Their surfaces have varying degrees of abrasiveness. This is, for example, Combo Stone with 100/240 grit. Or Double-Side Diamond Benchstone diamond stones with abrasiveness of 280/600 and 120/600 grit.
- Heavy Duty Tool Sharpender Lhone. This is a 70 grit bar with a ceramic working surface. It is used for preliminary sharpening or sharpening the edge of a hatchet, shovel, or machete.
- Pocket Stone LSAPS . Under this name there are several types of pocket bars measuring only 76x25x6 mm. All are made from Arkansas stone and vary in grain size. There are sharpening devices from 400 to 8000 grit. They can be used to sharpen straight blade knives and fish hooks. For the latter, special grooves are pressed onto the block.
- Diamond Pocket Stone . This is a pocket version of the diamond stone. It is used in the same cases as the previous whetstone. But the quality of processing of the sharp edge of the blade is higher.
Watch this video for a review of the Lansky pocket sharpener and whetstone:
Metal
A metal sharpener is a tool made from tungsten carbide or aluminum oxide. Its working part has a rough gray surface, similar to metal. This category includes:
- double-sided bars with an abrasiveness of 100/240 grit and a single stone with an index of 280 grit;
- Tungsten Carbide LSTCS pocket sharpeners, Sharp'n Cut;
- stone for garden tools Lawn & Garden Sharpening Tool.
Lansky has tools with combined working surfaces:
- Diamond/Carbide Tactical Sharpening Rod LCD02, which is a diamond rod with a carbide sharpener;
- Tri-Stone Benchstone BS-TR100, which has 3 bars - 280 grit aluminum oxide, diamond and ceramic.
What will you need?
- Metal rod 5-6 mm in diameter. It will be cut into pieces of varying lengths.
- Electrode for welding. It is needed in the manufacture of corner guides. The element must be freed from flux and cleaned with fine sandpaper.
- Stainless steel sheet. The required thickness is 5 mm. Clamps will be made from it, in which holes need to be drilled through. (To make this easier, you can use machine oil. After the necessary steps, it can be easily removed from the product with a highly concentrated soap solution)
- Metal corners 9x9x0.6 cm.
- All that is usually needed for fastening: a few nuts and screws.
Homemade manual machine for sharpening knives
Products made on the basis of well-known brands are a little more complex in design. They have an adjustable platform on which the knife is attached. The angle is set directly when attaching the knife. The block is attached to a rod, which is attached to the rack.
Fixed platform on which the blade is fixed
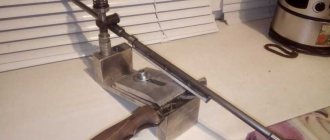
Let's look at the first version of the sharpener. The device is made from leftover laminate, two steel rods and a movable mount. This design has a fixed base. A platform with a knife lock is attached to it on regular hinges.
The near edge of the platform can be raised to achieve the required sharpening angle. But overall she is motionless. The vertical pin has a movable latch in which a loop is made. A rod with a bar attached to it is inserted there. There are several important points to note:
- Bar clamp. An emphasis is placed on the rod at a certain distance of 30-35 cm. He will be motionless. The second one will move, it is fixed after installing the block. Its movement is ensured by the thread cut on the rod; it will screw towards the bar and thus secure it.
- Knife holder. It is made of two steel plates, which are movably fixed to the platform. They are held in place by thumbscrews. Having loosened the fasteners, a knife is inserted between the plates and the wooden surface of the platform. It locks in very well.
- Guide with a bar. The pin with the bar attached to it is installed in the fastening loop on the main pin. Thanks to the movable hinge mount, you can set the required sharpening angle by moving it up or down.
Drawings of a homemade manual machine.
This device works well. You can move the abrasive along the knife blade. Perpendicular movements along the cutting edge are obtained. This technique works well on the straight part of the blade. But if you need to sharpen a rounded area, then this cannot be done on a stationary holder. This is the main drawback of this design. You can see the sharpener in more detail in the video:
With movable platform and magnetic holder
The second option is with a movable knife stand. This problem is solved here. In this option, only the frame holding the pin with the bar remains stationary. The bar holder moves freely along a guide set at the desired angle.
The knife is fixed on a movable table. It can be made from magnetic holders, or from a regular steel plate with wing fastenings. The table with the knife is rotated so that the movement of the abrasive is perpendicular. You can take a closer look at the design in the video:
Making a sharpener step by step
Step one: It is necessary to correctly measure and cut the metal corners. You can complete this step with a grinder and then clean it with a file and sandpaper.
Step two: You need to drill small holes in the fastening areas and process the edges of the guide rail.
Step Three: The bolt and nut will serve as the stand. The improvised stand must be secured between a vice or on any other convenient unit.
Step Four: Now it’s time to assemble the sharpener. Next, you need to attach a sample for the first sharpening test and the sharpening stone itself.
Step five: Test the device.
It should be noted that many of the parameters here are individual and the dimensions of the sharpener are often set by the manufacturer himself.
Recommended improvements
Bringing the Ruixin Pro 3 sharpener to perfection will require a lot of time and design ingenuity. But it's worth the result. As a result, a universal Chinese-Russian sharpener appears. Which can sharpen anything. Recommendations:
- It is necessary to secure the machine to a solid moving surface. A banal board slightly larger than the base of the device and at least 1 cm thick is ideal. An important point - from the rear edge of the base to the edge of the board, leave a margin of 5-6 cm. Later you will understand why. Screw on the sharpener. On the back of the board, create a rubberized base or legs. This will prevent the entire structure from slipping. Ruixin Pro 3 is screwed to the board.
- During operation, the abrasive does not reach its edge by several centimeters. Wear is uneven. It is not difficult to correct this defect. The reserve in the board is needed for these purposes. The vertical guide should be transferred to a wooden surface. We measure 4 cm from the center of its attachment to the base and drill a hole in the board. We secure it with the original wing and nut from below.
Shifting the guide onto the board. - The horizontal guide does not have a limiter, and with awkward movement it jumps out of the groove. The problem is solved by placing any plastic ring of suitable diameter on its end.
- When sharpening a knife at a small angle, the abrasive touches the wing holding the plate with the blade. It should be replaced with the hex head screw that comes with the key.
- To avoid play in the hinge element, it should be replaced with a bearing of a suitable diameter. When working, do not forget to lightly lubricate the sliding area of the guide with machine oil.
This is a list of the main improvements. In terms of small details, the Ruixin Pro 3 knife sharpener can be finished ad infinitum. Many craftsmen like to engage in design activities by purchasing a cheap product. For those who don’t like it, there are plenty of offers for more expensive products.
Sharpening machine from mounting angles
There is another way to make a knife sharpener. Here is the second master class.
What will you need?
- metal plates measuring 4x11cm
- aluminum corners
- metal rods at least 15 cm in length
- fasteners
- device for marking when cutting threads
- machine for sharpening metal (can be replaced with a file)
- fixing device (for example, a vice)
- small file (needed when working on smaller parts)
Detailed manufacturing instructions
Step one: You need to make marks to drill the holes.
Step two: You need to make a thread in the holes of the taps.
Step three: For the convenience and safety of using the sharpener, you need to smooth out all the irregularities, blunt the corners, and straighten the edges.
Step four: Next you need to drill grooves in the corners
Step Five: Tapping the Holes
Step six: You need to place the metal rods in the outer holes and secure with nuts
Step seven: Support the entire product - there is a hole in the groove of the base. You need to screw a bolt 14 cm long and 8 cm in diameter into it. You must first strengthen the bolt with one wing nut and two simple ones.
Step Nine: Place nuts in the other holes as well. They hold the part of the knife that needs to be sharpened.
Step ten: Thread nuts onto metal rods and install the corner.
Step eleven: The moment of fixing the abrasive. This is done using a metal rod, which should be in the shape of the letter “L”, a pair of clamps, and a wing nut.
Now it’s time to try out the resulting device.
It will be much easier and more convenient if, while working on the sharpener, you have the opportunity to simultaneously watch a video on the topic and work on the process. The convenience is that if something becomes unclear, you can always stop, slow down or watch the video again.
There are still enough options for making a knife sharpener with your own hands: an angle, a rotary sharpener, a double sharpener, with a vertical mechanism, etc.
Recommendation for finishing work
The points outlined above are in many ways the main and almost completely completed work. However, there are some tweaks you can make to ensure that your knife sharpener is great in every way.
- You can coat the box with paint, but it is better to do this before applying varnish. It will also not be superfluous, because it will be able to preserve the paint.
- It is also important to dry everything. There may be some space where the edges of the box end and the stone protrudes.
- It is better to seal it so that moisture does not accumulate.
You just need to have a thin stick (match), with which you can evenly distribute the sealing substance.
The process is very simple, because it is important to ensure that the sealant does not leak beyond the application area. If this happens, you should immediately remove excess from the surface.
Stages of work on knife processing
- You need to start sharpening from the edge of the blade that is located closer to the handle of the blade.
- To make it more convenient to control and not go beyond the desired part, you can paint it over with some bright marker.
- The movement itself during the process is consistent, light, without pressure.
- The tip runs strictly perpendicular to the sharpening element.
So, at home, you can make your own sharpener for your home kitchen or crafts and not spend large sums on purchasing a factory-made product.
The instructions were sent by this source.
Blade sharpening rules
There are several subtleties that are important when sharpening knives:
- It is recommended to start processing the blade from the base of the knife, from its bluntest part;
- It is recommended to paint the edge of the blade with a marker in any color so that when sharpening it does not protrude beyond the working area;
- the sharp edge should be perpendicular to the sharpening stone;
- household knives are sharpened at an angle of 20-25º;
- The movements must also be correct: sharpening must be smooth and even, without much pressure;
- Finally, the blade can be passed several times along a belt rubbed with goyi paste.
Knife sharpening angle diagram.
Photo of a DIY knife sharpener
Homemade knife
If the farm has a sharpening machine, it will make the process easier, but there is one circumstance. When sharpening on a machine, it is almost impossible to apply even pressure on the knife. Therefore, it is possible to make a device for sharpening knives, which will serve as a guide for the blade and ensure uniform pressure. The result is a simple but effective electric sharpener. To make it you will need the following components:
- Beam.
- Four bolts or four studs with M8 thread.
- Four lambs.
- Self-tapping screws for wood.
Opposite the electric sharpener, a guide is attached along which the slider will move. The guide itself can be attached to the workbench or a pre-made frame can be made. It must be mobile. To do this, you can cut a longitudinal groove in the frame and secure the tripod with two studs. Then take two bars, drill holes on the sides, insert studs and tighten them with screws on both sides. The next step will be the mount on which the cutting product will rest. This can be done using small pieces of timber, which should be attached to the sides of the moving carriage.


