There are often cases when you need to carefully process the edge of a board, create a connecting groove, or cut out a part of a rather complex shape. This operation is done using a milling cutter. You can buy such a tool at an electronics store or make it yourself. The article will give detailed instructions on how to make a router from a drill.
Homemade router
What is a homemade drill machine?
In this case, a hand drill (or screwdriver) will act as a drive for all equipment. You will need to clamp a drill or cutter into the chuck, which will be used to process the wood. The body of the drill on a homemade device is mounted on a base or a special mechanism, with the help of which the cutting part of the device can be positioned in the desired direction relative to the workpiece.
The operating principle of a homemade product will differ little from the factory version. The home design resembles the elements of a standard device, not made in handicraft workshops. The only exception is that the drill mounting parts are made independently, and the design of the unit itself will depend on the material that needs to be processed.
If you have to perform simple operations with a milling cutter, then there is no point in making a complex device, so you can use a minimum number of components.
For reference! If the need arises, you can always modify the unit by making a more complex design. It all depends on the capabilities of the master, as well as his needs.
Do-it-yourself milling machine manufacturing technology
The horizontal router is assembled in this order:
- Development of drawings with elaboration of trajectories of movement of moving parts.
- Selecting an electric motor.
- Assembling the frame (frame) using bolts or using a welding machine.
- Installation of the electric motor in a horizontal position on special brackets, with the shaft extending sideways beyond the tabletop.
- Cutting and installation of the slab (countertop).
- Installation of a “vertical lift” of the spindle.
- Securing the spindle and belt drive.
- Installation of the device for feeding the workpiece, stops and limit bars.
- To supply electricity, a panel with a circuit breaker and a switch is installed.
Design of a milling cutter from a drill
A drill is not the most powerful tool, and therefore at home you can only make a lightweight machine for milling.
In order to process wood efficiently, it is necessary to securely fix the drill on the tabletop, as well as the workpiece itself: it should not move during operation. If you create a structure with an overhead drill, you can process fairly durable wood and create a complex configuration.
Important! You can make different types of milling cutters from a screwdriver. More on this below.
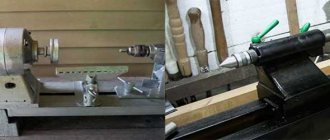
Table with router
If you have to mill regular grooves or form a tenon-mortise, then it is advisable to use a design with a protruding working element (cutter). This is a fairly simple assembly diagram to install on a small workbench.
The cover must be turned over during operation, a hole for the tool cutter is cut there. The size is approximately 5 mm larger than the diameter of the cutter used. It is necessary to install a strong strip perpendicular to the tabletop so that the spindle axis coincides with the created hole.
One of the possible forms of a milling machine
Using stops and clamps, the power tool is attached to the workbench. In working condition, the chuck is located under the cover, and the drill protrudes. As soon as the processing of the wood surface begins, the part will move along the table, without leaving a certain area, which is limited by the template.
You can use any other fastening method - it all depends on the available tools and the imagination of the master. In this situation, the main thing is that the axis of the cutter used exactly coincides with the center of the hole.
Important! All parts of the machine must be securely fastened; if distortions appear, the equipment needs to be modified.
Simple machine
How to make a milling machine from a drill - three main parts:
- Sole.
- Rack.
- Kerchief.
All this is made from plywood. The parts must be perpendicular. You need to make a hole under the sole through which the cutter will come out.
The stand should be equal in width to the body of the electric drill and be approximately 20 mm longer. The drill is fixed to it with clamps (just above the chuck). It is advisable to use an additional stop for more reliable fixation. Thus, the back side of the housing on the opposite side of the spindle will be securely fastened.
The gusset is necessary to increase the rigidity of the device. One part of it is adjacent to the sole, the other to the counter.
The sole is the base of the structure. To manufacture, you first need to make a drawing: draw (or print on a printer) a square, where the sides should be equal to the body of the electric drill. Next, add one strip at a time (on two adjacent sides), which are equal to the thickness of the plywood. Mark the center on the sole so that you can later make a hole there with a drill.
The sole is cut along the contour. It is advisable to round the corners so as not to hit them during operation. On the reverse side you need to make a 4 mm hole, as well as several recesses into which the countersunk heads of the screws will fit.
Important! A piece of rubber or linoleum is attached to the bottom of the sole to achieve smooth gliding.
If necessary, the stand can also be assembled from metal.
The stand is placed in the selected location and screwed in place. The gusset must be placed in such a way that on one side it rests against the base, and on the other against the stand. Thus, the structure will be as rigid as possible. It is necessary to fix the position of the drill when it falls below the sole. For this purpose, a stop and a clamp are used.
Machine with vertical movement of the cutter
In this case, the sole must be lengthened. You need to screw a large board with a U-shaped vertical profile (2 pieces) to it. They will serve as guides.
A drill will be installed on the bar on one side, and two slats in a metal profile on the other. It is necessary to screw a screw into the base from below, which will act as a stop when moving the body of the drill used down.
The router can be placed on the side cylindrical stands. And attach a spring to the bottom, which will return the tool to its original position. For fixation, metal corners, screws or staples are used. The milling depth can be changed using stop screws.
Horizontal milling machine
The second common version of the milling cutter is a horizontal machine. It has a simpler design compared to the vertical type, but can perform fewer functions.
Selecting materials for the router
The difference between the vertical and horizontal arrangement of the spindle only leads to a change in the principle of movement of the part and the working body. The cutting tool has the ability to move horizontally to adjust the depth of processing, and the spindle with slide moves vertically. The workpiece moves along the plate mainly longitudinally. The requirements for materials for a horizontal machine are similar to the requirements for the elements of a vertical unit.
This is primarily a high-strength metal frame. The worktop is large, which requires increasing the strength of the countertop.
Making a fixture for a stationary router
For horizontal milling, the same cutters are used as for vertical processing. You can make them yourself using the technology described above. Most often, horizontal machines provide the following operations: grooves on the ends and edges, drilling horizontal holes, grooving planks, forming skirting boards and various long products with relief.
Equipment for a homemade milling machine
The main components of a horizontal router have certain features:
- Spindle. It is positioned horizontally, for which a special support system is made. The photo shows drawings of a device that can be used in a horizontal router.
- Stove and countertop. There is no hole made in the plate of a horizontal machine for the working element. The tool is fed from the side. When cutting, a simple rectangular slab is formed. The most common size is 75 x 50 cm. The table layout for the milling machine is shown in the diagram.
Important! For a horizontal milling machine, an asynchronous motor of increased power is usually installed to ensure the ability to process large products.
Materials and tools
List of tools and materials required for assembly:
- Chipboard or a sheet of plywood approximately 12 mm thick is suitable for making a tabletop (the exact dimensions are selected individually).
- Boards of suitable thickness.
- Several wooden blocks.
- Self-tapping screws, screwdriver or screwdriver.
- Ruler and pencil for marking.
Important! If the design should ultimately be as reliable as possible, you can use metal (pipes, corners) instead of wood.
It is advisable to coat the wood with construction glue or PVA. To secure the moving units, studs or bolts with a diameter of 8 mm are used. You need to select nuts for them (regular and wing nuts).
Vertical milling machine
The vertical type milling machine is most popular in home workshops. Before starting production, it is necessary to decide on the design, taking into account the tasks assigned to the equipment, select the necessary materials, prepare the tools, and calculate the technical parameters of the future machine.
Selecting materials for the router
When choosing materials for the manufacture of a machine, these recommendations should be taken into account.
- Bed. It must withstand significant dynamic loads, which requires the use of metal. A square or rectangular steel pipe is most suitable. You can use a corner measuring 100 millimeters or more. Assembly can be done using a welding machine or bolted connections. The second option is preferable because it provides mobility.
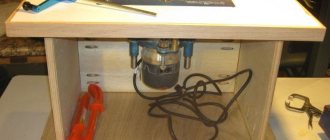
- Tabletop, work desk. The tabletop can be made from the following materials: multilayer plywood, board, chipboard or MDF. The surface must be smooth. It should be protected as much as possible from damage. Often a covering made of plastic, sanded boards or metal is used. The design of the table should allow you to store all the necessary tools and consumables. The photo shows examples of execution.
- Electric motor. Both asynchronous and commutator motors are suitable. Asynchronous is easy to operate, does not limit the size of the cutters, but is quite noisy. The commutator motor is accessible, but its brushes wear out much faster.
Important! The material should be selected taking into account the expected loads (working on wood or metal) and the size of the machine.
Manufacturing process
A simple design option
How to make a router from a drill or screwdriver? For household needs, you can assemble a vertical router; it has a fairly simple design and is easy to make at home.
Make a foundation
The sole (or base) should be oval or round with a hole for the cutter to pass through (done in advance). It should be offset relative to the center of the workpiece, taking into account the thickness of the stand, which is located on the side.
The size of the base is selected individually.
Install drill
Next, you will need to place the drill on the created base to mark its position. Using stops and clamps, secure it to the work area.
Attach to workbench
Having placed them exactly at right angles, fix the gusset and stand to the tabletop. Securely secure the tool body to the base. After installation, it is important to make sure that there are no backlashes or distortions on the created unit.
Do-it-yourself milling machine manufacturing technology
Assembling a homemade vertical milling machine with a bottom drive is carried out in the following order:
- Development of drawings. Carrying out marking of the movement of moving parts.
- Selecting an electric motor. Any motor with a power of 1–2 kW for a voltage of 220 V with a rotation speed of 700–3000 rpm will do. Often a motor from a washing machine or vacuum cleaner is installed. You can install an electric drill with high rotational force. It is important to consider that a motor with a power of up to 2 kW allows for a processing depth of up to 100 mm. To increase this parameter, you will have to install a 380 V motor.
- Assembly of the frame. It may have a bolted connection or a welded structure.
- Cutting and installation of the machine plate, including the formation of a hole for the working element.
- Fastening the guides.
- Suspension and fastening of the electric motor.
- Installing a spindle with a chuck on a lifting bar (vertical lift). Securing the drive.
- Installation of stops and limit strips.
- Installation of the dust collector.
- Completing the installation of the desktop.
- After installing the electrical panel, electricity is supplied and testing of the machine begins.
- To carry out the assembly you will need the following tools: a welding transformer, an angle grinder, an electric drill, a screwdriver, a jigsaw, a hacksaw, a hacksaw for metal, files and needle files, pliers, screwdrivers, wrenches and socket wrenches, calipers, a ruler, a square.
Advantages and disadvantages of a router
The main advantages of a do-it-yourself router from a drill:
- if single operations are to be performed, there is no need to spend money on purchasing special equipment;
- to make the device at home, you will have to spend about half an hour;
- if necessary, you can quickly change the bit (attachment), which will be adapted for a specific task.
There are also disadvantages:
- the drill cannot gain a large number of revolutions, so working with dense materials will be problematic.
- the operator's work area is severely limited by the small size of the router;
- The drill engine is much weaker than that of a professional milling machine, and therefore it is not possible to work for a long time on a homemade machine with maximum power.
In addition, we must not forget that the drill gets very hot when used for a long time, so the tool must be given time to “rest.”
Copy milling machine
Nowadays, copy milling machines based on 2D and even 3D technologies are moving into the category of standard equipment. In the first case, milling cutters with a tabletop or mounted pantograph are manufactured. The desktop version is simpler, but the copying accuracy is only 1 mm. A mounted pantograph makes it possible to ensure high precision processing and even engrave.
Features of working with a homemade milling device
It is important to pay attention to the speed of rotation of the shaft. The engine of a professional machine can reach 20,000 revolutions per minute. The drill's performance is much more modest - approximately 3000 rpm. Therefore, cutters designed for low speed operation may not be suitable. The rotation speed regulator must be set to the maximum position.
A similar situation is observed with engine power. This means that a home-made milling machine can only process soft wood or plastic workpieces.
For reference! The machining accuracy of a home machine will not be ideal, since a gear is used to transmit rotation.
During operation, slight play may be observed, which will affect vibration and beating. This affects the final result of the work.
The information provided is enough to understand how to make a wood router from a drill at home without much expense.
CNC router
A machine with computer numerical control (CNC) is used mainly for engraving and figured wood carving. It is controlled using a computer, thanks to which very complex patterns can be cut out on workpieces with high precision. In China you can buy ready-made mini CNC machines for making souvenirs at a price of about 10,000 rubles.
Of course, you can purchase all the parts for the machine and assemble the CNC router yourself. But if you look at the cost of all the components, it will be much cheaper to purchase a finished product with already configured software.
Basic rules of use
In this chapter we will try to answer the question: “How to work with a hand router correctly?”
A high-quality result is possible only if certain rules and working conditions are observed. These include the following wood carving requirements:
- It is necessary to work only with a sharp tool. If the treated surface is burnt, fleecy or has many small chips, the cutter should be replaced;
- The workpiece must be securely secured using clamps or other devices. You cannot hold the workpiece in your hands;
- The feed of the router should be smooth and leisurely, without jerking. Do not try to immediately remove a thick layer of material. In some cases, the excess mass is pre-drilled in order to remove a small remainder with a milling cutter;
- The cutting tool is changed only when completely disconnected from the network.
Example of table top milling:
Read also: Do-it-yourself manual riveter repair
Compliance with these requirements should become a prerequisite for work for a home master.
The cleanliness of the cut is ensured not only by the degree of sharpness, but also by the cutting speed. The higher the number of revolutions, the cleaner the processed surface. For hard materials - aluminum, dense wood, etc. — the shaft rotation speed should be reduced slightly so as not to overheat the cutting edges of the cutter.
When milling edges, the feed is made so that when moving away from you, the part remains to the left, and vice versa. If you need to make a groove, the direction of movement does not matter.
Let's look at common techniques for working with a hand router.
How to cut a circle
In order to cut a circle with your own hands using a router, you need to use special templates or devices.
First of all, it is necessary to clarify what exactly is meant - you need a part in the form of a circle, or a hole.
The delivery set includes a parallel stop.
If you drill a hole in it, you can make a simple circular jig. You need to turn the stop upside down, screw it in the center of the future circle onto a screw, use clamps to set the desired diameter of the hole and cut it in a circle. Sometimes the kit comes with a compass rod, which makes it even easier to make round holes.
When a circle is needed, a template should be used. It is a sheet with a hole of the required diameter. It can be made from plywood or fiberboard, which is recommended to be glued in half. This will result in a stiffer and thicker sheet, from which a high-quality template will come out.
The diameter of the template depends on how the emphasis will be made. If you rely on the base itself, then the diameter of the template should be increased by the amount of the platform radius plus the radius of the cutter. In cases where the emphasis is on the copy ring included in the delivery set, the diameter of the template is equal to the sum of the radii of the cutter and the outer convex part of the ring.
As a template, you can also use a ready-made circle into which the copy cutter bearing rests. The easiest way to fix it is with double-sided tape, after cutting off the excess material with an allowance of 2-3 mm.
The quality of work depends on the accuracy of the template. Usually it is cut out with a jigsaw, trying to maintain the shape as accurately as possible. In some cases, a round hole is cut using a jig with a clamped cutter.
Sampling quarter
Selecting quarters with a manual router can be done in several ways:
- Using a rip fence;
- Using an edge cutter with a smaller diameter bearing;
- With the machine platform resting on a flat bar, fixed at the required distance from the edge.
The first option is used when there is a smooth edge and a large quarter size that requires several passes. The second method is used to obtain the same quarter width, since only the immersion depth of the cutting part of the cutter can be adjusted. The third option allows you to make a large-sized quarter when the outer edge of the workpiece is uneven or unprocessed. Wide quarters have to be done in several passes, each time moving the stop a few millimeters until the desired width of the step is achieved.
How to choose a groove
To make a groove with a router, use:
- Parallel stop;
- A strip fixed at the required distance parallel to the groove line;
- A pair of planks between which the router platform moves.
The first two methods require accuracy and attention, since the milling machine can only be focused in one direction. If the master is distracted, the cutting line may go to the side. The third option allows you not only to avoid such situations, but also to increase the width of the groove. The distance between the slats can be increased slightly so that the width of the groove is equal to the diameter of the cutter plus the size of the gap. In this way, fairly wide recesses are made for various furniture parts, locks, and structural elements.
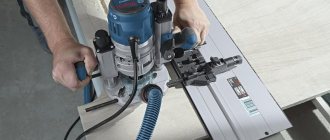
Edge processing, working with a template
For cutting edges, appropriate cutters equipped with a thrust roller (bearing) are used. It is necessary to pre-align the edge, otherwise the cutter will copy all the irregularities and the edge will look sloppy. In addition to edge cutters, templates are used to form a curved shape or produce a batch of identical parts. For work, a copy cutter with a bearing is used. The cutter is pulled out so that the thrust roller rolls along the template, and the cutting part processes the edge of the part.
Let's take a closer look at these working methods.
The width of the part is less than the length of the cutting part
In such cases it is necessary to use a template. The simplest option is to combine two identical parts into a pack. A bearing rolls along one of them, the other is processed by a cutting edge. If there is only one part, you will have to make a template from sheet material - plywood, MDF, chipboard or the like. It is important to accurately repeat the configuration of the part, to avoid the appearance of potholes or irregularities.
Many craftsmen do not like to resort to this method, since the template is often used only once and then thrown away. However, the quality of work is more important than labor costs. You should not spare time and effort, since it will be difficult or even impossible to eliminate defects after processing the edge.
The width of the part is greater than the length of the cutting part
Wide parts are processed using their edge as a supporting platform for the bearing. It rolls along the lower part, and the upper part is processed by the cutting part. This method is convenient at home and does not require labor-intensive template making. First you need to carefully inspect the edge, sand it with sandpaper, and eliminate possible flaws, potholes or irregularities.
If it is necessary to process the entire edge, several passes are performed. First, the cutter is pulled out to a certain depth and the edge is rolled, then the part is turned over and the procedure is repeated again.
Achieving Various Shaped Edges
Shaped edges are obtained using shaped cutters. They have a thrust bearing and most often do not require the manufacture of additional devices. Before carving, you should prepare the surface, remove all flaws, irregularities, and potholes, otherwise the appearance of the profile will be spoiled.
If a curved edge is needed on a curved surface, you must first give it the desired shape using a template, and then process it with a shaped cutter.
A video tutorial on how to mill an edge will be useful for beginners:
Making furniture panels using a hand router:
Option 1. Instructions for making a table for a manual router
Materials for making a milling table
To build a milling table you will need:
- 4 square bars;
- chipboard and plywood scraps, the dimensions of which are determined when constructing the table drawing;
- hardware (nuts, bolts, screws, hinges, etc.);
- jack;
- metallic profile;
- six-millimeter steel plate;
- aluminum guides;
- movable carriage-support (guide from the saw);
- manual frezer.
Drawing of a homemade milling table (option 1)
In any case, before you start making any such table, the drawing must be completed indicating all dimensions and determining the location of the working elements relative to each other.
Step by step assembly
Let us consider in detail each step in the manufacture and fastening of each element of a homemade milling table.
1st step. To make a stationary base for the table, you will need bars and chipboard cuttings, from which we twist the legs and further strengthen the rigidity with the help of horizontal connecting panels made of plywood. In the right side part we cut a hole for the start button, which will be connected to the hand router.
2nd step. The table top is made of chipboard. We make it liftable together with a router, for which we install hinges and make an additional support base from 15 mm plywood.
3rd step. To move the workpiece smoothly along the table, for example, to cut a groove in it, a moving carriage-stop is used. We cut a groove in the tabletop for the guides of the movable stop and install a metal profile into it. You can use a guide from an old saw as a stop carriage.
4th step. We also make the longitudinal stop from chipboard and make it movable to adjust the gaps around the cutter. To ensure mobility, we cut perpendicular grooves in the upper part of the stop and fasten the stop to the tabletop with clamps. We cut a small groove in the middle to suck out chips and other milling waste.
5th step. From thin plywood we make a box with a hole for connecting a vacuum cleaner hose, which will remove dust and shavings formed during the milling process. We fasten the box behind the perpendicular stop.
6th step. We take a six-millimeter steel plate and screw it to the tabletop flush with the surface. During the fastening process, we make sure that its edges do not protrude above the tabletop, otherwise the parts being processed will cling to them. A manual router will be attached to the plate from below.
7th step. We attach the router by the aluminum base to the bottom of the plate using bolts, but do not forget to pre-drill holes for the bolts in the base. Attaching the hand tool to a removable plate rather than directly to the table saves routing depth and allows for easy cutter changes.
8th step. We are building a router lift. To do this, we use a car jack, which allows us to change the height of the cutter with maximum accuracy.
9th step. We remove the handles from the router and instead screw in aluminum guides, which we connect to the jack mechanism.
Design and video of a homemade milling table for a manual router
Before you start making a milling table, you need to accurately determine its design features. This article provides instructions on how to make a simple router table. For other details of the first assembly option, see the video below.
We check the reliability of fastening of all elements - and the milling table is ready with your own hands!
We offer several more models of wood milling machines made by yourself for your taste.
Main types of nozzles
For milling work, end mills with a shank diameter of 6.8 or 12 mm are used.
They are sold individually or in sets that include the most popular types of cutters.
There are sets with 7 mm shanks, but it is difficult to find a collet for them. Depending on the purpose and shape of the cut, there are edge and groove cutters. Edges include:
- Profile;
- Conical;
- Moulded (moulded, quarter-rolled);
- Disk;
- Fillet.
A common feature of edge cutters is the presence of a bearing that acts as a stop. Groove cutters include:
- Rectangular (straight);
- Filling;
- "Dovetail";
- V-shaped.
Groove cutters do not have thrust bearings and allow you to cut both on edges and on faces. There are straight cutters with a bearing at the top, just above the cutting edges. Usually its diameter corresponds to the size of the cutting part, which allows you to cut curved shapes according to a template. Such cutters are called turning cutters. They are not included in standard kits; if necessary, they must be purchased separately. Almost all cutters are available in several standard sizes. To make a recess of the required size, you need to select a cutter of the appropriate diameter or profile.
Features of application
Of course, just installing a router from an electric drill is not enough - you need to properly care for it so that it functions for a long time. Experts make the following recommendations.
- All wood surfaces must not only be thoroughly sanded, but also treated with a protective coating in order to increase the ability to resist various adverse influences from the outside.
- The control system of the device should be carefully designed so that it is extremely comfortable.
- Certain additions can be made, such as a system for cleaning the work area from chips. For example, install a small pipe that you can connect to a hose from a simple vacuum cleaner.
Preparation
To install the cutter in the chuck, the router is laid on its side. Some types allow you to disconnect the engine with the cartridge from the platform without changing its settings. Others do not provide this option, so most often you have to lower the base as far as possible. The cartridge is unscrewed using a wrench, which is included in the package.
The cartridge is fixed in immobility using a special button located above the point where the shaft exits the housing. It is not present on all types of milling cutters; sometimes you have to fix the shaft with a wrench and unscrew the chuck with another.
It is not necessary to remove the union nut completely, but sometimes this has to be done if the cutter is clamped too tightly in the collet. By gently tapping on the side surfaces and turning the shaft, the collet is loosened and the jammed cutter is removed.
The nut is screwed on, the new cutter is inserted into the collet approximately 20 mm. Some cutters on the shanks have special marks indicating the minimum and maximum immersion depth, but most of them are installed by eye. If the installation depth is too small, sharp feed may cause deformation of the cutter and damage to the workpiece. This is dangerous, since the maximum rotation speed of the router shaft is 30,000 rpm or more. A cutter flying out of a collet while moving has great destructive power; if it hits a person, the consequences can be very undesirable.
Attention! It is prohibited to screw the union nut without a cutter installed, as this will break the collet.
Setting the milling depth is as follows:
- The router with the base lowered is installed on a flat platform;
- The cutter is lowered all the way and fixed;
- The depth indicator slider is set to zero;
- The depth stop is raised to the required amount and locked with a screw;
- The cutter is unlocked and lowered until the depth stop stops against the adjusting screw, after which it is fixed again.
It is recommended to check the set depth on a test piece so that adjustments can be made if necessary. You should not immediately make the depth too large; this will cause the router to overheat and create an excessive load on the electric motor. The recommended depth per pass is 4-6 mm.
We make homemade equipment
Despite the apparent complexity, making a homemade milling machine is not difficult. You just need to have on hand the appropriate diagram for the implementation of such a unit, and as a basis you can use an old unnecessary drill or an electric motor, which is connected to the working head and the router using a belt drive. When choosing an electric motor or a drill to use, preference should be given to models with a power of more than 2 kW. This drive provides high power and rotation speed of the cutter, which guarantees the quality of wood processing.
You will need to weld a strong supporting frame from metal or make it from wood, ensuring complete immobility and strength of the structure. A tabletop is fixed on top, which is used as a milling table. The tabletop must be made of strong, durable materials that are resistant to vibration and static loads. The main requirements for the frame are stability and rigidity of the structure. With a certain amount of skill and experience working with lumber, you can make an original version of a wood frame with numerous drawers for storing all kinds of tools and materials.
As a cutting tool, you can use a hand router, which should be secured strictly perpendicular to the mounted tabletop. You can also make special fixtures and adapters that minimize the effort when tilting and moving the depth of the router. To manufacture such additional devices you will need a durable metal profile, and all work is carried out according to existing drawings.
The router is attached to a bearing head, which can be made from an old drill. Such a drill will need to be secured to the frame bracket using a strong bolt connection. The working tool is fixed strictly parallel to the table, so when performing this work you will definitely need to use a level, regularly checking the correctness of the design.
If the design of the milling machine involves the use of an electric motor, the motor is usually mounted under the lower plane of the machine, bringing the drive to the working head through pulleys and belt drives. In this case, it will be necessary to provide the ability to adjust the rotation speed of the working head, for which they use a motor with several operating modes or install an additional PWM controller, which allows you to change the voltage power on the motor, thereby changing the spindle rotation speed for a wood milling machine.
At the final stage, a parallel stop is installed. The presence of such a parallel stop allows the parts to be correctly positioned and subsequently move at a given angle to the cutting edge of the router. The parallel stop device may be subject to increased load during operation and wood processing; accordingly, the stop must be made of durable materials, which will ensure the reliability of such equipment.
When milling and processing wood, a large amount of chips is released, for the removal of which a metalworker or drilling machine is additionally equipped with a vacuum cleaner, which allows you to quickly remove emerging chips from the working area, simplifying work on the equipment. It is necessary to plan the location of the vacuum cleaner nozzle so that it is located directly above the working area, but does not interfere with the movement of the cutter and the workpiece itself. The presence of a vacuum cleaner somewhat complicates the design of the machine, but significantly simplifies the work on homemade equipment.
Operating principle and classification
To manufacture the spindle, hard metal is used, which must meet certain requirements for rigidity and hardness. The operating principle of any milling cutter is as follows: the rotor is connected to a spindle onto which the cutter is fixed. When the tool is plugged in, the spindle begins to rotate. The material is cut with sharp knives.
The accuracy of the work performed depends on the rotation speed.
The stand for the router is also cut out from a piece of chipboard.
Since the number of revolutions depends on the density of the raw material, it is recommended to equip a homemade tool with a regulator.
Before building a router, it is recommended to decide on its type. According to the method of application, experts distinguish the following types of manual milling cutters:
- lamellar - makes grooves;
- upper - used to perform any woodwork;
- edging - makes edges and chamfers.
The top router is classified into the following types:
- fixed - rigid motor mount;
- submersible - the motor moves with the cutter.
Narrow-profile tools are subdivided taking into account the material and parts to which it is applied:
- tenon cutting machine;
- for drywall;
- to obtain a groove, etc.
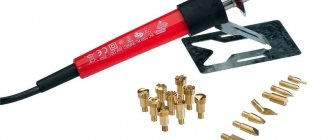
Cutting disc for drill
If it is necessary to use an angle grinder, but it is not available, it is permissible to use a cutting wheel for a screwdriver or drill. To be able to use this device, you need to purchase or manufacture a special attachment that ensures reliable fastening of the cutting disc.
PHOTO: img.staticbg.com The cutting disc must be attached using a special adapter
Using a drill attachment for a cutting wheel has several advantages, including:
- the ability to process metal in places where it is difficult to reach with a regular grinder;
- versatility since the user only needs to change the attachment without having to change the tool.
PHOTO: instrumentgid.ru A lower number of drill revolutions reduces the efficiency of metal cutting
The disadvantages of this method is the need to fully comply with safety rules when operating a cutting tool. Also among the negative aspects are:
- decreased operating efficiency due to fewer revolutions;
- limited thickness of the processed metal to 5 mm.
It must be taken into account that the shaft of the power tool can rotate in both directions. When cutting, you must ensure that its rotation is carried out exclusively clockwise.
PHOTO: ae01.alicdn.com A variety of cutting discs allows you to turn your drill into a universal tool
Active use of drill attachments allows you to significantly expand the range of applications of this tool, including use as equipment for plucking poultry or mixing a solution. Therefore, when carrying out construction or repair work, you need to think about the need to purchase such a device. You can once again learn about the features of nozzles for cutting metal from the presented video.
Watch this video on YouTube
PHOTO: beton-house.com The corresponding attachment turns the drill into a concrete mixer PHOTO: krasnodar.incubonline.ru One movement, and you can pluck a bird with the drill PHOTO: allmbt.ru A set of brushes will turn the drill into a device for cleaning and grinding metal
Previous DIY HomiusSpa at Home with Helpful Bath Bombs Next STORIESReinventing an Old Chair: 5 Creative and Easy Ideas
Using a drill
It's no secret that a drill can be used not only as a drill, but also as a multifunctional tool. There is a whole range of different devices that make the worker’s work easier.
Eg:
- a metal cutter for a drill allows you to avoid monotonous manual work with a file;
- the scissors attachment on the drill provides the ability to cut metal sheets and elements;
The drill attachment for cutting metal tiles, in turn, helps to accurately cut sheet metal roofing at any angle.
Working with this kit requires some skill, but over time you will understand the benefits of this method.
Let's take a closer look at each option.
For cutting tiles
Another name for this drill attachment is a cricket. The set is used both for smooth surfaces and for profiled iron sheets. The advantage of this cutter is the ability to create an even cut, without burrs or irregularities.
The cricket drill attachment is convenient to use for:
- cutting thin-sheet products;
- cutting parts from metal sheets.
Since its use does not depend on the spatial location, you can easily cut horizontal and even vertical sheets.
Scissor attachment
Of all the attachments presented, this one looks the least like a drill. It turns the drill into an electric one instead of a nibbler. They work on the principle of a straight cut, cutting metal with sharp edges using mechanical force. This is a rougher method for cutting metal and plastic. Such scissors perform only straight cuts; it is very difficult to change its direction during operation.
This set is more suitable for cordless tools.
Milling cutter
This attachment is otherwise called a cutter. It is intended for processing wooden and metal products:
- the cutter replaces the file;
- significantly speeds up the grinding process;
- eliminates defects.
One set can include cutters of different shapes, so you can choose the most suitable nozzle for each specific situation. Some of them are practically no different in appearance from a drill.
Safety precautions
Woodworking machines are the most dangerous type of equipment. A hand router is no exception. Working with it requires caution, accuracy and knowledge of safety regulations:
- Clothing should be sufficiently tight, without hanging ends, ties or other interfering elements;
- Wood dust is dangerous for the respiratory system and is a strong allergen. It is recommended to use a respirator, at least a regular “petal” one;
- Flying chips may get into your eyes. Most routers have a protective shield, but it would be a good idea to use glasses;
- It is necessary to hold the machine firmly in your hands. During operation, it vibrates and tends to turn in the direction opposite to the rotation of the shaft. You should not be distracted and let go of the running router;
- Recess the cutter shank into the collet by at least 20 mm and securely tighten the nut with a wrench;
- Before work, check the condition of the bearings on the edge cutters. They should not creak, wobble, or jam. If flaws are noticed, the roller must be replaced;
- First you need to start the milling cutter and wait until the working rotation speed is reached, and only after that insert the cutter into the material. If it is necessary to stop work, first remove the cutter from the material, then stop the machine;
- Always ensure that there are no nails or screws in the wood, and that there are no foreign objects or tools in the rotation zone of the cutter.
More detailed safety rules can be found in the user manual. Milling cutters from different manufacturers may have their own specific safety rules that you need to be aware of and follow during operation.
A hand router is an unpretentious device that does not require too complex or specialized maintenance. The main care for it consists of cleaning it from dust and chips, timely replacing the brushes on the motor and checking the bearings on the motor shaft and cutters. It is necessary to ensure the cleanliness of the guide rods and the ease of movement of the router along them.
Some experts advise covering the rods with a layer of lubricant, but this is a rather controversial advice, since dust and small wood particles will begin to stick to it. It is more correct to clean the rods with a brush moistened with turpentine, which dissolves tree resin and removes fine dust.
In conclusion, it is necessary to recall that a manual milling machine is a universal multifunctional machine that has a lot of capabilities and is capable of performing complex operations. With its help, complex parts, artistic panels and other crafts and products that require high qualifications and experience are made.
Gradually, skills and experience are developed, leading to the complication of work operations and obtaining more effective results. If at first the router is used to a minimum, this does not mean anything - one day it will perform complex professional tasks.
A router is an indispensable tool for all kinds of woodworking and is actively used by professionals. But if a home craftsman needs it for one-time work, then it makes sense to try to make it with your own hands from available tools. Of course, a homemade wood router, made, for example, from a drill or grinder, is not capable of completely replacing a standard tool. But some simple operations that do not require particularly clean processing can be performed with such a unit.