A wood lathe is a valuable piece of equipment for any woodworker. It doesn’t matter whether the unit is used in a workshop or solely for minor work in a home workshop, sometimes parts fail and require replacement.
Many of the parts of a wood lathe can be made at home with your own hands. This will be more economical and practical than purchasing an industrially produced structural element.
Functional features and device
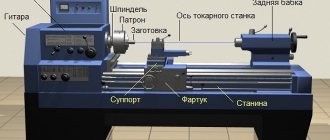
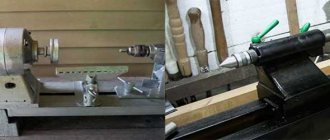
The tailstock and headstock of any lathe are important structural parts, each of which performs its own functions.
Headstock. The quality of the entire structure as a result depends on the precision of manufacturing of this part. A spindle is located on the headstock, which transmits torsional movement to the workpiece. The main elements of the headstock are:
- frame;
- spindle;
- bearings;
- design for controlling the direction of spindle movement;
- a device that controls the speed of the spindle;
- device for connecting and installing equipment.
Tailstock. This is the support unit of a woodworking lathe, which is designed to fix the workpiece. Main elements of the tailstock design:
- frame;
- quill;
- flywheel;
- flywheel handle;
- screw to move the tailstock laterally.
The tailstock has a hole in the quill into which a tool is inserted to process the part. During the working process, the headstock moves along the bed to select the optimal distance depending on the length of the workpiece being processed.
Electric motor for machine
The basis of the lathe drive is the engine. When choosing this unit, it is important to pay attention to its main characteristic – power. For a home machine, models with a power from 1200 to 2000 W are suitable. The type of connection is important; there are single-phase and three-phase motors.
In a low-power table lathe, you can use a motor from a washing machine. It is unlikely to cope with the processing of large workpieces, but it will help produce small decorative elements and kitchen utensils.
Step-by-step assembly and installation yourself
After studying the diagrams and drawings, you can proceed to the assembly and installation of both components of the lathe. Then you will need to set up and configure the equipment.
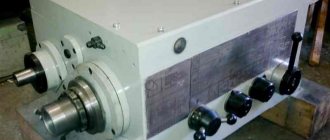
Headstock
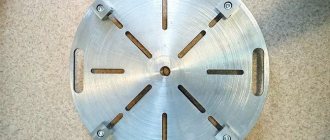
Algorithm for making the headstock:
- Turn out a cylindrical body with a wall thickness of 10 mm.
- The channel, which will be necessary to make a drain for attaching the headstock to the frame, is welded to a corner of sheet steel.
- Attach the headstock to the stand.
The cylindrical body has the following dimensions:
- outer diameter – 56 mm;
- length – 18 cm;
- mounting sockets with a diameter of 24 mm for bearings;
- shaft diameter – 30 mm.
Tailstock
Tailstock manufacturing algorithm:
- weld 2 bolts together to increase the overall length;
- make a rotating center from a pipe of such diameter that the outer race of the bearings fits tightly into it;
- If necessary, you can make a 2-3 mm wide cut in the resulting sleeve;
- the future wall of the rotating center has the same diameter as the outer race of the bearing;
- scald the washer and nut on the right side;
- Tighten the left nut and cut the horses flush with the washer;
- cut off the head of the bolts, clamp the bolt itself into a drilling machine and refine it using an abrasive stone.
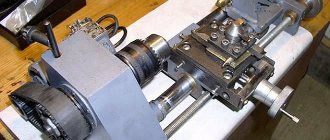
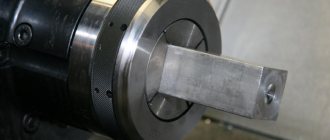
Then you need to make the spindle housing. For this:
- Take a piece of pipe with a diameter of ¾ inches, 6-7 cm long.
- Nuts are welded at both ends.
- The tailstock cone is also made from a bolt.
Before installation, first grind the cone shank to such an extent that it fits into the inner race of the bearings. To support the outer race, before installing the bearings, install a ring of bent wire with a diameter of 1-2 mm into the housing.
Conclusion
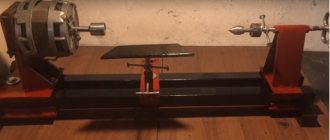
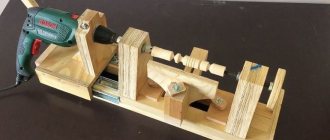
Today you learned how to make a wood lathe, which made maximum use of wood as the main material - plywood, timber and board. It is quite possible to make this design at home yourself, for which you will need to purchase or use an electric motor with transmission pulleys.
While working, you must remember to follow safety rules and safety glasses. The video in this article will give you the opportunity to find additional information on the above topic.
First start-up and equipment health check
To check the serviceability of the equipment, you must first run the machine at idle speed. Each master configures the machine in his own way, depending on the intended work and functions performed. All elements must be checked sequentially; only after checking at idle speed can you turn off the machine and set certain parameters for operation.
Before processing the workpiece, be sure to make sure that the wood is free of chips, deformations and cracks. The spindle should rotate without the slightest difficulty during operation. Be sure to check the coincidence of the centers of symmetry of the machine and the part.
Direct drive or belt drive
There are several ways to transfer rotation to the workpiece. The simplest is direct drive. In this case, the workpiece is attached directly to the motor shaft. A distinctive feature of this design is its simplicity. With all this, direct drive has a number of significant disadvantages.
First of all, a direct drive machine does not allow you to adjust the rotation speed, which is critical when working with hard material. It is also worth considering the load on the electric motor, especially when working with large workpieces. No matter how well it is centered, it cannot do without vibration. Motor bearings are not designed to withstand longitudinal loads and will often fail.
To protect the engine from damage and provide the ability to adjust the speed of rotation of the workpiece, it is worth considering a belt drive. In this case, the engine is located away from the axis of rotation of the workpiece, and torque is transmitted through pulleys. Using pulley blocks of different diameters, it is easy to change the speed within a fairly wide range.
It is advisable to equip a machine for your home with pulleys with three or more grooves, which will allow you to process wood of any species with equal success, and, if necessary, work with soft alloys.
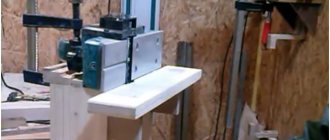
Frame manufacturing process
The slats selected for assembling the frame must be laid so that their upper edges are strictly in the same plane. The parallelism of these guides is checked by measuring the distances between their ends on each side.
- Longitudinal fragments are secured with clamps. The transverse parts are made from the same profile.
- There will be three crossbars in total. Two of them are fixed at the edges of the device, and the third is placed a couple of tens of centimeters from the left end.
At the next stage, all components are joined by welding into a solid composition. It is important that the resulting connecting joint is strong and smooth.
Selecting an Electric Powertrain
When choosing a motor to power the turning system, it is necessary to clarify how powerful it is. For the construction of a homemade self-heating unit, an indicator in the range of 1.2 - 2 kW is quite sufficient. In this case, you should find out exactly what scheme the connection is made according to.
For desktop woodworking, a motor from a household centrifuge is sufficient. Although he is not able to provide turning of a massive workpiece, he will definitely master the processing
- Miniature souvenirs;
- Kitchenware;
- Various types of furniture accessories.
Main components
The most important components of such a device include
- Bed;
- Electric drive;
- Front and back headstock;
- Stand for accessories.
Cutters of different calibers
Cutting attachments are sold in every major hardware supermarket. At the same time, it is possible to buy both single cutting parts and sets.
With a wide selection of cutters available, the turner will create any complex and intricate configurations, including
- Grooves;
- Chamfers;
- Cones;
- Dashed lines;
- Edging;
- Wavy lines.
Support frame base
The bed is a frame that allows you to connect all the parts into a harmonious mechanism. The strength and reliability of such a support directly determines the stability and durability of the entire device. It is better and easier to use a steel angle to make the frame; another suitable material is a rectangular profile.
First of all, it is necessary to mark the dimensions of the assembled automatic sharpening machine. These parameters are determined by what exactly this machine will be used for. As a rule, a stand for an apartment or garage modification does not exceed eighty centimeters in length.