Making a belt sander with your own hands + (Video)
Making a belt sander yourself is not at all difficult; you need to complete the following steps:
- select suitable materials and parts;
- create a reliable basis for securing the tool;
- install a suitable tabletop;
- secure the vertical posts with tensioner and drum;
- mount the motor and drums;
- secure with sanding tape.
To process fairly large parts and elements, it is necessary to make a large copy of a serial grinder. For example, if you take an electric motor with a power of 2 kW or more powerful with a rotor speed of 1500 rpm, then you don’t need to install a gearbox. The power of such an engine is quite enough to rotate a drum about 20 cm in diameter and process parts of about 2 m.
You can also use an electric motor from an old washing machine. In this case, the frame is made from a thick sheet of iron, preparing a place for installing the motor and carefully securing it with bolts to eliminate vibration. The design of such a machine consists of 2 drums, one of which is fixed, and the second can be tensioned and rotates on bearings around an axis. It is advisable to make the base for the machine from metal or several sheets of thick plywood. The drums are made on a lathe from chipboard. The tape is cut from sandpaper sheets about 20 cm wide and secured to the frame. The larger the table size, the larger the parts can be stacked and processed in the future. Drawings of finished products can be found online.
https://youtu.be/vDs1gBM_MW4
Belt grinder from an angle grinder - device ideas
The drive is a small angle grinder, which costs a little, and almost everyone has. The manufacturing work is simple: you need to make a frame to mount the tool. They are different, so the bed will be different in each specific case. Other important components: the drive shaft and wheels for sandpaper - all made from waste materials, no turning required. All you need is some profile pipes, sheet metal, a welding machine and a grinder.
Schematic diagram and operation
The sanding belt in the device moves on rollers, to which rotation is transmitted from an electric motor. In this case, the grinder acts as the drive, but you can just as successfully use a drill or any suitable motor. They are attached to the frame with reliable fasteners.
The principle of the tape attachment
To prevent the belt from sagging, a tensioning mechanism with a spring is used, which is pulled onto one of the rollers. The stationary unit differs from the manual unit in the table for fixing the workpieces. Safety is ensured by a transparent acrylic screen.
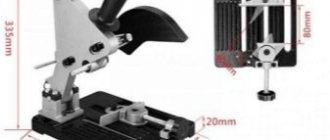
Industrial model
There are factory-made tape attachments for grinders on sale. They give the impression of solid, powerful designs, but users complain about poor mounting, an excessively long belt, which requires a powerful motor to drive. So, for purely practical reasons, and not just because of the high cost, many people prefer to make the console themselves.
DIY Car Ideas
There are many creative options for recycling household power tools to expand functionality. How to make a belt sander from a grinder is shown in the drawing below.
The implementation of the second idea is more difficult. You first need to make a bracket for the drive - the shape and dimensions may be different. They measure the tool and think about how to secure it. For production, steel plates are used, which are bent with the letter “P”. The parts are welded. The main task of this unit is to securely hold the angle grinder.
The bracket is attached to the frame on hinges
The following photo shows a general view of the product. Here it is important to pay attention to 2 parts that serve to adjust the tool. This is a spring between the base and the bracket, which is used to tension the working tape. There are also bolts in the mount. They are needed to change the angle of the angle grinder. This is necessary in order to achieve a position where the abrasive belt will be in the center of the drive wheel and will not fly off it.
Next they make driven rollers - there are two of them. Take closed bearings, which are put on a bolt of suitable diameter and length, and secured with a nut. Cover the top with a piece of plastic pipe. The leader is a bicycle stand, which is installed to perform various tricks.
Leading video
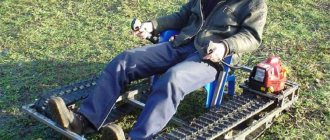
The following photo shows the general appearance of the product. In front is a table made of a piece of sheet iron welded to the base. Parts are processed with fixation on it.
The device is ready for use. Legs are attached to the frame; the bottom can be covered with rubber.
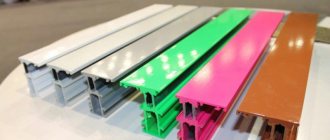
Abrasive tape – where to get it?
It is better to use factory tapes, which have standard dimensions of length 610, 915, 1230 mm, width 50 and 100 mm. Then you won’t have to think about making it yourself. Any version of the emery belt must meet the requirements:
- have an elastic fabric base;
- have a durable abrasive;
- do not heat up during prolonged operation;
- stretch out, but remain intact.
The dimensions of the factory sanding belt can be larger, but for a homemade device you should not take anything longer than 1230 mm. Otherwise, the dimensions of the product increase significantly, and these are unnecessary problems.
Making your own grinding machine is quite possible. Implementing the options is not particularly difficult, the main thing is to choose a suitable drive.
Making a grinder from a computer hard drive + (Video)
Any old hard drive can be converted into a miniature grinding machine. To do this you need to follow these steps:
- completely disassemble the hard drive and remove from the case everything that is located to the left of the magnetic disks;
- cut out a working circle from sandpaper, make a hole in the center of the circle for the spindle;
- stick several strips of double-sided tape onto the rotating disk of the hard drive and secure it with sandpaper;
- make a protective screen to protect the eyes from the possible ejection of the manufactured sanding disc;
- connect the finished design to the power supply from the computer and use it.
Of course, this design does not have high power, but it is quite possible to sharpen a small knife or scissors.
Often there is a need to perform various types of finishing work on wood surfaces.
The use of such a unique tool as a wood grinder helps to significantly speed up the execution of this kind of work, as well as improve their quality.
It is in quite high demand among buyers. That is why I would like to dwell in more detail on the features of this instrument, as well as its varieties.
The popularity of such equipment is due to its fairly wide area. By using a sanding machine for woodworking, you can perform the following types of work:
- Polishing a curved plane
- Leveling a flat surface that is located on a stationary work table or by manually moving it mechanically
- Processing the edges of various parts or their ends
- Preparing a wooden surface for painting, etc.
All these and other types of work often have to be performed in a country or private residential building.
In addition, a wood sander is simply an indispensable tool for craftsmen who work with wooden surfaces and workpieces.
In addition, when choosing equipment, you need to pay attention to such an indicator as the grain size of the abrasive belt. In order to be able to perform different types of work, experts recommend that when buying a machine, take several types of tape with different grain sizes at once.
Vibrating
The design of this type of equipment consists of a body and an abrasive element, which is secured using durable clamps.
Grinding occurs as a result of frequent oscillatory movement of the working tool.
The master can set the amplitude of movement independently in manual mode.
This indicator ranges from 1 to 5 mm.
The smaller the amplitude, the more accurate and finer the working surface will be processed.
Delta sander
A distinctive feature of this is the presence in its design of a working sole, the shape of which resembles an iron. Using this equipment, the master has the opportunity to work with all types of surfaces.
Different machine models have different operating speeds. The popularity of such a tool among buyers is significantly increased by the fact that its working surface can be rotated in different directions as needed, as well as different attachments can be replaced. Thanks to this, the use of equipment increases several times.
Eccentric
The main difference between this type of tool and others is that it is intended for performing jewelry processing of the working surface. The abrasive surface has a round shape.
The master can independently choose the degree of surface grain. The subtlety of the work performed depends on this indicator. The sole of the equipment is equipped with small holes through which dust is removed.
Thanks to this, working with such a tool ensures the safety of the master. It is also of great importance that the master can choose the speed at which the sole of the machine with the abrasive surface attached to it will rotate.
Assembly technology
Our belt sanding machine was designed for DIY production, so ready-made drawings and instructions for its installation simply do not exist. There is only a hand-drawn sketch with notes on which the main dimensions are indicated. Therefore, the exact position of some components and the holes for their fastening will have to be clarified during the assembly process (the design of our homemade grinder allows this).
The assembly procedure for a tape machine with a three-roller kinematic diagram:
1. Place the support on a flat surface and attach the stand to it with countersunk screws (hereinafter, use screw washers for threaded connections).
2. Install a grinder into the hole in the bottom of the stand. Make a backing from wood or plywood to rigidly fasten its body to the surface of the machine support, and then drill two holes in place: for an M8 screw (screwed into the threaded hole for the handle of the grinder) and under an M8 through screw to fasten the backing to the support. Attach the plastic body of the angle grinder to the lining with a clamp.
3. Check and adjust the horizontality of the angle grinder spindle, and then secure the drive pulley to it with a long nut.
4. Attach the tension roller to the rocker arm. Align the rocker arm to make sure its axes are parallel and the planes of rotation of all three elements coincide, and then secure it to the base and connect it with a bar to the stand. Weld the handle and install the tension spring.
5. Determine the exact installation location of the driven roller based on the length of the sanding belt 1210 mm (the tension roller should be closer to the front position). Drill a hole for the driven roller shaft, install it and check that the plane of rotation coincides with the drive pulley.
6. Attach the support of the band frame to the installation site and check it for turning on, off and adjusting the speed.
7. Place the suspended sanding belt on the top roller and drive pulley, and then tighten it using the tension roller.
8. Check the machine first at idle, and then at different speeds when processing wood and metal.
Attaching the stand and tension arm to the machine support can (and is probably better) done by welding. Screw connections are provided to allow for complete disassembly.
Recommendations, errors
When making a belt sander on your own, you can choose different workspace layouts and kinematic configurations. To make such a machine, you do not need to develop working drawings (a sketch with dimensions is enough), and no instructions are required to operate it. However, some design and operational features of the machines are common to all models, so it is necessary to dwell on them in more detail.
The design of the belt grinding machine should provide for the parallelism of the axes of the rotating elements and maximum vertical coincidence of their working planes during the assembly process. Significant deviations in these parameters can cause the sanding belt to come off under load. It is also important to observe the recommended grinding speeds for individual materials (wood, metals, plastics), which are determined by the diameter of the drive roller and depend on the drive speed. Other points to pay attention to are the quality of fit of the driven roller bearings and the need to maintain the shape of the tension roller.
Probably the most common mistake when designing a homemade tape machine (besides non-parallel axes and mismatched planes of rotation) is insufficient travel of the pressure roller. The fact is that sanding belts can stretch by 10-15% during operation, which must be taken into account when designing the tension mechanism.
How to glue sanding grinder tape yourself
Belt grinders contain a spring, which performs a very important function: it tensions the belt that has sagged due to wear. The belt is changed several times even when processing a small workpiece. This should be remembered.
When assembling a grinder with your own hands from plywood or metal, you can make an abrasive strip yourself. Gluing such tape is a complex undertaking that does not tolerate mistakes. There is a lot of advice on the Internet on how to properly glue tape, but many of them are incorrect.
The gluing process is as follows. First you need to select a fabric-based sanding material. Then you should prepare both ends of the abrasive strip. To do this, they are cleaned. The seam on the strip is made exclusively using the butt method. Experts definitely recommend reinforcing the glued tape from the inside with a thick strip of fabric, which is fixed with a special adhesive composition.
Gluing tape is a complex process that does not tolerate mistakes.
On a note! Under no circumstances should you use Moment glue to glue the tape.
In order to connect the ends of the abrasive strip, you need to purchase a special adhesive composition. The best option is to use elastic glue. There is no point in saving money, since cheap products, as a rule, are not of good quality.
Before gluing, it is necessary to prepare a strip for sanding tape. A do-it-yourself grinder (from scrap materials) needs a reliable abrasive strip, which is difficult to do at home. The process is carried out using a glue stick, which is installed on hot-melt guns. First, the composition is heated. To do this, you can use a regular hairdryer, which is found in every home.
Do-it-yourself belt sanding machine: operating principle
A distinctive feature of this device is that it has a simple design that anyone can replicate at home. This grinding unit includes an electric motor, rollers and the working tool itself – a belt with an abrasive coating. The strip may have different grain sizes. This indicator is selected in accordance with the purpose of the instrument.
The grinder, unlike the usual stationary machine, is a more versatile tool.
When assembling a grinder with your own hands at home, you should prepare and study the principle of its operation. When the unit is turned on, the engine starts. It has a shaft that connects to the main (drive) roller. The roller begins to rotate around its axis, acting through the abrasive belt on the secondary (driven) rollers.
Sanding is quite simple when the device is turned on. To do this, you need to attach the workpiece to a moving abrasive belt. During work, you need to focus on the position of the working strip.
A self-made grinding machine will allow you to process workpieces made of different materials. Such a unit has the ability to eliminate defects on the surface of metal, wood, and glass. Using grinders, rollers are often adjusted, which makes it possible to process defects of different depths.
It is worth remembering that with prolonged use, the sanding strip wears out, which leads to its stretching. In such units this problem is solved very simply. One of the device's rollers contains a special mechanism that allows you to tension the tape. Most often, such a device is installed on a roller located between the main and secondary roller of the device.
A grinder can easily remove rust from the surface and sharpen a knife.
Homemade wood sanders
All materials in any production, in addition to manufacturing, require additional and finishing processing. Vivid examples of such treatments include grinding and polishing the product. These two types of mechanical action on the surface of the part bring its appearance to perfection.
However, everyone knows that performing these operations by hand will take a lot of time and effort, and even processing can only be ensured by a very experienced craftsman. To facilitate this kind of work, people have come up with various devices and mechanisms to help them.
Some of them will be discussed further.
General purpose and types of machines
The machine is intended for final processing of parts and workpieces made of different materials by exposing them to an abrasive or diamond-coated surface. The machine, its component mechanisms and devices make it possible to maintain the accuracy of size and shape, and also ensure the creation of an ideal surface for a part or workpiece.
Using the machine, you can process flat parts, surfaces outside and inside, parts of various geometric shapes, grind or polish threads and gear teeth. According to their characteristics, grinding machines are divided into:
- Cylindrical grinders.
- Internal grinding.
- Centerless grinding.
- Surface grinding.
- Special machines (for grinding threads, gears).
Making a grinder from a drill
To turn an ordinary household electric drill into a grinding machine, you need to equip it with a special attachment - a working drum or a special support plate, depending on the task at hand.
The support or sanding pad is a plastic or rubber base with sandpaper glued on and a shank for clamping into the drill chuck. Discs with a flexible shaft are suitable for working with a loose drill, while those with a rigid shaft are best used only for a well-secured drill.
Sanding drums for a household drill are structurally a regular cylinder, a shank and sandpaper glued to the cylinder. When using drums, the working surface of the grinder is parallel to the axis of rotation.
The basic structure of a grinding machine
Without thorough knowledge of the design of grinding machines, it is impossible to assemble a high-quality device with your own hands. Before moving on to the structure, let's get acquainted with the most common types of grinders:
- Corner. Simply put, Bulgarian. Consumables are discs. Grinding wheels are designed for surface grinding. Pressure adjustment is carried out manually.
- Tape. Surface treatment is carried out with a sanding belt. Suitable for working on flat surfaces only.
- Delta sander. For processing products with a curved structure.
- Vibrating. Ideal for finishing smooth surfaces.
In addition to the above, there are several more devices that are less common:
Regardless of whether the device is factory-made or self-assembled, the main design elements are:
- Drive unit. The performance of the device depends on its power. Do-it-yourself devices use an electric drive, but there are pneumatic homemade ones powered by a compressor.
- Gearbox. Transmits torque from the drive to the working tool. The basic part of the gearbox is the spindle.
The gearbox is an integral part of tools such as an angle grinder or a drill. Some models, especially those assembled with your own hands, can do without it.
- Working platform. An abrasive material is attached to it. For this you can use circles, tapes, disks.
- Frame. Protects the structure from mechanical damage and dust, which is why many factory models are equipped with dust collection systems. The materials used to make a device with your own hands, as a rule, are not able to compete with high-quality polymers that are used in the production of professional tools.
- Control system. Includes turning off the power, as well as adjusting the abrasive speed.
Materials you will need:
- nut M12 extended;
- a piece of wood, a block of thickness corresponding to the width of the tape;
- two-component epoxy adhesive;
- wide metal strip with a thickness of 5 mm;
- steel corner 50 x 50 mm;
- M6 bolts;
- M10 bolts;
- M10 nuts;
- bearings 3-4 pcs;
- spring.
The following photo shows the process of making a homemade grinder.
First, you need to make a drive roller to rotate the belt. It can be drilled with a crown with a diameter of 40-50 mm from a block or board.
Please note that the width of the roller must be equal to or greater than the width of the tape. On one side, its central hole needs to be drilled out and pressed into it with epoxy glue and an elongated M14 nut.
When the glue hardens, the roller is installed on the angle grinder shaft. Next, you need to turn on the angle grinder and grind the roller, pressing it against the sandpaper. You need to give it a barrel shape, slightly pressing the edges and leaving the central diameter. In this case, the tape will then fly off.
The grinder frame is cut out of a strip or steel plate. Its dimensions will depend on the length of the selected sanding belt standard.
In the frame, drill a hole with a diameter of 40-45 mm. The grinder gearbox will be inserted into it and the shaft will be removed.
4 mounting holes and 2 grooves on the side are made in the frame so that when docking it does not interfere with the screws that press the gearbox to the angle grinder body.
The stand can be made from two corners. You need to make holes in the corners at the bottom of the stand to screw the machine to the table. Having secured the frame, you can try on the angle grinder, but the standard screws on its gearbox need to be replaced with elongated ones.
Let's make a lever for tensioning the tape. In the center, the lever is attached to the frame with an M10 bolt and nut.
A second M10 bolt is placed at the end of the lever, pressing 3-4 bearings. It is necessary that the width of the bearing group corresponds to the width of the tape. They will perform the function of a driven tension roller.
We install the spring for the sanding belt tension mechanism.
An adjustable stop plate is cut from the corner, as in the photo. It should have a groove to allow it to change position when clamped.
Also, a working platform is made from a steel plate and a small corner. You also need to make a groove in its corner to be able to adjust the position.
The stop and working platform are screwed to the frame with M6 bolts. After tensioning the sanding belt, the machine can be used for its intended purpose. It can perform absolutely the same tasks as a factory grinder. When not needed, the machine can be disassembled and folded compactly. The angle grinder used with it is not subject to design changes, so it can still be used for its main purpose.
The manufacturing process of the grinding machine is also shown in this video:
Machine device
The supporting structure of the tape machine consists of a vertical stand and support. The first is a metal strip, the lower part of which is bent at an angle of 90º, and the second is a rectangular sheet of thick metal. The bent part of the rack acts as its supporting platform, with the help of which it is attached to the front edge of the support. A drive is mounted on the support plane, the role of which is an angle grinder (grinder), connected from the mains via a speed controller.
A drive pulley in the form of a metal roller is attached to the grinder spindle on a thread, which sets the movement of the sanding belt. The driven roller is installed on the top of the rack. Behind it there is a T-shaped rocker arm, which is fixed at the lower end to the support and connected by a cross member to the stand. At the near end of the rocker there is a tension roller, and a spring is attached to the far end, providing tension on the belt.
Rotating elements
The most important and complex component of any belt sander is the system of rollers along which the belt moves at high speed. The size of the drive pulley determines the linear speed of movement, so its diameter must be determined by calculation.
The linear speed of the belt is calculated by the formula: V = (π × D × N) / 1000 × 60, where V is the speed (m/sec), D is the drive pulley diameter (mm), N is the number of drive revolutions (rpm) . Accordingly, the diameter is determined by the formula: D = V × 1000 × 60 / π × N (mm).
Recommended processing speeds for materials vary:
- wood - approximately 25 m/sec;
- steel - 25-30 m/sec;
- plastics (depending on type) - 10÷30 m/sec;
- titanium - 15 m/sec.
Since the main materials processed in a home workshop are steel, wood and plastic, the calculation will be based on a limit of 26 m/sec. The maximum spindle speed of our angle grinder is 11,000 rpm, so the calculated diameter will be 45 mm.
Many people try to make rotating elements themselves from chipboard, plywood or plastic, or select them from the availability of used tension rollers in auto repair shops. But since a specific diameter was chosen, and you want to make a belt grinding machine with your own hands with the specified parameters, it is best to order these products from a qualified turner.
All three rotating elements have the same diameter of 45 mm, but a different design:
- Drive pulley. Cylindrical in shape with edges at the edges to prevent the tape from coming off. The glass is machined inside to a depth sufficient for attaching it to the threaded end of the spindle with a long M14 nut. The total width of the working surface is 60 mm, the side is 1 mm.
- Driven roller. The outer surface is the same as that of the drive pulley. Rotates on two bearings, flush on both sides. A bolt with a diameter of 8 mm with a short end thread protruding beyond its overall dimensions is used as a shaft.
- Tension roller. The shaft and bearings are the same as the driven roller. The outer surface is barrel-shaped, without sides, 60 mm wide.
All three products are best tested and assembled where they were made. Experienced craftsmen will certainly help you seat the bearings correctly and correct possible defects. In addition, the workshop must make a hole in the bottom of the rack with a diameter of 42 mm to install the drive.
Structural elements and components
All other structural elements can be made independently or purchased at hardware stores and metal depots. To assemble a belt sanding machine with your own hands you need:
- Rotating elements. Described above.
- Bulgarian. For example, a Hitachi g12 sr2 manual angle grinder with 11,000 rpm and a power of 650 W. Connects to the mains via a power regulator.
- Base. A sheet of metal 10 mm thick, measuring 30 x 40 cm. 10 mm holes are drilled along the edges to attach it to the workbench. Two holes for screws are hidden in the place where the rack is installed and another one is located where the drive is fixed.
- Rack. The plate is 8 mm thick and 8 cm wide. The bottom is bent at a right angle (4 cm shelf) for installation on a support. The height from the fold to the upper end is 65 cm. In the lower part there is a hole for the drive, and in the upper part for attaching the driven roller. At a height of 20 cm from the bend there is a hole for attaching the connecting strip of the rocker arm.
- Tension roller rocker arm. It consists of a stand (thickness - 8 mm, width - 3 cm, height - 25 cm) and an asymmetric crossbar attached to its upper end (through a bushing with a bolt). A hole is drilled at both ends of the latter: on the long end for installing the tension roller, and on the short end for attaching the tension spring.
- Hardware and other materials. Screws, bolts, nuts, grommets and bushings required for assembly, as well as wooden pads and a clamp for attaching the angle grinder to the support.
The list does not include materials for the work table, which is mounted in front of the fully assembled sander. It must be manufactured individually depending on the installation location.
Rollers
The roller must be equipped with bearing seats and have a hollow design necessary to reduce weight. It is worth noting that after belt grinding machine is assembled, all the rollers must be on the same mowing line; failure to comply with this rule will lead to frequent jumping of the abrasive element.
The width of the rollers can be different; it is selected depending on the size of the abrasive tape, which can be purchased ready-made or glued yourself. Before starting to manufacture the rollers, it is necessary to draw up a drawing, and the products should ultimately acquire a barrel-shaped shape, which is necessary to prevent the tape from sliding off the surface during operation.
There should be no roughness or burrs on the outside of the rollers. It is not recommended to use open type bearings, as they will quickly fail due to the large amount of dust generated during processing. The best option would be high-quality parts manufactured by reputable companies, since the rollers have fairly high speeds, especially for smaller parts.
Motor and polishing discs
Remember that the functional parameters of such a homemade grinding machine are determined by the individual parts from which it is assembled. In this regard, you should use an electric motor from a fan, since the motor from a computer has less power, which may not be enough for some types of work. In addition, sanding discs made of sandpaper are not optimal devices of this type. Instead, you can purchase branded circles of small diameter, for example, for a drill.
You can create a more powerful stationary version of the grinding machine with your own hands. You can use a washing machine motor for it and equip it with large diameter grinding wheels. In addition to polishing discs, such a device can be equipped with sharpening and abrasive discs.
The simplest polishing machine
The easiest way to make your own is a polishing machine designed to work with grinding discs. To create this device you will need the following main parts:
The electric motor can be removed from various electrical tools and appliances. For example, components of a computer power supply or disk drive are suitable.
You can also use an electric motor from a fan, and a household battery is suitable to drive the electric motor.
In addition to the above components, you will need a board, which needs to be sanded with sandpaper. Next, the battery and electric motor are secured to the board with screws and connected with wires. It is also necessary to install a switch in this electrical circuit, securing it to the board. The wires should be secured with a stapler to prevent loosening.
The working element of the grinding machine of the design under consideration is represented by a circle. You can use branded products, or you can make your own sanding disc from sandpaper. To do this, you need to cut two sectors from a fragment of the source material and fasten them together with their back sides, gluing them together.
To ensure the drive of the abrasive disk from the axis of the electric motor, two bushings will be required. The diameter of these devices is determined based on the corresponding parameter of the motor axis. It should be taken into account that different electric motors have axles of different diameters. The considered grinding machine can be used for processing both wooden and metal surfaces, including during body work.
Grinding machines - types and features of units
There are 3 types of grinders, which differ in specialization and functionality:
- use tape to remove large layers from large areas;
- surface grinders are used for finishing;
- eccentric ones work on the verge of polishing.
Many craftsmen who are professional grinders have the entire set of these tools in their arsenal. The vast majority of devices operate on 220 V. They are heavy and overheat. A pneumatic machine is lighter than an electric machine, but requires a source of compressed air. Such units are produced by a few companies, the most famous being Bosch.
Tape machines are “tanks” among similar devices
Such a grinding unit, with its working body in the form of an endless ring, resembles a tracked machine, and is also similar in shape. It is relatively powerful, its design is simple but reliable. From the engine, the sanding belt is driven through a gearbox and V-belt drive.
Works with all kinds of materials: wood, metal, polymers, minerals. Removes a few millimeters from the plane, makes curves and edges. The quality is not the best - an orbital (eccentric) or surface (vibratory) sander is required for finishing.
Performance directly depends on motor power. LSMs have motors of 0.5–1.2 kW. Another important indicator in the technical characteristics of these units is speed. A fast device will do more, but it will not be possible to press it due to the high torque. In addition, in this case there is not enough power. Responsible manufacturers have the most balanced indicators; the capabilities are often regulated by electronics.
Fast devices are usually low-power. If they are given more power, it will be difficult to operate, the cost will increase significantly, and if used inappropriately, it is easy to damage the part. High-speed lightweight machines can easily process large areas in a short time. If the upcoming load on the grinder is unknown, professionals recommend choosing a lower speed for home use that can be pressed down (the usual range of devices is 150–550 m/min). Even more convenient is a tape option with a pre-set speed mode, for example, Dewalt DW433.
Surface grinding units - the importance of the platform in the design
The devices occupy an intermediate place between belt and orbital tools in terms of processing purity. They are popular because of their affordable cost, the availability of additional equipment, and the ability to finish quite large areas, including corners. The motor is usually 150–300 W, but there is enough power.
The main thing in such an ESM is the plate moving in the forward-reverse direction with a high frequency. Key Features:
- The amplitude of the sole stroke, which is mainly 1–3 mm. There are models where it reaches 5–6 mm. Increasing the indicator leads to faster processing, but of lower quality.
- Platform stroke frequency. A thicker layer is removed at high rates, but when they are lower, grinding is more precise. Some devices, for example, Bosch GSS AEL-BOXX, have a speed of 20 thousand strokes per minute.
- Plate material and dimensions. According to the latter indicator, there are standard and mini (100 mm2). Budget models have a steel or plastic platform. Better made of porous polymer with low vibration.
Emery is attached differently. Velcro is more convenient, but they are more expensive. Spring-loaded clamps are more complex, but you can use paper cut by yourself.
Eccentric (orbital) machines – a guarantee of high-quality processing
They work both with a flat surface and with a profile, volumetric, curved, except for angular ones. The design is similar to the PShM, but the plate moves not only along the axis, but also orbitally with a slight amplitude, which is set by the eccentric. Complex movement and high speed ensure high-quality surface processing. Motors are usually 200–900 W: the more powerful, the greater the sole pull.
The speeds (amplitude and orbital) are also different. The same rule applies here as for other types of units: higher speed means more processing area per unit of time, but worse quality. The eccentric grinder is rich in electronics, which are used to perform various functions: frequency support, brake, limiting starting currents.
What is necessary?
So, before you start making a belt sander from an angle grinder, you need to prepare all the component materials and tools. For this you will need:
- the grinder itself, which is the basis of the future device;
- bolts and nuts;
- Sheet steel;
- springs;
- square tubes.
Among the tools you will need:
- a vice on which most of the operations in the manufacture of the grinder will be carried out;
- drill;
- hammer;
- welding;
- set of wrenches;
- roulette.