The cordless screwdriver was created primarily for mobility. It is much more convenient to work with a tool without thinking about whether the wire is long enough, whether it is caught, etc.
But without batteries, such a convenient tool as a screwdriver becomes a simple piece of hardware, although it is fully functional. The battery life is approximately 3 years, and it is often impossible to find complete or similar ones on sale. For example, the manufacturer has already stopped producing this model, and other batteries are not suitable for various parameters.
It can be a shame to throw away an instrument for which you once paid money, sometimes quite a considerable amount. In addition, the cost of batteries is often up to 80% of the price of a screwdriver, and it would be wiser to buy a new tool. As a rule, the old tool is sent to a distant shelf and lies there useless. But there is a way to restore its functionality - convert it to power from a 220-volt electrical network.
Converting an 18 V Screwdriver to Mains Power
How to convert a cordless screwdriver into a corded one - options for craftsmen
When the batteries stop working, some people wonder how to convert a cordless screwdriver into a corded one. It is impossible to repair batteries with damaged elements.
The price of new power supplies is almost equal to the cost of a screwdriver. It is rarely possible to find suitable elements; models are often discontinued.
But for caring and experienced owners, of course, the solution is to power the screwdriver from the network.
The converted instrument has one drawback: it is tied to an outlet. However, for indoor work this is not so significant. But there are more than just advantages. Now there will be no hassle about recharging the battery, there will be no downtime in the work. The current strength always remains measured and does not depend on the discharge of the battery, this means that the torque is always constant.
While you go looking for a power supply unit (hereinafter referred to as PSU), study the characteristics of the screwdriver, which are indicated on the case or in the passport. Look at the tension. A 12-volt tool is more common; finding a power supply for it will not be difficult.
If the tension is not easy, the search will certainly drag on. You need to know the current consumption, which is not indicated in the technical specifications. The purchased unit must produce an average current value (between the battery capacity and the standard charger). The data is obtained from the markings.
There are two main options for converting a 220-volt cordless screwdriver. The first is the process of using an external power supply.
Any rectifier capable of delivering the required constant voltage will do. Even if it is big and massive, there is no obstacle. After all, you don’t need to carry it around the room.
The block is installed near the outlet, and the cord to the instrument is made to the required length.
Remember that as the voltage decreases, the current increases if the power remains constant. This means that the cross-section of the low-voltage cord must be made more simple than from a 220 V network.
The second option is that the power supply is mounted in a housing from the battery. The only obstacle in the process of choosing such a method is usually the size of the transformer.
Mobility is maintained, the radius of use depends on the length of the power cord.
It is important to remember that the instrument is supplied with power , so the cord is reliable, and the input itself is made neatly and painstakingly insulated.
For an external source, available power supplies are used:
- charger
for car batteries; - PSU from an old computer;
- laptop charging;
- homemade power supply.
Converting a screwdriver to a network one
In the trade, of course, it’s cheap to buy an old charger. Nowadays, pulse chargers are mainly used, and old devices are often sold as unnecessary.
This particular charger, with the ability to manually adjust voltage and current, is perfectly suitable for any screwdriver, regardless of its operating voltage.
The whole modification consists of connecting a low-voltage cord to the output contacts of the charger.
The computer power supply is purchased from older models; it may have a shutdown button. It will not be useful, but this is exactly the version of the AT format that is needed.
On the radio market, a unit with a power of 300–350 watts is selected, which will ensure reliable operation of low- and medium-power screwdrivers. What remains for our client to do is the technical properties are indicated on the sticker on the case. The unit has a cooling fan and overload protection.
To convert a computer power supply at home into an external one for a screwdriver, we perform simple operations:
- disassemble the body;
- on the large square connector we find a greenish wire and at least some dark one;
- we connect both wires to each other and insulate them;
- on the other smallest connector we remove the wires to our client, leaving yellowish and dark;
- We solder a low voltage cable cord into the apartment.
To maintain polarity, you need to know: the yellowish wire is positive, the dark wire is negative. The tool operates with a voltage of up to 14 Volts from a computer power supply.
We power the screwdriver 18V from an ATX power supply
We power the screwdriver 18V
from an ATX
power supply
. I offer it to all owners of screwdrivers, usually those that have come out.
Converting a cordless screwdriver to a 220V network in homemade conditions
power unit
for
alteration
. AUTO ELECTRONICS-HERE-KITS.
Most laptop chargers have properties that allow them to be used as a power source for a screwdriver
. Chargers with an output voltage of 12–19 Volts are suitable. The only configurations that will need to be made are related to the output plug. It should be cut off, the wires should be stripped, and a cable of suitable length should be soldered into this list.
Persons who have an understanding of electrical engineering can make a homemade power supply. Its circuit is quite ordinary and includes a step-down transformer, a diode rectifier and two capacitors.
Our client is left with the parts they buy, as they call it, taken from old radio equipment. A transformer from a tube TV with an output of 24–30 V is suitable. The presence of a rectifying diode bridge is a must.
The capacitors used are not in short supply, from old equipment: one is 0.1 µF and the other is electrolytic at 4700 µF.
Attention! The structure must be enclosed in a housing. To protect against short circuits, it is imperative to install fuses at the input and output.
The mains power supply for the screwdriver is, of course, placed in the battery housing, as it is also called in the handle. Possible options:
- any PSU suitable in terms of features and size;
- Chinese 24 V power supply;
- homemade.
A power supply with suitable parameters is selected on the radio market. At home, you should carefully remove it from the case and place it in your own screwdriver, firmly securing it; all that remains for our client to do is to make the components.
If the wires are short, lengthen them so that they do not touch the iron parts. Place the transformer and the board separately. For better cooling, install additional radiators on the microcircuits.
It would also be a good idea to have holes in the housing to allow air to circulate and heat to be removed during operation.
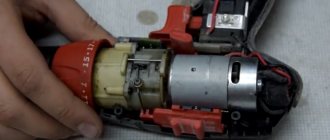
Converting a cordless screwdriver to a corded one
In a radio parts store we buy a 24 V power supply, current 9 A. Screwdrivers operate on 12 or 18 Volts, so the task is to reduce the voltage to the required level.
To perform such work, little knowledge of radio engineering is required. The output voltage is maintained by resistor R10 with a nominal value of 2320 Ohms. Instead, you should install a 10 kOhm trimmer resistor.
How to configure the power supply is described below:
- remove the permanent resistor;
- set the resistance of the trimming resistor to 2300 Ohms for the device;
- solder the tuning resistor to the unchanged area;
- With the power supply turned on, adjust the voltage.
The design of a homemade power supply will be based on a 60 W Feron or Taschibra electrical transformer. You can buy them at an electrical goods store; they are designed for halogen lamps.
They do not require any modification. The removal of the secondary winding from the middle point made it possible to use two Schottky diodes instead of the usual 4. The operation of the power supply is controlled by the HL1 LED.
The diagram shows our client the necessary details.
Transformer T1 is wound independently. A non-scarce ferrite ring NM2000 with dimensions 28×16×9 is used. Before winding, the corners are cleaned with a file, and the ring is wrapped with FUM tape. The manufactured block is installed on a 3 mm wide duralumin plate and not simply placed in the battery housing. It also performs the common wire function.
Operational reliability and safety depend on the reliability of the installation of the electronic part. A soft multi-core cable is used as a network and low-voltage cable. If the device is outdoor, the ends of the cable should be connected to its terminals.
We treat copper wiring and brass contacts with soldering acid, then they are simply soldered. Almost often special clips are used - alligator clips.
In the screwdriver itself, there is no way to do without soldering; the crocodiles do not hold so well that the contacts do not become disconnected during operation.
Making battery-based power supply
The best option is to use an old battery case. It is disassembled and the entire interior is removed. In this case, harmful substances are released, take care to protect the respiratory tract and skin. The body is washed with soda, running water and dried. On the inside of the contacts, solder the ends of the cable, observing polarity.
So as not to guess, we temporarily connect the cable, turn on the screwdriver and see in which direction the spindle turns, mark the wires. We make a hole in the bottom of the case and pass the wires through. Inside the case, the cord should be firmly fixed by wrapping insulating tape there. This thickening will prevent the wiring from stretching and breaking.
Then we solder the ends to the contacts.
We place a counterweight inside the body. The best material would be compressed rubber. It has the necessary features: the highest density, insulating qualities. So that the rubber does not dangle inside, we cut it out with a small overlap. To place the counterweight in the body, we bend the material a little and place it so that it will not oscillate and will serve as additional insulation.
To some of you, the counterweight may seem unnecessary, but not to that extent. The design of the screwdriver provides that the center of mass is in the handle. This loads the arm, but relieves the hand. When batteries are removed from the body, the center of mass shifts, increasing the load on the hand. Work becomes awkward and difficult. A homemade counterweight restores the center of mass close to the factory one.
Have you seen how easy it is to recycle a cordless screwdriver
online. The practice of craftsmen gave a hint of ordinary and useful tips for operation:
- after 20 minutes of work, you should give the screwdriver a five-minute rest;
- Fix the electronic cable on your hand so that it does not interfere with work;
- The power supply should be frequently cleaned of dust;
- do not use extension cords to connect the power supply to the network;
- The power supply must be grounded;
- It is prohibited to use corded screwdrivers when working at heights.
Compliance with these rules will extend the life of the refreshed instrument. Mobility has been lost a little, but the unit does not require recharging and works smoothly and confidently.
Source: https://vdiweb.ru/peredelka-shurupoverta-18-v-na-setevoe-pitanie/
Glamorous trees for boudoir
The next year of the white metal Ox means decoration in white and pastel colors. Nothing red or flashy!
PHOTO: YouTube.com For a glamorous decoration, you will need ready-made Christmas trees from Fix Price, which consist of a conical frame and tinsel, as well as a feather and fluff boa, which can be found in the same store
The bright tinsel will have to be removed - you only need a cone. And then it’s a matter of literally a few seconds: wrap the cone with a lady’s jewelry and secure the ends.
PHOTO: YouTube.com Window sill, mantelpiece, festive table, table in the bedroom - this decor will look unusually gentle and simply chic everywhereDIY switching power supply for 18 V screwdriver
The weakest point in household screwdrivers is the battery. Like any galvanic element, it has its own service life. The battery for a screwdriver lasts on average 3–4 years, no more, and then must be disposed of. By the way, claims that with proper care and maintenance it will last 10 years are clearly exaggerated.
How to give a screwdriver a second life if the battery has failed?
Switching power supply for 18 V screwdriver: diagram
There is a way out, and there is more than one. You can purchase a new battery. But the price of such a device may exceed the cost of the entire instrument purchased several years ago. Therefore, the most acceptable solution would be to convert the screwdriver to mains voltage.
Options for connecting a screwdriver to a 220 V network
One solution would be to create a power supply yourself. There are many options for creating a homemade power supply:
- universal option;
- with a two-pole resistor;
- with three-pole resistor;
- with amplifier;
- with and without zener diode;
- on one filter.
However, they have proven themselves to be the most reliable pulse modifications.
Component elements of the switching power supply circuit
Making a switching power supply for an 18 V hand tool with your own hands is not at all difficult. For this you will need:
- Output capacitor 5 pF.
- Resistor.
- Integrated negative directivity converter.
- Comparator with two or three plates.
- Low resistance rectifier.
- Channel filters with beam adapters.
- Schematic diagram of a switching power supply.
Connecting a cordless screwdriver to a 220 V network: AC adapter
The electric drive of the screwdriver can be driven from a 220 V network by a network adapter. It can be purchased ready-made - the price allows it. You can do it yourself. The purchased adapter must be inserted into the battery housing of the screwdriver, having first removed the batteries. The only drawback is the short length of the cord.
DIY power adapter for a screwdriver: materials
If you need to make a power adapter yourself, then a laptop charger is ideal for this.
The process of converting a cordless screwdriver into a corded one is simple and does not take much time. To do this you need to have:
- Laptop charger.
- Screwdriver with used battery.
- Electrical wire.
- Electrical tape.
- Soldering iron and solder.
- Acid.
Do-it-yourself power adapter for a screwdriver: step-by-step instructions
The rework process includes the following steps:
- First you need to measure the output voltage on the device. It should be 19 V.
- After this you need to take the battery and disassemble it. If it is twisted with screws, then simply unscrew them; if it is glued, then you must first tap it with a rubber hammer. Clean the housing from dirt and prepare it for further work by drilling a hole in it for the power cable.
- Now you need to cut off the connector and strip the wires of insulation.
- The battery should not be thrown away immediately. It can serve as a counterweight for some time. The center of gravity of the screwdriver is shifted and is located in the area of the handle. When the galvanic elements are removed, its location will change, and it will be inconvenient to work with the tool.
- You need to connect an extended cable from the laptop charging to the wires coming from the battery terminals. It must first be passed through a prepared hole in the housing. The cable can be soldered or twisted and insulated with electrical tape.
- When everything is ready, you need to put everything in the case and check the polarity. After this, test the screwdriver.
Power supply for 18 V cordless screwdriver based on an electronic transformer
Another solution for converting a cordless screwdriver to a 220 V network is to use an electronic transformer.
Materials for assembling a transformer power supply
To do this you need the following details:
- Electronic transformer TOSHIBA 105 W or Kamelion 200–250 W. The latter device additionally has short circuit protection.
- Ultrafast diodes KD213 or KD 2999, KD 2997 for 10 A, 4 pcs.
- Choke from a computer power supply.
- Electrolytic capacitor 2200 mF at 25 V.
- 220 nF film capacitor at 25 V.
- Load resistor 1–2 kOhm.
Procedure for assembling a transformer power supply
- The process begins with the modification of the electronic transformer. 4 turns must be added to the secondary winding.
- After this, you can assemble the diode bridge. The circuit assembly is carried out by surface mounting or everything is placed on a printed circuit board.
- Then you need to install a choke in the circuit. A 2200 mF capacitor at 25 V is soldered behind it. This is the optimal capacitance of the device. Neither more nor less is needed.
- A film capacitor must be installed in parallel with the electrolyte. It is needed to ensure that high-frequency residues do not damage the main capacitor, but pass through the film capacitor.
- A load resistor must be installed at the output. It will provide the same voltage value, regardless of the load, and will prevent the failure of capacitors.
- After this, a capacitor must be installed in the electronic transformer to enable starting without load.
- The first time you need to turn on the power supply to the network using a 40 W test light. This is necessary to prevent a short circuit that may have occurred during rewinding of the transformer or assembly. If the lamp does not light up, then everything was done correctly.
- After this, you need to remove the control and check the block under load by connecting it to a screwdriver.
- The resulting unit can be placed in the tool's battery housing.
The reader, having familiarized himself with the information presented in this article, can give his screwdriver a second life.
To do this, it is enough to choose the most acceptable method of converting a battery tool for a 220 V network.
Source: https://pro-instrument.com/ruchnoj/shurupovyort-18-volt-ot-seti.html
Additional Information
The above-described principle of powering a screwdriver with a dead battery is far from the only one. The instructions show the simplest method. As you can see, the presence of a large external transformer spoils the entire aesthetics and practicality of the instrument, which, according to the original idea, should be mobile and lightweight.
A special board based on the IR2157 chip will help make the power supply circuit more professional. The master will only need to use a transformer winding, a capacitor and a diode bridge in the board that correspond to the parameters of a particular screwdriver.
Thanks to the compact dimensions of the board, it can be neatly placed in the battery pack case. Below is an auxiliary video, the author of which assembles a board on the IR2157 chip with his own hands, and also powers a cordless screwdriver with its help.
If you can’t assemble this board yourself, it doesn’t matter. IR2157 can be purchased at any radio market. All that remains is to modify the transformer and diode bridge with capacitor.
How to Convert a Screwdriver to Mains Power
How to convert a cordless screwdriver into a corded one in different ways
An excellent household assistant is a cordless screwdriver.
You will have the tool } myth everywhere, but it works exactly until the battery runs out, but the number of charge cycles is limited, even from idleness the battery can deteriorate.
The batteries last about three years; after that time you will have to change it. There is an option to save the tool if you convert it from a battery to a mains one; there are different methods for such conversion.
Why remake a cordless screwdriver?
Why remake a screwdriver? When does such a need arise? If you are reading this article, there is no such person who has already appreciated all the convenience of this tool. Without unnecessary wiring, do not always use it even in the most inaccessible places until the battery runs out.
This is not the first shortcoming of the screwdriver. The cheaper the tool, the faster its battery will exhaust its charging cycles. This is not the second flaw. You don’t need to realize that the manufacturer saves in exactly the same way as you do; there is nothing unusual in this matter.
You will learn how to correctly connect single-phase 220 volt electric motors using the example of motors from a washing machine.
Buying a new battery in terms of costs is actually no different from buying a screwdriver, but the solution is currently considered options for converting a screwdriver from battery to mains power
.
There are several ways to convert a screwdriver from a cordless one to a mains one:
- using a laptop charger;
- using
PC power supply - using a car battery;
- using a power supply from halogen lamps;
- using a Chinese 24V power supply board.
How to convert a cordless screwdriver to work on a 220 volt network?
Methods for converting a cordless screwdriver to work on mains power
vary in complexity. Connecting charging from a laptop requires almost no knowledge; to install a computer power supply you need to be familiar with a soldering iron, and to reconfigure a Chinese unit, a master must be able to handle measuring instruments.
Using a laptop charger
This method requires minimal technical knowledge from you. If there is a need to convert a screwdriver into a network one, an unnecessary laptop charger can help you, since it has similar characteristics and can easily be found in any home. First you need to look at the output voltage of the charger. 12-19V chargers are suitable.
The battery pack will need to be modified; to do this, you need to disassemble it and remove the failed batteries.
- Take a laptop charger.
- Cut off the connector and strip the wires of insulation.
- Take the bare wires and solder them. If this is not possible, tape them with electrical tape.
- Make a hole in the body for the wire and assemble the structure.
??How to convert a screwdriver to power from a 220 network
Corded screwdrivers
Russia
How to convert a screwdriver to a corded 220
When the batteries do not hold a charge and have exhausted their service life, and the screwdriver
still in good condition
Using an external power supply from the computer
So, you will need an AT format power supply. It is likely that you will find it at home, but you can easily purchase an old working power supply at any radio market. Its cost is unlikely to be high.
I connected the motor from the old washing machine to the emery machine via the relay from the kit, as shown in the diagram. It is very important to remember that a power supply with a power of 300–350 W and a current in a 12 V circuit of at least 16 A is suitable.
The modification steps are as follows:
- Unscrew the power supply
. Under the case you will see a fan, a board and many wires that go from the board to the connectors. - It is necessary to remove the power-on protection. To do this, you need to find the green wire on the large square connector.
- Connect the green wire to any black wire from the same connector. For convenience, you can cut it shorter and leave it inside the case. Alternatively, you can use a jumper made from a small piece of wire.
- Cut off unnecessary wires, leaving yellow and black.
- Using a piece of wire as an extension cord so that the power supply can be in a convenient place during operation, solder it to the yellow and black wires
- We attach the other end of the wire to the terminals of the empty battery compartment, as in the previous instructions.
Using a car battery
The principle of such a modification is no different from the method using charging from a laptop. Thanks to the current trends towards compact pulse charging, linear analog devices with manual control can be purchased on the car market at a very attractive price.
If the voltage on the battery changes smoothly, then it will fit absolutely any screwdriver, and the modification of such a tool is carried out as follows:
- To connect a screwdriver to a car battery, you should use inexpensive wires with a small cross-section; car cigarette lighter wires are suitable.
- On all sides of each wire, cut off the so-called “crocodiles”, and at the free end, strip the wire of insulation by 2-3 cm.
Taking a Chinese power supply board
So, we are talking about a power supply with an output voltage of 24 V and a maximum current of 9 A. Screwdrivers are usually designed for a voltage of 12 V or 18 V, so you will first have to lower the voltage to an acceptable level.
To change the output voltage, you need to make modifications to the feedback circuit. The resistor under position R10 is responsible for the output voltage. Let's look at an example of how to make a frame sawmill.
This is only an approximate diagram; depending on the required parameters and the chosen design, it may differ. Its nominal value is 2320 Ohm.
Instead of this resistor, we will install a trimming resistor, thus it will be possible to change the output voltage of the power supply to suit our needs, the value of the trimming resistor is 10 kOhm.
- Remove the permanent resistor.
If the battery is faulty: how to make an adapter for a screwdriver?
There are two ways to make an adapter: use an old battery pack, because it already has a connector that fits a screwdriver, or connect the wires directly to the handle.
Connecting the old battery pack
Connecting the old unit is done as follows:
- First you need to disassemble the battery pack; to do this, unscrew the screws as shown in the figure.
Fault prevention
Batteries are made of several elements put together, which do not fail simultaneously, but in parts. To determine the broken part of the battery, it is necessary to fully charge it and allow it to work at full power until discharged. After that, disassemble and measure the voltage of each individual element.
Parts on which the voltage will be absent or inferior to other elements must be completely replaced. Repairs are carried out using a soldering tool. All battery cells are soldered together with the same wire strip that originally connected the parts.
Ways to solve the problem
Although a tool such as a screwdriver is the most popular, not every home craftsman uses it every day. Every day the battery is subject to spontaneous discharge, as a result of which the internal structure of the product is destroyed.
After the battery does not last for several minutes, the question arises, what to do with the screwdriver now? You can buy a new battery, but first you need to find it, because you can only find the exact design of the power element from official dealers. The second option is to throw away the screwdriver and buy a new one, the cost of which is at least 2-3 thousand rubles (this is an average quality product). The third option is the simplest, but at the same time it requires effort - to convert the product to be powered by alternating voltage.
The advantages of the latter option are the following factors:
- There is no need to constantly recharge the battery, which is very annoying during the work process;
- Now the screwdriver can be stored as long as you like, without thinking that the battery spontaneously discharges every day;
- Constant torque, which will provide voltage from the mains.
Among all the advantages, there will be only one drawback, which is due to the need to connect the device to an outlet, so the product must be connected to the electrical network during operation.
The process of dismantling the battery case
Before the screwdriver is converted to lithium batteries, it is disassembled. The tool body can be connected using :
- glue;
- locking rivet devices;
- screws.
The most difficult to remake is a model with a glued body. It is carefully disassembled along the joining seams, tapping it with a hammer with a soft plastic head. If you accidentally damage the halves of the box, it will be difficult to assemble, and in the future it will be problematic to work. The case is easily disassembled, connected by latches and self-tapping jumper screws .
Precautionary measures
After remaking a screwdriver, it is important to adhere to the following precautions:
- Provide rest for the device every 20 minutes of operation, which will extend its service life;
- Do not operate the device at a height of more than 2 meters from the ground;
- Periodically clean the power supply from dust;
- Make sure that the electrical cable during operation is not pinched, strained or exposed to negative factors, which can lead to the creation of a short circuit current.
After the alteration, following the safety rules, the old screwdriver will last longer than the new two.
How much power will the PSU need?
People who decide to learn how to make a screwdriver from the network will have to deal with the required power of the power supply.
Pulse
To connect the instrument to the network, a switching power supply is often used. Calculating its power is quite simple. Most often, rechargeable models operate on batteries with a voltage of 12 V. Based on this, it turns out that during operation the device consumes at least 120 watts.
It is recommended to choose a power supply with a power reserve of about 20-30%. This way the screwdriver will be able to work normally even under maximum loads.
Transformer
Since the operating voltage of most screwdrivers is 12 V, choosing a transformer power source is quite easy. You can power an electric tool using any model with a power of about 200-300 W.
Parts and tools for conversion
To convert an existing screwdriver to lithium, you need to purchase:
- set of Li-Ion batteries;
- charge controller board (BMS):
- wires with a cross-section of at least 2.5 sq. mm (preferably in silicone insulation).
Tools you will need:
- a soldering iron with a power of at least 40 watts with a set of consumables, including acid flux;
- small plumbing tools (screwdrivers, scalpel, etc.).
The process itself is quite creative, depending on the existing initial conditions and the design of the screwdriver, so something else may be required as the alteration progresses. You need to be prepared for this.
Before converting a power tool to run on Li-Ion batteries, future operating conditions must be taken into account. Lithium-ion cells are not suitable for use in low temperature environments.
↑ Further refinement
As a load and at the same time an indication, I soldered several 12 and 26V light bulbs of low power to the output terminals of the transformer, respectively, to 5 and 12 volt ones. Here is a schematic representation of the transformer from the terminal side and a diagram. At least I have these (“pinout” can be determined by the board from which the transformer is soldered):
Rice. 4 In
- “network” winding,
Gnd
- “pigtail” coming out from the top of the transformer - the midpoint of the secondary windings.
Rice. 5
5 - volt windings are wound with double wire and paralleled on the corresponding pairs of transformer terminals. Plugged it into the network (at first in series with an incandescent lamp 220x60). All the indicator lights lit up like a Christmas tree garland! The 220×60 lamp did not even flash - it has a low-capacity electrolyte - 6.8 µF x 400 V.
After a couple of minutes, I turned it off and felt the elements, observing the main rule of an electrician - keep one hand in your pocket! – all the elements were cold! Then I increased the load - I soldered a 10 W car lamp and plugged it into the network directly - it works! Turning it off, I felt the elements - they were cold. I left it for half an hour. Transistors and trans are slightly warm. I attached small aluminum radiators to the transistors - they don’t get hot anymore. I attached a strip of electrical cardboard to one radiator - the radiator was dangerously close to the mains voltage switch.
I tried different trances (I have three of them) - the brightness of the lamps changed slightly. This is understandable - I once experimented with them using the method from the Datagor article “A new life in audio for an old computer power supply!” and discovered that the sections of the primary winding have different numbers of turns, and the difference is significant - up to 40%! Forgivable Chinese absent-mindedness...
Rice. 6
For rectification we take two ER302
from the same ATX. We solder the anodes to the 12-volt terminals of the transformer.
Rice. 7
Note.
For 12-14 volt batteries we connect to the 5 volt terminals. Next to the cathodes is an output voltage choke of the same ATX, on which only a 12-volt winding is left. Without a throttle, the screwdriver is unstable. And this chain is completed by parallel-connected electrolyte 100 μF x 63 V minus the “pigtail” of the transformer and ceramics 0.1 μF.
Rice. 8
I thought about making a scarf, but then I decided to make it into a canopy - it’s easier and more visual. The trans and throttle are attached to the bottom of the battery container, from which the batteries have been removed, with nylon ties plus hot-melt adhesive - shocks and falls are possible during operation. Yes, and vibration. We screw the energy saving board with an M3 screw with a nut and a spring washer to the bottom of the container. We fasten the radiators together with a wooden spacer with small screws. For strengthening, we wrap the ends of the spacer with a harsh thread (the thread is so terrible - it’s scary to approach!) and impregnate it with PVA.
We connect the screwdriver, observing the polarity. Turn it on - it works at both speeds! We try to stop it with our hands - the speed drops a little, but it’s impossible to stop it! We assemble and install the switch. The yellow LED is installed for... yes, I just had it! And the indication is noticeable, especially when the voltage drops under load (by the way, you can organize local lighting of the work area).
Fig 9
The voltage on the capacitors without load is about 22.5 V - the same as Ux.x. batteries from 15 batteries. We solder a 3 kOhm ballast resistor to the LED terminal and enclose it in heat shrink. We connect the LED in parallel with the capacitors.
Ready for the holiday season!
Rice. 10
PS
I have a corded screwdriver. Everything is fine, but it does not have an electric shaft brake! And this one has it!
I think a similar UPS can be attached to other devices. If you strengthen the conductors on the board and other elements (not forgetting to replace the thermistor with an ATX one), at least 200 watts can be pumped out of it.
Safety precautions when working with batteries
When assembling the battery, you should remember that the currents during operation of a screwdriver can reach 11-12 amperes, so the contact area of the connecting bars between the elements should be maximum. Therefore, the spot welding connection option, often offered on the Internet, is not the best . It is better to solder the busbars over the entire contact area of the battery. At the same time, you need to understand that the elements are very sensitive to overheating, so you need to solder quickly and confidently, using acid fluxes - battery cases are not made of copper or brass. It is advisable to use heat sinks, which can be pliers, etc.
It is necessary to ensure that splashes of acid during soldering do not fall on other surfaces, because this will subsequently lead to corrosion in these places. The ration areas must be thoroughly washed.
Why remake a cordless screwdriver?
Some people don’t understand why turn a cordless electric screwdriver into a corded one. It's actually quite simple. The fact is that you can use such a tool only until its battery runs out. After discharge, you will have to recharge the screwdriver and only then continue to use it. Many people are not satisfied with this, and they decide to start converting the tool into a network model.
This is also often done when the battery fails and stops charging. Many people don’t want to spend money on a new battery, and they decide to remake the tool so that it works from the mains.
Some useful tips
These modern batteries, due to their large capacity, slowly consume their charge. With proper use they will last at least 10 years .
An advantage of equipping a screwdriver with a lithium battery may be the ability to relatively quickly fill them with energy. This type of cell tolerates storage and operation well in a not fully charged state.
They are very sensitive to the charging process . The voltage should always be as low as possible, otherwise the lithium-ion battery will quickly fail.
You need to know how to store lithium batteries for a screwdriver, this will help:
- extend battery life;
- minimize capacity losses;
- effectively use their capabilities.
For storage, they are taken out and placed in a dry, cool place where the temperature is maintained from +1 to +25 degrees . Do not allow batteries to freeze. You can put it in a bag and in the refrigerator, but not in the freezer. The lithium battery is stored in a charged state with a state of charge of 40%. In this case, during self-discharge the voltage will not drop below 2.5 V/cell. If stored at a voltage below the threshold value of 2.5 V for 3 months or more, the capacity will drop and it will be impossible to restore, the elements will rust.