A cordless screwdriver is an indispensable tool that is often used around the house. There are situations when the device's battery fails. In this case, it is not necessary to buy a new battery. You can modify the tool to work from the mains. However, before that, you need to figure out how to make a screwdriver directly from charging.
Why remake a cordless screwdriver?
Some people don’t understand why turn a cordless electric screwdriver into a corded one. It's actually quite simple. The fact is that you can use such a tool only until its battery runs out. After discharge, you will have to recharge the screwdriver and only then continue to use it. Many people are not satisfied with this, and they decide to start converting the tool into a network model.
This is also often done when the battery fails and stops charging. Many people don’t want to spend money on a new battery, and they decide to remake the tool so that it works from the mains.
Ways to solve the problem
Although a tool such as a screwdriver is the most popular, not every home craftsman uses it every day. Every day the battery is subject to spontaneous discharge, as a result of which the internal structure of the product is destroyed.
After the battery does not last for several minutes, the question arises, what to do with the screwdriver now? You can buy a new battery, but first you need to find it, because you can only find the exact design of the power element from official dealers. The second option is to throw away the screwdriver and buy a new one, the cost of which is at least 2-3 thousand rubles (this is an average quality product). The third option is the simplest, but at the same time it requires effort - to convert the product to be powered by alternating voltage.
The advantages of the latter option are the following factors:
- There is no need to constantly recharge the battery, which is very annoying during the work process;
- Now the screwdriver can be stored as long as you like, without thinking that the battery spontaneously discharges every day;
- Constant torque, which will provide voltage from the mains.
Among all the advantages, there will be only one drawback, which is due to the need to connect the device to an outlet, so the product must be connected to the electrical network during operation.
Advantages and disadvantages of remodeling
Converting a screwdriver into a network model has a number of advantages. Among the main advantages are the following:
- no need to periodically recharge the device;
- the power of the tool will not deteriorate due to a weak battery;
- no need to change batteries.
However, this rework also has its drawbacks. The main disadvantage is that such a tool is more difficult to use in hard-to-reach places. You will have to buy a special extension cord.
Glamorous trees for boudoir
The next year of the white metal Ox means decoration in white and pastel colors. Nothing red or flashy!
PHOTO: YouTube.com For a glamorous decoration, you will need ready-made Christmas trees from Fix Price, which consist of a conical frame and tinsel, as well as a feather and fluff boa, which can be found in the same store
The bright tinsel will have to be removed - you only need a cone. And then it’s a matter of literally a few seconds: wrap the cone with a lady’s jewelry and secure the ends.
PHOTO: YouTube.com Window sill, mantelpiece, festive table, table in the bedroom - this decor will look unusually gentle and simply chic everywhereHow much power will the PSU need?
People who decide to learn how to make a screwdriver from the network will have to deal with the required power of the power supply.
Pulse
To connect the instrument to the network, a switching power supply is often used. Calculating its power is quite simple. Most often, rechargeable models operate on batteries with a voltage of 12 V. Based on this, it turns out that during operation the device consumes at least 120 watts.
It is recommended to choose a power supply with a power reserve of about 20-30%. This way the screwdriver will be able to work normally even under maximum loads.
Transformer
Since the operating voltage of most screwdrivers is 12 V, choosing a transformer power source is quite easy. You can power an electric tool using any model with a power of about 200-300 W.
How to convert a screwdriver to work from the network
You need to figure out in advance how to convert a 12-volt screwdriver to work from a 220-volt network. There are several recommendations that will help you do this correctly.
Connecting to charging
The easiest way to connect the tool to the network is to do it through the charger. This is done as follows:
- Solder the power wires to the charger.
- Disassemble the old tool battery.
- Make holes in the housing for the cable.
- Solder the wires to the power supply of the electric drive.
Using this method, you can use your laptop charger.
Connecting the unit in the housing from the battery
People who were able to find a suitable power supply can use it to connect the screwdriver to the network. Before assembling an electric screwdriver with a power supply, you need to understand the nuances of such work. This is done like this:
- Remove the old battery from the screwdriver and remove the used components from it.
- Install a new power supply into the case.
- Connect wires to the block to connect to the network.
- Install terminals.
- Assemble the housing and place it in the screwdriver.
If you use a compact power supply, you need to take care of cooling. To do this, several holes are made in the walls of the housing for air circulation.
Connection to external power supply
If you cannot install a compact power supply into the case, you will have to use an external one. To connect an electric tool to it, you must perform the following steps:
- Disassemble the screwdriver body and remake the input for connecting the power source. This is done so that you can connect the power supply.
- Connect the power supply to the device. You may need a special low voltage adapter for this.
- Launch the tool and check its functionality.
If nothing happens after starting, you need to carefully inspect the connections of the wires. Often the contacts come loose and because of this the tool does not start.
Connecting to the power supply from a computer
People who decide to remake a cordless screwdriver and connect it to the network can use a computer power supply. A model with a power of 300 W or more is suitable for this. Such devices output 16-18 A. This is quite enough for the tool to operate.
Connecting a screwdriver to a computer power supply is simple. This is done using two wires. One of them is 12 volt “plus”, and the second is ground.
Additional Information
The above-described principle of powering a screwdriver with a dead battery is far from the only one. The instructions show the simplest method. As you can see, the presence of a large external transformer spoils the entire aesthetics and practicality of the instrument, which, according to the original idea, should be mobile and lightweight.
A special board based on the IR2157 chip will help make the power supply circuit more professional. The master will only need to use a transformer winding, a capacitor and a diode bridge in the board that correspond to the parameters of a particular screwdriver.
Thanks to the compact dimensions of the board, it can be neatly placed in the battery pack case. Below is an auxiliary video, the author of which assembles a board on the IR2157 chip with his own hands, and also powers a cordless screwdriver with its help.
If you can’t assemble this board yourself, it doesn’t matter. IR2157 can be purchased at any radio market. All that remains is to modify the transformer and diode bridge with capacitor.
How to power a screwdriver while maintaining its autonomy
There are situations when you have to work outdoors or indoors where there is no electricity. In such situations, you need to power the screwdriver yourself to make it work. There are several ways to do this.
Replacing old elements
Most often, people are unable to use a cordless tool because the battery has failed. The easiest way to solve this problem is to connect a new battery. It is recommended to use the same batteries that were previously installed in the screwdriver.
Important! When replacing the battery, the polarity of the components must be observed. This will prevent a short circuit.
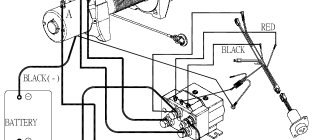
Connecting to a car battery
Another way to quickly power the tool is to use a car battery. This is done as follows:
- Take three wires from the cigarette lighter and strip them of 3-4 cm of insulation.
- Connect the wires. They are connected to the battery terminals and to the screwdriver.
- Tighten the connections with clamps or insulate with electrical tape. It is necessary to wrap them in such a way as to hide all metal parts.
After this, you need to check whether the tool works.
Connecting to an external battery
If you need to use a screwdriver, you can connect it to an external battery. A battery from any unnecessary UPS is ideal for this. To connect the instrument, do the following:
- Cut the screwdriver cable and clean the contacts on it.
- Connect the cord to the battery terminals.
- Check the connection is secure.
- Insulate connections.
After finishing work, the screwdriver must be disconnected from the battery.
↑ Further refinement
As a load and at the same time an indication, I soldered several 12 and 26V light bulbs of low power to the output terminals of the transformer, respectively, to 5 and 12 volt ones. Here is a schematic representation of the transformer from the terminal side and a diagram. At least I have these (“pinout” can be determined by the board from which the transformer is soldered):
Rice. 4 In
- “network” winding,
Gnd
- “pigtail” coming out from the top of the transformer - the midpoint of the secondary windings.
Rice. 5
5 - volt windings are wound with double wire and paralleled on the corresponding pairs of transformer terminals. Plugged it into the network (at first in series with an incandescent lamp 220x60). All the indicator lights lit up like a Christmas tree garland! The 220×60 lamp did not even flash - it has a low-capacity electrolyte - 6.8 µF x 400 V.
After a couple of minutes, I turned it off and felt the elements, observing the main rule of an electrician - keep one hand in your pocket! – all the elements were cold! Then I increased the load - I soldered a 10 W car lamp and plugged it into the network directly - it works! Turning it off, I felt the elements - they were cold. I left it for half an hour. Transistors and trans are slightly warm. I attached small aluminum radiators to the transistors - they don’t get hot anymore. I attached a strip of electrical cardboard to one radiator - the radiator was dangerously close to the mains voltage switch.
I tried different trances (I have three of them) - the brightness of the lamps changed slightly. This is understandable - I once experimented with them using the method from the Datagor article “A new life in audio for an old computer power supply!” and discovered that the sections of the primary winding have different numbers of turns, and the difference is significant - up to 40%! Forgivable Chinese absent-mindedness...
Rice. 6
For rectification we take two ER302
from the same ATX. We solder the anodes to the 12-volt terminals of the transformer.
Rice. 7
Note.
For 12-14 volt batteries we connect to the 5 volt terminals. Next to the cathodes is an output voltage choke of the same ATX, on which only a 12-volt winding is left. Without a throttle, the screwdriver is unstable. And this chain is completed by parallel-connected electrolyte 100 μF x 63 V minus the “pigtail” of the transformer and ceramics 0.1 μF.
Rice. 8
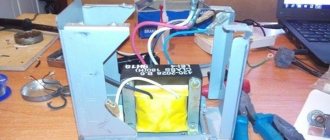
I thought about making a scarf, but then I decided to make it into a canopy - it’s easier and more visual. The trans and throttle are attached to the bottom of the battery container, from which the batteries have been removed, with nylon ties plus hot-melt adhesive - shocks and falls are possible during operation. Yes, and vibration. We screw the energy saving board with an M3 screw with a nut and a spring washer to the bottom of the container. We fasten the radiators together with a wooden spacer with small screws. For strengthening, we wrap the ends of the spacer with a harsh thread (the thread is so terrible - it’s scary to approach!) and impregnate it with PVA.
We connect the screwdriver, observing the polarity. Turn it on - it works at both speeds! We try to stop it with our hands - the speed drops a little, but it’s impossible to stop it! We assemble and install the switch. The yellow LED is installed for... yes, I just had it! And the indication is noticeable, especially when the voltage drops under load (by the way, you can organize local lighting of the work area).
Fig 9
The voltage on the capacitors without load is about 22.5 V - the same as Ux.x. batteries from 15 batteries. We solder a 3 kOhm ballast resistor to the LED terminal and enclose it in heat shrink. We connect the LED in parallel with the capacitors.
Ready for the holiday season!
Rice. 10
PS
I have a corded screwdriver. Everything is fine, but it does not have an electric shaft brake! And this one has it!
I think a similar UPS can be attached to other devices. If you strengthen the conductors on the board and other elements (not forgetting to replace the thermistor with an ATX one), at least 200 watts can be pumped out of it.
Operating rules
Before using a screwdriver, each person should familiarize themselves with the rules of its operation. There are several recommendations that must be followed:
- You only need to work in a stable position, watching the position of your arms and legs;
- if you have to screw in screws at a height, it is better to use a stepladder;
- Every half hour you need to take a break so that the instrument cools down;
- When drilling, you need to secure the workpiece so that it is stationary.
Another important rule that must be followed is regular checking of all components. Before use, you should inspect the screwdriver to ensure there is no damage.
Precautionary measures
There are several safety precautions you should be aware of before using a cordless power tool:
- The device can be stored at a temperature not lower than 0 degrees;
- Do not allow liquid to come into contact with the battery;
- The battery can only be charged at a temperature of 10-50 degrees Celsius;
- You cannot charge a damaged battery.
Quite often, owners of cordless screwdrivers are faced with situations where the battery stops working. In such cases, you will have to connect the device to the network. However, before this, you need to find out how to convert a screwdriver to power from a 220V network and what needs to be done for this.