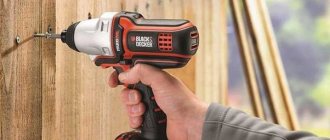
A cordless screwdriver, unlike a corded tool, allows you to work comfortably without a cable connected to the electrical network. In this case, you don’t have to worry about the cable not being long enough or getting caught on something.
But the service life of such a tool is limited and can be significantly reduced due to improper use. What to do if the screwdriver begins to quickly discharge and lose power?
You can buy another removable battery. But often, during the life of the tool, the manufacturer no longer produces this model, and it cannot be found on sale. At the same time, the prices for the battery and the new tool may be the same. This means this option is not suitable.
It is useless to contact the service center, since the service center does not repair the battery. All that remains is to try to repair the screwdriver battery yourself. As a rule, batteries produced by different manufacturers have a similar structure.
How to identify battery problems
If, when working with a screwdriver, the operating time on a single charge is significantly reduced and the power of the tool drops noticeably, the battery is faulty. You can check this by simply replacing the battery.
Of course, batteries do not last forever, and their service life is limited. The easiest option, of course, would be to buy a new battery. Or you can take a chance and restore the screwdriver battery yourself. To do this, you need to open the battery case, remove the battery and, after identifying the faulty element, replace the latter.
What other option is there to test the degree of charge besides the controller?
The screwdriver has been converted to use lithium batteries. The standard charger integrated into the case is an ideal option. However, the price of the controller is quite high. The device will cost 30, which is equivalent to the price of the battery itself.
To test the charge level of a lithium battery on the go, without using a charger, use a special indicator RC helicopter lipo battery AKKU portable voltage meter tester alarm 2-6S AOK. The price of the device is very low. It has a balancing and charging connector similar to the iMax6 device. The device is connected to the battery using an adapter. This device for monitoring voltage levels is very convenient. It can measure from 2 to 6 lithium cells connected to each other in turn, and in addition give a total indicator, that is, the voltage of each element separately with extreme accuracy.
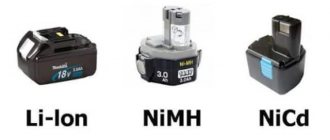
What kind of batteries are in screwdrivers?
The screwdrivers can be equipped with nickel-cadmium, nickel-metal hydride or lithium-ion batteries. As a rule, lithium-ion batteries are installed in more modern models.
These batteries are the best option for use in screwdrivers due to the following characteristics:
- ratio of capacity and dimensions;
- life time;
- no memory effect.
But along with the advantages, there are also significant disadvantages - significant temperature restrictions. Operation is not possible at low temperatures, as the batteries quickly discharge, and there is a risk of self-ignition or explosion if subjected to a sharp impact or strong heating.
Differences between nickel-cadmium and lithium-ion batteries:
- have a smaller capacity;
- greater weight;
- they are not so afraid of frost;
- upon reaching the service life limit, the electrolyte dries out;
- there is a “memory effect”. The battery capacity can sharply decrease as a result of improper use, when a not completely discharged battery is charged.
Compared to lithium-ion batteries, nickel-metal hydride batteries have:
- less pronounced “memory effect”;
- heavy weight;
- smaller capacity.
At the end of their service life, batteries of this type cannot be restored.
In principle, the design of the battery itself does not depend on the type of battery. The only difference will be in their number, since the voltage of one lithium-ion cell is from 3.6 to 3.8 V. The voltage of one nickel-cadmium battery cell is from 1.2 to 1.4 V.
In addition to the batteries, the battery case contains a protection and control circuit, a temperature sensor and a contact block.
Advantages of the second option
Option 2 is more suitable, since the voltage in the battery drops quite rapidly from the highest to the lowest (from 16.8 to 14.8 V). For an electronic motor, which, in fact, is a screwdriver, exceeding 2.4.8 V is not a critical point.
The lowest voltage indicator is for the 3S-Li-Ion modification. It is equal to 7.5 V, which is insufficient for the production activities of the electronic device. By mounting four configurations, we will increase the electronic capacity of the battery.
What tools will we need?
When restoring a battery for a screwdriver, you will need:
- screwdriver;
- multimeter;
- tin;
- special flux;
- soldering iron, preferably with a power of at least 100 W.
At the factory, spot welding is used to connect contacts with minimal heat. Therefore, high speed is required when soldering to avoid damaging the battery cell.
How much will it cost to change from Ni-Mh to a lithium device?
How much money will it require to convert a screwdriver to a lithium battery?
The cost of such a device consists of the price of several components:
- lithium -based 4S battery configuration costs RUR 2,200;
- purchasing a controller for charging and discharging plus a balancer costs 1,240 rubles;
- the price of welding and assembly is 800 rubles.
It turns out that a lithium battery made independently costs 4240 rubles.
For comparison, let's take a similar configuration from factory-produced lithium. For example, the Makita 194065-3 device is designed for a screwdriver. It has similar parameters. The price of such a device is 6500 rubles. It turns out that converting a screwdriver to lithium batteries saves 2,300 rubles.
Source
Step-by-step repair instructions
At home, you can independently revive the screwdriver battery. To do this, you need to open the battery case and replace the elements (or in other words, the cans).
How to disassemble the battery case
The battery of most screwdrivers has a collapsible housing. But some manufacturers, to prevent self-replacement of elements, make battery cases non-separable. Thus, they force the owner to purchase a new branded battery. In this case, it will be very difficult to disassemble the case without irreversible damage.
The connection of the housing parts can be done using screws, latches or glue. In the first case, you can separate the parts of the case by simply unscrewing the screws with a screwdriver.
If the body parts are glued together, you need to carefully use a knife to push the parts apart by inserting the blade into it. Then you need to wedge the joint by inserting any solid object of suitable size into the resulting gap. Then you need to move along the entire perimeter of the body. After the body is disassembled, its parts will need to be reattached with glue.
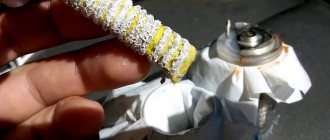
Finding faulty cells
After the case is opened, you can see that the battery cells are connected in series to each other. In order to repair a battery for a screwdriver, you will need to identify the faulty element - usually one or two elements - and replace it.
Prolonged soldering cannot be used, as the element can be damaged if it is heated. Lithium-ion batteries are especially sensitive to heat. If you have no experience soldering such batteries, you can purchase batteries with already welded contacts on AliExpress.
They write on the Internet that nickel-cadmium batteries dry out over time and the element (can) can be restored by drilling a hole in it and using a syringe to pour water inside. But this method of restoration can lead to damage to the element and even injury, so we will not consider it.
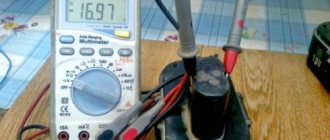
In order to find faulty cells, you need to check what voltage each battery cell produces individually.
To make accurate measurements, the battery must be fully charged.
You need to remove the contents of the case and lay out all the elements on a flat surface. It will be much easier to measure voltage if you provide free access to each contact of the battery cell.
For convenience, you should draw a diagram on a piece of paper and mark the voltage of each element on it. We measure the voltage using a multimeter, having previously selected the DC voltage measurement mode with a low measurement limit.
The voltage level for each nickel-cadmium cell should be between 1.2 and 1.4 V, and for lithium-ion cells between 3.6 and 3.8 V.
Then you should discharge the battery. To do this, you can connect a load to it. For example, a high-power incandescent lamp, or you can assemble a battery and use a screwdriver until it runs out.
After this, the battery is disassembled again and the voltage is measured. If voltage losses were previously determined on the elements, when measuring again, the multimeter readings will be even lower. It is necessary to replace elements where the difference in voltage readings will be significant: up to 0.5 or 0.7 V for cadmium and less than 2.5 volts for lithium.
Expert opinion
Alexey Bartosh
Specialist in repair and maintenance of electrical equipment and industrial electronics.
Ask a Question
If the battery is very worn out, then even after long-term charging, the voltage on some batteries will be significantly lower than on others (sometimes even close to 0 volts). They need to be changed; they are unlikely to be restored.
Selection of replacement elements
There are several ways to select Li-Ion (lithium-ion) or Ni-Cd (nickel-cadmium) battery cells for replacement. If you have several faulty batteries from one screwdriver, you can find working ones by disassembling them, or find them in electrical goods stores, or on online shopping sites, for example, on AliExpress. As a rule, manufacturers of major brands of screwdrivers use lithium battery models produced by several manufacturers.
Also on AliExpress you can buy the necessary battery cells with additional contacts already welded using resistance welding. This will greatly simplify the replacement process and reduce the likelihood of damage to the element being replaced.
Pay attention to the compliance of the technical characteristics of the replaced elements, especially capacitance and voltage.
How to solder cans to a battery
If you have experience in soldering radio components, then replacing a damaged battery (can) will not cause difficulties:
- Carefully disconnect the damaged element by cutting the connecting plate. When replacing an element, observe the polarity;
- then you need to solder the elements together. Pay attention to the heating time of the contact - it should be minimal, which is especially important for lithium-ion batteries. With prolonged contact, such an element will inevitably fail, and may also spontaneously ignite or explode. Therefore, the soldering movement must be precise and very fast;
- After all the elements are securely soldered, you need to assemble them and fasten them together with tape or insulating tape. The assembly process is similar to disassembly, but in reverse order. After assembly, the contents are placed in the housing and the lid is secured with screws or glue.
Disassembly and assembly
Converting a screwdriver to lithium batteries
includes the following steps:
- You should open the old battery by unscrewing 5 screws.
- Remove the Ni-Mh battery from the housing. It will be noticeable that the contact pad that engages with the contact group of the screwdriver is welded to the negative contact of one of the Ni-Mh cells. Weld points should be cut using a tool with a DREMEL 4000 cut-off stone built into it.
- Wires are soldered to the contacts, the cross-section of which is no less than 2.4 mm 3.5 for power terminals and 0.4 mm 2.7 for the thermistor. The contact pad is glued into the battery body using hot-melt adhesive.
- Based on the internal resistance indicator, four cells are selected on the meter. The value is the same for all 4 devices.
- Lithium cells are glued together with hot glue so that they are placed compactly in the case.
- Welding of cells is carried out on a machine for contact welding using a welding tape made of nickel (its cross-section is 2x10 mm).
Checking the battery after repair
After replacing battery elements, it is necessary to equalize the potentials of all battery elements. To do this, leave the latter to charge for a long time. Then, after charging the battery of the screwdriver, you need to leave it for about a day to recover.
You can discharge the battery by using a screwdriver until it is completely discharged or by connecting a load to it. For example, an incandescent lamp designed for the appropriate voltage. To equalize the battery charge, the charge and discharge cycle should be repeated twice.
Replacing faulty batteries
The most effective way to repair a screwdriver battery is to replace the worn elements in it that were previously identified.
To do this, you can take some of the serviceable cans from the “donor” battery or buy new ones, which can be quickly found in online stores that provide delivery of goods by mail. Ni-Cd cells with a capacity of 2000 mAh are inexpensive. The main thing when purchasing is to check that the sizes of the elements match the original ones.
Also, to connect them into a common serial circuit, you will need a soldering iron with a low-corrosive flux (alcohol flux based on rosin is better) and tin. We do not discuss the spot welding process, because few people have it at home and it is not practical to buy it for one-time repair work.
The process of replacing cans in a Ni-Cd screwdriver battery is not difficult if you have even a little experience in working with a soldering iron.
It is important to remember the following:
- When soldering with a soldering iron, you must do everything quickly, otherwise, as a result of heating, the battery may be damaged and cannot be repaired.
Can soldering process
- If it is impossible to use original plates for connection, then install copper plates of a similar cross-section. This is very important, because large currents pass through them, and if a smaller cross-section is selected, the conductive plates will become very hot, which is why the thermistor will often trigger.
- When soldering plates between batteries, it is important to maintain a serial connection: the “-” of the previous battery must be connected to the “+” of the next one, and the plus to the minus.
After soldering the plates to the elements, it is necessary to equalize the potentials on them, because they are different. The repaired battery is installed in the previously removed housing and sealed hermetically to prevent moisture from entering it.
Start of assembly
Replacing faulty batteries in a screwdriver battery involves fully charging and discharging the repaired power source three times. The first time you need to charge the restored battery overnight, then let it cool for 1 day and then measure the voltage on the batteries. If the repair work is carried out correctly, then all banks will have 1.3V.
To discharge, you will need to install the battery in the screwdriver and load it to the maximum. It is necessary to spare the screwdriver itself, otherwise it may break. Thus, we recharge it 2 more times. It is advisable to systematically remove the “memory effect” once every 3 months so that the battery lasts longer.