Instrumental search is simply enormously popular. Adults and children, amateurs and professionals are looking for it. They are looking for treasures, coins, lost things and buried scrap metal. And the main search tool is metal detector.
There are a great variety of different metal detectors to suit every taste and color. But for many people, buying a ready-made branded metal detector is simply financially expensive. And some people want to assemble a metal detector with their own hands, and some even build their own small business on their assembly.
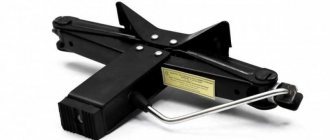
Detailed instructions for the Terminator 3 metal detector with your own hands
This type of design is designed to search for coins.
The process of assembling it is completely simple. However, experience in assembling such a tool is still necessary. The Terminator is able to detect an object even if the target of capture is minimal. To begin, you should prepare the necessary equipment, namely:
- a multimeter that measures speed.
- LC meter
- Oscilloscope.
Next, you need to find a diagram broken down into nodes. Now you can make a printed circuit board into which jumpers, resistors, panels for microcircuits and other parts should be soldered in order. The next step is to clean the board with alcohol. It is definitely worth checking for defects. You can check whether the board is in working condition as follows:
- Turn on the power.
- Turn down the sensitivity control until no sound is heard from the speaker.
- Touch the sensor connector with your fingers.
- When turned on, the LED should blink and then go out.
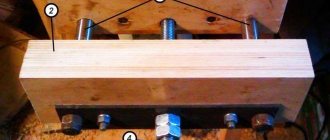
If all actions occurred, then everything was done correctly. Now you can make a coil. It is necessary to prepare a winding enamel wire with a diameter of 0.4 mm, which must be folded in half. A circle is drawn on a sheet of plywood with a diameter of 200 mm and 100 mm. Now you need to drive nails in a circle, the distance between them should be 1 cm.
Next, you can move on to winding the turns. At 200 mm you should make 30 of them, and at 100 - 48. Then the first coil should be soaked in varnish; when it dries, you can wrap it with thread. The thread can be removed, and by soldering the middle, you get a solid winding of 60 turns. Afterwards, the coil must be wrapped with electrical tape quite tightly. And a 1 cm foil is placed on top, this will be a screen, and more electrical tape is wound on top of it. The ends should come out.
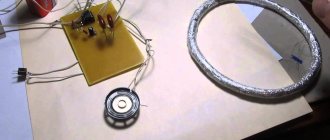
On the second coil it is also necessary to solder the middle. In order to start the generator, you need to connect the first coil to the board. The second coil should be wrapped with a wire of 20 turns, then we connect it to the board. Now you need to connect the oscilloscope minus to minus to the board, and the plus is connected to the coil. Be sure to look at what frequency it will be when you turn it on and remember it or write it down on paper.
Now the coils need to be placed in a special mold so that they can then be filled with resin. Next, the oscilloscope is connected to the board, with the negative pole, the amplitude should reach zero. The coils in the mold are filled with resin to approximately half the depth. When everything is ready, the metal discrimination scale is adjusted.
Parts list for the Terminator 3 metal detector
As parts for the trio metal detector you will need:
- Metal film capacitors;
- SMD resistors;
- Microcircuits;
- Transistors;
- Diodes.
If you have these parts, you can assemble the Terminator Pro metal detector yourself.
Circuit diagram of a metal detector with metal discrimination
You can make a metal detector with metal discrimination yourself using the circuit for the Chance pulse device. The process of making a coil is quite simple.
The diagram itself can be found on the Internet. But still, experience in assembling such devices will be useful. Assembling the metal detector should begin with the board.
After the board is manufactured, the microcontroller needs to be flashed. And at the end of the work, we connect the metal detection device to the power supply.
However, in order for the equipment to work, a coil is required. It is best if it has low parasitic capacitance. The winding enamel wire is wound onto a reel. And then you can connect it and check the functionality of the metal detector. It is imperative to make a body and a rod for it. And you can start working.
DIY metal detector without microcircuits
Homemade equipment can be made without complex microcircuits, but using a simple transistor generator. The metal detector will be non-discriminatory. It will detect objects in the ground to a depth of 20 centimeters, and in dry sand - to a depth of 30 centimeters. In this device, the transmitting and receiving coils operate simultaneously.
How to make a simple metal detector for searching on the beach
In this article I will tell you how to build a simple metal detector for searching for coins and jewelry on the beach. It consists of one chip - the NE555N timer, a coil and several other radio components.
To assemble the metal detector you will need:
- NE555N timer chip, in DIP package;
- resistor 47 kOhm;
- two capacitors 2.2 µF, 16 V;
- piece of contact breadboard;
- 9 volt battery, switch, battery socket;
- electromechanical sound emitter;
- 100 meters of copper wire with a diameter of 0.2 millimeters;
- some thick cardboard and glue.
Instead of an electromechanical sound emitter, you can use a 10 µF capacitor and any speaker with an 8 Ohm impedance, connected in series.
The idea for the metal detector was taken from the book “499 NE555 Timer Circuits.” I just added a switch between the battery and the chip, and I also use an electromechanical sound emitter from an old electronic alarm clock instead of a speaker.
Terminator 3 metal detector coil
To begin with, you should take winding enamel with a diameter of 0.4 mm. Fold it so that there are two ends and two beginnings. Next, you should wind from two reels at a time.
Now we need to make transmitting and receiving coils; for this, two circles of 200 mm and 100 mm are drawn on a plywood sheet. Nails are driven in along these circles, the distance between them should be 1 cm. 30 turns of enamel wire are wound onto a large mandrel. Then you should apply varnish to the coil and wrap it with thread, then remove it from the winding and solder the middle. This creates one middle wire and two outer wires.
The resulting coil should be wrapped with electrical tape and a piece of foil should be placed on top, and foil again on top. The ends of the windings should go outside.
Now it’s time to move on to the receiving coil. 48 turns are already wound here. To start the generator, you need to connect the transmitting coil to the board. The middle wire is connected to the negative. And the middle terminal of the take-up coil is not used. The transmitting coil requires a compensating coil, on which 20 turns are wound.
We connect the oscilloscope to the board like this: a probe with a minus to the minus of the board, and a plus probe to the coil. Be sure to measure the frequency of the coils and write it down.
After connecting the coils according to the diagram, they must be placed in a special container and filled with resin. The oscilloscope now sets the division time (10 ms and 1 volt per cell). Now you should reduce the amplitude to zero. We wind the turns until the volt value reaches zero. We make a compensating loop at the coil, which will be outside.
The mold should be filled halfway with resin. When everything hardens, you need to connect the oscilloscope and bend the loop inward. Then twist it until the amplitude value becomes minimal. Afterwards, you need to glue the loop, check the balance, and now you can fill the second half of the container with resin. The reel is ready for use.
Metal detector coil repair
Before you begin the repair, you should prepare the following tools:
- Stationery knife;
- Incandescent lamp;
- A container for glue, preferably flat;
- Special or epoxy resin;
- Medium and fine sandpaper;
- Small spatula.
First of all, you need to dry the coil using an incandescent lamp. And use a utility knife to widen the cracks on it. Squeeze the glue onto a flat surface and mix with a spatula. Apply this substance to the coil. In places of cracks, you can apply more resin. Now you should wait until it all hardens thoroughly. And then sand it, using first medium and then fine sandpaper. This procedure will help smooth out all the unevenness. In this fairly simple way, you can revive the oldest coil from a metal detecting device.
The so-called "butterfly"
This nickname was received due to the characteristic shape of the platform on which the inductors are located.
The arrangement of the elements is related to the operating principle. The circuit is made in the form of two generators operating at the same frequency. When identical coils are connected to them, an induction balance is created. As soon as a foreign object with electrical conductivity gets into the electromagnetic field, the balance of the field is destroyed.
Generators are implemented on NE555 chips. The illustration shows a typical diagram of such a device.
The coil for the metal detector (there are two of them, in the diagram: L1 and L2) is made by hand from wire with a cross section of 0.5–0.7 mm². The ideal option is a transformer winding copper core in varnish insulation (removed from any unnecessary transformer). The characteristics do not have to be maintained with pinpoint precision, under one condition: the coils must be identical.
Approximate parameters: diameter 190 mm, each coil has exactly 30 turns. The assembled product must be monolithic. To do this, the turns are grabbed with a mounting thread and filled with transformer varnish. If this is not done, vibration of the turns will throw the circuit off balance.
Electrical diagram
There are two manufacturing options:
- given the small number of elements, you can assemble it on a breadboard by connecting the legs of the parts using conductors;
- For accuracy and reliability, it is better to etch the board according to the proposed drawing.
Any “snot-based” soldering can fail in the field, and you will be offended for wasting your time.
Just like a transistor metal detector, the NE555 device needs fine tuning before use. The diagram shows three variable resistors:
- R1 is designed to adjust the frequency of the generator and achieve that same balance;
- R2 coarsely adjusts sensitivity;
- Using resistor R3, you can set the sensitivity with an accuracy of 1 cm.
Information: This scheme cannot discriminate against metals. The seeker only makes it clear that the object exists. And by the tone of the signal (based on your experience) you can determine the approximate volume and depth of the deposit.
The power supply is quite universal: 9–12 volts. You can select a battery from an uninterruptible power supply, or assemble a power supply from AAA batteries. A good option is 18650 batteries (they are also used for vaping).
Butterfly setting
The principle of operation is described above, so let’s just look at the technology. We set all resistors to the middle position, and ensure that the synchronization of the generators is disrupted. To do this, we fold the coils in a figure eight and move them relative to each other until the squeaking turns into crackling. This is a synchronization failure.
Read also: How to distinguish high-current 18650 batteries from regular ones
We fix the rings and rotate the resistor R1 until a steady crackling sound appears at even intervals.
By bringing metal objects to the place where the coils overlap (this is the search point), achieve a steady squeak. The sensitivity is adjusted by resistor R2.
All that remains is adjustment with resistor R3, which is used rather to correct the voltage drop in the power source.
Mechanical part
A do-it-yourself metal detector rod is made from a lightweight plastic pipe or wood. The use of aluminum is undesirable as it will interfere with operation. The circuit and controls can be hidden in a sealed housing (for example, a junction box for wiring).
The butterfly finder is ready to go.
Parameters of metal detectors depending on purpose and technical device
Metal detectors for amateurs are the simplest dynamic type devices. The search head of the device must constantly move; this is the only way the desired signal can appear. If you stop moving, the signal will disappear. Such simple detectors are convenient because they do not require complex settings and allow you to exclude medium soils. Disadvantages include its low sensitivity and frequent false alarms in difficult areas.
The scanning speed of the device is about 30 centimeters per second.
Mid-range devices have better sensitivity. In the factory configuration, this device comes with several search heads of different sizes. Setting up the detector will require certain skills. Mid-range metal detectors are capable of recognizing metals.
Computerized devices are already professional instruments with a liquid crystal screen and pointer indication. The memory of its processor is loaded with programs capable of recognizing and distinguishing a signal and classifying each detected object. Professionals independently program devices for search conditions, eliminating unwanted triggers.
Gold detecting tools work not only on coins and jewelry in the ground, but also on native metal. It is not suitable for searching for small particles such as sand. It does not recognize them, especially if the soil is highly mineralized.
Otherwise, these metal detectors are very sensitive and work great, for example, when searching for gold jewelry in the sand of the beach
Depth detectors are designed to search for objects located at impressive depths. They can detect metal at a depth of up to 6 meters, while other models “pierce” only up to 3. Such devices recognize voids and other internal soil anomalies. Depth detectors operate on two coils, one is parallel to the ground surface, the other is perpendicular.
Stationary detectors are frames installed at particularly important protected sites. They detect any metal objects in people's bags and pockets that pass through the circuit.
Household metal detector
A household metal detector (HIM) (Fig. 15), produced earlier (Moscow), allows you to detect small metal objects at a distance of up to 45 mm. The winding data of its inductors are unknown, however, when repeating the circuit, you can rely on the data given for devices of similar purposes (Fig. 13 and 14).
Rice. 15. Scheme of a household metal detector.
Literature: Shustov M.A. Practical circuit design (Book 1), 2003
What types of metal detectors can you make at home with your own hands?
Detectors are divided into 5 main types based on the principle of detecting the desired object.
Let's look at which metal detectors are suitable for making with your own hands at home:
| Type | Peculiarities | Is it suitable for making it yourself? |
| Reception and transmission | Works with two induction coils. If the desired object is absent, the signal does not pass into the receiving coil. | Yes |
| Induction | Combines the functions of both coils. The signal is constant, changing when detecting the metal. | No, as a rule, difficulties arise in isolating the effective signal. |
| Based on frequency meter | The design of the device includes an LC generator that changes the frequency when metal objects are detected. Has low sensitivity. | Yes |
| With Q meter | Has an LC generator signal analyzer. Does not work well at low temperatures. | Yes |
| Pulse | Based on the transmission of eddy pulse currents. The signal changes its character depending on the type of metal detected. | Yes |
And now more about how to make a simple metal detector with your own hands using the example of the “Pirate” design.
Simple metal detectors from ready-made electrical appliances
- A metal detector can be made from a radio receiver by adding a simple HF transmitter to it:
The search coil is wound from 0.5 mm² wire: 16 turns 12 cm. When a metal object enters the range of action, a receiver tuned to the MW/LW range will change the tone of the sound. - A homemade metal detector made from a cell phone is nothing more than a myth. Upgrading its electrical circuit at home is not feasible, and it is technically impossible to make a standard mobile phone work as a metal detector.
- In fact, there is no need to make a metal detector out of a magnet. You simply bring a powerful neodymium magnet to the place where there is a metal object and physically feel the force of attraction. Of course, this only works with metals that have ferromagnetic properties (iron, steel).
Homemade metal detector “Pirate”: diagram and detailed description of the assembly
If you are just thinking about how to make a homemade metal detector, do not try to take on complex models. Start with a simple but effective "Pirate". The name was invented by the author of the homemade product from a combination of Pi (pulse) and Ra-t (radioscope). The name stuck, and the simple and clear assembly scheme was so loved by users that “Pirate” became one of the most popular homemade products in this area. Currently, there are already 4 modifications of the “Pirate” scheme. The metal detector is simply assembled with your own hands, without using any specific tools.
The only drawback of this device is that the DIY metal detector does not have a scheme for working with metal discrimination. But for a novice treasure hunter this is unimportant.
In addition to the parts required for assembly, you will need a soldering iron, screwdriver, and insulating tape.
Parts for assembling a metal detector
To make the device you will need to purchase:
- ceramic capacitor - 1 nF;
- 2 film capacitors - 100 nF;
- electrolytic capacitors: 10 μF (16 V) – 2 pieces, 2200 μF (16 V) – 1 piece, 1 μF (16 V) – 2 pieces, 220 μF (16 V) – 1 piece;
- resistors - 7 pieces per 1; 1.6; 47; 62; 100; 120; 470 kOhm and 6 pieces for 10, 100, 150, 220, 470, 390 Ohm, 2 pieces for 2 Ohm;
- variable resistors - 3 pieces for 10 and 100 kOhm, 400 Ohm (1W);
- transistors – 3 pieces, VS557, IRF740, VS547;
- 2 diodes 1N148;
- 2 microcircuits: K157UD2 and NE555.
In addition to the listed details, stock up on headphones from the player
You will also need a plastic pipe for the rod, 9V batteries or accumulators and a PEV wire with a diameter of 0.8 mm.
For your information! Many people are interested in how to make a metal detector from a phone with their own hands. Some developers even offer programs that can be downloaded to your phone and used for this purpose. Serious radio enthusiasts can only advise you to use some spare parts - for example, a headphone input or a battery, perhaps a board to create a microcircuit.
DIY metal detector circuits
The simplest “Pirate” scheme looks like this.
The board can be placed in the body of a pocket receiver or any conveniently sized plastic box; even simple junction boxes from an electrician’s arsenal are suitable.
Important point! To get rid of possible interference when touching the device regulators, all variable resistor housings are connected to the negative side of the board.
If you want to take your experiments further, here is a diagram for making a gold-focused metal detector.
Schematic of the Terminator 4 metal detector with increased sensitivity
If you assembled the circuit correctly, the device will work properly. Possible problems with the microcircuit.
| Problem | Solution |
| There is no squeak or reaction to frequency changes. | Select a 10 kOhm resistor in series with the 300 pF capacitor in the generator. |
| Excessive generator excitation, hissing and whistling | Add a 1000 pF capacitor with a lead to the case. |
How to assemble a metal detector circuit board with your own hands
The metal detector circuit board circuit is quite simple. Conventionally, it can be divided into several blocks:
- search coil assembly;
- transistor sound amplifier;
- pulse generator;
- two-channel amplifier.
This is what it looks like.
The pulse generator is assembled on the NE555 timer. By selecting C1 and 2 and R2 and 3, the frequency is adjusted. The pulses obtained as a result of scanning are transmitted to transistor T1, and it transmits the signal to transistor T2. The audio frequency is amplified using the BC547 transistor to the collector, and headphones are connected.
For your information! You can make a metal detector with your own hands without microcircuits. On the Internet you will find many analog circuits using transistor oscillators. Such devices will detect metal at a depth of up to 20 centimeters in the ground and up to 30 centimeters in loose sand.
How to make a metal detector coil with your own hands
The coil is an important part of the device. It can be made from copper wire or twisted pair. More details in our master class.
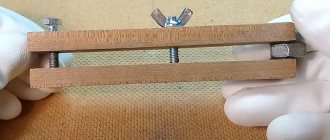
Copper wire spool
| Illustration | Description of action |
| Copper wire with a diameter of 0.5 mm is suitable for the coil. | |
| For winding, prepare a board with guides. The distance between the guides should be equal to the diameter of the base on which you will mount the reel. | |
| Wind the wire around the perimeter of the fastenings in 20-30 turns. | |
| Secure the winding with electrical tape in several places. | |
| Remove the winding from the base and give it a round shape. | |
| Choose a base that will hold its shape. This could be a plastic bucket lid or a wooden craft hoop. | |
| Connect the circuit to the device and test its operation. | |
| When assembled, a coil of wire may look like this. | |
| To test the operation of the device, pass metal objects over the coil at different heights. |
Twisted pair coil
| Illustration | Description of action |
| Roll the wire into two coils as shown in the photo, leaving two ends of about 10 centimeters each. | |
| Strip the winding and free the wires for connection. | |
| Connect the wires as shown in the diagram. | |
| For better contact, solder the ends of the wires. | |
| Test the coil in the same manner as a copper wire coil. |
Advice! If you want to make a more powerful DIY coil for your metal detector, give it an elliptical shape.
Detailed instructions for setting up a DIY metal detector “Pirate”
For final assembly of the device you will need a plastic pipe. The assembly diagram is simple. The sensitivity of the detector is adjusted using potentiometers. Achieve the result so that it recognizes a coin from a distance of 30 centimeters. He can “hear” large metal deposits a meter to one and a half meters away. “Pirate” does not recognize non-ferrous or ferrous metals underneath you, so you just have to dig, and it is possible that you will stumble upon an old trough, and not the desired treasure. But in this case, you can take it not by quality, but by quantity, because any metal can be taken to a recycling collection point.
It is possible that you will be lucky and all your efforts will not be in vain
What the assembled “Pirate” will look like is in the next video. It only remains to note that the construction kit for making this device can be purchased on the Internet. By the way, it comes with detailed instructions on how to make a metal detector yourself at home from kit parts.
Features of deep metal detectors
A deep metal detector is attractive because it can detect objects where other devices are powerless. A good deep metal detector, made by yourself, looks to a depth of 6 meters, and is not hindered by roots, voids or other obstacles. One caveat - with its help you can only detect large objects, and this is understandable, because for the sake of a couple of coins you will not dig a six-meter hole.
And again we return to the same universal model of the “Pirate” detector. It turns out that you can make an in-depth device based on it, and it’s not at all difficult. The modification process is described in this video.
Instrumental search is simply enormously popular. Adults and children, amateurs and professionals are looking for it. They are looking for treasures, coins, lost things and buried scrap metal. The main search tool is a metal detector.
There are a great variety of different metal detectors to suit every taste and color. But for many people, buying a ready-made branded metal detector is simply financially expensive. And some people want to assemble a metal detector with their own hands, and some even build their own small business on their assembly.
Homemade metal detectors
In this section of our website about homemade metal detectors, I will collect: the best metal detector circuits, their descriptions, programs and other data for making a metal detector with your own hands. There are no metal detector circuits from the USSR or circuits with two transistors here. Since such metal detectors are only suitable for visually demonstrating the principles of metal detection, but are not at all suitable for real use.
All metal detectors in this section will be quite technologically advanced. They will have good search characteristics. And a well-assembled homemade metal detector is not much inferior to its factory-made counterparts. Basically, various circuits of pulse metal detectors and circuits of metal detectors with metal discrimination are presented here.
But to make these metal detectors, you will need not only desire, but also certain skills and abilities. We tried to break down the diagrams of the given metal detectors by level of complexity.
In addition to the basic data required to assemble a metal detector, there will also be information about the required minimum level of knowledge and equipment for making a metal detector yourself.
To assemble a metal detector with your own hands, you will definitely need:
This list will contain the necessary tools, materials and equipment for self-assembly of all metal detectors without exception. For many schemes you will also need various additional equipment and materials, here are just the basics for all schemes.
- Soldering iron, solder, tin and other soldering supplies.
- Screwdrivers, pliers, wire cutters and other tools.
- Materials and skills for making a printed circuit board.
- Minimum experience and knowledge in electronics and electrical engineering as well.
- And also straight hands will be very useful when assembling a metal detector with your own hands.
Metal detector based on the principle of generation frequency interruption
The metal detector can also operate on the principle of disrupting the generation frequency. The diagram of such a device is shown in Fig. 12. If certain conditions are met (the frequency of the quartz resonator is equal to the resonant frequency of the oscillatory LC circuit with the search coil), the current in the emitter circuit of transistor VT1 is minimal.
If the resonant frequency of the LC circuit changes noticeably, the generation will fail, and the readings of the device will increase significantly. It is recommended to connect a capacitor with a capacity of 1 ... 100 nF in parallel to the measuring device.
Rice. 12. Circuit diagram of a metal detector that works on the principle of disrupting the generation frequency.
Here you can find diagrams for self-assembly of the following models of metal detectors:
| Metal detector Kid FM and Kid FM-2 | ||
| Principle of operation | Electronic frequency meter FM | |
| Metal discrimination | yes (Black and all others) | |
| Maximum search depth | 0.6 meters | |
| Programmable microcontrollers | There is | |
| Operating frequency | 19 kHz | |
| Difficulty level | elementary | |
| Metal detector PIRATE | ||
| Principle of operation | PI (pulse) | |
| Metal discrimination | No | |
| Maximum search depth | 1.5 meter | |
| Programmable microcontrollers | No | |
| Operating frequency | — | |
| Difficulty level | elementary | |
| Metal detector CHANCE | ||
| Principle of operation | PI (pulse) | |
| Metal discrimination | There is | |
| Maximum search depth | 1 meter | |
| Programmable microcontrollers | There is | |
| Operating frequency | — | |
| Difficulty level | average | |
| Metal detector Clone PI | ||
| Principle of operation | PI (pulse) | |
| Metal discrimination | No | |
| Maximum search depth | 2.5 meters (Depends on coil size) | |
| Programmable microcontrollers | There is | |
| Operating frequency | — | |
| Difficulty level | average | |
| Metal detector Clone PI AVR | ||
| Principle of operation | PI (pulse) | |
| Metal discrimination | No | |
| Maximum search depth | 2.5 meters (Depends on coil size) | |
| Programmable microcontrollers | There is | |
| Operating frequency | — | |
| Difficulty level | average | |
| Metal detector Clone PI W | ||
| Principle of operation | PI (pulse) | |
| Metal discrimination | No | |
| Maximum search depth | 2.5 meters (Depends on coil size) | |
| Programmable microcontrollers | There is | |
| Operating frequency | — | |
| Difficulty level | average | |
| Metal detector Quasar | ||
| Principle of operation | I.B. | |
| Metal discrimination | There is | |
| Maximum search depth | 1-1.5 meters (Depends on the size of the coil) | |
| Programmable microcontrollers | There is | |
| Operating frequency | 4 - 17 kHz | |
| Difficulty level | Average | |
| Metal detector Quasar ARM | ||
| Principle of operation | I.B. | |
| Metal discrimination | There is | |
| Maximum search depth | 1-1.5 meters (Depends on the size of the coil) | |
| Programmable microcontrollers | There is | |
| Operating frequency | 4 - 16 kHz | |
| Difficulty level | Average | |
| Metal detector Sokha 3TD-M | ||
| Principle of operation | I.B. | |
| Metal discrimination | There is | |
| Maximum search depth | 1 - 1.5 meters (Depends on the size of the coil) | |
| Programmable microcontrollers | There is | |
| Operating frequency | 5 - 17 kHz | |
| Difficulty level | Average | |
| Metal detector Fortune | ||
| Principle of operation | I.B. | |
| Metal discrimination | There is | |
| Maximum search depth | 1 - 1.5 meters (Depends on the size of the coil) | |
| Programmable microcontrollers | There is | |
| Operating frequency | 4.5 - 19.5 kHz | |
| Difficulty level | Average | |
| Metal detector Fortuna PRO-2 | ||
| Principle of operation | I.B. | |
| Metal discrimination | There is | |
| Maximum search depth | 1 - 2 meters (Depends on the size of the coil) | |
| Programmable microcontrollers | There is | |
| Operating frequency | 4.5 - 19.5 kHz | |
| Difficulty level | High | |
| Metal detector Fortuna M2 and M3 | ||
| Principle of operation | I.B. | |
| Metal discrimination | There is | |
| Maximum search depth | 1 - 2 meters (Depends on the size of the coil) | |
| Programmable microcontrollers | There is | |
| Operating frequency | 4.5 - 19.5 kHz | |
| Difficulty level | High | |
| Metal detector Fortunam M | ||
| Principle of operation | I.B. | |
| Metal discrimination | There is | |
| Maximum search depth | 1.5 - 2 meters (Depends on the size of the coil) | |
| Programmable microcontrollers | There is | |
| Operating frequency | 7 - 16 kHz | |
| Difficulty level | High | |
| Metal detector TERMINATOR-3 | ||
| Principle of operation | I.B. | |
| Metal discrimination | There is | |
| Maximum search depth | 1 meter (Depends on coil size) | |
| Programmable microcontrollers | No | |
| Operating frequency | 7 - 20 kHz | |
| Difficulty level | High | |
Design and principle of operation of the device
Metal detectors on the market operate on different principles. Many believe that they use the principle of pulse echo or radar. Their difference from locators lies in the fact that the transmitted and received signals act constantly and simultaneously; in addition, they operate at the same frequencies.
The principle of operation of the metal detector
Devices operating on the “receive-transmit” principle record the signal reflected (re-emitted) from a metal object. This signal appears due to the exposure of a metal object to an alternating magnetic field generated by the metal detector coils. That is, the design of devices of this type provides for the presence of two coils, the first is transmitting, the second is receiving.
Metal detector circuit
Devices of this class have the following advantages:
- simplicity of design;
- Great potential for detecting metallic materials.
At the same time, metal detectors of this class have certain disadvantages:
- metal detectors can be sensitive to the composition of the soil in which they search for metal objects.
- technological difficulties in the production of the product.
In other words, devices of this type must be configured with your own hands before work.
Other devices are sometimes called beat metal detectors. This name comes from the distant past, more precisely from the times when superheterodyne receivers were widely used. Beating is a phenomenon that becomes noticeable when two signals with similar frequencies and equal amplitudes are summed. The beat consists of pulsating the amplitude of the summed signal.
The signal pulsation frequency is equal to the difference in the frequencies of the summed signals. By passing such a signal through a rectifier, it is also called a detector, and the so-called difference frequency is isolated.
This scheme has been used for a long time, but nowadays it is not used. They were replaced by synchronous detectors, but the term remained in use.
A beat metal detector works using the following principle - it registers the difference in frequencies from two generator coils. One frequency is stable, the second contains an inductor.
The device is configured with your own hands so that the generated frequencies match or at least are close. As soon as metal enters the action zone, the set parameters change and the frequency changes. The frequency difference can be recorded in a variety of ways, from headphones to digital methods.
Devices of this class are characterized by a simple sensor design and low sensitivity to the mineral composition of the soil.
But besides this, when using them, it is necessary to take into account the fact that they have high energy consumption.
Typical design
The metal detector includes the following components:
- The coil is a box-type structure that houses the signal receiver and transmitter. Most often, the coil has an elliptical shape and polymers are used for its manufacture. A wire is connected to it connecting it to the control unit. This wire transmits the signal from the receiver to the control unit. The transmitter generates a signal when metal is detected, which is transmitted to the receiver. The coil is installed on the lower rod.
- The metal part on which the reel is fixed and its angle of inclination is adjusted is called the lower rod. Thanks to this solution, a more thorough examination of the surface occurs. There are models in which the lower part can adjust the height of the metal detector and provides a telescopic connection to the rod, which is called the middle one.
- The middle rod is the unit located between the lower and upper rods. Devices are attached to it that allow you to adjust the size of the device. On the market you can find models that consist of two rods.
- The top rod usually has a curved appearance. It resembles the letter S. This shape is considered optimal for attaching it to the hand. An armrest, a control unit and a handle are installed on it. The armrest and handle are made of polymer materials.
- The metal detector control unit is necessary to process the data received from the coil. After the signal is converted, it is sent to headphones or other display devices. In addition, the control unit is designed to regulate the operating mode of the device. The wire from the coil is connected using a quick release device.
Metal detector design
All devices included in the metal detector are waterproof.
It is this relative simplicity of design that allows you to make metal detectors with your own hands.
Me and Diode. Entertaining - Tech Blog
After reading a little about amateur radio forums on making metal detectors , I discovered that most people who assemble metal detectors , in my opinion, unfairly write off beat-based metal detectors - the so-called BFO metal detectors . Allegedly, this is the technology of the last century and “children’s toys.” — Yes, this is a simple and unprofessional device that requires certain skills and experience in handling. It does not have a clear metal selectivity and requires adjustment during operation. However, it is also possible to perform a successful search under certain circumstances. As an option, beach searching is an ideal option for a beating metal detector .
Types of metal detectors
There is a wide range of metal detectors on the market, used in many areas. Below is a list that shows some of the varieties of these devices:
Ground modelDeep metal detectorUnderwater vehicleSecurity deviceIndustrial metal detector
- Ground. These devices are designed for searching with your own hands for scrap metal, jewelry, coins, etc.
- Deep. These devices are used to search for the above-mentioned metal products at great depths.
- Underwater. Devices of this type are designed to operate underwater. They can work at different depths.
- Metal detectors for searching for gold. These devices allow you to find gold and gold jewelry in any environment.
- Security devices. These devices are used to detect metal products on the human body and in luggage. Such devices are made in the form of arches and are installed at the entrance to places with large crowds of people, for example, at train stations, shopping centers, etc.
- Industrial. This equipment is part of conveyor lines. Their main task is to detect metal in other substances. For example, in a mined sand-soil mixture.
- Army. The military uses such devices to detect mines, unexploded shells, bombs, etc. with their own hands. The military calls such devices mine detectors.
- Do-it-yourself devices are most often assembled by novice “treasure hunters”.
The use of modern materials allows us to design and manufacture devices with high accuracy in detecting metals in different environments. The use of microelectronics has made it possible to minimize their overall weight parameters. In addition, the simplicity of the electrical circuit allows you to make a metal detector with your own hands at minimal cost.
Main settings
Like any technical device, a metal detector has certain parameters that characterize its functional properties.
Detection depth
In the first place is the depth of metal detection. By the way, many companies producing such devices do not indicate the maximum depth at which their products can detect metal products. And if such a figure is indicated, then most likely this is data obtained during laboratory tests. That is, real field conditions differ significantly from laboratory (test) conditions.
This means that when doing real work with your own hands, the detection depth will be slightly less than indicated in the passport. Why is this happening? The fact is that the composition of the soil has a significant impact on the capabilities of the metal detector. In fact, it is one thing to search in river sand, and another in soil with a high iron content. Metal products, especially those that remain at depth for a long time, oxidize and change their properties, and this affects the ability to detect an object.
Metal detector detection depth
Most modern metal detectors can find metal objects at a depth of up to 2.5 m; special deep products can detect a product at a depth of up to 6 meters.
Operating frequency
The second parameter is the operating frequency. The thing is that low frequencies allow the metal detector to see to a fairly large depth, but they are not able to see small details. High frequencies allow you to notice small objects, but do not allow you to view the ground to great depths.
The simplest (budget) models operate at one frequency; models that fall into the middle price range use 2 or more frequencies. There are models that use 28 frequencies when searching.
Checking and setting up the metal detector
After all the components of the metal detector are connected, you can begin checking and setting it up. The sensitivity of the device is adjusted by rotating the potentiometer knobs. You need to ensure that a slight crackling sound is heard in the speakers. This is absolutely normal, since it is almost impossible to eliminate all electromagnetic interference.
Then they begin testing on real metal objects. A well-tuned metal detector should detect a metal plate with a diameter of 25 mm (which corresponds to a 5 ruble coin) from a distance of about 30 cm.
After testing the device on coins, you can test the distance from which the detector operates on larger or smaller pieces of metal. This will allow you to prepare for work in real “field” conditions.