Sharpening a knife correctly by hand is quite difficult. It will take some time to develop the habit of maintaining a constant sharpening angle, which is not at all easy. A knife sharpening device can make the task easier. There are factory options. But for good copies you have to pay a couple of hundred dollars, and this is clearly a lot. The good news is that these devices are easy to make yourself. Moreover, many homemade knife sharpeners are no worse in functionality than those from famous manufacturers, but they are many times cheaper.
What to do with dull knives?
If there are no problems with knives with replaceable blades (naturally, if these same blades are present), then a knife with a sharpened blade must be periodically sharpened. Typically, a special knife sharpening device is used for this.
Buying this now is not difficult. But not everyone prefers this solution to the problem. And the point here is not only the considerable cost of such devices. High-quality sharpeners cost a lot of money.
Many craftsmen will get great pleasure from a machine designed for sharpening knives, made by themselves. Although, even using an ordinary “bare” block, of course, you can sharpen knives with your own hands, but in order to sharpen a knife efficiently using only a whetstone, also known as a “block”, you need to have a certain skill and “steady” hands, because you will need to maintain the sharpening angle identical along the entire cutting edge, and this is not the easiest task. A special sharpener for knives is designed to make it easier, be it factory-made or made with your own hands.
But just to speed up sharpening, any sharpener, both factory-made and home-made, will help.
Making a homemade machine
It is quite possible to make a knife sharpening machine yourself at home. The main requirement when creating a homemade sharpening machine is to rigidly secure the blade being sharpened and the abrasive element. Thanks to this, the main requirement for the entire procedure is achieved: creating and maintaining a sharpening angle.
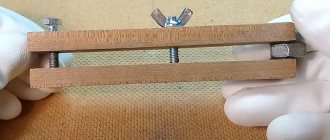
Elementary vertical device
The device is designed for quick manual sharpening of knives with your own hands and is a wooden structure assembled in the form of a corner. The exact assembly drawing will not be given here, since the dimensions depend on the size of the grindstone used. You need to prepare:
- 4 bars or planks 5-7 cm wide and 2-3 cm thick. The length of the plank is determined by the length of the stone;
- 4 M4-M6 bolts with a wing nut. The length of the bolts is determined by the formula: (thickness of the board) x 2 + thickness of the whetstone + 1 cm;
- 4 self-tapping screws for wood. The length is selected based on the following calculation: board thickness minus 0.2 cm;
- Protractor or other angle measuring tool;
- A drill with a drill, the size of which is equal to the size of the bolt, or larger by one unit of the size range;
- Wood hacksaw;
- Chisel or chisel (or a powerful knife);
- Pencil or marker.
Making the device involves assembling two corners from existing planks. On one of them, at a distance equal to its width, a cut is made with a hacksaw to the middle. Then, from the end of the board, the sawn-off part is chopped off with a strong knife or chisel. A similar chip is made on the second plank. This is done so that when connecting the boards into a corner, both sides have a common plane. Then the boards, with their chipped parts, are joined into a corner. The second half of the device is assembled in the same way. Next, holes for connecting bolts are drilled in the upper and lower parts of the device. The holes are marked at the ends opposite to the junction, 3-4 pcs. on every board. The holes are marked so that there is at least 3 cm from the edge of the board to the outer bolt, and the distance between it and the other holes allows the edge of the sharpening stone to be securely clamped.
A mark corresponding to each of the future sharpening angles is applied on the inside or outside of one of the boards.
Sharpening work is carried out in the following algorithm: the knife to be sharpened is placed with the blade on the sharpening stone so that it is in a vertical plane. Then you need to move the knife along the sandpaper in a back-and-forth motion, with light pressure. Finer sharpening or grinding of the blade on this machine can be done if the sharpening stone, before installing it in place, is wrapped in sandpaper of the desired grain size.
The advantage of such a device is its simplicity, ease of assembly and low cost. The disadvantage is the lack of rigid fastening of the sharpened blade.
Sharpener from mounting angles
The proposed device is more advanced compared to the previous one. The blade to be sharpened is rigidly fixed in it and the angle of inclination of the emery in relation to the blade is fixed. Another difference is that in this device the moving part is a stone rather than a blade.
The device is attached directly to the knife blade, in its upper part. The device consists of two interconnected metal corners and a movable part resting on one of the shelves.
The following figure is schematically indicated:
- The basis of the design is 2 corners.
- A movable rod or knitting needle with a thread.
- Clamping nuts with washers for securing the emery to the rod.
- Lever.
- Holes for adjusting the sharpening angle and supporting the moving part.
- Set of adjusting washers.
- Tightening bolts with nuts.
- Stitched edge of the top corner.
- A sharpened blade or knife.
- Whetstone (whetstone).
Manufacturing the device begins with selecting the corners of the base. In the vertical shelf of the upper corner, 3-4 holes are drilled with a size larger than the size of the rod by 3 steps. For example, for a rod with a diameter of 6 mm, 9 mm holes are required. The outer edge of the upper plane of the upper corner is ground down “to the bottom” at a distance of 10-12 cm from the end, so that the emery does not touch it when sharpening. In the horizontal shelves of both corners, two holes are drilled coaxially for the coupling bolts. These holes are drilled according to the principle: the first - at the end of the grinded part of the upper corner, the second - 10-12 cm from the first. The thickness of the set of shims should be equal to the thickness of the blade being processed. The diameter of the clamping washers located on the movable rod should be equal to the thickness of the sharpening stone multiplied by 2. As a handle, you can use a piece of PVC pipe of a suitable diameter or wrap several layers of electrical tape. To prevent the moving part from jumping off the blade, the rod on the outside of the upper shelf must be bent in the shape of the letter “L”, or secured with a locked nut if there is a thread.
What are the differences between abrasive stones?
Sharpening stones come in a variety of shapes, bar sizes, and grain sizes. The optimal size of the bar is considered to be one in which its length exceeds the length of the blade of the knife being sharpened by at least one and a half times. This allows you to work with such a bar much more comfortably than with a bar that does not meet this simple requirement.
As mentioned earlier, sharpening stones can have not only different sizes, but also very different grain sizes. There are five main levels of grain size for such bars:
- Grain size 200-300 Extra coarse. In English called Extra coarse. Such bars are not used for sharpening tool blades and knives in particular;
- Grain size 300-350 Coarse grain. In English called Coarse. With the help of such bars, damaged or very dull blades are sharpened;
- Grain size 400-500 Medium grain. In English called Medium. You can do without such a block in the household;
- Grain size 600-700 Fine grain. Called Fine in English, these whetstones are the most popular for sharpening tool blades in the home workshop.
- Grain size 1000-1200 Very fine. In English called Ultra fine. These bars are used for final processing of blades that need to be brought to a shine. Such bars can be used as a tool for a homemade knife sharpener.
Knife sharpening basics
Knives have different uses and there are even several of them in the ordinary kitchen. There is one for slicing bread and other soft foods, and one for cutting meat, chopping bones, and other hard objects. And these are just household ones. But there are also those who take them hunting and fishing. If you look closely, you will see that they all have a different sharpening angle (this is if they have not already been sharpened at home). It is the sharpening angle that is the most important characteristic, which is determined by the purpose of a given blade.
A knife sharpening device will make your work much easier
At what angle
The sharpening angle is determined based on the main area of application of a particular blade:
- Straight razors are sharpened at 8-12°. Such a small angle allows you to easily cut hairs after finishing, but when you try to cut something else, the blade will become dull very quickly.
- Fillet knives are sharpened almost as sharply - 10-15°.
- To cut food, it is best to sharpen the blade at 15-20°.
If you look at the blade at multiple magnification we will see something like the following: - For hunting knives and general purpose knives, you should choose an angle of 20° to 25°. A cutting edge of such sharpness will not only allow you to cut soft foods, but will also cope with bones, wood, etc. without much difficulty. Some manufacturers of hunting knives and knives sharpen their blades within a wider range - 20-40°. A knife with a 40° blade cuts much worse, but it copes better with opening cans or other similar work.
- Heavy knives for special purposes (machetes, for example) are sharpened at 30-50°. It will be problematic to cut bread with them, but they cut trunks, vines and other similar objects perfectly.
These are general recommendations based on many years of experience. There are, however, options: some blades have several zones with different sharpening. This makes them more versatile, but the difficulty of sharpening increases many times over.
From the above it follows that the device for sharpening knives must be able to set the required sharpening angle. And this is the main difficulty in its design and manufacture.
What to sharpen
To sharpen knives, sharpening stones of various grain sizes are used. They are conventionally divided into coarse, medium and fine. Why conditional? Because different countries have their own designation of grain size. The most convenient classification is by the number of grains per unit area. It is expressed in numbers: 300, 600, 1000, etc. Some companies also use English terms. Here is an approximate division:
- 200-250 - very rough (extra coarse). They are not used for sharpening knives.
- 300-350 - rough (coarse). Used when profiling the cutting edge of a damaged or very dull blade. If the cutting edge has no visible flaws and you do not plan to change the sharpening angle, this abrasive should not be used.
- 400-500 - medium. Many manufacturers do not have bars of this grain size, since they are easy to do without.
- 600-700 - fine. The main type of whetstones used for sharpening knives. They are used to sharpen knives that have become dull during normal use.
- 1000-1200 - very fine (ultra or extra fine). They bring the sharpened blade to a mirror shine. Whetstones for sharpening knives are required with medium and fine grain; for finishing (polishing) you can take an even ultra-fine one
In addition to grain size, sharpening stones are also distinguished by their origin: some are of natural origin (slate, corundum, etc.), some are ceramic and diamond. Which ones are better? It’s hard to say - a matter of taste, but natural ones wear off faster and are rarely fine-grained.
Natural ones are soaked in water before use or simply moistened with it. They absorb water and, during sharpening, an abrasive paste is formed from water and separated abrasive particles on the surface, which increases the efficiency of sharpening. For the same purposes, you can use a special little (honing oil) or a mixture of water and soap (whichever you prefer). In general, you should try all these options with each sharpening stone and choose the best one.
The shape of a whetstone for sharpening knives is a block, and it is desirable that its length be much longer than the length of the blade - it is easier to sharpen. Bars with double grain are convenient - coarse on one side, finer on the other. To sharpen knives for ordinary purposes, it is enough to have two bars with medium grain (different) and two fine ones (one can be very fine).
Manual sharpening procedure
A device for sharpening knives only makes it easier to sharpen the edge, so knowledge of manual sharpening techniques is mandatory. Without them, it is impossible to sharpen a knife correctly.
The procedure for sharpening knives is as follows:
- First we take a block of medium or coarse grain - depending on the circumstances, we place it on the table. It’s better if it is secured - you won’t have to worry about not moving it while working.
- We calculate the required sharpening angle - it is equal to half the selected angle. We hold the blade at approximately this angle. Now the main task is to maintain this angle constantly.
- All movements when sharpening a knife are without strong pressure. Smoothly and evenly.
- We begin sharpening with a movement “from ourselves”. In this case, in one pass the blade must “pass” along the stone from beginning to end. There is also an important point here: at the point of contact with the block, the edge must be perpendicular to the direction of movement. There are no problems with the straight part - you drive straight, but as the rounded edge approaches, you have to turn the handle to maintain perpendicularity (see photo).
The process of sharpening a knife on a whetstone - Upon completion of the movement, the tip should remain on the surface of the block. It should not break off, as the tip may become dull, and its side surface may also be damaged. For this to be possible, the length of the bar must be 1.5-2 times longer than the blade. Then the movement will be smooth and uniform, as it should be.
- After the tip of the knife has stopped, we begin the reverse movement.
- We repeat the movements back and forth until a burr is formed on the back of the blade - a thin edge rolled inward. Feel it with your finger, running it perpendicular to the edge (not along it - you will cut yourself). Ideally, it should be even along the entire length of the blade. If not, work on it some more, and not in areas where there are no burrs, but along the entire length.
- When there is a burr, turn the blade to the other side and repeat the same. The burr will move to the other side, but will become slightly smaller. Once again in the graph - how to sharpen a knife correctly - the movement of the blade along the block
- You change the block, and with movements “from yourself” you continue to sharpen the blade (there is no more reverse movement). Finer grains leave smaller grooves on the edge and a slightly smaller burr.
- Use the same grindstone to process the second side.
- Change the abrasive to an even finer one. Repeat everything again (the movement is still on your own). And so on until you achieve a “mirror-like” edge, and this is achieved on a very small block. This means that the grooves left by the abrasive are very small and the cutting edge is polished enough to cut well.
- But even after this, a burr remained on the back of the blade. We remove it on the smallest block you have. We perform the already learned movement “from ourselves” once for each side, gradually reducing the pressure. In this way, it is possible to reduce the burr to a minimum, which almost does not interfere with work.
At this point, we can assume that sharpening the knife is complete. Some people are still finishing the edge on the old belt. A piece of belt can be secured to a wooden block (glued, not nailed), rubbed with goyi paste. Then pass several times alternately with one side or the other, but turning the cutting edge back. This way the last grooves left by the abrasive are polished and the belt is not “cut” in the process.
Why do knives get dull?
In order to ensure long and comfortable work with a knife after sharpening, first of all try to answer the question, “Why do knives become dull?” Why is it necessary to sharpen the knife again some time after sharpening, and sometimes to completely sharpen the knife again?
The reason for the loss of sharpness by the cutting edge of any tool is this: when working, the cutting edge of a knife or any other tool is exposed to the smallest abrasive particles of the material being cut.
Such particles are found in any material, be it stone, wood, or food.
Even soft vegetables and fruits contain such particles. There may just be more or less of them, but they will definitely be there. Their size, sharpness and quantity only determine the speed at which the instrument will become dull.
Sharpening angle, what is it?
So, since it is impossible to stop the process of dulling the cutting edge, then at least try to slow it down, and for this you need to sharpen your tool very well. Earlier in this article you have already come across such a concept as the sharpening angle of the cutting edge. And now more about it.
Blade sharpening angles can vary greatly. From an angle of about 10 degrees for razors and scalpels, to an angle of about 50 degrees for various Machete-type knives.
What could cause such a significant difference?
The fact is that the sharpening angle depends on what materials the blade is supposed to cut. The smaller the angle, the softer the materials should be and vice versa.
The fact is that a blade with a small sharpening angle will not only be easier to cut, but will also become dull more easily. That is why there is not and cannot be a single universal sharpening angle.
Note!
- Do-it-yourself compressor: selection of materials and tools for assembly at home + step-by-step instructions for making and assembling yourself
- Homemade products for the garage with your own hands: options for products for arranging a garage, detailed diagrams and drawings for creating with your own hands
- Do-it-yourself press - design features, choice of manufacturing materials. Step-by-step instructions for making it yourself + simple diagrams and drawings
After reading this article, you will not only learn how to properly sharpen a knife so that it can serve you for a long time until the next sharpening, but also answer your question about how to make such sharpening easier.
To facilitate the correct sharpening of knives, a lot of different tools have been invented, from the simplest devices to the most exotic ones, at a quick glance at which it is not only unclear how to work with them, but it is also difficult to figure out what it is in general.
Video description
About the classic homemade sharpener in the following video:
Electric machines operate on mains power; special guides allow you to sharpen the blade in compliance with the sharpening angle, so that the knife remains sharp for a long time. Sharpening is carried out using flexible abrasive belts; some devices are supplemented with abrasive discs with preset sharpening angles. All this allows you to sharpen not only straight blades, but also more complex blades: fillet, curved, with a hook.
Many owners do without expensive tools. When the need arises to sharpen a blade, and specialized tools are not available, emery for sharpening knives or a wooden block is used. Owners of a tabletop (grinding) sharpening machine do not have problems with dull knives. The work can also be done by carpentry grinding machines in which the saw blade can be replaced with a grinding wheel.
The simplest device for a certain angle Source mtdata.ru
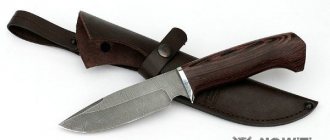
What knives can be sharpened?
Not all blades can be sharpened at home, but only blades made from not very hard materials. So, if the hardness of the material from which the blade is made exceeds 55 units on the Rockwell scale (55HRC), then it will not be possible to sharpen it with any tool available to most people. But most of the knives produced now are made of fairly soft materials and such knives are not at all difficult to sharpen.
True, their service life between sharpenings is not long at all.
But no matter what metal the knife is made of, sooner or later it will still have to be sharpened. The only exceptions to this rule are knives with replaceable blades and ceramic knives that cannot be sharpened at all. Thus, a knife sharpening device must be universal, that is, it must be able to sharpen various blades with different sharpening angles.
Note!
Do-it-yourself winch: classification, manufacturing materials, description of work stages + instructions for DIY construction- Do-it-yourself clamp - step-by-step production and description of options for using a clamp
DIY knife | A step-by-step description of how and from what materials to make a homemade knife
Therefore, when creating a device for sharpening knives, it is necessary to provide for the possibility of sharpening blades with different angles, and this is the most difficult task both at the design stage and during the manufacture of such a device.
Making a sharpening machine with your own hands step 1
I installed an electrical box on the engine, placed a capacitor in it to start the engine, a toggle switch - a switch and a power supply for the lamp.
I used a toggle switch from a Soviet tube TV - it turns out to be a reliable thing, first I installed a modern, beautiful Chinese toggle switch - when using it, the machine “stuttered” (worked with some jerks), and replacing the toggle switch with another of the same brand did not help until I installed a Soviet toggle switch.
Out of curiosity, I later installed these Chinese toggle switches on another engine, which also began to “stutter”, it’s a shame, I paid 100 rubles for 2 toggle switches. - I just threw money away...
Well, with the capacitor - everything is standard, I won’t describe 101 times how to connect a three-phase motor to 220V - it’s easy to find on Google, or in our article on calculating a capacitor.
What properties should a sharpener have?
So, before you make a device for sharpening knives with your own hands, you need to think about its design. And to do this, you need to answer the question: what properties should a knife sharpener have:
First, any device for sharpening knives must securely fix the knife, preventing it from falling out, but without damaging the blade material.
Secondly, a homemade knife sharpener must ensure that the block is held at a strictly defined angle, which is necessary for sharpening the entire cutting edge at a constant angle.
Third, the most difficult and perhaps the most important, a sharpening machine for knives, both self-made and factory-made, should allow changing the angle of installation of the sharpening stone; this is necessary to ensure sharpening of various tools and will even allow sharpening of stepped knives.
Note!
DIY vices: simple and reliable homemade vices from A to Z (190 photos)Do-it-yourself vibrating table - selection of materials, components and assemblies for a vibrating table with a step-by-step manufacturing description
- Do-it-yourself grain crusher - operating principle, types and features of creating a device for processing grain crops
Base
When making a sharpening machine at home, you can use various parts. In particular, you can use laminated box plywood 12 mm thick, which was previously used to create radio equipment housings.
When constructing a machine at home, a household member performs the following actions:
Selects a base for such an installation, which must weigh at least 5 kg. Otherwise, it will be impossible to sharpen chopping devices and tools on the machine. Therefore, in the manufacture of such equipment, the tenant uses various steel angles measuring 20x20 mm;
Next, 2 parts are cut out of plywood with a jigsaw, which have a trapezoidal shape, the base is 170 by 60 mm, and the height is 230 mm. When cutting, the mechanic makes an allowance of 0.7 mm for sharpening the ends: they end up straight and fit according to the markings;
Installs 3 parts between the inclined walls on the sides - an inclined surface made of plywood with dimensions of 230 x 150 mm.
In such a situation, the trapezoidal sides are located laterally on a rectangular surface.
The result is a base - a wedge. In such a situation, a protrusion of an inclined surface measuring 40 mm is formed in the front part;
Then, along the side wall ends, the mechanic marks 2 lines with a thicknesser. At the same time, it retreats by half the thickness of the plywood;
Next, he drills 3 holes in the boards to connect the parts of the structure with screws;
Drills the ends of the inclined surface and connects the base parts for a while;
At the back of the structure, the mechanic connects the side walls using a 60x60 mm block, which is attached to the end with two screws on both sides; — makes a 10 mm gap in the block.
In such a situation, it retreats 50 mm from the center - 25 mm from the edge. To maintain a vertical position, first drill with a thin drill from 2 edges, and then expand;
Then, at the top and bottom, two threaded fittings are screwed into the gap, and in the fittings - a 10 mm pin, the length of which is 250 mm.
If the threads do not match the studs, the lower fitting is adjusted.
What will we make it from?
The next question to consider is.
The materials from which you will make it.
To create such a device you will need the following materials:
- A sheet of thick plywood (can be replaced with a sheet of chipboard) 16 mm thick;
- Self-tapping screws 50-70 mm long; (it is better to use furniture format);
- A drill corresponding in diameter and length to your self-tapping screws or conformation;
- M8 hairpin of appropriate length (approximately 70 cm);
- Aluminum plate (at least 5 mm thick);
- M8 bolts with nuts (it is advisable to use wing nuts, although you can also use regular nuts, but keep in mind that then, with each sharpening, you will have to use a wrench, and this, you will agree, is not very convenient);
- You will also need a small block of textolite or ebonite to create a movable connection between the stud and the frame, which can be adjusted in height (if necessary, it can be replaced with a block made of hard wood, for example, it could be oak, beech or hornbeam);
- Of course, you will also need abrasive stones of various grain sizes;
- You will also need a powerful neodymium magnet (“you can get” such a magnet from an old computer hard drive that has become unnecessary).
Using replaceable blocks and making a carriage
When making a sharpening carriage, the machine operator performs the following actions:
Welds 30 cm M10 threaded rods with a smooth rod whose thickness is 10 mm;
Uses 2 solid bars 50x80 mm and the thickness is 20 mm. In all blocks, in the center and on top, 20 mm is retreated from the edge, and then a gap is made 10 mm wide;
Screws a wing nut onto the rod, then a large washer and 2 bars, then a nut and washer;
Clamps rectangular sharpening stones between the stones or makes several replaceable sharpening stones.
As a timber base, the machine operator uses a rectangular tube from a profile or a piece of cornice, the width of which is 50 mm;
He sands the flat machine part and cleans it of grease, and glues strips of sandpaper with a grain size of up to 1200 grit using Super Moment glue.
The sandpaper should have a fabric base, and on one of the blocks you need to glue a strip of suede to apply polish to the blades.
What are we going to do?
The tools you will need are: a drill, a drill of a suitable length and diameter, a screwdriver with bits suitable for your screws or format. Instead of a screwdriver with suitable bits, you can also use a screwdriver (but this will be more difficult).
Any tool for cutting metal (a hacksaw or an angle grinder equipped with a cutting wheel).
How will we do it?
Having asked the question “how to make a knife sharpener?” First of all, let’s find drawings for our future knife sharpener, which we will make with our own hands, and to do this, enter the following query into the search bar: “device for sharpening knives drawings.”
In response to such a request, any search engine will return a large number of suitable search results. Choose the one you like.
Having cut the plywood in any convenient way into parts for our future frame, we drill them at the points of attachment to each other, and then fasten them with self-tapping screws or conformat to each other.
On the frame we fix, using a bolt, an aluminum plate pre-processed according to the drawing (it will serve as a clamp for the knife being sharpened).
Next, we attach a vertical section of the pin to the frame and firmly fix a “cracker” on it. It consists of two parts made of an ebonite block (the Cracker is a very important part, it determines the angle at which the abrasive bar and the blade being sharpened will come into contact).
Now let's create a mount for the abrasive stone: for it we use the remaining section of the pin. Two blocks of ebonite or other similar material and two nuts.
What did we get?
Having assembled the design according to the drawing, you will receive the simplest device for sharpening knives, however, despite its simplicity, this device will allow you to sharpen knives and any other blades quite efficiently.
In order to understand how to use such a device, just enter “video knife” in any search engine.
Did you manage to sharpen the knife? Hooray! You have successfully made a DIY sharpening machine.
We should not forget that any sharpening machine, even if it is made by hand, requires strict adherence to the rules and safety requirements!!!