The functionality of electrical appliances can be increased by connecting devices and various additional accessories. Thus, a wood cutter for a drill allows you to work with wood and cut shaped notches in timber. They achieve a high-quality level in roughing or finishing of blades by installing working attachments with an actuator.
Wood cutter for drill
Manufacturers have produced various types of cutting elements, but they need to be selected correctly; they must be suitable for working with a specific drill.
general information
The drill cutter is one of the replaceable elements. Each part in the assembly performs an important function. The motor of the electrical appliance transmits the rotation speed to the shaft, and the nozzle with accessories will rotate with it.
Milling cutter
Only the cutter processes a given area. The final result depends on the correct choice of which, combination of parameters, compliance with conditions.
Technological capabilities of the drill-cutter
The tool looks like a regular end mill. At the same time, it seems possible to perform the following transitions from one installation:
- Making V-grooves.
- Drilling.
- Milling.
- Obtaining chamfers.
This possibility is ensured by the presence of two working planes - side and end, the profile of which is determined by the material being worked with (there are combined drill-cutters for metal and wood). True, the metal should not be heat-treated, and the wood should not be too hard.
As you know, the significant difference between a drill and a cutter is the geometry of the tool’s contact points with the workpiece. When milling, an S-shaped gap is always observed at the end, while when drilling it is possible only on the generatrix of the working part. Accordingly, the strength and elasticity of different zones of the tool are also different.
The milling drill optimally combines the helical geometry of the side cutting edges with a variable helix pitch along the length of the tool. This increases productivity and allows material removal operations to be performed in one pass.
How the cutting part works
Actuating mechanism
The actuator consists of 2 elements:
- shank (1) – it is clamped by a cartridge to transmit torque;
- working sphere (2) – there are sharpened blades on the sides of the head.
The configuration of the cutting edge provides different capabilities to this knife. The quality and type of sharpening are used to perform tasks of varying complexity. An additional element - a support bearing (3) - can simplify milling with a drill or expand these functions. For example, process a workpiece according to a template. If the system is dismountable, the cutter with its constituent parts regulate the work processes in the desired direction using:
- locking couplings;
- calibration bushings;
- washers;
- screws
The shank or base of the cutter comes in different lengths and diameters. These parameters are taken into account when choosing.
The chuck must hold the part tenaciously and be long enough to perform specific operations. The technical characteristics and purpose of the blade determine how much work can be done with it. It is sharpened manually and using high-precision equipment if there are no backlashes in the structural elements. In addition to sharpening, the alloy from which the item is made is also important. The hardness level of the steel must correspond to the structure being processed, in this case wood.
The standard set of cutters includes elements of different parameters and categories in the form:
- mounted, when the landing part with a diameter of 32 mm can only be installed in stationary milling equipment;
- end with a shank from 8 to 12 mm. in diameter, they are mounted on the machine shaft and on the drill.
This assembly replaces a professional milling cutter when processing:
- natural wood;
- plywood;
- chipboard;
- MDF.
When the cutting tool is going to process plywood, a knife with a high level of wear resistance is inserted. Let's say that a jigsaw with its cutting plates contains a strong alloy and is not sharpened.
Selection options
When choosing one or another method of milling wood, first of all you should pay attention to the possibility of installing a milling attachment on a drill. To do this, the power tool must have a cylindrical neck, in the extension of which a chuck is installed. In the absence of one, it is not recommended to use a specific drill model for milling. If it is installed on a specialized drill device intended for milling, then you can select cutters. First of all, you should pay attention to the type of work. The milling tool is not universal, so each operation will require its own model of equipment. The diameter of the shank must allow clamping in a specific drill chuck. It is not recommended to use large cutters, as they can require significant spindle power.
It is also necessary to take into account processing modes. Many wood tools require high RPMs that are unattainable with drills. It should be remembered that any electric drill is not designed for long-term loads. Therefore, it is not recommended to apply great effort to it and perform work continuously for a long time.
What do they pay attention to?
If you use a drill for milling wood, take into account a number of features:
- The operation of bearings on a shaft with the calculation of axial longitudinal load. In some types of mechanisms, a lateral force is applied, which affects the rapid wear of parts.
- Speed of revolutions.
- Cooling methods.
- Engine power.
- Handle placement.
- Cartridge quality.
Electric drill cutters
The electrical device must be equipped with a function that regulates speed with a large reserve of power - this means that cutters for an electric drill can be installed on it.
If there is incompatibility in the mechanism of devices, negative consequences are possible:
- the tool will overheat;
- the gearbox will fail;
- in the process, a distortion of the workpiece is formed;
- the shank will pop out due to an unreliable cartridge.
There are unwritten rules for milling:
- actions are performed slowly, accurately and accurately;
- check all connections, electrical wiring, fixation;
- Allow the drill to cool periodically.
When large volumes of work are to be done, a carbide nozzle is needed. Only after the equipment is securely fixed in the chuck do they begin to mill.
Choose a knife according to the following criteria:
- size - the parameter affects the assigned technological task;
- shape, configuration, location of the blades;
- sharpening angle;
- manufacturing materials - the performance of various operations and service life depend on the steel;
- purpose - if the milling drill is durable, it is used not only for wood drilling, but also for harder materials.
When buying any product, they visually evaluate it and look at the manufacturer’s company. The reputation of the enterprise will reveal the pros and cons of production. You need to do the same with the equipment. If the buyer is not rich enough to afford a cheap thing, the cutter should be of good quality and expensive.
Required materials and tools
If you need a wood cutter, but you can’t go and buy it in a store, but you have a metal drill at home, you can easily and simply sharpen it into a tool of the desired diameter. A steel drill is intended for metalworking, which means it will withstand drilling wood just fine.
To make a cutter, in addition to the metal drill itself, you will need the following materials and tools:
- Bulgarian;
- file;
- drilling machine (preferably vertical);
- router or drill.
Also, for the convenience of the work process, it is necessary to prepare a marker or tape, a piece of wood for testing the resulting attachment.
In some cases, additional tools and materials may be required to make work more convenient.
Design Features
The cutting device is based on the teeth around its body and the manufacturing technology of the structure itself:
- solid - made of one metal composition;
- combined - with knives made of one hard alloy and a body made of another metal;
- welded, when the shank is connected to the blades by welding;
- soldered - the assembly is fixed by soldering.
The blades can be pointed with a front and back flat surface. The disadvantage of such items is that they are sharpened; they shrink in size, so they are not suitable for reusable use. Unlike backed bits, which can be resharpened. On the front side they are flat, and on the back they are twisted like an Archimedean spiral. Such a profile is obtained by uniform movements - translational and rotational. The backing procedure is performed with cams, which creates a stable back angle along the entire length. A similar design is created for cutters:
- shaped;
- worm;
- modular.
Cylindrical peeling knife
The mounted cylindrical peeling knife has separation grooves for chips.
They are directed in one direction, and the backed tooth is directed in the opposite direction. Blades placed in different directions allow high-quality processing of side walls. They are pressed into the body, where the radial corrugations move. After sharpening, the dimensions of the actuator do not change.
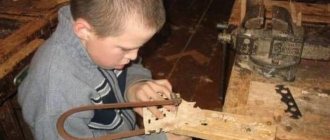
How to make a milling cutter from a drill
Sharpening a cutter in this way is not at all difficult, but the product you receive will not have very good qualities and high abilities. Undoubtedly, a spiral cutter made of carbide is much superior to its homemade counterpart. But in terms of price, the drill is, of course, almost a hundred times cheaper than a figure-eight cutter. So, if you are not satisfied with the high quality of your products, experts have already figured out how to resharpen a drill simply and quickly.
First, we must understand what we will do and what we can get in the end. Therefore, we will study the section of the drill in a cut. The cutting part of the drill is a cylinder-shaped rod with two spiral grooves. During the drilling process, chips fall along them from the hole being machined. Each groove on the protrusion has a cutting edge. The cutting part of the drill consists of the front and back surfaces, two cutting edges, sharpened along two surfaces in the shape of a cone, with a jumper at an angle of 55 degrees between them. During operation, all cutting tools, including drills, behave depending on the material from which they are made, heat treatment and the angles at which the cutting edges are sharpened.
Twist drills are widely used in industry. These drills have a diameter ranging from one tenth to eighty millimeters. The main parts of the drill are the working part, a conical or cylindrical shank (with its help the drill is secured in the spindle or in the chuck) and the legs, which act as a stop for removing the drill from the spindle.
Drills have different spiral angles. The less the drill spiral is twisted, the better the cutter will be. And sharpening such a drill is much easier. Plus, such cutters vibrate much less.
When examining the cross-section of the cutter, you will notice that the largest diameter is only at one point through which the cutting edge passes. At any other point in the section, its diameter is less than the original one.
Air flows passing through the backing grooves prevent the cutter from heating up. Looking at the cylindrical hole being processed, in which milling takes place, we notice the movement of air, which cools the cutting tool well. The cutting edge of the cutter touches the surface being processed at only one point, nothing interferes with the process. Air currents also help remove cut chips.
To begin work, we will need a marker for marking. Since we will be processing two identical spirals, we will paint over one of these spirals with a marker so as not to miss when sharpening.
Take a drill and grind it along a spiral turn, passing once. We cut off part of the metal until we finally get the profile we need. We grind with small ribbons, making backing. This operation must be carried out without fail on both one spiral and the second. A cutter with a back that is too flat will not show good cutting properties.
We will carry out the work on a household machine, which is perfect for turning our drill into a milling cutter. In the process of sharpening the drill, we will need to hold it at a certain angle. On this machine we can do this very easily, unlike other machines in which the jaw is located far from the circle. It will not be possible to place the drill on them at the desired angle to the disk.
Let's take a closer look at cutting spiral grooves in a backfill drill. When we install a drill for processing, we place it on the edge so that our future cutter touches two points. Then we will be able to observe at what point in the cut spiral the stone touches. When changing the angle to a more acute one, the point of contact will shift towards the cutting surface. We must not reach it without additional passages. It is necessary to position the drill at as sharp an angle as possible. When placed horizontally, the rear part will be backed up.
The sharpening process occurs according to the following scheme. Pressing our drill with our finger, we move it back and forth several times. Since the edge becomes very sharp when sharpening, you can damage your fingers. Therefore, prepare in advance. You can protect your hand from wounds by first wrapping several layers of adhesive tape around the finger with which you will hold the drill. A thimble or something similar is also suitable as a protection option.
At the very beginning, we painted one of the grooves with a marker, leaving the second white, unpainted. Why did we do this? In order to grind the spirals evenly and efficiently. We will sharpen the unpainted groove first. Then we will also process the groove marked with a black marker at the same angle. Metal will be removed more accurately from both faces. After this, we change the sharpening angle, and again we will sharpen the white groove, followed by the black one, without changing the angle.
When rotating the drill when sharpening it for a cutter, never try to grind the cutting surface from start to finish. It will not be possible to sharpen the entire cutting edge as expected. You don't need the entire work surface to work with. When sharpened, such a drill will become less durable, and the cutter you receive will not be hard enough. During operation, the cutter begins to dangle and whistle. A loose cutter grabs material during processing. The surfaces will be uneven, and in some places the material will be torn out.
That is, the resulting cutter can mill with an error of 0.5-1 mm, and the product will be imperfect or even defective. Therefore, do not try to process the drill as much as possible over its entire length. When sharpening, you will still have to cut off 2-2.5 cm of the length of the drill. But that's how it should be. Helpful tip: prepare a container of water to cool the drill, as it will get very hot.
So, we set the stop at a slight angle. This will allow us to change the sharpening angle in a wide range - from 0 and more. We start sharpening from the white edge. The process begins approximately at the center of the visible face of the drill. Using a pencil or marker, draw a line on the stop with which we align the starting line of the sharpened spiral of the drill. Rotating the drill, we sharpen it from start to finish using a circle at a spiral sharpening angle. We change the angle of the drill downward or away from the stop and sharpen all the protruding edges again.
Then we sharpen the working edge, not pressing it too hard against the stop. The drill material is almost not removed. If it is the cutting edge that is being turned, then during turning we will immediately determine this by the appearance of chips not behind or under the cutter, but on the front surface. The drill will not be well sharpened along its entire length, but only in its middle part. Using a marker, we mark the line from which uniform sharpening was made and cut off the not perfectly processed end of the drill with a grinder.
After trimming, you need to sharpen the end of the resulting new cutter. On the stop we attach a small piece of wooden board or plywood, cut at an angle. Using it, we align the angle of the cutter when sharpening two sharp tips. We press the cutter first with one side and then with the other to the wood, sharpening both whiskers.
Basic actions and their order
Wood is a soft raw material. Different types of cutting tools have been developed for its processing. When choosing equipment you need to consider:
- The wood cutting knife should not be used for grinding or cutting metal structures.
- The drill for metals is made of strong high-alloy compounds that cannot negatively affect the operation with chipboard. There will be no overheating of the motor and gearbox. The end blade has this design; it is used to cut sheet material, and small-sized groove milling is performed. Although such models are endowed with a small number of feathers.
Groove cutter with different geometries, convenient for creating long grooves. And shaped cutters are used only for tortuous, complex design configurations.
Edge knife
The edge knife itself speaks about its purpose; it is good for sanding the sides. A bearing is installed at the end of such blades; it regulates the direction and prevents it from moving away from the formation of the edge. Finishing is performed on both straight and shaped edges.
Repairs to wooden buildings are not complete without sealing old holes and cutting out new ones.
Actuator of different designs
This requires a drill, and to perform several tasks you will need a whole set.
Where each tool has its own dimensions in diameter and length. They have the peculiarity of changing proportionally. When one value increases or decreases, another indicator changes in the same direction. There are no thin and long elements; they will simply break under a slight load. For example, at 12 mm. diameter, the length will be a drill bit for a drill of 50 mm., There are also 60 mm. These devices are also different in appearance:
- spiral;
- screw;
- feathers;
- ring;
- countersinks;
- flexible.
Through space can be created, different in geometric shape:
- cylindrical;
- conical;
- stepped;
- square.
The mechanism for wood processing, unlike metal processing, has a conical end; it is used to mark the drilling location.
How to make it yourself
Having prepared everything necessary for work, you can proceed directly to the remodeling process:
- Use tape or a marker to mark the part of the drill bit that you want to keep. It is usually about half the size of the entire instrument. Don't forget to leave a small reserve for sharpening.
- Saw off the remaining part in a convenient way.
- Using a machine, use a rough wheel to form an approximate drill profile. If you look closely at the cutter cut, you can see that the clearance angle is quite large, about 40 degrees. Shape the back surfaces.
- Place a diamond wheel and gradually bring the cutter profile to the desired one. You also need to form a spout (centering). Then carefully process the shank.
- If there is a thin circle, use it to trim the edges. This way you can achieve maximum resemblance to the factory tool.
- Check the alignment, making sure that the resulting spout is exactly in the center. To do this, draw 1 line on one side of a piece of wood, and then turn the drill 180 degrees and draw a second line. If they coincide, it means the alignment was done correctly.
After sharpening is completed, you can begin testing your homemade cutter. We place the resulting attachment on the router and make several holes in the wood. If everything was done correctly, the holes will be of high quality, perfectly rounded, even. The wood is perfectly milled, without any effort. To compare the result, do the same with a branded drill. As a result, you can see that there is almost no difference.
This homemade product will save a lot of money, since factory cutters are very expensive. It turns out to be of high quality and reliable. But for an excellent result, you will need to practice on old drills, comparing them with wood cutters, and turning out the desired shape. With a little practice, forming the correct angle and edge will be quick and easy.
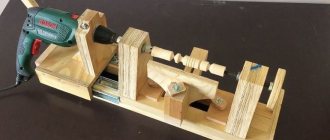
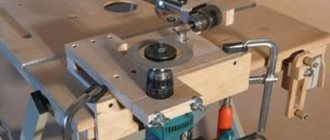
How to prepare a drill for milling
Electric drill
It may not be possible to open a full-fledged carpentry business with an electric drill, but in a home workshop, various milling procedures are often simply necessary.
Reconstruction begins from the place where the electric motor will be mounted.
If you don’t have an old table, you can put it together from available materials - boards, plywood. Bars are suitable for support legs. A recess is made on the countertop for installing the device with guides. You will need to cut a semicircular groove with a saw and drill through the circles to attach the support sheet.
After building the table you will need:
- electrical appliance;
- small cutter for testing;
- cartridge;
- chipboard sheets.
The drill is secured with clamps to a chipboard stand. The cutter is installed on the shaft. The elevator will be the carriage of the power tool with the main body. The stand and the limiting platform are connected at a right angle. The knife should extend beyond the base.
Edge sharpening
The set of equipment is not thrown away after long use; if corrected, they retain their normal condition. This is how a shaped end mill is sharpened along the front cutting edge with a diamond stone. It is attached to the table and the blade is moved along it. The sharpener is moistened with soapy water. The pointed areas will gradually recover with minimal loss in diameter.
If there is a guide bearing, remove it first, then start sharpening. Before work, first clean the cutter with a solvent to remove any remaining wood resins. The sharpening stone is chosen of the correct shape according to the level of grain. It depends on the thickness of the layer being removed and the degree of surface grinding.
They sharpen each tooth in turn, maintaining symmetry with the same number of movements, pressures - in the same direction. For soft cutters, use ordinary sandpaper, abrasive paper, which is glued to a steel or wooden strip.
Grinder
If you have a sharpening machine, then manual work can be replaced with mechanical work. The tip is restored to its former state all around, material is used for it:
- white or normal electrocorundum;
- elbor;
- green silicon carbide.
The machine can sharpen even the most complex spiral tooth shapes using rotational and translational movements. The cutter, during its longitudinal movement towards the circle, makes synchronized turns along the axis. The position of the edge does not change in height, and contact with the abrasive is maintained along with the sharpening angle.
At the end of the procedure, a control inspection of the blade is made for chips and cracks. A special device is used to determine the deformation for runout and the absence of changes in the angles. A deviation of 1 degree is allowed. Good care and correct editing will extend the life of cutters and main power tools.
Summary
Article Name
Wood cutter
Description
Wood cutter for drill 35 mm, 50 mm, 100 mm. Wood end mill for drill. Do-it-yourself wood cutter from a drill.
Author
Sarychev Alexander Viktorovich - forensic construction and technical expert, candidate of technical sciences
Publisher Name
Wikipedia of construction tools
Publisher Logo
- Related Posts
- Drill attachments for car polishing
- Metal cutter for drill - review, instructions for use
- Metal brush for a drill - review, how to choose
« Previous entry
Types of wood milling attachments for electric drills
Let's look at popular types of wood cutters used together with a drill.
Drill
The milling cutter shaft (spindle), which rotates the cutter, produces from 10,000 rpm to 30,000 rpm.
An electric drill is on average 10 times smaller, maximum 3000 rpm. The screwdriver at the first speed is only 400 rpm, at the second up to 1500 rpm.
At such speeds, drills and cutters work very well with a drill. First of all, this is a Forstner drill. It is called a drill because this equipment is designed for drilling holes. But by design it is a milling cutter.
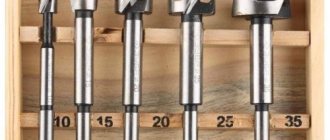
Forstner drill
The design of this cutter is very successful and efficient. Therefore, such cutters are widely used all over the world. Has three working elements:
- central sharpened cone . Centers the cutter, preventing it from moving to the sides, which is especially important when starting drilling;
- lateral cutting (trimming) incisors . The circle diameter of the hole is cut cleanly, minimizing tearing and chipping of the workpiece around the hole;
- horizontal (main) incisors . They are located strictly perpendicular to the drilling axis, and the bottom of the hole is also chosen evenly if it is not through.
This is important when drilling holes for fitting round furniture elements and other carpentry parts. A regular twist drill with a cone point at the bottom leaves the same cone hole. A Forstner drill drills a hole with a straight "bottom".
Sold both individually and in sets of 5 - 10 pieces, of different diameters. Mostly from 8mm to 40mm. Available for sale with a diameter of 56 mm or more.
Pazovaya
A regular groove cutter from a hand router is practically not suitable for a drill. You can try to select a groove with a drill and with its help, but the work will be done roughly and slowly. For the above reasons, drills have low speeds. Slot cutters specifically for specially designed drills compensate for low speeds.
The photo shows a groove cutter and the result of its work.
Essentially, this is a file (rasp) for wood with a large tooth, but not flat, but round.
End, chamfering, edge
Processing the edges and ends of workpieces and chamfering are usually performed with a manual milling machine. It is possible to perform such operations using a drill if you use suitable equipment. An example of a cutter for chamfering the longitudinal edges and ends of workpieces using a drill:
Low drill speeds are compensated by a large number of cutting edges. If a cutter for a manual electric router has only 2 of them, then there are 8-12 of them on cutters for drills.
Under the hinges
It is very difficult to select a fit for flat door and frame hinges using a drill. A hand router is used for this. But the selection for round hinges is easy and simple, even with a screwdriver. To do this, use the above-described Forstner drill of a suitable diameter.
We recommend reading the article on how to cut door hinges with a hand router.
Furniture hinges with a round seat have standard sizes. This is what milling cutter manufacturers focus on. Therefore, you can always find a Forstner drill of a suitable diameter for round furniture hinges on sale.
An example of such use is in the following video:
Disk
The design of such cutters for drills is clear from the name. This is a small disc with cutting teeth. Works on the same principle as large circular saw blades. But due to the low power and speed of the drill and the size of the disk itself, it is not used for sawing. May be suitable for auxiliary work in various carpentry operations. This may require special devices for clamping and fixing the drill.
An example of a disk cutter for a drill:
Tubular (crown)
A widely used and very effective accessory for drills. Using crowns, holes of different diameters are cut.
Even a low-power drill works with crowns relatively easily, because the entire array of holes is not selected, but only a circle is sawed.
Set of crowns of different diameters
In the set:
- two shanks of different sizes for seating crowns, one with a centering drill that can be rearranged;
- a set of the crowns themselves;
- hex key for fixing bits to the shank.
The peculiarity of the cutters is that the circle selected from the hole is not drilled into chips, but remains intact.
There are tubular cutters of other designs. They look like a regular large diameter twist drill, hollow inside. Along the circumference of the end there are cutting edges.
There is also something similar to replaceable crowns as in the photo, but instead of a monolithic bowl with teeth, a flexible round file is used. The equipment is weak, but well suited for soft, thin materials. Such equipment no longer refers to cutters, but to hole saws, although it performs the same tasks as crown cutters.
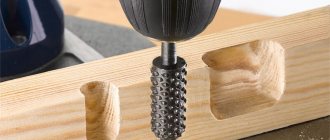
Sharoshka
A roller cutter is a tool used to refine already made holes or machined surfaces. For example, a round hole has been drilled, but the part for fitting is oval in shape or simply does not fit a little in size. For fitting, cutters are used. They come in different shapes and from different materials, including abrasive stone. Although the abrasive can be called a milling cutter only conditionally. Classic cutter cutters made of metal. An example of a set of such equipment in the photo:
We also recommend reading an interesting article about the types of cutters for a hand router.