Abrasive and cutting tools in metalworking machines play a major role in the process of processing workpieces. The quality depends on the characteristics of the device and how firmly it is attached.
As this device, a collet chuck is chosen, which is distinguished by a variety of variations and standard sizes depending on the type of shank and type of machine.
What are collets for hand routers?
Collets are often mistakenly confused with jaw chucks, which are used for similar applications. Their main difference is that the jaw chuck is a more versatile clamping device and, unlike collets, can be successfully used to hold tools with shanks of various diameters. In collets designed for a shank of a certain diameter, it is impossible to fix a tool with a shank of a different size. That is why from a set of collets you should choose those that exactly match the diameter of the shank of the tool used.
Collet chuck
Collet nuts designed for tools with shanks of different diameters are no different from each other; the differences between such devices lie in the different sizes of their clamping elements. In this regard, one nut, from which the collet can be removed quite easily, can be used in a set with clamping elements for shanks of various diameters, but it is much more convenient and practical when each collet for a router is included in the set with its own nut.
What it is
Features of the collet mounting of cutters are high centering accuracy. The cutter, clamped in such a clamp, is located exactly in the center and rotates without beating. This is very important, especially for high-precision machining.
The collet clamp provides reliable strength for fastening the cutter, which is also important at high speeds in woodworking and heavy loads when processing metal.
The collet clamp consists of three main parts:
- main load-bearing part with a shank , which is attached to the spindle of a machine or hand router (in different ways);
- the collet itself is a cone-shaped bushing with petals or slots;
- clamping nut.
The cutter or drill is inserted into the collet. When the clamping nut is tightened along the thread, the cone of the collet is recessed into the seat of the main part and compressed. It is for the possibility of compression that all collets have petals or simply slots on two or three sides.
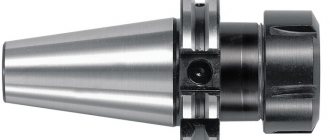
The classic collet clamp in the following image:
This collet chuck has a tapered fit into the machine spindle. The clamping nut does not have a hexagon for a standard wrench. There are slots for a special key with two horns, which comes complete with such cartridges.
A short visual overview of such a clamp can be seen in the video:
Included with the described cartridge is a set of collets of different internal diameters. This makes it possible to mount cutters and drills with different shank diameters.
A replacement set of collets is important. Jaw chucks can accommodate shanks of different diameters. For example, from 0 to 10-20 mm. The collet can only hold the diameter that fits. Having a set of replaceable clamps, the master will have no restrictions in using cutting equipment with different shank diameters.
Device manufacturing algorithm
The collection takes place in 3 stages. Let's take a closer look at each of them.
Making a mini cartridge
In order to assemble a mini drill chuck, you need to purchase a collet - a special mechanism designed for clamping cylindrical objects. Next, you need to connect the motor to the contacts of the future battery, which will power the device during operation.
If your drill is spinning in the wrong direction, swap the wire contacts.
Finding a drill of the right size is not difficult. Insert the drill into the collet body and clamp tightly. Next, the finished nozzle must be installed on the motor body. The collet should fit tightly onto the motor shaft. Otherwise, you cannot avoid vibration. The chuck for a homemade mini drill is ready.
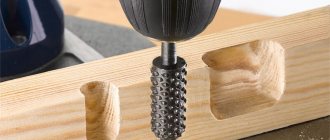
Attachments for a homemade mini drill
can be purchased at any hardware store. Before purchasing, make sure they match the diameter of the collet.
Preparing the body
As a housing for the future device, you can use either an antiperspirant container or a regular hollow tube of a suitable size. hollow tube as the body
.
it is necessary to cut off the bottom and insert a rubber or other plug in its place. If you are making a device from an antiperspirant body
. a hole must be drilled in the cover for the drill to exit.
Connecting the elements
The motor must be installed on the reverse side. If your motor is not the right size, choose another tube. The fit must be very tight to avoid vibration as the shaft rotates. After this, it is enough to tighten the bolts on the collet and connect the resulting device to the electrical network.
One of the main disadvantages of assembling a drill with your own hands from a motor is the lower power compared to a standard device and the low strength of the drill.
If your work requires a cutter, you can easily make one yourself from an old lighter.
To do this, remove the spinning drum from the lighter and place it on a bolt of a suitable size. Secure this with a nut and insert it into the collet hole. The cutter for surface treatment is ready!
If for some reason the cartridge does not fit in size
to the cylindrical shaft of the motor or coil, it is necessary to degrease it well and then attach it to hot glue. This will help to obtain a stable and durable structure.
Such a mini drill with purchased attachments can perform minor repairs on technical equipment, drilling plastic, thin metal, and making crafts.
The problem of consumption or lack of collet cartridges is especially familiar to jewelers. Specialists involved in the manufacture of printed circuit boards also face this problem.
Collet chucks can be created independently from available materials. However, there are some nuances that will be covered in detail in the article below.
It should be noted right away that a hastily made collet will not be dismountable. That is, strictly speaking, removing one drill from it and inserting another will not work. For this reason, the manufacturing method is more suitable for those who need to create a large number of identical holes.
So, to create a homemade collet chuck we will need:
- drill;
- blank;
- steel wire;
- soldering flux;
- hoop.
Initially, you should wind the steel wire around the blank in the form of a rigid spring (the half rings come as close to each other as possible). Next, the resulting structure must be thoroughly soldered.
Today, anyone can easily purchase a special cam for any type of drill. This can be done both in construction boutiques that offer equipment for sale, and on the Internet (at auctions such as Ebay or Amazon).
The price of such a device does not exceed sixty rubles. Purchasing a cam will forever save you from searching for suitable collets for using various drills.
Of course, it is better to purchase a cam made of high-carbon, durable steel. To tighten it, it is recommended to use a special wrench, which is included in the kit.
Engine power and control system
There are three gradations of milling cutters: low, medium and high power. High drive performance is required with increased cutter lengths. So, for artistic milling and making grooves up to 10 mm deep, low-power milling machines with a power of up to 800 W are quite sufficient. In turn, processing the edges of tabletops, making quarters and carpentry processing of massive parts requires the use of tools with a power of over 2 kW.
You should choose the power of the router carefully: due to operation at high speeds, the gyroscopic effect is clearly manifested, which makes the tool difficult to hold in your hands. On the other hand, an increase in power is associated with an increase in the size and weight of the tool, which makes it very difficult to process small parts that require a delicate approach.
Any router should be equipped with a speed controller, preferably an electronic one. The diameter of the cutters can vary widely; therefore, to achieve the correct cutting speed, it is necessary to set the rotation speed from 10 thousand rpm to 35 thousand rpm. The speed setting range for different milling cutters can vary greatly; this parameter is determined by the type of materials being processed and the size of the cutters that will be used during work. It must be remembered that the speed controller scale is marked conditionally, and therefore the user manual must have a speed correspondence table.
To work with valuable wood species or artificial stone, the router must be equipped with so-called constant electronics. This is a small spindle speed control unit that maintains the set speed regardless of the load on the engine and the current mains voltage. Without this option, it is almost guaranteed that the milled surfaces will be uneven.
How to make a chuck for a mini drill Video
For a homemade cartridge, you will need a piece of metal or textolite pipe with a diameter suitable for the motor shaft. The length of the homemade bushing should be at least 2 times the length of the shaft and allow the drill to be securely secured.
The sleeve can be secured using screws or hot glue. As a rule, the motor shaft has a diameter of 2-5 mm, and drills for making circuit boards have a smaller diameter. This means that you need to fill the resulting space with filler and achieve alignment between the drill and the shaft.
As a filler, take rosin and pour it into the hole in the sleeve. Melt the rosin with a soldering iron and insert the drill. The rosin will harden and hold it securely.
To achieve perfect alignment, melt the rosin again and turn on the power. While the rosin has not hardened, try using tweezers to correct the position of the drill. If necessary, repeat the operation again.
(1
ratings, average:
5.00
out of 5)
Collet chuck design
The chuck consists of a clamping nut and a set of collets. Available with retractable, retractable or fixed collet. According to their purpose, collets can be clamping or feeding.
The feed collet is a hardened steel sleeve with 3 cuts that form a kind of petals with ends directed towards the center and springy. The opening of the feed collet should be such that the workpiece is clamped tightly. The feed collet is screwed onto a rotating feed rod, which feeds the workpiece using a hydromechanical or cam mechanism. When installing the workpiece into the chuck, its Morse end moves between the petals, spreading them apart. Under the influence of elasticity, the petals are pressed tightly against the workpiece. The adhesion increases during processing due to frictional forces.
A solid collet is a sleeve with petals that spring back when impacted. To work parts with a diameter of less than 3 mm, three-lobe collets are used, from 3 to 80 mm - four-lobe collets, and more than 80 mm - six-lobe collets. The grip is increased by reducing the clearance of the slots as the collet is pulled into the chuck.
Split collet - used for fastening parts of the smallest diameter. The jaws of such a cartridge are moved apart using springs. Split collets can be equipped with replacement inserts; their type and dimensions depend on the characteristics of the workpiece.
Collet chucks also hold metalworking tools (drills, taps, cutters) with a small diameter Morse shank. The cutter is secured with a replaceable collet, additionally reinforced with a nut. When screwing the nut, the collet is recessed inside, and being elastic, it firmly clamps the Morse shank. The disadvantage of this type of chuck is that each cutter diameter requires its own collet.
In longitudinal turning machines, a self-clamping chuck is used to secure the mini-workpiece being processed. The design of such collets is somewhat different from conventional ones. Together with them, conventional tools for clamping a Morse taper can also be used to secure the workpiece.
Design and Application
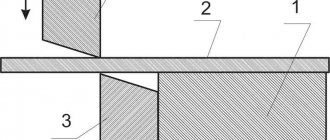
The collet is a springy split sleeve with a truncated cone and a hole of the required diameter. The collet body has special cuts that ensure the movement of the locking blades when installing or removing the tool. The compressive force ensures the rotation of the nut.
Read also: The meaning of the word “halberd” in 7 dictionaries
The figure below shows a collet (1), a straight-shank cutter (2) and a collet chuck (3).
Homemade collet coupling of the simplest design
The simplest collet, operating on the principle of a coupling, can be made of steel wire with a diameter of 1 mm. It should be borne in mind that the collet of the proposed design is not a universal clamping device and can only be used for drills of the same diameter
It is important that the transverse size of the drills used corresponds as closely as possible to the diameter of the output shaft of the drive motor. In addition, it is important to consider that such a collet can only be used when drilling materials with low viscosity
To manufacture a collet coupling of the proposed design, the following consumables, fixtures and tools will be required:
- a cylindrical metal blank, the diameter of which corresponds to the diameters of the output shaft of the electric motor and drill;
- steel wire;
- electric soldering iron;
- soldering flux.
The process of manufacturing a collet chuck for a microdrill is carried out according to the following algorithm:
The wire is wound onto a blank so that a rigid spring is formed
It is important that the spring coils are located as close to each other as possible. The finished spring is carefully soldered without removing it from the blank. The simplest collet can be made with your own hands and in a different design
The design of such a cartridge, the manufacturing cost of which will be very low, consists of two halves fastened with a screw. On the inner surface of each of these halves, cylindrical grooves are machined, which, when tightening the screw, ensure fixation of both the clamp on the drive motor shaft and the tool used. If you decide to make such a collet clamp with your own hands, keep in mind: in order for it to work correctly, you must balance it before using it.
The simplest collet can be made with your own hands and in a different design. The design of such a cartridge, the manufacturing cost of which will be very low, consists of two halves fastened with a screw. On the inner surface of each of these halves, cylindrical grooves are machined, which, when tightening the screw, ensure fixation of both the clamp on the drive motor shaft and the tool used. If you decide to make such a collet clamp with your own hands, keep in mind: in order for it to work correctly, you must balance it before using it.
Recommendations for use
To achieve maximum performance from collet chucks, the following recommendations must be followed:
- Reliable fixation of the cutting tool with the required force.
- Minimizing runout during operation.
- Check the cartridge in a timely manner for wear and scratches, and replace if necessary.
- Keep the cartridge clean, thoroughly wipe and degrease the components.
It is advisable to use nuts with ball bearings, which have higher static rigidity during finishing and provide excellent damping to reduce vibration during cutting.
Mini drill made from an electric chuck
The first option for assembling this device with your own hands is based on the use of an electric cartridge
. which can be purchased separately, or taken out of the light bulb. If you buy it, it is very inexpensive, but the cost will be justified.
Also, to assemble a mini-drill with your own hands from a chuck, you will need the following things:
- motor;
- a jar of soap bubbles;
- construction knife;
- insulating tape;
- hot glue;
- blowtorch;
- household switch.
Mini drill body and core
Work should begin by preparing the body of the mini-drill, which will serve as a jar for soap bubbles
. This is done like this:
- Prepare a jar lid. To do this, heat up the soldering iron and use it to make a small hole in the lid of the jar.
- The diameter of this hole should be slightly larger than the diameter of the drill base.
- The bottom of the jar must be completely cut out.
Let's start working with the core:
- We connect the cartridge with the motor. Most often, motors are taken from different tools that have already been used.
- Before the bonding process, the motor must be completely degreased using acetone.
- The cartridge can also be degreased, but there is no need to water it like a motor with acetone. Regular wiping will be sufficient.
The method of fastening occurs through cold welding
. If this method does not suit you, you can also use hot glue. Remember that the more complex your future mini-drill, the more materials you will need to assemble it yourself.
When planting with welding or glue, you need to work extremely carefully so that everything turns out as smooth as possible. It will not be possible to redo the work later, keep this point in mind.
You also need to consider the following:
- at the mounting location on the cartridge there is a hole that needs to be covered before connecting the parts;
- putty is carried out using simple plasticine;
- Only the holes should be filled with plasticine; there should not be any left on top of the cartridge.
How to choose the right set of collet clamps
When purchasing a set of collet clamps for a hand router, you may encounter the fact that the collets will not be of the highest quality. In addition, they may not coincide with the diameters of the shanks of the tools they are intended to fix. Such situations, unfortunately, are not very uncommon and are especially typical for those cases when a cheap set or products from little-known manufacturers are purchased. The only way out of such situations is most often the purchase of a new set of collets for the router.
The collet chuck must match the router spindle, and the collet must match this chuck. Collets often have different cone angles and fit only “their” clamping nut
To avoid the problem of purchasing collets of inappropriate quality and size for a router, it is better to opt for products from trusted manufacturers. If this is not possible, you must carefully check the collets included in the kit to ensure they comply with the required quality and standard dimensions of the milling tool.
How to choose a collet chuck
The first condition when choosing a self-clamping chuck is attachment to the spindle. The clamp can be installed directly on the spindle, through an adapter, or screwed onto a thread.
Flange size: diameter of the flange for connection or Morse taper parameters. Without knowing the parameters of the end of the flange, you cannot select a cartridge.
Number of cams: a set can have two, four, six. The price of the product depends on the quantity, shape and metal. Depending on the type of work, you can purchase fasteners made of hard or soft metal alloy.
Collet chuck design
The chuck consists of a clamping nut and a set of collets. Available with retractable, retractable or fixed collet. According to their purpose, collets can be clamping or feeding.
The feed collet is a hardened steel sleeve with 3 cuts that form a kind of petals with ends directed towards the center and springy. The opening of the feed collet should be such that the workpiece is clamped tightly. The feed collet is screwed onto a rotating feed rod, which feeds the workpiece using a hydromechanical or cam mechanism. When installing the workpiece into the chuck, its Morse end moves between the petals, spreading them apart. Under the influence of elasticity, the petals are pressed tightly against the workpiece. The adhesion increases during processing due to frictional forces.
A solid collet is a sleeve with petals that spring back when impacted. To work parts with a diameter of less than 3 mm, three-lobe collets are used, from 3 to 80 mm - four-lobe collets, and more than 80 mm - six-lobe collets. The grip is increased by reducing the clearance of the slots as the collet is pulled into the chuck.
Split collet - used for fastening parts of the smallest diameter. The jaws of such a cartridge are moved apart using springs. Split collets can be equipped with replacement inserts; their type and dimensions depend on the characteristics of the workpiece.
Collet chucks also hold metalworking tools (drills, taps, cutters) with a small diameter Morse shank. The cutter is secured with a replaceable collet, additionally reinforced with a nut. When screwing the nut, the collet is recessed inside, and being elastic, it firmly clamps the Morse shank. The disadvantage of this type of chuck is that each cutter diameter requires its own collet.
In longitudinal turning machines, a self-clamping chuck is used to secure the mini-workpiece being processed. The design of such collets is somewhat different from conventional ones. Together with them, conventional tools for clamping a Morse taper can also be used to secure the workpiece.
How does a collet clamp work?
Made in the form of a sleeve with a truncated cone having a hole of a given configuration (round, tetrahedral, hexagonal, etc.). Cuts are made along the collet, forming clamping blades with conical working surfaces.
The operating principle of the device is as follows:
- when clamping, into the hole formed by the clamping petals: the workpiece is inserted;
- the cartridge is screwed into the thread;
- the conical surface of the cartridge moves onto the working surface of the collet;
- the petals compress, capturing and centering the workpiece; the device clamps the object.
- The part is removed by rotating the chuck in the opposite direction and removing its force from the surface of the collet blades.
Classification
When starting to install household communications, you should understand that the parts for pipelines differ from each other and each of them has its own purpose. Classification according to general characteristics helps not to get confused in the diversity of market offerings.
Push-in fittings can be divided according to their purpose into:
- gas pipeline (pneumatic);
- water supply (hydraulic).
Parts for gas pipelines have only one o-ring on the fitting or do not have one. Pneumatic fittings can be divided into parts with cylindrical pipe threads and parts with tapered threads based on the type of thread.
According to their use, fittings are divided into three categories:
- intended for rigid pipe (metal);
- for semi-solid pipelines (metal-plastic);
- for soft pipes (polymers).
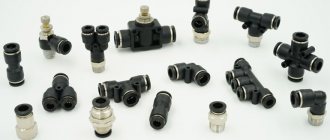
Push-in fittings made of plastic do not have a union nut. They are secured by means of a latch of the part body directly to the collet. The collet has metal teeth that press the soft polymer pipe.
By type of connection:
- intended for a straight section - simple couplings, transition couplings for different diameters, transition couplings from pipe to hose (with fitting), plug couplings;
- intended for an adjustable unit - tees, crosses;
- intended for turning or circling - corners.
In order to select fittings of the required configuration in sufficient quantities, you should have a project for the future pipeline.
How to make your own cartridge
For work on wood, soft metals and plastics, and home production of printed circuit boards, a low-power mini-drill made by yourself is suitable. The easiest way is to equip it with a ready-made mini-self-clamping mount made from a pen or pencil. But if you don’t have any at hand, it’s not at all difficult to make a mini-collet with your own hands. Required: soldering iron, 1 mm thick steel wire, solder.
- a spiral is rolled from the wire with a diameter equal to the diameter of the electric motor shaft and the drill with which to work;
- the spiral is soldered, high quality connections are ensured by soldering flux or KFET;
- the spiral is put on the shaft and the mini-collet is ready.
Video about how a qualified metal turner made a self-clamping chuck with his own hands:
A collet chuck is a type of chuck widely used in lathes. it is a self-clamping type of such fixtures since it does not require any additional parts. This is a simple and reliable device that is perfect for turning. What are the features of a collet clamp and how to choose it correctly will be discussed in the article.
How to replace on a hand router
Replacing the collet on manual routers is the simplest operation and consists of the following steps:
- The spindle itself is secured using a stopper in the housing or a key in the grooves of the spindle (depending on the model).
- The clamping nut is completely unscrewed and removed.
- The collet is pulled out.
- A new one is inserted.
- The nut is tightened.
There will be no problems if the part fits exactly on the clamp of that particular model. It is important that the diameter of the mounting hole of the new collet matches the shank of the cutter that will be used.
The nut should be tightened tightly enough, but without fanaticism, so as not to strip the thread.
Purpose and types of collet chucks
Collets, acting as clamping elements, provide fixation not only of tools for the router, but also of workpieces that are being processed. In chucks equipped with collets, in particular, workpieces subjected to both roughing and finishing can be equally successfully fixed.
According to their design, collet chucks are divided into several main types:
- retractable;
- retractable;
- equipped with fixed collets.
Design of chucks with retractable and retractable collets
According to their purpose, collet chucks can be classified as feed chucks or clamping chucks. The first is a sleeve made of hardened steel, on the side surface of which three partial cuts are made, forming springy clamping tabs. The dimensions of the internal hole of such a device, in order for it to be able to provide reliable fixation, must strictly correspond to the geometric parameters of the workpiece being processed. A cartridge of this type is used in conjunction with a supply pipe (screwed onto its threaded end). In order for the workpiece, which is located in such a pipe, to receive axial movement, a cam mechanism or a hydromechanical drive is used. This device works on the principle of the well-known collet pencil, through the opening and closing petals of which the lead rod moves.
Advantages of ER collet chucks
In comparison with milling and screw chucks, heat-crimping mandrels and other fastening forks, the collet design has a number of advantages:
- Lowest runout, which increases the service life of the fixed tool.
- Easy to use.
- High reliability and ease of maintenance. Regular cleaning and replacement of the cartridge, which is a consumable material, is sufficient for long and reliable operation.
- High processing speed.
- High modal and dynamic rigidity for finishing and roughing, respectively.
- Low cost.
Collet clamps, their types, application features, tips for making a collet with your own hands
A collet chuck is a type of chuck widely used in lathes. it is a self-clamping type of such fixtures since it does not require any additional parts. This is a simple and reliable device that is perfect for turning. What are the features of a collet clamp and how to choose it correctly will be discussed in the article.
Depending on the work to be done and the purpose of the machines, all clamping products can be classified into the following types:
- Lever;
- Collet;
- Drilling, also known as quick-clamping;
- Wedge and hydraulic chucks;
- Three- and four-cam;
- Thermal cartridges and membrane.
Self-clamping drill chucks are used on universal or special lathes. Their use allows the clamping force to be transferred with less torque compared to drill chucks.
Self-production
For working on wood, metal and plastics and for making a variety of printed circuit boards, a small drill is best. It should be equipped with a ready-made mini-clamp-type mount.
But if you don’t have one at hand, you can easily make it yourself. Here you will need a soldering iron, millimeter-thick steel wire and solder.
Next, the manufacturing process proceeds according to the following scheme:
- We roll the wire into a spiral. Its diameter must be equal to the diameter of the electric motor shaft and the drill with which it will be necessary to work;
- Solder the spiral. High quality is ensured by soldering flux or similar options;
- Then we put the spiral on the shaft - and the mini-chuck for our drill is completely ready.
Homemade collet chucks are perfect if there are no ready-made clamps for drills and if you have the appropriate skills to make such mechanisms yourself. They will also become indispensable in the household, when work with specific parts is required, and ready-made clamps may not be suitable for any specifications.
The collet is an important element in lathes of various modifications. With its help, you can carry out work on processing and milling metal and plastic parts. In addition, you can easily make it yourself using available materials.
The variety of such mechanisms available today allows you to select the optimal clamp model for your personal needs.
It is also very important to take into account the method of attaching it to the spindle and the dimensions of the flange, since without them it will be impossible to select a collet
Have fun working with different types of clamps!
Types and features
Depending on the area of application and the design features of the mechanism, collet chucks are divided into several types:
- ER collets. With two clamping points and a through hole, the most commonly used type;
- for taps. With a square groove compensating the axis;
- through and blind. The former process parts of unlimited length, the latter are suitable for workpieces of limited size, for example, workpieces in which one end is sealed;
- with one and two clamping sections. The second type, compared to the first, fixes the part more reliably by holding it at two points on the axis.
Collet chuck clamps come in two types:
- clamping The bushing is made in the form of several springy petals corresponding to the size of the fastener. The three-lobe bushing is designed for processing workpieces with a diameter of up to 0.3 cm, four-lobe bushings - from 0.3 to 8 cm, six-lobe bushings - for parts more than 8 cm in diameter;
- servers. The steel collet is equipped with three longitudinal grooves, forming petals with converging ends. The well-springing design feature allows for easy installation and reliable holding of a workpiece of the required diameter in the chuck. During operation, the feed mechanism with the screwed collet begins to move, which contributes to an even closer approach of the petals.
The feeding type of cartridge is more reliable, but requires a special key for fixation. Clamping types are used in cases where frequent replacement of cutters during operation is necessary.
Push-in connection Pipes and plumbing
Plastic pipes are becoming increasingly popular every year; they are actively used for organizing both cold and hot water supply networks, as well as for installing heating systems.
To combine such pipes into systems and to connect them to plumbing fixtures, various connecting elements are used, which include a collet clamp.
Collet-type fittings, the use of which does not require special tools and complex equipment, are capable of providing reliable and durable connection of pipeline elements for various purposes. Such clamps can be used both for the installation of pipelines and for connecting plumbing fixtures to the latter.
Straight and angled push-in fittings
How to make your own cartridge
For work on wood, soft metals and plastics, and home production of printed circuit boards, a low-power mini-drill made by yourself is suitable. The easiest way is to equip it with a ready-made mini-self-clamping mount made from a pen or pencil. But if you don’t have any at hand, it’s not at all difficult to make a mini-collet with your own hands. Required: soldering iron, 1 mm thick steel wire, solder.
Work progress:
- a spiral is rolled from the wire with a diameter equal to the diameter of the electric motor shaft and the drill with which to work;
- the spiral is soldered, high quality connections are ensured by soldering flux or KFET;
- the spiral is put on the shaft and the mini-collet is ready.
Video about how a qualified metal turner made a self-clamping chuck with his own hands.
The question of how to make a collet clamp with your own hands is relevant for those who are engaged in jewelry making, engraving or printed circuit board manufacturing and use such equipment. It is specialists in these categories who most often encounter breakage of the collet clamp, which can be replaced with a new production model or made with their own hands.
There are several options for making a collet chuck with your own hands, each of which has certain nuances. However, no matter what method is used to make a homemade clamp, its price will compare favorably with the cost of a serial model.
Working principle of the collet chuck
Chucks with a set of replaceable collets are used for fastening axial workpieces and cutters on milling, lathe, drilling machines, and computer numerical control (CNC) equipment. There are many sizes and types of collet chucks that all work on the same principle. The self-clamping nut applies pressure to the end of the collet, which moves into the conical opening; its diameter decreases due to compression, firmly holding the tail end of the Morse cutter. To remove the cutter or part, the nut is screwed together, the pressure is reduced and the collet is released.
Typically, such fasteners are used for processing bushings, cylindrical parts with a Morse shank, and rods. They are very convenient for secondary fastening of already processed parts. If the profile of the part does not match the shape of the cartridge inlet, replaceable cartridges from the kit are used.
How does the collet clamping mechanism work?
A milling or turning chuck, the basis of which is a collet clamp, works according to the following principle:
· A self-tightening nut, which is tightened, creates pressure on the end of the collet mechanism.
· Under the influence of pressure, the collet moves into a cone-shaped hole, which leads to compression of the petals that make up its working part.
· By contracting, the collet blades reliably fix the tool shank or workpiece.
The big advantage of collet chucks for a milling machine (or turning equipment), when compared with similar devices of other types, is that the tool or workpiece that is fixed in them is perfectly centered, which ensures minimal radial runout. In addition, to use a collet-type milling or lathe chuck, there is no need to use special keys, which, as a rule, are often lost.
Centers
Various devices are used to install and secure workpieces on lathes (Figure 31).
The main types of devices include: two-, three- and four-jaw chucks, collet and drive (Figure 31, d) chucks, centers (Figure 31, b, c), steady rests. The chucks are mounted on the machine spindle, and the centers are installed in the tailstock quill or in the hole in the machine spindle.
Figure 31. Accessories for lathes:
A) -
three-jaw self-centering chuck;
b) -
ordinary center;
c)
- rotating center;
d)
- driving cartridge;
d)
- fixed steady
Jaw chucks are divided into self-centering ones, which ensure that when securing a workpiece having a cylindrical surface (external or internal), its axis coincides with the axis of the machine centers, and simple ones, which do not implement this function.
Self-centering chucks in most cases are made with three-jaw (Figure 31, a)
. Chucks of this type are convenient to use, since all the cams that secure the workpiece move along radial grooves towards or away from the center simultaneously and synchronously with each other.
Simple (non-self-centering) chucks are usually made with four-jaw chucks. Each cam in them moves with its own screw independently of the others. This allows you to install and secure workpieces of cylindrical and non-cylindrical shapes in the chucks.
When processing long and non-rigid workpieces on lathes, steady rests are used. Lunettes are divided into fixed ones (Figure 31, d
), fixed on the machine bed, and movable, mounted on a support. The fixed steady rest does not change its position relative to the machine when processing the workpiece. The movable rest, used for longitudinal turning, moves along with the support.
Clamps
The transmission of rotation from the spindle to the workpiece installed at the centers of the machine is carried out using a clamp, which is put on the workpiece and secured with screw 1, figure below - a), while the shank 2 of the clamp rests against the pin of the driver chuck. A self-tightening clamp is more convenient to use, figure below b), in which the shank 2 is fixed in the body 5 movably on the axis 4. The lower part of the shank 2, facing the workpiece, is made eccentric with respect to the axis 4 and has a notch. To install the clamp on the workpiece, shank 2 is tilted towards spring 3, which, after installing the clamp, pre-tightens the workpiece with the shank. During the machining process, the pin-lead 1 of the chuck performs a final tightening of the workpiece with a shank in proportion to the cutting force.
a - regular: 1 - screw; 2 - shank; b - self-tightening: 1 - stop; 2 - shank; 3 - spring; 4 - axis; 5 - prism
Mandrels
There are a number of rules for using turning mandrels that help improve the accuracy and cleanliness of processing:
- The accuracy of the mounting hole for installing the holder should not be lower than the seventh quality, the surface cleanliness should not be worse than Ra 1.0.
- The tool must be positioned along the center axis of the machine.
- The contact surface between the turning mandrel and the machine socket should be maximum. This is achieved by installing a cylindrical mandrel in a split (collet) holder.
- To avoid deformation and deformation of the tool during the cutting process, the hardness of the material from which the holder collet is made should not be less than 43...47 HRC.
- The greater the overhang of the mandrel, the more reliable and accurate its fastening should be. It is not permissible to fasten long holders using screws to a V-shaped or cylindrical surface. To install long mandrels, additional support devices are used.
The correct processing of the workpiece also depends on the accuracy of the turning equipment itself. Testing and diagnostics are carried out using a test mandrel to check the lathe . It is a cylindrical part made with a high degree of precision. A control sample, as a rule, is installed in the centers of the headstock and tailstock, then an indicator mounted on the machine support and moving along the mandrel determines the accuracy of the equipment and compares it with the permissible values regulated by the standard.
Lunettes
A steady rest is an additional device for a machine that acts as a main or secondary support when working with workpieces. The device is often used to provide stability to workpieces and avoid damage or deformation. There are several types of steady rest for a lathe, each of which has its own effect on the processing of workpieces. In this article we will analyze all the functionality of this device, its advantages and disadvantages.
Installation of a fixed steady rest is carried out in several stages:
1. Fix the workpiece in the centers of the machine.
2. Pre-set all three cams of the device.
3. The neck of the workpiece is ground at the point of contact with the cams of the steady rest.
4. Fix the workpiece for work.
It is worth noting that preliminary turning of the workpiece neck is not always required. If the part has already been pre-processed or has fixed dimensions, then turning can be omitted.
Faceplates
The faceplate is a disk (most often cast iron, but there are options made of steel), which has a hole in its center, a hub (its diameter may vary), intended for attachment to the spindle of a lathe. As mentioned above, this part is used in the case when it is necessary to fasten a part that is not of a simple design, but of an irregular shape, or of a very large size. For this operation, the faceplate can be equipped with four or six (optional) T-shaped grooves (T-profile grooves), plus several through holes. The fastening procedure itself is carried out using several strips or bolts, which are usually located diametrically opposite. Instead of bolts, other parts can be used, for example, thrust posts (or so-called “corners”), clamps and linings.