From the author: Hello, dear masters! Many people who are often involved in construction work deal with a variety of drills that sometimes require sharpening. This element can be used for a long period of time, but sometimes there comes a time when it begins to work worse. Then a person may have a question about how to sharpen a wood drill.
People who have never done such an activity find it difficult. But those who have repeatedly resorted to sharpening tools know that this process is quite simple.
Features and types of wood drills
So, first you need to figure out what this item is. Many people know that high-quality work with any material requires a special type of construction tools, this also applies to drills.
This item is divided into several types, each of which is used for different categories of work. The following modifications are distinguished:
- feather ( feather). This type of drill is used for drilling holes of medium diameter - up to twenty-five millimeters. Typically, this element is used when the accuracy of the geometric parameters and the quality of the hole made are not important. It is not very expensive and, on top of everything else, is very easy to use,
- spiral ( screw ) - the working part of such a drill is somewhat reminiscent of an auger; it is used for drilling holes of small diameter. The design is practical in that the process removes wood chips very well. And, in addition to the above, the screw drill accurately and efficiently fulfills its role,
- screw - a variation of the previous option. Designed for working with wood, but the peculiarity is that it drills against the grain,
- Lewis drill is a subtype of auger drill. It has a serpentine shape. The diameter of the drilled holes is from ten to sixty millimeters,
- crown - designed for making holes of larger diameter,
- Forstner drill - this item helps to make a hole with a bottom. This is its difference from previous types - it is not intended for through drilling. When working with such an element, the bottom turns out to be perfectly flat.
Types of wood drills
Typically, high-quality drills are used by experienced craftsmen who require various types of products in their work to create holes in wood.
These could be holes, for example, for tenons, bolts or dowels. Moreover, the drilling process itself can be very diverse in quality, which will lead to thoughts about how to properly sharpen the drill after use and whether it will have to be sharpened at all. The most common types of drills today include: screw, spiral, feather, center, ring and Forstner drills.
Screw
If you need to drill wood across the grain without once again asking yourself the question of how to properly sharpen a drill for wood, then a screw drill with a fine thread at the end will come in handy. They can reach up to 50 millimeters in diameter. A special screw shape will help remove chips from the work site in a timely manner and thus not overheat the rod. Depending on the required hole depth, you can purchase drills longer than a centimeter, with a minimum size of 400 millimeters.
Screw drills for wood
Spiral
A spiral product can immediately be distinguished by a perfectly polished milled spiral with an edge that prevents any movement of the rod to the side during operation. It is thanks to the spiral shape that they can easily drill holes in veneer structures. The diameter of the corresponding drills reaches 52 millimeters, and the smallest can be found at 3 millimeters. In order to accurately target the intended drilling location, the tail of the product is equipped with a conical shape, which gives a lot of convenience.
If, when purchasing, the choice fell on twist drills, then you should always remember the relationship between the diameter of the product and the maximum number of revolutions that it can produce. Otherwise, the service life of the product will be sharply reduced. If you need to process hard wooden surfaces, it is better to set a maximum of 900 rpm with a drill diameter of 14 millimeters or less. But for soft wood, you can set the drilling tool to 1800 rpm.
Twist drill bit set for wood
Feathers
The most common type of drill is the feather drill. It is this that makes you think about how to sharpen a feather drill for wood, and is most often used in repair and construction work. It is the most convenient and has various options in diameter.
It has only one important drawback: this shape of the drill does not facilitate chip removal and the drilling process becomes significantly more complicated, especially when a hole with a large depth is needed. That is why experts recommend using this type of drill when working with wood boards or thick boards, where the drilling process will occur as efficiently as possible.
A special type of tip for a feather drill or a similar product with an extension can correct the situation. This extension has a hexagonal shape and can be used for other types of drills. In this case, the diameter of the final hole can reach up to 52 millimeters.
Feather drills for wood
Center and ring
But center drills are useful for creating perfectly smooth through holes in a wooden surface. Typically, such products take the form of a 50 mm (minimum 12 mm) rod with a cutting edge at the bottom, reaching a length of up to 150 mm. Of course, it will not be possible to make deep enough holes. For this purpose, ring drills are suitable, which look similar to a crown or a ring with teeth. They are usually sold as a whole set in the form of attachments with a centering drill and a single base.
Forstner drills
When it comes to repairing or creating furniture, and not about thoughts with the question of how to sharpen a feather drill for wood, then you can immediately safely go for Forstner drills, which are best suited for this task. They allow you to drill completely blind holes with a perfectly flat bottom. In this case, the diameter of the product reaches from 10 to 50 millimeters. The drill itself is coated with a specialized alloy, which serves as protection and increases service life.
Forstner wood drill bit
What you need to know before you start sharpening
Sharpening is a fairly important process that affects the subsequent operation of the tool. But it's important to know that you don't need to sharpen it if you don't need to. This is a waste of time and effort (especially when sharpening by hand). That is why it is necessary to familiarize yourself with the signs that the tool has become dull.
Firstly, it quickly heats up during operation, becomes deformed and interferes with its normal use. This is one of the signs that it is time to sharpen.
Secondly, if during the process it feels like the holes are taking much longer to drill than before, then it is worth examining the drill for dullness.
And finally, thirdly, the hole made is too uneven. This is probably one of the most important signs indicating the need for sharpening.
Technology for sharpening drills of various types
There is no need to worry here, because due to interaction with such a soft material, the tool can work without sharpening for more than one year.
But with metals the situation looks different - after a couple of months you can notice signs of loss of sharpness. How do you know when it's time to sharpen your tools?
The drill begins to hum or squeak when starting work. It generates heat and overheats.
Such a tool breaks down much faster, making metal processing impossible.
You can sharpen a drill using a machine or a special device.
If possible, it is better to trust such a process to professional equipment, but if you don’t have it at hand, you can really do everything yourself at home.
The most popular way is to make a machine with a sharpening stone at home, which is easy to use and does not require significant expenses.
The question of sharpening a drill for metal torments many people, because the center line of the cutting part can have a varied design: one cavity or two, and it can also be conical, cylindrical or helical.
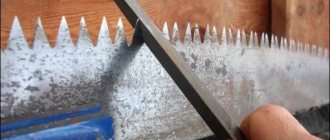
Sharpening should be done correctly along the back edges. The angle at which the tool is fed into the machine plays a big role.
An incorrect angle can damage the drill beyond repair.
The cutting part itself consists of an edge - it must be the sharpest in order to cope with metals, as well as an auxiliary screw, a jumper, and the back and front surfaces.
Sharpening methods
It's time to get closer to the main question - how to sharpen a drill correctly? There are two available ways to do this:
- using a file,
- electric machine.
Carrying out the procedure with a file is more problematic and time-consuming, so many people prefer an electric machine. But some are conservative and use exclusively manual methods.
The disadvantage of the machine is that the tool will have to be cooled frequently (during sharpening it will heat up too much, which can lead to deformation). With a file this problem will not arise, but as mentioned above, the process will take much longer.
Features of sharpening the tool in question
The complexity of the drill design means that a huge number of nuances can arise during sharpening. The features of the work carried out include the following points:
- Many people notice the need for sharpening when problems arise during drilling work. It is worth considering that problems can arise not only due to a dull cutting edge, but also due to breakage or wear of the entire tool.
- The first sign that the drill should be sharpened is a significant increase in the operating time. In other words, it takes much longer to get the hole.
- A dull drill heats up much faster. It is worth considering that elevated temperatures cause metal deformation. High temperature leads to increased ductility of the metal.
- If you do not have the required experience, you should conduct training on worn drills. This will eliminate the possibility of damage to the cutting tool. If the work is carried out incorrectly, the drill cannot be used for further work.
Read also: Rules for storing acetylene cylinders
Varieties of wood drills.
An important point is that the wood drill is made from a less durable material. Drills intended for drilling metal are made from more wear-resistant material.
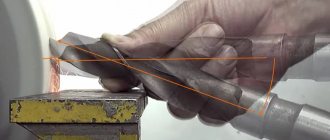
Using an electric machine
To begin with, it is worth clarifying that this process will be quite complicated for those who have never sharpened before. If you are one of these people, then try to practice and sharpen an already worn out tool that you have not used for a long time. Only after a little training will you get an idea of how things are going with the process. You can get down to business directly.
The work is painstaking - one extra movement can ruin the instrument, which, of course, you don’t want. Therefore, it is very important to follow the instructions below, it will help you complete the procedure most correctly.
During execution, you need to follow several rules that will ensure you a good outcome:
- place a container of cold water nearby - it will be useful for cooling an overheated drill,
- 45 degrees - this is the most correct angle. Therefore, try to keep the element in this position,
- the drill is installed on the edge of the machine disk - this is the most correct option,
- if you want sharpening to be carried out most accurately, then place the element in the washer - this way you will be confident that the work will go smoothly,
- the rear edges of the drill must be turned a few millimeters and then ensure their evenness,
- the tool bridge should be thin, this will provide you with the greatest ease of operation,
- after the process is almost complete, slow down the machine speed a little and continue sharpening,
- After finishing, cool the finished item with water, make sure it works properly. If this is not the case, then continue the process until the instrument is in optimal condition.
How to sharpen a Lewis drill?
With a sharp increase in load during drilling, as well as deterioration in the quality of the resulting hole, Lewis drills must be sharpened. It is performed in the following sequence:
- When single-plane sharpening, the back angle of the drill is given a value of 28...32º using a file, and they try to maintain this value along the entire length of the screw part. When using a grinding wheel, the drill must not be moved. This sharpening is used for small diameter twist drills;
- When conical sharpening, which should be performed for drills with a diameter of more than 6...8 mm, the tool is placed at the side of the grinding tool. Hold the tip with your right hand, and the screw part of the drill with your left hand, and as close as possible to the cone. By rocking the tool at an angle of approximately 45º and pressing it against the end, they try to recreate the previous value of the taper when moving from the threaded part to the screw part;
- If it was not possible to maintain the required parameters, the Lewis drill can be sharpened. For this purpose, the rake angle is reduced and the width of the cutting band is increased. True, the drill cannot be used with the same efficiency for drilling viscous wood with high humidity;
- At the final stage, the drill is fine-tuned, which consists of removing all identified marks and nicks, after which the conical thread on the tip is restored.
Practical training
If you feel that you are unable to sharpen the tool correctly, then you should practice more. This can be done through a lot of practice - take a few drills that you no longer use and try to sharpen them correctly. Through trial and error, you can learn to perform the procedure perfectly.
Sharpening a tool is not a difficult process, although some people think otherwise. Many online resources describe in detail and even show the steps of this process. Here you can watch a video that very accurately shows exactly how to sharpen a drill.
The video shows how to sharpen correctly. By following the man's instructions, you can get the job done efficiently. The tool should turn out the same as it was purchased. Only if the procedure is correctly performed will you be able to use it in the same way as before.
If you make a mistake, you will have to throw away the drill. But everyone makes mistakes, so don’t be upset if you weren’t able to sharpen your tool the first time. Every person learns from their mistakes. The main thing is not to abandon unfinished work because something doesn’t work out for you.
In order to learn how to perform an action with the highest quality, try to get involved in the process as much as possible, to understand how it works. Only competent consideration of every detail can lead you to success.
Initial stage of work
Content:
First of all, let’s decide what you will need in the process of sharpening with your own hands.
When sharpening a drill for metal, and even with your own hands, you always have to look for an alternative to factory tools, because there are special sharpening machines in production.
At home, the minimum set for sharpening a metal drill will be more difficult to find.
First you need to buy special grinding wheels.
Usually you need one circle, but with frequent use it will wear out quickly, so it is better to take several at once, for a reserve. The circle itself is installed on a rotating shaft with your own hands.
We also need a container and the coolant itself: here you can even choose water or engine oil.
While the drill is being sharpened, it will also heat up at the same time. If it is not cooled, then during operation it will fail faster due to the temperature difference.
It is equally important to maintain the angle; here eye control is unacceptable. It is because of this problem that people buy a special device so as not to constantly carry out tedious calculations.
It is necessary to know the angle of approach of the metal drill. The main angle is the rake angle, it can be defined in the main cutting plane as the angle between the front part and the base of the cutting part.
The rear angle has the same parameters, only on the rear plane. The angle at the top can be seen if you look at the metal drill from the side: it is located between the two edges.
It is believed that for the front angle you need to maintain a slope of 20 degrees, and for the rear - 10 degrees. The angle at the top is the same in all metal drills and has a value of 118 degrees.
Don't forget to take precautions when working with your own hands. Since we have to work with sharp parts, it is better to protect our hands with gloves. Be sure to wear glasses while sharpening.
In the process, small particles will fly off from the circle, which are also very overheated.
Watch the position of the tool, because if the feed angle is incorrect, it can be torn out of your hands.
How to do it yourself?
If you don't want to buy an extension from a hardware store, you can make a long drill bit yourself. To do this, you first need to take a long nail of a suitable diameter. His hat will need to be carefully riveted. This can be done using a simple hammer. All edges of the nail head are gradually ground down, little by little giving it the pointed shape of a regular drill.
If in the future you have to drill in loose wooden surfaces, it is better to rivet the nail head in the form of a pointed tip. During the process of drilling with a homemade part, the walls of this material are compacted, which is an important condition for easy and quick tightening of screws. You can also lengthen the drill yourself by increasing the length of the shank. To do this, you need to create a small hole in it for the internal thread. Then it is cut with a tap. An external thread is made on a rigid metal rod. The resulting parts are twisted together.
The shank can be extended in another way. To do this, you first need to prepare a strong, thin metal rod. In this case, its diameter should be slightly larger than the diameter of the shank. Its surface must be absolutely smooth, without small scratches or cracks. You will also need turning equipment for the job. The extension begins by slightly reducing the diameter of the shank on a lathe. At the same time, a small depression is made in the metal rod. It will act as a hole for inserting the tool itself. After this, the shank is fixed as tightly and firmly as possible in the rod.
It is recommended to weld and clean the joint. At the final stage, the diameters of the old drill and the new extended shank are equalized. This can also be done using turning equipment. In some cases, the extension is made by welding a new metal rod and drill. But at the same time, the diameters of both components must be the same. At the end, the junction of the parts is welded and cleaned so that there are no unevenness or scratches on the surface.
To learn which drill extension to choose, see the following video.
Drills for ceramics and glass
Ceramic tiles or glass are drilled with a crown or a special spear-shaped tool. Its tip is made of either pobedite or tungsten carbide. If a specialized tool for glass or tiles is not available, you can use a concrete drill
It just needs to be sharp, and you need to work with it carefully, since its shape is not entirely suitable for such work.
Spear drill bit for ceramic tiles and diamond-coated bit.
A crown for glass and tile is almost no different from a crown for stone. Only on its cutting edge instead of teeth there is a diamond coating.
A tool called a ballerina is used to drill large holes in tiles. It resembles an ordinary compass. Drilling is done from the underside of the tile. The drill speed is set to minimum.