Working with various materials requires the use of high-quality cutting tools. Most of the required types have standard parameters and are freely sold in stores, but some samples have specific sizes or shapes. They are not produced or are extremely rare. To a greater extent, the question concerns cutters that have many profile options, varieties or types of design.
Finding the right type can take too much time, so sometimes there are no other options other than making a cutter at home.
Will need
We only need two M8 bolts and a washer with an outer diameter of 35-45 mm. By the way, the size of the bolt depends on the problem being solved. In our case, we select the future tool for a Forstner cutter to match the holes for a small ball bearing. It must be secured flush with the plane of the base. We will also make a clamp for pressing the element into the wood.
So, let's arm ourselves with power tools:
- Grinder (angle grinder) with cutting and grinding abrasive discs.
- Drill.
- Electric welding machine.
- Vertical drilling machine.
The hand tools we will need are: a file, a marker, and a caliper. Well, a workbench with a vice can be found in every workshop.
This is interesting: Making a stand for a drill with your own hands: instructions, drawings, video
Useful tips
To get good results when working with wood, you should follow safety rules. You need to make sure:
- The cutter is fixed in a collet.
- The accessory corresponds to the power of the power tool.
- When using an edge router, you must ensure that the bearing or guide ring is installed.
- The correct insertion depth is set (when using a submersible device, this can be seen on a special limiter).
- The workpiece must have support.
- To reduce the amount of dust when working, use a vacuum cleaner.
The use of attachments specially designed for the material being processed can significantly improve the result.
And depending on the angle of their use, a different cut is obtained. Experienced craftsmen often make such attachments themselves. To do this, the cutting edge is sharpened at the required angle. But if you don’t want to waste time on homemade cutters, then you can easily buy them; the range in stores is quite wide. It is quite easy to make accessories for a wood router with your own hands, and their benefits are great. This option is suitable for those who do not want to spend a lot when buying a tool or when the necessary equipment is not on sale. And the use of a router with furniture templates significantly reduces assembly time, and also improves the quality of work and prevents mistakes.
Originally posted 2018-07-04 08:29:39.
DIY cutter: making homemade wood cutters
The question of how a wood cutter can be made with your own hands worries not only home craftsmen who do their own carpentry and modeling, but also professional finishers. And the main thing here is not only the desire to save money, but the fact that serial tools for woodworking, which today are easy to purchase in specialized stores or on construction markets, often do not have the required configuration of the working part. That is why specialists and home craftsmen who use such a tool have to modify its serial models or make it from scratch, using cylindrical steel blanks.
Homemade wood cutters
Preparing the template
Stage 1. Sketching.
Stage 2. Cut out the shape.
Stage 3. Making the mold.
The simplest clamp for pressing
We will make this device from the same M8 bolt and a washer of suitable diameter. We place the bolt vertically on a metal surface, providing mass contact for electric welding. We place the washer on top in the center of the bolt head, holding it with pliers. We scald the center with an electrode, filling the area of the inner hole of the washer.
We clamp the resulting clamp in a vice and clean it with an angle grinder. The back part can be passed with a cleaning brush attachment for a drill.
We insert the finished clamp into the chuck of a vertical drilling machine, and try to press the bearing into the wood. This simple device will save you unnecessary effort and allow you to accurately handle such tasks.
How to make a cutter
Milling cutter is a general name for a wide group of cutting tools. There are two main types:
- on wood;
- on metal.
There are many types of cutter designs used to perform different technological operations:
- Whole.
- Composite (prefabricated).
- End.
- End face.
- Shaped.
- With replaceable plates and others.
The production of cutting tools is a high-tech process that is demanding on the quality of the material. For example, the production of end mills consists of several stages:
- Turning of a workpiece (shaping).
- Milling teeth.
- Processing of cutting edges (sharpening and backfilling).
- Heat treatment of the material (hardening, tempering, other operations resulting in a high-quality metal structure).
To manufacture other varieties, similar or other operations are performed, determined by the type and design of the tool. Homemade cutters are only modifications of ready-made samples.
Attention! The manufacturing technology of cutting tools is complex and requires the use of precise equipment. At home, production “from scratch” is impossible; only processing of the finished tool, changing its shape or size is available.
The need to use one type or another, to obtain a certain profile or size of the cutting organ, forces you to decide the issue yourself. Let's look at how to make a cutter with your own hands at home.
Homemade wood cutters
Making a wood cutter with your own hands is possible if you have the appropriate workpiece and a machine where it will be installed. At home, an electric drill or a hand-held milling machine is usually used. The most affordable option is to change the shape of a regular metal drill, but other methods can also be used.
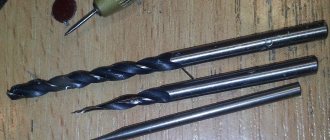
Let's look at how to make a wood cutter from a drill. Depending on the purpose of the tool, you will need a workpiece (metal drill) of a certain size. If you plan to manufacture a shaped cutter, then the diameter of the workpiece must be equal to the maximum diameter of the final product. Manufacturing consists of two stages:
- Giving a profile.
- Creating a shank.
Both operations require the use of industrial equipment. In any case, a lathe will be required to make the shank. The hand router collet is designed for a diameter of 8 mm (there are options for 6 and 7 mm). Therefore, for large drill diameters, the shank should be prepared before creating the profile. This will eliminate beating, which is dangerous when processing wood. The easiest way to create a profile is by grinding. First you need to make a template, according to which you need to constantly check the status of the profile. To work, you will need a grinding machine (emery), a grinder or a cutting wheel mounted in the chuck of an electric drill.
To create replacement plates for the milling head, either ready-made samples are used, which are given the desired shape, or blanks made of high-quality metal. The profile is created by grinding on a machine at hand.
The final operation is backing. This is the process of setting a specific cutting edge angle to ensure that the back of the edge does not contact the workpiece.
Important! Backing is a rather labor-intensive process, but necessary; it is the only thing that gives the cutter the ability to work normally.
DIY metal cutter
Making cutters for metal at home is limited to regrinding existing tools, changing the profile or diameter of the cutting part. More active intervention will require the use of industrial equipment, as it will be necessary to perform complex procedures:
- Tempering of metal (a procedure reverse to hardening).
- Machining, including shaping, sharpening, backing).
- Hardening the cutter.
It is almost impossible to carry out these actions efficiently at home. In addition, work of this kind requires considerable professional training and experience, which not everyone has. Therefore, they are limited to only available procedures that involve minor intervention in the original state of the workpiece.
Making cutting tools at home requires the necessary equipment and suitable workpieces. In addition, you must have skills and experience, otherwise you can end up with a very dangerous product that can ruin the surface being processed and harm the craftsman himself. It is not recommended for an untrained person to carry out such work; it is better to seek help from a specialist.
This is interesting: Metal burrs: types and application features
Types of cutters
For processing wood, board and composite materials based on it: chipboard, OSB, MDF, plywood and others, two types of cutters are used:
- End - clamped using a collet clamp. They have a shank like a drill and a cutting part of any configuration. They are used with manual routers, including those built into a table or stand, pantorouters on their base, and CNC machines.
Factory equipment
- Mounted or disk - made in the form of disks of any thickness. Designed for cutting grooves, tongues, quarters, profiling lumber and finished products. Installed on the shaft of a vertical milling or circular machine.
Mounted models
- Milling heads or drums are a tool for profiling lumber.
Drum with knives
Required Tools
Production does not require anything special. We will prepare the necessary materials and tools for the work:
- Small grinder with a circle of 125 mm;
- A piece of I-beam 180 mm long, 20-25 cm, or a sheet of iron 5 mm thick;
- Cutting disc;
- Cleaning disc;
- Cord brush for angle grinders with metal bristles;
- Chalk;
- Vise;
- Round bit with a diameter of 40 mm for drilling holes;
- emulsion coolant;
- 10 cm of square pipe 25*25 mm and 50 cm of profile 20*20 mm;
- 2 extended nuts and 2 regular nuts with a diameter of 8 mm, 2 bolts 8*40 mm;
- A piece of sheet iron 1-1.5 mm thick;
- Chuck for drill 1.5-13 mm with threaded connection;
- Tap M14;
- Clamping bolts with wings 8*20 mm - 2 pcs., 2 nuts 8 mm.
- Drills 8 and 10 mm;
- 2 bolts 8*10 mm.
Do-it-yourself active cutter for a walk-behind tractor
Typically, an active cutter for a walk-behind tractor is sold complete with the walk-behind tractor. But sometimes you need to get the job done using specialized cutters that are not sold anywhere. In this case, you need to make cutters for the walk-behind tractor yourself.
In this case, you can go two ways: make the cutter yourself or order production from a master. The first option is quite labor-intensive. But a little time and money will be spent on manufacturing the cutter, as well as the cost of materials.
The second option has a number of advantages: the master has all the necessary tools and materials, and as a result the cutter will be more practical.
First you need to think about the functionality and design of the cutter. To do this, you should familiarize yourself with the analogues. To achieve maximum functionality and safety, all design details must be taken into account. If this is not taken into account, then the cutter will not do the necessary work, and all the work on its manufacture will be a waste of time.
You need to prepare the necessary materials after you have prepared the drawings. If the cutter design contains figured or pobedite elements, their production is ordered in the workshop. And other elements are bought in the store or those that are available are used.
After all the parts are made, it is necessary to assemble a normally working cutter, which not everyone can do. Assembly must proceed strictly according to the drawings, without any deviations in the design. Otherwise, the cutter will constantly move to the side, which will greatly complicate the work.
After the cutter is assembled, you need to test its operation. If the need arises, we alter the cutter so that it does the required job.
Milling cutters according to customer drawings
The release of any batch of cutters is preceded by a design stage.
As a rule, customers come to us with already developed drawings, thereby significantly reducing production costs. Our technologists just have to read the documentation, check the drawings, check the correctness of the technical calculations, and if all the calculations are correct, transfer the project to direct production. But even if you don’t have technical documentation on hand, this is not a problem: we will produce standard cutters according to standard drawings, and for the production of non-standard tools we will offer the services of our design engineers.
Manufacturing Features
A homemade part of this type has certain restrictions on the materials that can be worked with when using it. Creating cutters for a hand router usually involves working with steel, which belongs to the soft category. For this reason, such a device allows you to work perfectly with wood, but if the material is very hard, then the effectiveness of the device is significantly reduced.
To create a homemade cutter, scraps of reinforcement or steel rods are usually used. Sometimes it is made from a drill. If the reinforcement is the base, then its ribbed coating will need to be leveled using a lathe.
First we need to make the shape of our future cutter.
- Using a pencil and ruler we draw knives. If the diagram is not at hand, then you can find examples on the Internet or in the relevant literature, then simply redraw the required profile and follow the further algorithm.
- Now you need to directly cut out the shape. Depending on how many knives we need as a result, it is necessary to count out the required number of sheets and, having grabbed them, carefully cut out the shape of the future product, without catching the pair of load-bearing sides of the knife, as well as the tip.
- After this you can start making the form. Using an adhesive composition, you will need to glue the template to the workpiece and carefully saw it off using a grinder. It is important to remember that not only the tip should be preserved, but also the side parts. So when working with an angle grinder you will need to be as careful as possible and take into account the dimensions of the product.
Manufacturing technology and recommendations
A homemade cutter has limitations on the materials that can be processed with its help. Making cutters for your own needs, as a rule, involves working with soft grade steel. That is why such a homemade tool is capable of cutting wood quite effectively, but when processing harder materials it quickly becomes dull.
In order to make their own milling tools, craftsmen use scraps of steel rods or reinforcement. If reinforcement is used as a workpiece, its ribbed surface is leveled using a lathe.
Scheme of a homemade cutter
The technology for making a homemade wood cutter from such a blank is as follows:
- On the part of the cylindrical workpiece where the cutting part of the homemade tool will be formed, half the diameter is cut off.
- A smooth transition is formed between parts of the workpiece with different diameters.
- Another quarter of the diameter is removed from the treated section of the workpiece; such a section of the workpiece is also connected with a smooth transition to the untreated part of the rod.
- The processed part of the workpiece is given a rectangular shape, for which its lower part is cut off. The thickness of the part of the workpiece on which the working part of the woodworking tool will be formed should be 2–5 mm.
To trim the rod, you can use a grinder and a drill, and the formation of the working part can be done on a sharpening machine
A homemade cutter can be used to process wood, but its internal angle must coincide with the center of rotation.
In order for a home-made wood cutter to be used for effective processing, the following recommendations must be followed when making it.
- The cutting edge must be sharpened at an angle of 7–10°. If you make it sharper, it will hold an edge poorly and have low cutting properties.
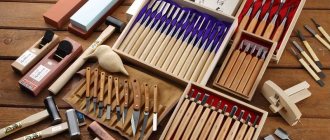
- To give the cutting part of the tool the required configuration, diamond-coated needle files or angle grinders with discs specially designed for metal work are used.
- If a homemade wood cutter must have a complex configuration, then it can be bent or flattened.
The cutting edge is polished with a diamond disc, then the surface is polished with sandpaper
With a small thickness of the cutting part, a hand-made milling tool has a fairly short working life. To slightly increase the service life of such a wood cutter, the corner on the bottom of the tool, located opposite its cutting edge, can be slightly rounded.
A homemade cutter cannot immediately cope with a large volume of wood removed from the surface of the workpiece, so processing is carried out in several passes.
Carbide cutter – component of machine tools
Carbide cutters: area of use, design features
We all need to do some work related to metal processing from time to time. This is especially true for owners of country houses and dachas. Drills and cutters made of hard alloys are used to make holes in metal parts and process metal surfaces.
Carbide cutters are used in most cases for processing various groove holes, as well as when working with metal products. Moreover, such products of the end variety are an integral part of the machines themselves. The wide range of all kinds of cutters, which differ in their design, size and scope of application, is amazing.
It should be noted that when choosing a product, you should know what the component will be used for in the future. For example, carbide end plates are subjected to perpendicular type surface treatment; angular - process inclined products, etc.
Wide variety of carbide cutters
All carbide cutters have a high degree of reliability and resistance to mechanical factors. Mostly for their production, materials with a predominance of tungsten are used, thanks to which it is possible to process hard and heat-resistant surfaces.
The main parameters by which cutters differ:
- form;
- diameter;
- dimensions;
- design.
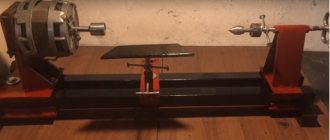
How to make a wood lathe with your own hands: drawings and technology
The easiest way to make a tool yourself at home is to construct a lathe or milling machine from a drill or electric motor removed from another tool. This process is not that complicated, so every master can handle it. To do this, you will need an electric motor, the power of which does not exceed 500 W, and available materials. A drill can also be used as a drive. Of course, making a lathe will require some skill.
The device of the tailstock of a homemade wood lathe
To build the machine, the following elements are required:
- metal frame;
- electric motor;
- handyman;
- tailstock.
It wouldn’t hurt to get a drawing that will help you navigate the dimensions and correctly manufacture all the structural elements for its subsequent assembly.
How to make a homemade drilling machine with your own hands with a motor
First you need to prepare the electric motor shaft. To do this, a faceplate is installed on it; a steel center with a thread is also suitable. Installation of the second center is carried out in the tailstock tube. To make the frame, you will need a pair of corners measuring 5x3 cm, their length is 15 cm. A motor is attached to the frame using a bolted connection.
An example of a homemade drilling machine
Note! The central part of the tailstock must coincide with the middle of the electric motor shaft.
At the next stage of making a homemade machine, you assemble the headstock yourself. This element is formed from a pair of horizontal and a pair of vertical corners. A pipe intended for the spindle is attached to it. You need to insert a bolt into it, the diameter of which is 1.2 cm. First, its head is sharpened at a right angle. Thus, the central part of the spindle is designated. After this, the headstock is installed on the bed. On the top post, which connects to the horizontal corners, it is necessary to secure the tube by welding.
To make a tool rest, you need to take a steel rod with a chamfer. This element must also have a hole that will be used to secure the support ruler. It is necessary to vertically weld the tube with the locking screw to the long angle. Then the tool rest rod is inserted into it.
The motor rotor on which the faceplate is attached will be used as the headstock spindle. You need to make several holes in it. A fork will be inserted in the central part. The holes along the edges are intended for fixing the part with screws.
Even with the help of simple tools you can create interesting wooden products; for this you need to study the technology of working with the tool and practice
How to make a wood lathe from a drill with your own hands
Having a workbench with a strong and flat working surface at hand, you can build a lathe without resorting to building a bed. The electric drill in this case will serve as a rotary drive and headstock. According to the simplest drawing of the machine, it is enough to fix this tool on the surface of the workbench through the neck. Clamps and a clamp are suitable for fixing.
Next you need to make a stop that will act as a tailstock.
This element is mounted opposite the drill. To create it, you can take two blocks of wood and an adjusting screw, sharpened at one end to a cone. If you intend to use the machine for processing massive wooden workpieces, then it is advisable to fix the stop on the table using clamps.
To make a tool with your own hands, inexpensive materials are enough. A drill-based lathe can be used to turn various parts:
- door handles;
- structural details of the staircase;
- decorative items, etc.
Using a workbench with a durable and flat working surface, you can make a lathe from a drill with your own hands
Note! The machine with a wooden clamp is suitable exclusively for processing wood blanks. It is not allowed to use such a tool for working with metal.
To expand the functionality of the tool, its design can be supplemented with attachments and other devices that can improve the quality of work.
Such improvements include:
- winding on transformers;
- applying a coloring composition over a rotating part to create patterns;
- applying spiral notches to the workpiece, etc.
Installing a special attachment in the form of a copier will allow you to use the machine to create a whole series of identical parts or products according to a template.
An example of a multifunctional homemade woodworking machine from a drill
DIY drill cutter
The drill, as the most versatile tool in our household, can be used as a router. Moreover, for some types of milling it can work directly, without additional devices, and some can be done using simple devices or by making them with your own hands.
Which drill is suitable for milling?
For some milling jobs, any drill may be suitable, especially if the material being removed is small and there is no significant load on the tool bearings.
But for clean processing of material by cutters, a high rotation speed is required. On hand milling machines it is 20 - 30 thousand rpm, and sometimes reaches 35,000. The most high-speed drills, such as Makita-6501, have 4500 rpm. Therefore, it is often impossible to obtain the same processing result with a drill as with a router, but sometimes it is not necessary.
- But hence, the first condition for a drill-milling machine is that the rotation speed must be at least 1500 rpm, or better yet, higher. But for some types of cutters, on the contrary, it will need to be reduced, so the presence of speed control is desirable.
- The second condition is powerful mechanics that can withstand large lateral loads that prevail during any milling. After all, if you regularly use a drill as a router, you will have to change the bearings much more often, so it is better to initially have some margin of safety.
- The third condition will be the presence of a reliable chuck that does not weaken the grip of the tool shank during operation, because the cutter takes much greater loads than the drill. It is best that your drill chuck is wrench tightened.
Which cutters are suitable for a drill
Almost any cutter in which the shank can be fixed in its chuck is suitable for a drill.
Some of them are designed specifically for use with a drill. Namely:
1. Crown cutters for concrete.
These cutters do not require high speeds. The cutting part on them is carbide tipped, which at very high speeds can peel off from the cutter. And it’s better to use them with an impact drill or even a hammer drill.
But for diamond-coated cutters, a rotation speed of at least 1500 rpm is required, and 2.5 thousand revolutions is optimal, otherwise they will quickly fail.
2. Crown cutters for metal.
This tool has hardened teeth and is often equipped with helical flutes to remove chips. It can also be used on plastic and wood.
3. Cone cutters.
Most often they are used with a drill, and they come in a wide variety.
It is pointless to describe for what types of work they are used, because the range of their use is quite wide.
The main thing here is to correctly select the material of the cutter itself to the workpiece material being processed.
4. Mills for chamfering cylindrical parts.
They are often used as a repair tool to restore the functionality of damaged top threads in screw connections. After processing the threads with such a cutter, as a rule, the nut is easily screwed onto the screw. There are large diameter cutters that are used with very powerful drills. They are used to sharpen fence stakes, posts, etc. to a cone.
5. Attachments for drills, turning them into cutters.
These are removable countersinks that correspond to the main diameters of standard drills, allowing you to remove neat chamfers on the holes at the end of drilling.
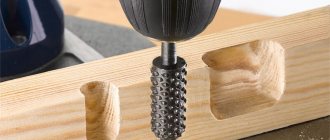
6. Drill-mill and cutters from a drill.
There are cutters combined with a drill, with which you can mill various shapes in thin material, be it wood, plastic or soft metal.
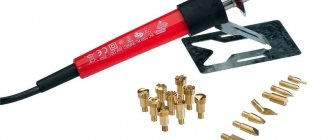
7. Special cutters for drills.
There are quite a lot of them, in particular these include the famous Forstner drill, and various specialized cutters for inserting furniture fittings, which are more often used with a drill than with a hand router. These also include a special crown cutter for producing round tenons of various diameters.
It also fits perfectly with an electric drill.
8. Wood drill bits.
This is obviously the most common tool for hand milling work. It has cylindrical shanks of small diameters, ideal for most household electric drill chucks.
It is for milling wood that you need to have the highest number of revolutions of the tool, otherwise the edges of the workpiece may be torn. And the use of such cutters in drills requires great skill and strength of hands of the worker producing it, despite the presence of thrust bearings in them, which limit the penetration of the cutter into the workpiece and facilitate its movement along it.
There are also possible options for their use in the manufacture of certain devices and accessories for this power tool.
Devices for milling metal and wood
We will not describe the drill attachments we mentioned here. In particular, racks that turn it into something like a drilling machine. The same article shows a device that brings its functionality closer to a manual router.
But the modification of such a stand, which makes it possible to securely fix the tool at a given height, can greatly facilitate the performance of milling work on molded material using various wood cutters. To do this, it is enough to set the drill at the required height from the work table and attach a guide to it, along which you will feed the long wooden strip being processed.
To make long longitudinal grooves in a large number of wooden slats, it is worth using such a simple device, as shown in the photo. And use a finger cutter of the required diameter for this.
It is also possible to use both factory-made and home-made stops for milling with a drill, with minor modifications to fix the tool at a certain distance to the site, ensuring the degree of penetration of the cutter into the material.
With or without such stops, the drill works wonderfully as a wall chaser in cellular concrete:
It is of interest to use various jigs to obtain longitudinal grooves by milling.
And if you put a side stop on such a device, then similar grooves and grooves can be made on rectangular workpieces. The jig inserts have a hole diameter corresponding to the diameter of the finger cutter used.
But still, in our opinion, the most rational way to work with shaped wood cutters would be to modify the workbench shown in the video. Especially if you have to do frequent work on milling chamfers of various curved workpieces.
Dear readers, if you have any questions, please ask them using the form below. We will be glad to communicate with you
We recommend other articles on the topic
How to choose the power drive of a wood milling machine for a home workshop
Specialists recommend choosing a power unit for equipment in this category with a power of at least 1.4-1.6 kW. If large volumes of work are expected to be constantly performed, this parameter is increased by 20−25%.
Sufficiently powerful equipment performs its functions without overload, which reduces the risk of breakdowns and extends the actual service life. The price of such a milling machine will not increase significantly. But it will be possible to install large cutters.
For a correct assessment, the rotation speed should be taken into account at the same time (range - 10,000-35,000 rpm).
It must be remembered that as the diameter of the cutter increases, the angular velocity increases accordingly.
If a certain threshold is exceeded, the frictional force will increase the temperature until the wood piece darkens (a flame appears).
“To eliminate difficulties when choosing the optimal processing mode, it is recommended to smoothly adjust the spindle speed.”
Creating a wood milling machine with your own hands - a description of the important steps with instructions
The milling machine belongs to the class of especially dangerous structures. Therefore, before you start making such a product, be sure to study the procedure and technology of work. Otherwise, it is better to purchase a ready-made device.
What components and materials are needed for the work?
For a sample, you can use a factory product with good consumer characteristics
It is better to make the structural elements of the structure from steel. Standard corners (pipes, squares) with walls of 2 mm or more are suitable.
Instead of welded joints, it is more convenient to use screw joints. In this case, disassembly for long-term storage and movement over long distances is simplified. It will also be easier to replace a damaged part.
The table top, rulers and some other parts can be made from durable types of wood and plywood.
Such materials are destroyed under the influence of high humidity and temperature changes.
This must be taken into account when placing equipment in an unheated room.
Making your own frame for a homemade wood milling machine
A strong, stable base can be made from profile pipes (20×20; 30×30)
Using a grinder, the necessary blanks are cut. The base for the tabletop is made from a corner. Reinforcing crossbars are installed in the lower part.
Support plates are welded to the ends. If you make threaded holes in them and screw in the bolts, you will get a convenient device for stable installation of a milling table on wood on an uneven surface.
With your own hands, with good preliminary preparation, such a design can be made in a day.
Making a countertop
The surface of this part of the structure must be perfectly flat.
A high-quality chipboard (from 25 mm) with a thick polymer protective layer on top and at the ends is suitable.
Such products have better resistance to adverse external influences compared to solid wood.
Recesses are created using milling. Metal profiles are inserted into them.
A construction vacuum cleaner is connected to the work area with a corrugated hose for automated removal of sawdust
Other functional parts
This universal clamping unit can be used to equip a router and circular saw. Stop, vertical and horizontal combSteel comb and technology for its use
Selection of electrical equipment
Requirements for the motor, switches and other components should be considered separately.
As with evaluating materials, selections must be made based on the conditions in the workshop.
Some electrical apparatus and devices are manufactured in accordance with IP standards. Its value determines the protection of the product from moisture and dust.
This cam switch complies with IP 40 standard
This marking means:
- “4” – preventing the penetration of dust particles with sizes of 1 mm or more into the housing;
- “0” – no protection from water.
Features of connecting a do-it-yourself wood copy-milling machine to the power supply
In accordance with the current PUE rules, there must be a grounding when operating equipment connected to a three-phase network at 380V.
Many household factory models and homemade wood turning and milling machines are designed for 220 V. In this case, it is also recommended to use a safety chain.
Grounding will prevent electric shock and damage to individual components.
Potential equalization schemes are also used by analogy with equipping rooms that have high levels of humidity.
In what order are the components assembled?
To make a wood milling machine with your own hands, a drawing of this relatively simple design is suitable
Welding of metal corners can be done in a specialized metalworking workshop.
You should also order steel combs and other complex components there. Assembly begins with the frame. A tabletop and hanging parts are installed on it. The structure is placed on its side. Connect the electric drive and the corrugated hose of the vacuum cleaner.
They return the machine to its working position, plug it into the network, and check its functionality.
Copy rings and templates
Devices for a hand router, such as copying rings, are a round plate with a protruding shoulder that can slide along the surface along the template, thereby ensuring the exact trajectory of the cutter. Often this element is attached to the base of the workbench. There are several ways to install it:
- Screwing the ring into a threaded hole.
- Installation of special antennae of the device into the holes on the sole.
If you have such a device for a manual router as a template, you can also achieve more accurate and efficient work. The said element is fixed directly to the workpiece itself with double-sided tape, after which both parts of the device are pressed to the machine using clamps. Upon completion of the work, experts recommend checking the condition of the ring - see whether it is securely pressed against the edge of the template or not.
Another feature of the tool in question is the ability to process not the entire edge, but only its corners. At the same time, some devices for a hand router allow you to make curves of four different radii at once. Thus, the process of cutting material using a template is an excellent way to cut grooves for a part.
Tools and materials
So, to create a wood cutter with your own hands, you will need to have a pair of M8 bolts, as well as a washer with an outer diameter of about 4 centimeters. Naturally, the sizes of the bolts will depend on the problems that need to be solved. If we are talking about a tool for a Forstner cutter made from a drill, then you should take into account that it must have holes for a small ball-type bearing. It should be attached flush with the base plane. In addition, you will need to make a clamp, which will allow you to press the element into the wood.
The tools you will need to have on hand are:
- drill;
- vertical drilling machine;
- electric welding machine;
- angle grinder with abrasive discs of grinding and cutting type.
If we talk about hand tools, you will need:
- calipers;
- marker;
- file;
- Desktop;
- vice.
Step-by-step instruction
So, let's move on directly to considering the instructions for making the above-mentioned device.
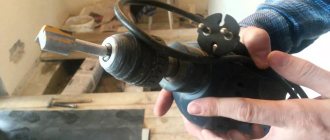
- First, use a caliper to measure the residual distance on the bolt head relative to the bearing being installed. If we are talking about an M8 type bolt, then the size of the hat circle in this case will be 1.27-1.3 cm. The diameter of the handle is about 1.16 cm, which makes it possible to easily clamp it in the vast majority of modern drill chucks.
- The cap should be adjusted to the bearing diameter. It is this area of the bolt that will represent the working part of the cutter.
- For marking, it is better to use a thinner contrast marker; the main thing is that the marks that will be applied with it are easily distinguishable on the metal. Now we apply the markings of the cutter's burrs. This solution will allow her to get rid of shavings without much effort.
- After this, we clamp the bolt in a vice. Using a cutting wheel, we use a grinder to create slits on the cap.
- We measure the bearing diameter. To work the head of a bolt with a faceted surface to a circle, you should transform the drill into a lathe. To do this, you need to clamp it in a vice, and then firmly attach the bolt in the chuck precisely in the center.
- Now you should fix the drill key at a constant operating mode, after which you can begin processing the bolt head. This process must be controlled at all stages of its implementation in order to prevent the center of the bolt from moving, which can cause a violation of the uniformity of the operated teeth.
- After this, you should install an abrasive disc on the grinder for grinding and process the edges around the circumference. The end area of the cutter should also be removed a little, leaving only a slight sharpness in the center. This element is of great importance, because this type of cutter will first find the center when working, and only then will the material be triggered by the rims and edges of the cutting type. Here you can carefully refine everything using a file, so as not to accidentally cut off more than is necessary during the grinding process.
- The cutter itself will be almost ready. All that remains is to give the cutting edges the required shape, and then sharpen them a little.
For greater efficiency, it would be useful to make the simplest clamp for pressing. Therefore, the instructions for creating it also need to be considered.
- This device is also made from an M8 bolt and a washer of suitable diameter. The bolt should be placed vertically on a surface made of metal so that the required contact for electric welding is ensured. The washer must be installed in the center of the bolt head. To make this job easier, you can use pliers. After this, the central part will need to be treated with an electrode to fill the area of the inner hole of the washer.
- Now you need to clamp the clamp, which was obtained as a result of the above actions in a vice, and then clean it using a grinder. You can walk along its back using a special brush attachment for a drill.
- At the final stage, all that remains is to install the finished device into the chuck of a vertical drilling machine, after which you will need to press the bearing into the wood. Such a simple “gadget” will eliminate a number of inconveniences when using a homemade cutter.
By the way, an end mill for wood can be made not only from a drill, but also from a tube with thin walls.
In this case, the algorithm for creating it will be as follows:
- in this case, the workpiece will be a piece of pipe with a length of about 20 centimeters;
- on the side where the cutting edge will be located in the future (somewhere at a distance of 2 cm from its intended location), oval-shaped grooves should be made on both sides of the pipe;
- the future cutting part of the cutter itself will need to be shaped into a cone - it is ground at an angle of about 2-3 degrees;
- when clamping the workpiece in a vice, a cross-shaped cut should be made at its end area - this can be done using an angle grinder;
- From the side of the cutting part, you need to make grooves on the workpiece - right up to the oval holes made earlier.
Types of homemade cutters for wood processing
Cone cutters, processed at medium and high speeds, are used to remove excess wood from the end elements of the workpiece. The best option for making a tool of this type on your own is a cutter from a drill. This cutter from a drill is made at home as follows: the tool is cut closer to its shank (from half to a quarter of its length), then each cutting edge of the cut drill is ground down by 1/2 – 1/3 of its diameter. If the cutting edges are ground down to a large amount, then not only will its body be exposed, but it will also lose its cutting properties. It is difficult to restore the cutting edges of homemade wood cutters, which have a spiral shape, with your own hands.
From a drill you can make cutters with different working heads
An end-type wood cutter can also be made from a thin-walled tube. How to make a cutter from such a blank? The following recommendations should be followed.
- A piece of pipe is taken as a workpiece, the length of which is 15–20 cm.
- From the side of the future cutting edge (at a distance of 2–3 cm from it), oval-shaped grooves are made on both sides of the pipe.
- The future cutting part of the wood cutter is given a conical shape, and it is ground at an angle of 2–3°.
- Having clamped the workpiece in a vice, a cross-shaped cut is made on its end part, for which an angle grinder is used.
- From the side of the cutting part, grooves are cut on the workpiece - up to oval holes.
Homemade tubular cutters
Using a homemade end mill made from a thin-walled tube, you can create blind or through holes in wood products. In this case, the inner surface of the blind holes must be refined using a chisel.
Many home craftsmen are interested in the question of how to make a large-diameter cone cutter with their own hands. It should be borne in mind that it is not easy to make such a tool for woodworking; for this you need to use special blanks and complex metal-cutting equipment.
Adviсe
Let's talk a little about tips that should be taken into account when creating homemade cutter models.
- To give the cutting area the correct configuration, you will need to use diamond-coated needle files or angle grinders with discs that are used specifically for working with metal.
- The edge for cutting should be sharpened at a 7-10 degree angle. If you make it sharper, then it will hold an edge poorly, which is why its cutting properties will significantly decrease.
- If a wood cutter made by yourself must have some kind of complex device, you can flatten it or bend it.
- When using an edge router, take into account that the guide ring or bearing is already installed.
- The cutter must be secured in the collet before starting work.
- The presence of additional accessories will help increase the power of the electric tool.
- The part to be processed must have some kind of support.
- When carrying out work, the correct insertion depth level should be set.
- To prevent too much dust from being generated when working, you can use a vacuum cleaner.
In general, it should be said that creating a wood cutter yourself is not difficult. True, it should be understood that in this way you can quickly solve some simple problem, because for hardware such as bolts, ordinary steel is used, not tool steel. This means that such a homemade cutter will quickly wear out. But its life can be significantly extended in a number of ways. Therefore, this solution has a place and should be used in cases where you really need to quickly acquire a pretty good wood cutter in order to get the desired result.
For more information on how to make a wood cutter with your own hands, see the following video.
Do-it-yourself router from a drill: a detailed guide
Situations often arise when you need to make a groove, carefully trim the edge of a board, or make a part of a complex shape. Typically this work is done using a router. In a well-equipped workshop, any tool and all the necessary machines are at hand.
But what if, for example, instead of a workshop there is a garage, and only a drill is available. You can resolve the issue at your nearest power tool store. But, as usual, it all comes down to either finances or the fact that the milling tool is needed only for a while, and then it will simply gather dust on the shelf. As you know, there is a way out of any situation, and specifically from this one - a do-it-yourself router from a drill.
Cone cutters
Wood cutters, the working part of which has a conical configuration, are used for processing surfaces of complex terrain. In particular, with the help of such cutters, finishing of grooves in elements of furniture structures is performed. To manufacture such wood cutters in production conditions, complex-shaped workpieces are used, which are problematic to process at home. Such a cutter can be made with your own hands from a drill, the working part of which is given the required configuration.
Due to the fact that a homemade wood cutter is used to process fairly soft material in several passes, there is no need to further strengthen the structure of the material from which such a tool is made.
Manufacturing options for cone cutters
Production of milling cutters: features of technological processes
The production of cutters is a complex and multi-stage process that begins with the formation of forgings.
Their primary turning is carried out on rotary lathes. This is followed by more precise, but still rough processing of the workpieces. Before the main operations, they are hardened in a furnace and then tempered: this procedure helps strengthen the metal. Then comes the turn of more “jewelry” actions. All surfaces of the cutter and its cutters are ground with a minimum allowance of no more than 3 mm. After this operation, another heat treatment follows: heating to +550 degrees and natural cooling. Despite the fact that the workpiece does not undergo any changes externally, this stage is very important: during it, the internal stress of the metal is relieved.
After cooling, the part undergoes a series of mechanical operations: surface grinding, milling and final processing - bringing it to the required dimensions. To obtain cutters of increased hardness, their surface is additionally saturated with nitrogen, which significantly extends the service life of the tool.