For the most part, this is due not only to cost, but also to size. If it becomes necessary to turn a piece of wood, then replace the full-size device with a lathe made from a drill, which you made yourself.
The construction of such a device will not take much time, but the most important thing is that such a device can completely replace expensive woodworking equipment.
Lathe - what is it, and is it possible to make it yourself?
This device allows you to make various products and blanks at home - sticks, barrels, cylinders. They can be used in repair or construction. Often such elements are used to create decorative products. They can also be used in modeling.
Purchasing a large lathe is not always necessary. It has a high price and large sizes. Making a wood lathe with your own hands from a drill is simple and accessible.
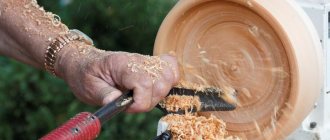
The principle of operation of such a device is simple. To begin with, the workpiece is cut into the headstock chuck. In this case, the tailstock fixes the product along its length. Then you need to install the tool rest, turn on the drill and start turning the part.
Choosing an Electric Motor for Woodworking Operations
An equally important element of the machine is the engine. The main characteristic that needs to be given enough attention is power. Regardless of the type of motor - single-phase or three-phase, the power can range from 1200 to 2000 W.
Perfectly suited engines:
From a washing machine, if a lathe is needed for small-volume work and the size of the workpiece will not exceed 30–40 cm, in this case the exact maximum length is selected experimentally. Such engines can help in processing small items, dishes, small knobs for stairs and similar interior elements.
Some models of washing machines are equipped with an asynchronous electric motor, in which, by changing the winding, you can step by step change the shaft rotation speed. Similar motors are also installed in floor fans, only there they have a lower power of about 40–100 W. This motor is enough for a mini-machine for small household products.
The motor from a washing machine produces about 300–500 W, which is more than enough for the average needs of a wood turner. Motors in washing machines are much better suited for turning operations, since the bearing assemblies in the drive itself are designed to withstand high shaft fracture loads. This will make it possible to process trunks with a slight deviation from the cylindrical shape.
Device
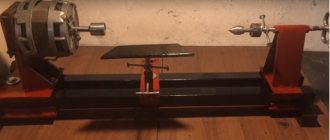
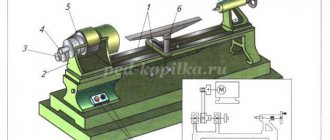
Any lathe includes a certain set of components that should be in a home device.
bed
This node represents the base. It ensures reliable fixation of the elements and their correct placement. The stand also makes the device stable.
Headstock
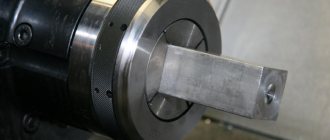
This part of the device fixes and rotates the workpiece secured in the chuck.
For reference! On small homemade devices it moves along the guide elements of the frame.
Tailstock
It is a moving part that fixes and presses the workpiece to the chuck. This is carried out during processing in centers. This element must have perfect alignment with the spindle assembly.
Caliper
On small machines, the support function should be performed by a tool rest. It is important that it moves along the guides of the frame and is well secured in the working position. On small machines, this fragment serves as a stop for the cutters.
When manufacturing a device, it is important to consider its design
Additional equipment of the machine
Additional attachments will allow you to use the machine for drilling holes at an angle and perform simple turning and milling technological operations.
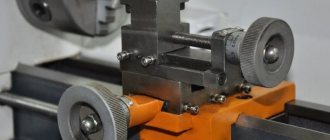
To perform milling work on this equipment, it is necessary to ensure horizontal movement of the workpiece, for which a movable horizontal table with a vice is used to fix the workpiece. The best drive for this table will be a screw gear, which is driven by a handle.
Using a homemade drilling machine, where the role of the working head is played by a hand drill, holes are drilled at an angle if the machine is equipped with a rotating plate with holes in an arc. On this plate, capable of rotating on an axis, which is fixed to the machine stand, there is a carriage and a drill. The holes on the rotary plate are made at angles of 30°, 45° and 60°. The procedure for manufacturing the mechanism:
- A hole for the axis is drilled in the center of the machine stand and the rotating plate.
- Using a protractor, the axes of the holes located at the most common angles are marked on the rotary plate, and the holes are drilled.
- Using the axial holes on the post and plate, these two elements are combined and secured with bolts.
- Three holes are drilled on the stand to secure the rotating plate with pins.
The rotating plate is rotated to the desired angle with the tool attached to it and is fixed with three pins connecting the fixed and rotating parts of the stand.
Machines with a rotary plate can also be used to perform simple turning work. For these operations, the drill is positioned horizontally using a rotary plate.
Selecting materials to create a device
To make the device you will need:
- Electric drill - performs drive functions. It must be fixed to the wall of the front support.
- The support should preferably be made from boards and beams. The best option would be a product in the shape of the letter T.
- Supports - they are made of metal corners or beams. The materials used affect the strength and reliability of the machine.
- Bed - can be made of steel. This will make the tool more reliable.
Mechanism assembly sequence
We assemble the machine frame using channels and beams. The larger the parts you plan to work with, the stronger the materials the frame should be made of.
To produce the headstock, we will need a hydraulic cylinder with a wall thickness of 6 mm or more. We press 2 bearings into the cylinder. Using large diameter bearings we lay the shaft.
It is necessary to fill the lubricating fluid into the hydraulic booster. Then we install the caliper with guides and pulley.
We install a tool rest to give the cutter stability. At the bottom we attach a small strip of metal, which makes the working part wear-resistant.
Options for homemade machines
To make a lathe, it is recommended to perform a number of actions:
- Attach elements that will regulate the interval from the table to the chuck. You can use boards for this.
- Make a back support from wooden beams. In their design, it is important to provide a screw that can be adjusted.
- Make a tool rest from wooden blocks. You need to attach a rail to it. Its length must coincide with the interval between the supports.
- Provide a button that will put the device into operation. To do this, you need to transfer the contacts to a new button or block the regular press. In the second case, the device will start when the plug is plugged into the socket.
There are also various types of device modifications:
- The base can be a beam or a metal structure.
- To secure the drill, you can use 3 pieces of plywood in the shape of the letter P.
- If you have a welding machine, you can make the tailstock yourself. This will require several nuts, bolts, and bearings. You also need to take sheet steel and short pipe fragments.
Features of the use of machines
Working with a drill while holding the tool only with your hands significantly limits its capabilities. The weight of the tool and vibration do not allow the drill to be firmly fixed in the desired position. But if you think through and design a special frame where it will be firmly attached, then an ordinary hand drill will turn into professional, almost industrial equipment.
From a drill you can make the following types of machines yourself:
- drilling;
- turning;
- milling;
- grinding.
Moreover, after replacing the working or cutting element, the machines become interchangeable. They provide a two-in-one function, for example, a drilling and milling machine, a lathe and a grinder. It all depends on the installation conditions and the needs of the owner.
The power of the machines and their capabilities will depend on the type of drill (the power of its electric motor), the method of fastening, since in this case it is the main working part of the equipment.
Practical examples of a homemade lathe
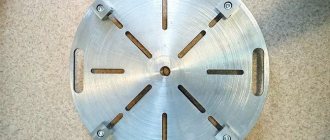
To make a simple machine, it is important to ensure the alignment of the drill shaft with the support tip. It can be placed on a frame made of durable plywood. It is not necessary to use a spindle. It is quite acceptable to clamp thin workpieces in a drill chuck. For larger items, you can make a special washer plan. The drill itself is supported by a special bracket. This helps prevent vibrations.
The stop for the incisors must be movable horizontally and vertically. The tailstock is not vertically adjustable. In this case, horizontal fine adjustment is carried out using a screw.
Note! The main advantage of this design is the ability to use the drill for its intended purpose. To do this, it needs to be dismantled.
Additional nodes
Additional components allow you to make the machine more functional, for example, to be able to drill holes at an angle, perform some kind of turning or even milling operations. For example, to provide the latter, you will need an attachment that will allow you to move the part horizontally. To do this, the horizontal table is given mobility, and a special vice is mounted that will clamp the part. For example, it could be a helical gear that is activated by a handle, or a regular lever drive that is activated by a handle. In other words, a second stand is installed on the machine, but horizontally, and a vice will be placed on it instead of a drill.
You can drill at an angle if you use an additional rotary plate with holes placed in an arc. The carriage will move along with the drill on this rotating axis, and the axis itself will be fixed to the frame. The holes with which you can fix the position of the working head are usually cut at an angle of sixty, forty-five and thirty degrees. Such a machine, equipped with a rotating mechanism, can also be used for turning operations if the additional plate is rotated horizontally.
Next, in a circle on the additional panel, you need to drill holes at angles that are measured using a protractor. At the next stage, the holes for the axes of both parts are aligned and fixed with a fin. Then you will need to drill three holes through the additional panel on the rack, and fix the first one at the desired angle with pins or a combination of screws and nuts.
How to make a stand for a drill with your own hands, watch the video.
Is it possible to make this on metal?
To make such a device, you need to take into account that the power of the electric drill will be small. In addition, the lathe is made exclusively of metal. In any case, it can only be used on soft materials such as copper, aluminum or bronze.
Important! Instead of a drill, you need to use a powerful and professional tool. Household devices break down too quickly.
The metal cutting machine must be more powerful
Components of a home lathe
In terms of design, a home machine is not much different from stationary production equipment.
The common components of any machine equipment associated with wood turning include:
- The bed is a fixed support platform on which the entire structure is mounted. Factory stationary machines are equipped with a fixed metal support. In homemade mini-machines, you can use strong wooden beams connected to each other by timber as a frame. The bed is “responsible” for the stability of all turning equipment.
- A headstock placed on the support of a lathe. The main purpose of this unit is to accurately support and move the wood workpiece being processed in relation to the electric drill drill. Depending on the location on the machine equipment and the functional purpose, this unit is divided into a headstock, which is responsible for the accuracy of the rotational movement, and a tailstock, the main purpose of which is to create the thrust part of the machine.
- Electric motor for creating rotational torque of the workpiece. Factory stationary models are equipped with three-phase electric drives operating at a voltage of 380 W and an electric motor speed of 1500 rpm. In the home version, an electric motor with a power of 200 to 400 W is sufficient.
The tailstock and headstock are the main working parts of the lathe. A piece of wood is installed between the executive elements.
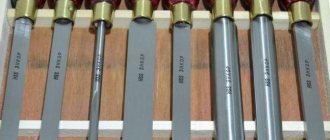
The lathe is equipped with: a lathe chuck, a rotation element, a special stop for placing the workpiece, a guide beam, fastening screws for fixing wooden blanks and other elements.
Machine turning equipment, regardless of the installation location (factory or home workshop), has the same operating principle:
- An electric motor transmits rotational motion to the workpiece through the headstock.
- The tailstock remains in a static position and holds the locked part motionless.
- The movement of the headstock is created by a manual drive.
Rules of care and use
In order for the device to serve as long as possible, it is necessary to provide it with high-quality care. To do this you need to do the following:
- promptly remove waste that gets on the device during operation;
- keep the machine in a dry place, since wooden elements may be damaged by moisture, and metal elements may become rusty;
- promptly change parts when they fail - this must be done before starting the next work.
Making a lathe from a drill is not difficult. To get a high-quality and reliable design, you need to think through all its components and prepare drawings indicating dimensions.
Tools, equipment and supplies
Let's move on to collecting the tools with which we will have to build a lathe with our own hands.
The set is the simplest, requiring no instructions:
- M12 thread tap, with holder;
- a hacksaw for metal with spare blades, or a small “grinder” with a 125-150 mm disc.
- a wood hacksaw with a fine tooth, or even better, a jigsaw;
- slick;
- sandpaper with medium grain size 20-25N;
- carpenter's square;
- wrenches, Phillips screwdriver and indicator el. assembly, knife with retractable blade;
- bench vice, medium;
- ruler or folding meter, carpenter's pencil.
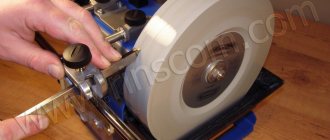
The most sophisticated device you need: an electric sharpener. If he is not there, negotiate with someone to let you work for half an hour or an hour. Since we have a drill, we will stock up on metal drills with a diameter of 4; 7; 11 and 12 mm for wood.
Let's get to work. Materials
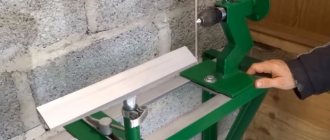
We will create the simplest mini-machine with direct transmission of rotation of the drill chuck to the workpiece. Having made it yourself, you can move on to more complex models.
First, let's prepare the wood. For the base we take a dry board one meter long, 50x300 mm. For the back and front headstock we will stock a wooden beam with a cross-section of 60x60 mm or a little larger. To construct a support, a board 6-8 cm wide and 20 mm thick is enough. It is best to use oak. As a last resort, birch or pine wood will do.
In addition you will need:
- Heels of M10 mm bolts, washers (including Grover) and nuts, wood screws.
- Long (25-30 cm) bolt or stud with M12 thread.
- 30 cm of steel strip 1.5-2.0 mm thick, 3-5 cm wide and a piece of rubber from an old camera. From this we will make a clamp for attaching the drill.
- Another strip of steel 3-5 cm wide, 15-20 cm long and 4-5 mm thick, for the support (support).
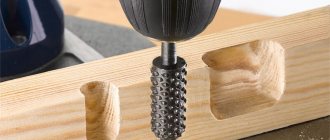
- Annular cutter for wood and plasterboard in the form of a cup, with a diameter of 15-20 mm.
- A section of channel approximately 10 cm, height 65-80 mm (number 6.5 or
 . This profile has a metal thickness of about 4.5 mm, and the size of the shelves is about 4 cm.
 - Push-button switch with two positions. Its power must correspond to the drill used as a drive.
- A socket, a plug and a couple of meters of flexible cable with double insulation and two copper conductors with a cross-section of 2.5 mm2.
Preparation of metal parts and assemblies
First of all, let's draw a diagram, or better yet, drawings of the future machine from a drill. Indicating at least general dimensions and main details. Then we move on to the manufacture of units for fastening the workpiece processed in our device.
Manufacturing instructions:
- We drill a hole in the bottom of the annular cutter for an M10 bolt. We grind its head in the form of a prism with a cut in the middle, so that a pair of teeth is formed.
- We insert the bolt into the hole of the cutter, then put on a large (4-8 cm in diameter) washer, screwdriver and tighten it with a nut.
- To install the quill (the movable part of the tailstock), we use a long pin with an M12 thread. We sharpen the head in the form of a cone.
- We put on the washer and tighten it with a nut with a groover. This will be a centering to rest against the end of the wood part being processed.
- We drill coaxial holes at the outer edge of the channel shelves.
- We cut threads in them and screw in the quill, where we first put the nut. By rotating, the rod can extend to the required distance and lock in this position.
- We drill four holes for screws in the wall of the channel with the quill.
We bend a clamp from a steel strip. We drill several small holes for screws to attach it to the headstock and one large one for the clamping bolt.