This article discusses homemade machines and devices for the home workshop. Here we describe in detail the features of the most popular and necessary DIY tools, as well as tools for a workshop or garage, step-by-step technologies for their manufacture and other useful recommendations on this topic.
Many home workshop owners create the equipment they need with their own hands.
Homemade machines and devices for the home workshop: general information
Each owner of a garage or workshop, depending on his needs, selects the equipment himself. Many of them know how to make homemade machines and devices for garages, so they make do with their own resources when arranging the premises, customizing the technical features of the structures to suit themselves.
So, when creating a metal workbench with your own hands, the drawings and dimensions of the product on them can be adjusted to the parameters of the room and other conditions. Even for a small home workshop, you will need to allocate enough space to accommodate at least the design of a universal folding workbench and a minimum set of tools. The required area for this is at least 3-5 m².
A workshop set up in a specially designated room
Manufacturing of tools storage devices: shelves, racks
In fact, it is very difficult to achieve optimal operating conditions. It is desirable that the size of the room be at least 6.5 m. To equip a workshop, you can make an extension to the house or garage. This solution will be the most profitable in any case.
Before designing a drawing of a folding workbench with your own hands, which has the largest design (therefore its dimensions are taken into account first), it is worth deciding on some points:
- indicate what types of work will be performed in the workshop;
- determine a list of necessary tools and equipment.
By mounting the tool on the wall, you can significantly save useful space in the workshop. Shelves or racks are perfect for this. You can successfully arrange these structures, achieving the most rational distribution of area.
The home workshop should be located so that noise from working tools does not disturb residents
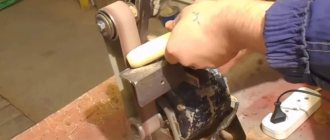
In order to save space, you can get a special device for a circular saw with your own hands, made on the basis of a conventional drill. Such a universal machine can perform several functions at once, combining the following capabilities:
- circular saw;
- grinding machine;
- sharpened;
- mini lathe for wood;
- cutting machine.
The work table can be combined with a vice for a carpentry workbench and equipped with drawers to store small tools.
DIY tool shelves: popular designs
Metal structures are more durable and reliable, while wooden ones are affordable. There are several options for rational storage of tools:
- wall shelves;
- DIY tool racks;
- suspended ceiling shelves;
- Shelves-boards for hanging small tools.
Perforated steel shelf for hanging small tools
Technology for making a shelf for tools with your own hands (shield):
- A shield is cut out of a plywood sheet, and the places where the shelves will be installed are marked on it.
- Using a jigsaw, shelves with side walls are cut out. The length of these sides must match the length of the shield.
- Shelves for tools are assembled and fixed to the surface of the shield using long self-tapping screws.
- Hooks are being installed. Holes are made in the shield where dowels are installed. You need to screw special hooks equipped with threads into them. First, you should distribute the entire tool and mark the points where it will hang.
- Brackets or lugs are installed on the rear wall of the structure.
All that remains is to fix the shield shelf on the wall. To prevent the lugs from sliding off the anchors, it is recommended to fix them with special washers.
Diagram of the device with installation dimensions of the tool rack in the workshop
Purpose and types
Making homemade machines with your own hands is a completely feasible task. They are indispensable in the home workshop and help solve many problems, such as:
- processing of metal blanks, since in everyday life you often have to sharpen or drill something;
- working with wood.
The price of professional tools is high, so homemade machines and other devices made independently are in great demand.
The standard set in the workshop includes:
- carpentry workbench;
- device for sharpening cutting objects;
- device for sharpening drills;
- drilling machines;
- pressing mechanism;
- cutting machine using discs.
Making a carpentry workbench with your own hands: drawings, videos, technology
The drawing of a carpentry workbench should include the following details:
There are several modifications of workbenches:
Having familiarized yourself with the structure of a carpentry workbench, you can begin to manufacture it.
Technology and drawings of a do-it-yourself carpentry workbench: how to make a simple design
Step-by-step technology for manufacturing the structure:
- To make a lid for a wooden carpentry workbench, you will need to take thick boards. The size must be selected so that, as a result of their connection, a shield with parameters of 0.7x2 m is obtained (the length can be less than 2 m). Long nails should be used as fasteners, which must be driven in from the front side and bent from the back.
- You can finish the lid by securing a beam with a section of 50x50 mm along its lower perimeter.
- Depending on the size of the carpentry workbench (its cover), vertical supports are located. To make them, a timber (12x12x130 cm) is taken. At this stage, it is necessary to take into account the height of the working surface, because it should be comfortable. The upper limit of the support should be at the level of your lowered arms. Subsequently, due to the installation of the cover, about 8-10 cm will be added to this indicator. Markings for installing the beams should be applied to the ground and these elements should be dug to a depth of 0.2-0.35 m.
- Next, we install the frame part and the cover of the wooden workbench with our own hands. The installed support bars must be connected in pairs. For this, wide boards are used, fixed at a height of 0.2-0.4 m with long screws. The cover is secured to the ends of the supports using the same fasteners.
Setting up a workbench for carpentry work
Technology for making a universal wooden workbench with your own hands
Despite the fact that the technology for creating this design is in many ways similar to the previous version, for the manufacture of a composite carpentry workbench, drawings with dimensions will be required. But in this case, bolts are used instead of screws.
In addition, you can install drawers for storing tools in a folding universal workbench with your own hands.
Technology for making a folding workbench with your own hands:
The dimensions and parameters of equipment created by yourself can be completely adjusted to your own needs.
DIY carpenter's vice design for a workbench
Usually workbenches are equipped with a vice. Many garage workshop owners know how to make such a device with their own hands. For a homemade design you will need special studs. Such fasteners are sold in hardware stores.
For beginners, experts recommend using additional materials to create a vice with your own hands: a video on how to make such a tool can be easily found on the Internet.
To work, you will need a special screw pin. This threaded part is the main operating component of the structure. The minimum pin diameter is 2 cm, the cutting length is 15 cm. The longer this part is, the wider the vice can be spread. If you take into account exactly these dimensional parameters in the drawings of a vice with your own hands, you can get a design that is set apart by almost 8 cm.
Assembly diagram of a vice for a homemade carpentry workbench
The jaws of the tool are made from a pair of boards. One part of the part will be fixed. To make it you need to take pine. The second part measuring 2x1.8x50 cm will move. In each of these boards you need to drill a hole for a screw. Using a drill with a diameter of 1 cm, holes for the studs are formed in all boards at the same time. To prevent the holes from moving relative to each other, you can connect them using nails.
After all the holes are made, the screw and all the studs are inserted into them along with the washer and nut.
Additionally, you can use the video below to create a vice with your own hands.
Make or buy?
An electric drill is a ready-made drive, gear, spindle and chuck in a monoblock. Place it on the carriage of the machine and you can drill. In terms of accuracy, the solution, generally speaking, is not optimal (see below), but in many cases it is acceptable, but eliminates the need to order expensive turned parts of increased accuracy, see below. In view of this, frames for installing drills are now sold only on the street from trays; prices are affordable. When choosing one to make a drilling machine from a drill, be guided primarily by the operating mode of the equipment; The price also depends on it:
- Occasional drilling/milling for yourself with the accuracy of what you get - cast plastic bed or stamped steel. The feed mechanism is lever with a cranked lever (see below). Carriage sliding bearings (see below) are steel on steel or with nylon liners. Prices are $20-$30.
- Regular drilling for yourself or to order with ordinary machine-building precision. The materials processed are up to the hardness and toughness of ordinary structural steel. Everything is the same, but the sliding bearings are steel on steel (worse) or with bronze bushings, and the frame is cast iron or (more expensive) composite, also vibration-absorbing. Prices: $30-$40.
- Regular drilling and milling of any materials that can be tooled with periodic overloads of the tool and/or with increased accuracy - plain bearings are only bronze on steel, cast iron frame. The feed mechanism is rack and pinion (see below); vibration-absorbing console. Prices: $60-$180.
Choosing a bed
The stand for the drill (which sellers for some reason stubbornly call stands) must be chosen not according to - not “China”); Now the market is full of “German China”, not to mention products from post-Soviet states. The design needs to be checked.
First, samples with plastic non-nylon liners for sliding bearings are definitely rejected: runout and drill drift of more than 0.5 mm will appear already on the 10th – 20th “hole” and will further increase. The second is console play. We take it by the far end, swing it up and down and to the sides while holding the latch. There should be no noticeable “chatter” (the tactile sense of an untrained person feels a beat of 0.4-0.5 mm).
Next is an inspection of the structure, see Fig. below. For regular drilling, the one shown in pos. 1. The ideal option is at pos. 2: collet clamp of the drill, shifting the column to the side reduces the vibration of the console by an order of magnitude, and by turning it sideways by 45 degrees, you can mill the part by hand with the precision “as best you can” on a standard fixed table, removing a couple of table fasteners, because in this case, its manual displacement relative to the horizontal working axis of the console will be linear.
How to choose a bed (stand) for a drill
And here is a sample for pos. 3 do not take under any circumstances. Firstly, the collar of its column is low and its fastening is unreliable. Secondly, longitudinal grooves under the table facilitate manual milling “as it happens,” but, unlike diagonal ones, they do not dampen vibrations of the bed. Moreover, they will concentrate where shown by the arrows (the tide under the column is made too narrow) and from there they will go straight into the column and table.
Popular articles Crafting a snowman: step-by-step master class and options for making a snowman with your own hands
Which is cheaper?
Bench Drill Press Spindle Drawings
Let’s say the price for the machine you like doesn’t suit you. Or a drill, if it’s a “crowbar” one, with an impact mechanism, that was used in work on building structures and the beating of the chuck is visible to the eye. Then the first thing we do is find out if there is a craftsman within reach who owns a lathe with high precision (no rougher than 0.02 mm). Which, by the way, is not a fact - a high-precision machine is very expensive and never pays off with the flow of regular orders. But let's say he was found. We take the drawing in Fig. on the right, we go to him and ask if he can turn it out of steel no worse than 30KhGSA, and how much he will charge for the work. “This” is the drawings of the tabletop drill spindle. The rest of its parts can be turned on a regular machine, or found in ruins at an iron market or in your trash. Most likely, it will turn out that it is cheaper to buy a bed + table, and if you estimate the costs for the rest, then perhaps a drill of increased accuracy will emerge. There are some of these on sale; they can be recognized by the absence of a striking mechanism and a collar specifically for installation in the frame: a turned steel cuff is put on it.
Making a metal workbench with your own hands: how to make a metal structure
For plumbing work, it is better to make a metal workbench with your own hands, because a wooden one will not be suitable for this. The fact is that wood is not that durable. In addition, when working with metal workpieces, a tabletop made of this material will be constantly damaged and will quickly become unusable.
In the general drawing of a do-it-yourself bench, you can identify five main components of the design:
- For longitudinal rigidity of the product, horizontal beams (3 pieces) measuring 6x4 cm are used. Length – slightly exceeds 2 m.
- Rack-mounted small-sized beams (9 pcs.) made of profiled pipes measuring 6x4 cm. They are used to assemble the frame part of the cabinets. In the corner area there are welded spacers made of steel strips. Due to all these elements, the frame is rigid and very durable.
- Rack beams (4 pcs.) 9-10 cm long (section 6x4 cm). To do this, it is better to use metal profile pipes with thick walls (more than 2 mm).
- Corner No. 50 (4 pcs.), which will be used as vertical posts. The height of these elements is 1.7-2 m. Working tools will be attached here.
Dimensions of the bench:
| Workbench options | Size, cm |
| Structure length | 2200 |
| Structure width | 750 |
| Structure height | 950 |
| Width of cabinet with drawers | 750 |
| Clearance between cabinets | 700 |
Do-it-yourself workbench manufacturing technology: how to assemble
Making a universal workbench with your own hands begins with assembling the frame. To do this, you need to take a couple of short and a couple of long beams. During the welding process, these elements may become twisted.
To prevent this, you must:
Installation diagram of a metal workbench
Then the rear vertical racks and the rear beam (long, one of three) are attached. You definitely need to check how evenly they are placed in relation to each other. If there are any deviations, the beams can be carefully bent using a hammer. At the end, the remaining vertical rack elements are assembled, as well as elements that provide rigidity.
When the frame is ready, corners can be welded to it to strengthen the structure. The tabletop is formed from wooden boards. They must first be soaked in a fire-resistant liquid. Then a sheet of metal is laid on top.
A plywood tool shield can be mounted on the vertical rack elements. The same material is used to sew up the cabinets. For boxes, you can use metal boxes or make wooden structures.
You can use the video below to understand in more detail the technology of making a workbench with your own hands:
Newest workbench
A standard workbench is made of a lid with different vices. This design is needed to create products with your own hands. It is not well suited to working with electrical devices due to the fact that the workpieces are sometimes difficult to secure. You can purchase a new compact workbench MASTER cut 1000 worth 12 thousand rubles, which should be foldable. You can put hand tools on it: a circular saw, a jigsaw or a router. But then it will need to be redone. The Festool MFT 3 workbench has excellent characteristics. However, the price of 30 thousand rubles makes you think. The master can easily make homemade tools for the home workshop that work at the same level.
- To make a workbench, you will need high-quality plywood without knots. The thickness must be at least twenty mm. By attaching an electric jigsaw to the bottom, you can cut boards and small bars along, across, at an angle, and also make complicated curved profiles. The devices perform auxiliary functions of circular and band saws.
- First, the tabletop is created. A groove is cut into it in the form of an arc to install a guide, which can be changed at any angle. A guide with a slot is also created for the jigsaw. Its width is determined by the size of the sole of the device.
- It is worth making sides from plywood and attaching them to the tabletop to give full rigidity. The legs of the workbench are made of timber. You can make a frame out of metal, and then attach the tabletop to it with screws. Then the structure will be light and strong. The guides at the bottom are attached to the tabletop with special furniture nuts.
- The jigsaw is placed at the bottom of the workbench lid, as if upside down. Only the file will remain visible from above. For ease of use of the jigsaw, an auxiliary switch is installed. The guide should also be quickly removed so that you can safely replace the saw of the device. For easy access to the lower part, the tabletop can be made folding and hinged.
- The workbench takes up little space and can be placed even at home. To do this, it is made foldable so that it can be easily disassembled and taken to a closet or pantry.
Garden device
To work on a summer cottage or in a country house, you need a high-quality workbench. The tabletop is made of thick boards up to two meters long. It won't hurt if you secure it a little more with self-tapping screws. The bottom perimeter of the tabletop is sheathed with timber. The table legs are made in the form of a square section 120 by 120 mm. They can be buried in the ground or attached to a reinforced concrete base. The entire structure must be treated with an antiseptic, and it is also covered with drying oil.
When the workbench is installed, do-it-yourself devices are mounted on it: guides, devices for fastening workpieces and electric tools.
https://youtube.com/watch?v=k0—UtWeM6w
Features of creating a wood lathe for a home workshop
In the technology of making a wood lathe with your own hands, the bed occupies a special place. The operation of other parts, as well as the stability of the entire structure, directly depends on this part. It can be metal or wood.
To create a wood turning and copying machine with your own hands, you can use an old manual milling machine, which is no longer needed. This tool is placed on a plywood platform 1.2 cm thick and 20x50 cm in size. You must first make holes in it for the cutter and fasteners. Stops made of bars will also be mounted here. They are necessary to ensure that the cutter is in a fixed state. The router itself is secured with two nails between the clamps.
In fact, it is absolutely not difficult to make a copy design of a homemade wood lathe with your own hands - video - there are enough materials on the Internet.
The main parts of a simple lathe (on the left - only with a leading center, on the right - with a leading and driven center): 1 - frame; 2 - drive; 3 - leading center; 4 - workpiece; 5 — stop for the cutter; 6 - tailstock; 7 — driven center (center-bolt); a - height
An example of a homemade wood lathe with your own hands
For the base, it is better to take a steel profile with thick walls. To make the structure reliable, it is recommended to use two supports. A frame will be installed on top of them. To fasten parts, a groove type of connection is used. First you need to make support platforms intended for the headstocks (rear and front).
List of parts for a wood lathe (it’s easy to understand how to assemble the structure yourself based on this list):
Drawing for making a homemade lathe
As supporting information, you can use a video detailing this process to assemble a wood lathe with your own hands.
The second example of a DIY woodworking lathe
An alternative solution would be to make the design of a simple mini wood lathe with your own hands based on an electric drill. This example of technology can be used as a test before building a more serious tool.
This type of machine is suitable for processing small-sized wooden workpieces. The material for the frame can be wooden beams. The return headstock can be replaced by a combination of a shaft mounted on a support bearing. To fix the workpiece, you will need to take out the appropriate attachment for the drill.
This design has its drawbacks, they are associated with:
- high probability that errors will occur in milling;
- low level of reliability;
- inability to process large-sized wooden workpieces.
A simple DIY mini woodworking lathe
But you shouldn’t give up this option, because it forms the basis for technologies for creating more advanced and complex turning tools. To correctly calculate the design, determine for yourself the necessary operational properties and technical characteristics.
The principle of making cutters for a wood lathe
The technology in this case is complicated only by the correct choice of workpieces, which not only must have a level of cutting edge hardness that meets the requirements, but also be correctly installed in the clamp - the holder.
Recommended types of blanks:
Turning cutters: A - with a semicircular blade for rough turning; B - with a straight blade for finishing turning; B - shaped; G - machine passage
The machine can provide the ability to change cutters. For this purpose, a special modification of the housing is made with the necessary mounting parts. These elements must be strong enough to withstand the loads during operation and at the same time maintain the original location of the edge part.
When the cutter is made, it is sharpened and the cutting edge is hardened. After the cutting part is heated, the cutter must be dipped into machine oil. Using slow hardening technology, the surface of the product can be made as hard as possible. In this case, the heated workpiece should cool naturally.
Design
Machines, even the least critical ones, cannot use sheets with a thickness of less than 0.6 cm. In any case, this applies to the supporting and load-bearing parts of the assembly. Sometimes an exception is made for housings and other light parts. However, even then you have to carefully weigh the pros and cons in order to give a correct assessment of the selected details. Mistakes in their selection can be fatal.
Some experts believe that a sheet with a thickness of 1 to 1.2 cm is quite enough for individual machines, for example, if we are talking about a cutting table.
Other experts proceed from the fact that parts of large thickness are always needed, even for minor sections of the structure. There is also an opinion that volumetric parts glued together from medium-thick plywood are more effective at damping harmful vibrations during occasional vibration. But real masters always give preference to considerations of reliability and safety. That is why they try to make maximum use of plywood sheets with a thickness of 19 mm or more, despite the heaviness and significant prices.
But you should not focus on just one thickness. The type of original wood must be taken into account. Coniferous wood is lighter and softer, it is used mainly for secondary nodes. Hardwood veneer is more expensive, but is still used more often.
But differences in the chemical composition of adhesives and the level of resistance to moisture practically do not matter; in most cases, FK grade plywood is quite sufficient.
What is much more significant is the veneer category. An increase in the number of knots threatens cracking and delamination. Experienced professionals try to take sheets of second grade and higher. You should not try to buy very cheap unsanded material. Bringing it to the required parameters in artisanal conditions is almost impossible.
Fully sanded workpieces are also easier to glue.
A 4-in-1 plywood machine can be considered as an optimal homemade sample. This design involves the use of a box measuring 54x32x88 cm and a table measuring 65x98 cm. The plywood for these parts is 10 and 18 mm thick, respectively. The cross-section of the disc grinding unit will normally be 18 cm.
To work on wood, you need a different apparatus, the types differ sharply, namely:
- sawing based on a hand-held circular saw;
- jigsaw;
- using a drill;
- universal model, suitable for hanging various devices.
DIY knife sharpening devices: drawings and recommendations
To make a sharpener from a washing machine motor with your own hands, you can limit yourself to a motor from an old Soviet design, for example, SMR-1.5 or Riga-17. A power of 200 W will be enough, although you can increase this figure to 400 W by choosing a different engine option.
The list of parts needed for a DIY sharpening machine includes:
- tube (to grind the flange);
- a nut for fixing the stone on the pulley;
Homemade knife sharpening device
- metal for making a protective casing for a sharpener with your own hands (thickness 2.-2.5 mm);
- whetstone;
- an electrical cable cord having a plug;
- starting device;
- a corner made of metal or a block of wood (for the frame).
The diameter of the flange must match the dimensions of the bushing on the motor. In addition, a sharpening stone will be placed on this part. On one side, this element is threaded. The indentation should be equal to the thickness of the circle multiplied by 2. The thread is applied with a tap. On the other hand, the flange must be pressed onto the motor shaft using heat. Fixation is carried out by bolting or welding.
The working winding of the motor is connected to the cable. It has a resistance of 12 ohms, which can be calculated using a multimeter. The starting winding for a DIY knife sharpener will have 30 ohms. Then the bed is made. It is recommended to take a metal corner for it.
Assembly drawing of a homemade universal knife sharpener
Some people need a chainsaw chain sharpener. You can make such a structure with your own hands from a frame with 3 supports, two spindles, a stepper motor (2 kW) and pipes used as holders.
Carpentry equipment
“Advanced” craftsmen have good workbenches with vices, rare machines and tools that are very necessary for making furniture:
- A surface planer is an electric planer that is permanently mounted. It allows you to plan boards to a given thickness. Using a surface planer, a purchased raw board is transformed into a high-quality material with a beautiful structure.
- Quite a rare unit - a band saw machine similar to a jigsaw, an extremely convenient and necessary thing. The machine allows you to make curved cuts, cut out unusual shapes, and opens up great opportunities for creativity.
- A miter saw is a very important tool; it is needed when you need to cut a large number of identical workpieces. With its help, this is done simply and accurately.
- A sanding machine is a very convenient thing. If you attach it to a workbench with a clamp, you get a good grinding machine.
- The milling cutter is one of the main mechanisms of the workshop. If there are a lot of repetitive operations, then it is not very convenient for them to do it and it takes a long time. To expand the possibilities, you can attach it to a workbench, and you will get an improvised milling machine.
The ubiquitous grinder
Every man has a power tool called an angle grinder. In fact, this is a grinding machine that is used to perform abrasive cutting of metal, stone, ceramic tiles and other materials. To do this, install a special abrasive disk with a thickness of 0.7 to 2.5 millimeters. The diameter of the cutting disc is from 115 to 180 millimeters, it all depends on the hardness of the material being processed.
The peculiarity of this machine is the high speed of the electric motor, for example, the Whirlwind UShM-125 has 11 thousand revolutions per minute. It is this indicator and low weight, only 2.5 kilograms, that excites the minds of home craftsmen to adapt it to perform types of metal-cutting work unusual for it.
Homemade grinders are available in every garage and home workshop, and each master makes a device for his own needs.
Cutting machine
A homemade option for the workshop is offered - a cutting machine suitable for cutting angles, pipes, square profiles, and fittings. The design of the device is simple:
- Desktop;
- spring return brackets;
- platform for attaching an angle grinder;
- emphasis
The table is made of metal. To do this, using electric welding, a frame is made from a 40x40 millimeter corner, onto which a steel sheet 3 millimeters thick is welded. Table size 500 x 400 millimeters.
Stands in the form of ears with an axle are attached to the table for movable mounting of the grinder platform. The platform itself has the same ears and base for attaching an angle grinder. A 400 mm long handle and a return spring are welded to the platform. A clamp is installed on the table in the form of a corner welded parallel to the cutting line.
The mechanism works as follows. The material in the form of a pipe is placed on the table, pressed against the stop, the grinder is lowered using the handle and cuts the material, the return spring returns it to its original position.
Pipe cutting device
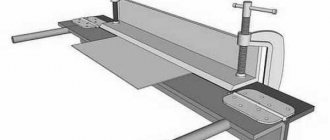
If cutting angles, round timber and pipes is rarely done, there is no point in making complex homemade machines and devices; you can make a simple device that can simplify the work when cutting material.
To do this, you need to make a tabletop measuring 400 x 300 millimeters from waste, and attach a steel strip to it on a hinge, on which the grinder is attached. For the return movement, use an elastic band attached to the tabletop and handle of the grinder. Cut a slot in the tabletop for the abrasive wheel to exit and install a stop.
Instructions for creating a stationary circular saw with your own hands
Creating a table for a hand-held circular saw with your own hands is the most important stage in creating the machine, since this structure will house the main parts of the equipment in the form of:
- power unit;
- control block;
- cutting component;
- other components.
The support bed on the hand tool table doubles as a guide for your DIY circular saw. It controls the direction in which the cut is made and fixes the workpiece.
Construction of a table for a hand-held circular saw is the most important stage in creating a machine
The sawmill is a modification of the circular saw. The only difference is that the disk is located at the bottom. The design of the table for a circular saw with your own hands is assigned the function of a bed. The power unit, block, fixing disk and control system are also installed here.
At the design stage for DIY circular saw drawings, you should take into account some factors:
Diagram of a stationary circular saw
How to make a circular saw from a grinder with your own hands
First, the tabletop is made from sheet material. Markings are applied to it in accordance with the dimensions of the instrument. Using these markings, cutouts are made to install the saw.
Next is done:
For a DIY circular saw machine you will need legs. They are mounted taking into account the dimensions of the tabletop made of wooden beams with a section of 4x4 cm. The use of steel corners is allowed. To provide additional stability, stiffeners should be installed between the supports. A control unit is placed next to the workplace. You should not refuse to install RCDs and devices that protect the engine from overloads.
Variant of a circular saw from a drill. Layout diagram: 1 - drive (electric drill); 2 — work table (duralumin, sheet s5); 3 - circular saw; 4 — rack (St3, strip 20?5, 4 pcs.); 5 — support holder of the mandrel shaft; 6 — mandrel; 7-electric drill holder; 8 — base plate (furniture chipboard, s30)
Selecting materials to create a device
Very often among home craftsmen there are those who try to make their own lathe from an electric drill.
The manufacturing process is not at all complicated, and to achieve the desired result you will need to take all the necessary materials to prepare them in advance. In the production of the machine, woodworking materials can be used, but you should be aware that with such devices you can only process small parts and workpieces, for example, make handles for knives, handles for furniture, etc. If you need a reliable sled that you plan to use very often, then it’s worth investing once and making it out of metal.
Technology for creating a wood cutting machine
Manufacturing technology of a homemade cutting machine:
Simple cut-off machine design for home workshop
All that remains is to mount the motor on the short arm of the rocker arm. The cutting element is placed on the long arm. The shaft and motor are connected using a belt drive. For the tabletop you can use a sheet of metal or a planed board.
Manufacturing of cutters
Blanks for the manufacture of cutters must have adequate strength and a hard edge responsible for the thread, and be securely inserted into the clamp.
Suitable for making cutters:
- Small pieces of steel rods corresponding to the dimensions of the parts and having a square cross-section.
- Failed files and rasps that do not have strong chips or cracks.
- Car springs. The workpiece is first given the shape of a square - using welding or autogenous.
To install cutters on a machine, you need a specially modified housing with parts for installation. All elements must be made of high-strength material that can withstand heavy loads.
After the cutter is made, it is sharpened. To increase strength, the cutting part is hardened by heating to the desired temperature and dipping into machine oil. By repeating this process several times, a durable tool is obtained.
Assembling a drilling machine with your own hands: video on how to make a structure, recommendations
A good drawing of a drilling machine from a drill with your own hands is the main condition for acquiring the necessary tools. To create such a machine, you do not need to use special materials or buy additional components.
Components for the construction of a homemade drilling machine with your own hands:
- bed (base);
- rotation mechanism (drill);
- device for supplying;
- vertically located rack for fixing the drill.
To create a drilling machine from a drill, you do not need to use special materials or buy additional components
In mastering the technology of making a drilling machine from a drill with your own hands, video material can provide invaluable help.
Guide to creating a drilling machine with your own hands (how to make a simple design):
A self-made mini drilling machine requires a feed mechanism for a rotary tool. The classic design scheme involves the use of a spring and a lever. The spring is fixed between the block and the stand.
There are many devices for sharpening drills with your own hands; the video material will help you understand this topic.
Properties of plywood
Plywood is a very versatile material. It is sufficiently durable, easy to use, widely available and relatively inexpensive. That is why plywood is often used not only to make furniture or decorative items with your own hands, but also to make homemade machines.
Physical and mechanical characteristics and standard sizes of construction plywood of the FSF and FBS grades
Some machine parts can be perfectly replaced with parts made from plywood. For example, a plywood table is perfectly used for cutting material; casings and movable supports made of plywood have also proven themselves to be excellent in use. And these are not all the parts that can be made from plywood in order to make a machine with your own hands.
- When choosing a material, you should take into account the load the plywood and parts made from it are designed for. In most cases, when making a homemade machine, it is optimal to use medium-thick plywood.
- Thus, homemade machines are intended for use at home without changes in temperature and humidity. Thick is used if the machine or its elements, for example, a table for cutting material, require increased strength, then it is better to use a more durable one, with a thickness of 10 mm or more. However, when making any homemade machines, you should initially refuse to use thin plywood, because it is too fragile for such work and is unsuitable for use in the production of a homemade machine.
- When cutting parts up to 6 mm thick, you can use a manual or electric jigsaw. If there is a need to cut a thick sheet exceeding a thickness of 6 mm, a circular saw is used.
- When sawing plywood across the grain, special cuts are made with a knife in order to relieve tension on the wood.
Features of DIY CNC milling machines
Software is considered an important component in a DIY wood CNC router. Drawings of a conventional design, taking into account this condition, must include additional elements for it:
- LPT port;
- CNC block.
Assembling a wood milling machine for a home workshop
At the first stage, drawings are drawn up for a wood milling machine with your own hands, which include information about the placement of all structural components, their dimensions, as well as methods of fixation.
Diagram of a CNC milling machine
Next, a support frame is assembled from pipes pre-cut into parts of the required size. For fastening you need to use a welding machine. Then the dimensional parameters are checked in order to begin manufacturing the working surface.
You need to act within the following scheme:
Be sure to test the machine before work. When the router is turned on, it should not vibrate too much. To compensate for this drawback, it is recommended to additionally install stiffeners.
The most important requirement for workshop machines is operational safety
Assembling a metal milling machine with your own hands
Step-by-step instructions for making a homemade metal milling machine:
Diagram of the milling machine device (a - general view, b - kinematic diagram): 1, 5 - guide rulers; 2 - gear sector; 3 - cutter; 4 - fence; 6 — control panel; 7 — additional spindle support; 8 — bracket; 9 — handwheel for lifting the bracket; 10 — belt tension handwheel; 11 - electric motor; 12 - spindle; 13 — handwheel for adjusting the spindle height; 14 - bed; 15 — spindle speed switch; 16 - switch; 17 - table
After this, you need to attach a cone (Morse 2) to the spindle and install a collet or drill chuck on it.
Device
The traditional version of a lathe includes the following main components: electric drive, bed (base), headstock, tailstock, caliper. An electric drill is used as an energy source (electric drive) on a homemade lathe.
bed
Designed to accommodate all other nodes. She takes all the workload on herself. Therefore, the bed must have a margin of safety. The design is minimally deformed during work, ensuring precision in the manufacture of parts.
The bed is highlighted in red
In the classic version of a lathe, the bed is a technologically difficult unit to manufacture. Its surface, mating with other assembly units included in the lathe, is made with high precision requirements. In the process of its technological processing, special high-precision equipment is used.
Headstock
In the headstock of the lathe there is an electric motor with a gearbox and a control unit. Its functions include transmission of rotation, as well as positioning of the workpiece for processing. Another name for the headstock is spindle, because the main part of this unit is the spindle. This is a multi-stage shaft with a hole inside, rotating in precision adjustable bearings.
On the side of the working area there is a flange to which a three-jaw self-centering chuck is attached. Various clamping devices, such as a collet, are installed through the holes in the shaft. Fastening the workpiece in a homemade machine is carried out using a drill chuck of an electric drill, that is, it has significant limitations.
Popular articles Crafting a snowman: step-by-step master class and options for making a snowman with your own handsThe control unit of a conventional lathe allows you to select almost any option for processing the part according to the technological process. In the homemade version, the function of the headstock is performed by an electric drill along with the base on which it is attached. Therefore, the choice of workpiece processing mode is limited by the functionality of the power tool.
Tailstock
To create the necessary rigidity during processing, the workpiece is fixed on both sides
This is especially important for long parts. Therefore, the back one is located opposite the front headstock.
In the tailstock body there is a thrust or rotating center that serves to press the workpiece. Cutting tools such as drills, countersinks, and reamers can be installed in the tailstock.
Caliper
The lathe support ensures that the tool is fed into the processing area. Typically, the tool is mounted in a special tool (tool holder), which is placed on the support. The kinematic design of the support allows it to move both longitudinally and transversely relative to the spindle axis. To obtain conical surfaces, the tool can be installed at an angle.
The working tools of lathes are driven both manually and with the help of mechanical devices. On homemade lathes, the tool is fed into the cutting zone mainly using manual physical force.
Features of making a thicknessing machine with your own hands
Do-it-yourself thicknesser drawings with a complex design involve the use of expensive components:
- bearings with increased wear resistance;
- rolled steel sheets;
- cog;
- pulleys;
- powerful electric engine.
As a result, the cost of producing a homemade surface planer increases significantly. For this reason, many try to limit themselves to the simplest design.
Instructions for a homemade thickness planer for wood:
| Design element | Data |
| bed | Frames (2 pcs.), made using welding based on a corner (4-5 cm). The frames are connected using studs (ground hexagons - 3.2 cm). |
| Broach | Rubber squeezing rollers from a washing machine. They are machined to the size of the bearings and put on an axle with a diameter of 2 cm. It operates through rotational manual movements. |
| Table | The sanded board is attached to the frame using a bolted connection; the heads must be countersunk. The boards need to be treated with oil (already used). |
| Engine | for 3 phases, power – 5.5 kW, rotational speed – 5000 rpm. |
| Protective cover | Made of tin (6 mm) placed over a frame corner (20 mm). |
Assembling a thickness planer from an electric planer with your own hands
To create a homemade thickness planer, you need to place the plane on the block, secure it with a device such as clamps, not forgetting to leave a gap.
The scheme for making a surface planer from a plane with your own hands is very simple:
- the support beam is fixed on a convenient surface;
- the required gap size is selected by adding layers of plywood;
- The surface planer structure made from an electric planer is attached to the resulting base with clamps.
Two clamps hold the base on the table, the other two hold the plane. After making sure that this fastening is secure, you can start using the tool.
Diagram of a homemade thickness planer
Vertical tool holders
Every craftsman strives to organize his workplace so that the tools are at arm's length. This is facilitated by vertical holders.
Wrench holder
- A wooden plank is attached to the wall above the workbench. The rail is screwed with screws into dowels installed in advance.
- Small nails are driven into the strip at intervals equal to the width of the wrench handles.
- The keys are hung on the rail.
- Nail heads hold keys horizontally and vertically.
Screwdriver holder
- In a piece of timber 40 x 40 mm, holes are drilled corresponding to the diameters of screwdrivers, at a distance of 30 - 40 mm from each other.
- A piece of timber is nailed to the wall with dowels so that the holes are located vertically.
- Screwdrivers are inserted into the resulting sockets. Now you can quickly get the tool you need without leaving your workplace.
Chisel belt
- The plank is secured to the wall with dowels.
- The belt or belt is nailed to the bar so that unique through pockets are obtained.
- Chisels are lowered into the pockets, through which only steel blades pass. The handles are held in place by a belt.
The device can hold hammers, pliers, pliers and other tools.
Homemade soldering iron stand
When working with a soldering iron, a situation arises when you need to put the tool down. Placing a soldering iron with a hot tip on a tabletop or on any object is always risky. A homemade stand will solve this problem.
An example of making a stand for a soldering iron
- The holder is made of wire in the form of a spiral. To do this, unbend a wire clothes hanger.
- The wire is wound around a cylindrical object with a diameter of 1.5 - 2 cm. The handle of a chisel or other tool will do.
- On one side of the spring there is a free end of the wire.
- The end is bent into a loop with pliers.
- For the base of the stand, take a board 200 x 100 x 20 mm.
- A through hole ø 4 mm is drilled at the base.
- A hole is drilled from the back of the board with a large drill for a countersunk screw head.
- The screw is threaded from bottom to top.
- Place the spring loop on the screw and tighten the nut.
- Circles are cut into the board using a crown to fit the size of a cup for candles or similar products.
- Using a chisel, make a sample of wood in 3 recesses.
- Cups are inserted into the openings, which are filled with solder, tin and a napkin to clean the tip.
- The soldering iron is inserted into the spring.
- A small hole is made in the board for attaching a flexible steel cord from a lamp.
- A clamp is attached to the end of the cord, which is used to secure various parts for soldering.
The design may have a different look - it all depends on the imagination and ingenuity of the author.
Scheme for creating a wood grinding machine with your own hands
Recommendations for making a consumable belt sanding machine with your own hands:
- The optimal width of the sanding belt is 20 cm.
- The sanding cloth of the tape is cut into strips.
- The abrasive tape is applied end-to-end.
- To strengthen the seam, you need to place dense material underneath.
- It is not recommended to use low-quality glue, as it will cause the material to tear along the seam.
- The diameter of the tape shaft in the center should be 2-3 mm wider than at the edges.
- To prevent the tape from slipping, it is recommended to wind it with thin rubber (a bicycle wheel).
Calibrating - wood grinding machines belong to the group of drum structures. This category is broad and includes many varieties of equipment.
To make a drum sanding machine for wood with your own hands, you can choose the following designs:
- surface grinding – the workpiece is processed within one plane;
- planetary - with its help a flat plane is formed on the workpiece;
- cylindrical grinding – it is used to process cylindrical workpieces.
From the video below, you can learn how to make a grinding machine with your own hands.
The simplest mousetrap in the world
This name can be assigned to many homemade mousetraps invented by craftsmen. They have one thing in common - humane treatment of animals caught in a trap. The device does not kill the animal, but isolates it. A few examples of how to make a simple mousetrap:
Plastic funnel
Cut a plastic 3 liter bottle in half. The cut neck is turned over and inserted into the bottom of the bottle. Bait (seeds, grain, etc.) is poured onto the bottom.
The trap is placed close to an object that the mouse could climb. A rodent, having fallen into a funnel, can no longer get out of the bottle.
Console
The design is a tilting platform. It is made from a piece of cardboard or plastic. The bar is placed on a plane so that half of it hangs in the air.
The bait is placed on the edge of the console so that the bar is on the verge of balance. The animal, having reached the bait, overturns the bar and falls along with it into the substituted bucket.
Suspension
An empty plastic bottle with bait at the bottom is placed on the edge of the table. A cord is attached to the neck by piercing the plastic with a hook made from a paper clip. The other end of the cord is tied to some support.
The mouse, attracted by the smell of food, enters the container. The bottle tips over under the weight of the rodent and hangs on the cord.
Pneumatic and electric tools
In Canada there is a settlement of Old Believers who live by their own laws: they do not use electricity, do not ride bicycles or cars. But this does not prevent them from having a carpentry workshop and using compressed air instead of electricity. To achieve this, all rooms are equipped with air ducts from a huge compressor; each workbench has a connection point for pneumatic tools. Using various carpentry tools, Canadian craftsmen are quite capable of making furniture without electricity.
The workshop has huge windows , as electric lighting is not used. All machines operate from compressed air. The external design of the machines does not change, only a pneumatic motor is installed instead of an electric motor. The workstation provides operation of pneumatic screwdrivers, drills, and milling cutters.
Sawing machine
The high speed of the grinder allows it to be used with a saw blade for wood processing. Without some protection this is very dangerous. The craftsmen have come up with a very useful and original homemade device for do-it-yourself carpentry, which allows you to safely use an angle grinder as a sawing machine.
For this purpose, special protection is made, similar to the standard casing that comes with the tool. It has a slide, two handles and a rotating device. The slide looks like a plate measuring 200 x 120 millimeters, with a slot for the saw blade to exit.
The plate is attached on one side to the casing on a hinge, the other to a steel strip with a 9 mm wide slot for sliding along an M8x1.5 pin, which is on the casing for fixing with a wing nut.
Two handles are welded to the casing to hold the sawing machine during operation. It is very convenient to cut and saw thin lumber, and the high speed of the machine on the joiner makes it easy to cut material up to 30 millimeters thick.
Vertical drilling model
The frame can be made from pieces of angle 50x50 millimeters and a steel sheet 5 millimeters thick. To do this, weld two corners along the edges of the sheet along the entire length; they will serve as legs. Table size 350 x 200 millimeters. Weld a bracket from a square pipe 80 millimeters high on top to attach the rack.
The stand or guide for the drill is made of a square pipe three millimeters thick. A section of water pipe eight millimeters long is welded into the upper hole. A cable tensioning mechanism is inserted into it. The height of the stand is 700 millimeters. The stand is inserted into the bracket and crimped with four bolts - two on two sides of the square pipe.
The carriage is a movable unit on which the drill is attached . It is made of 50x50 corners welded together, the height is 170 millimeters, the eyes are made of strip three millimeters thick. An axle is inserted into the eyes, around which the cable is wound.
A continuation of the axis is the handle that drives the carriage.
The carriage drive consists of an axis on which a cable and a handle are wound. One end of the cable is fixed to the bottom bracket. The upper end of the cable is fixed in the pipe at the upper end of the rack. A special bracket with a seat for an electric drill is attached to the carriage. The drill itself is tightened with a special clamp made from a strip 2 mm thick and 40 mm wide.
Wood sanding machine
The design of such a machine has a cylinder on which sandpaper is placed. This unit rotates while processing the part. The assembly of a homemade machine is often performed for grinding cylindrical workpieces. A device is also made to create a flat surface of the workpiece.
When fixing the sanding paper, follow these rules:
- the width of the abrasive cloth should be approximately 250 mm;
- the sanding belt is connected without a gap exclusively end-to-end;
- The sandpaper is attached using a high-quality adhesive;
- at the edges of the shaft for the abrasive cloth there must be a side, the protrusion of which is from 2.5 to 4 mm;
- a rubber backing should be placed under the tape.
The shaft of the device is rotated by an electric motor. These two parts of the machine are connected by a belt drive. The design of the frame itself can have different designs. The option is chosen depending on the size of the workpieces being processed.
Device for polishing wooden parts Source notperfect.ru
Briefly about the main thing
Typically, craftsmen assemble machines for their workshops if the area of the room is at least 3 m2. Universal devices are manufactured or to perform a specific type of work. In addition to shelves and racks, in the workshop you can often find a workbench for carpentry work made of boards and bars, which is equipped with a vice.
Craftsmen also make a metal workbench from corrugated steel pipes, angles, and sheet metal. They also assemble a lathe on a metal frame, with a clamping spindle in the form of a drill head and an electric drive. Also popular in the workshop are a stationary circular saw based on a grinder, a drilling machine made from an electric drill, a surface planer made from an electric planer, and a CNC router.