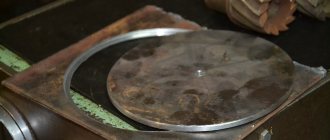
How to cut a large diameter hole in a metal plate?
We tell you how to make a homemade circular drill (ballerina) with your own hands for cutting round holes in sheet metal.
We spotted this interesting idea on the YouTube channel “Made in a Garage.”
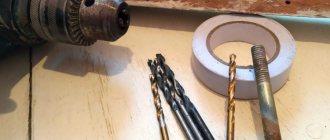
Necessary materials:
- metal blank;
- round steel bar;
- square bar;
- metal drill;
- fastening hardware - screws.
note
: The circular ballerina drill can be easily adjusted to a specific diameter. To do this, you need to move the cutter holder to the left or right, increasing the distance between the cutter and the blank.
It is better to use a homemade drill on a drilling machine, and not in conjunction with an electric drill - this is the only way you will be able to achieve a high-quality result.
How to Cut a Circle with a Grinder
How to cut a circle
in metal: best methods and valuable tips
Any design, for example in your home, in production, involves working with metal.
Often, during the operation of this material, the question may arise: how to cut a circle
in metal?
It deserves attention, since the complexity of the process of performing the work and the quality of its result directly depends on the choice of the right tool and technology.
Methods for cutting a circle from thin metal
Metal circles
Metal can be thin, as it is also called thick, but not durable; a variety of tools are used for cutting it.
The choice of materials and cutting technology also depends on how correctly you can choose the studio, what diameter the circle
not how smooth it must be.
Using a jigsaw
If you need a perfectly even circle, use an electric jigsaw to cut it out.
The work is carried out in stages:
- First, the thickness of the metal is determined and the appropriate saw blade for the electric jigsaw is not selected.
- Well before cutting a circle in metal with a jigsaw, the outline of the circle that will be cut is outlined on the working plane.
- Using a drill, not a drill (with a diameter of eight to ten millimeters), a hole is cut out from which work begins.
- A jigsaw saw blade is placed into the resulting gap and cutting continues according to the intended drawing.
Cutting with application does not take a long period of effort. In addition, using a jigsaw you will get a circle with perfect edges. Alas, this tool is used only for metal of minimal or medium thickness (nettle two - three mm).
Using an angle grinder
The grinder is used when working with thin metal. There is an option to create a round hole with this tool by following these step-by-step tips:
- Well before cutting
a circle in the metal
with a grinder
, markings are made so that its contours are clearly visible. - Short sections are cut along the entire length of the intended drawing, which will eventually be connected.
- The figure will be more like a polyhedron than a circle. Therefore, after cutting is completed, the product is processed and not cleaned until the edges are sufficiently even and smooth. For processing there is also the option of using a grinder. If the circle has a wide diameter, of course, grind the contours with a large disk.
How to cut a circle with a grinder part 1
Like a Bulgarian
cut in
a Circle
, without any adaptations Photo in mine: .
When processing a cut circle using a grinder, you should be careful that the disk is inside the hole and, despite this, is located in the same plane with the work sheet.
Cutting a circle in thick metal
Cutting a circle with a grinder
In order to outline the exact contours of the figure that will be cut out of metal, you should use a ruler, a marking compass, or a marker.
First, using a ruler, the required width of the compass connector is set so that it matches the required diameter of the circle.
Then the center point of the circle is determined on the metal plane.
Contours are drawn from it using a compass.
To make them clearly visible in robots, they should be drawn with a marker.
Application of cutting torch
Of course, cut a circle into medium-thick metal using a gas cutter. The work is carried out in stages:
- The outline of the circle is outlined.
- The instrument burner lights up.
- The combustion torch is adjustable.
- The torch is carefully and slowly drawn according to the drawn drawing.
Using this method you can cut
a hole in metal that is about four or five millimeters wide.
Application of welding machine
If you don’t have a gas cutter at home, use a welding machine.
It needs to be adjusted to the current level.
Then the burning arc is placed against the contour and is not held against it until a hole is formed.
Then you just need to slowly move it along the drawing until it is impossible to make an even circle.
However, the most important thing is to correctly adjust the power of the tool.
Nettle, if metal about four millimeters thick is used, you need a device operating at a power of about one ampere. In this case, the metal is thicker - which simply means that the power of the tool will not be enough.
To speed up the work process, it is better to use thin electrodes. However, they burn out quickly and do not need to be replaced. Because of this, there will be a need for frequent heating of the metal, since in time for replacing the electrode it will have time to cool down.
What actually happens, how to cut an even circle from metal with a cutter, is presented in the video:
Noticed a mistake? Select it and don't press CtrlEnter to let us know.
Hole cutting
On the surface we draw a circle - the outline of the hole that we will subsequently cut through the angle grinder,
The trick is that we put not a new, but an old, worn-out cutting wheel on the grinder.
DIY electronics in a Chinese store.
It has a small diameter, so when cutting it touches the metal with a smaller area. With its help you need to cut a small recess along the contour of the hole. It is enough to go literally 1/3 of the thickness of the steel. Since the erased disk has a small diameter, the insertion will be smooth, without the formation of serifs outside the circle.
Having scratched the outline of the hole, a new cutting disc is installed on the grinder. They already cut out a square through window in the center of the circle. It should not reach the boundaries of the drawn circle by a few centimeters, maybe more.
Now you need to remove the remaining part of the metal between the outline of the round hole and the border of the square cut out in it. To do this, use a grinder to split the excess steel into sectors 1-1.5 cm wide. If the metal is thick, then when making cuts it is better to keep a small step.
Next, along the edge of each sector, blows are applied with a hammer through a chisel or punch.
The metal is bent and then returned to its original position with blows from the reverse side. It needs to be broken like a wire. It's not difficult at all. If the diameter of the hole allows, then the metal can be bent with pliers. It is necessary to break out all segments sequentially.
If the worn cutting wheel had a small diameter, and when broken, the metal dissolved into narrow segments, then the resulting hole will have the shape of an almost perfect circle. It doesn't even need to be sanded. A similar method can be used if necessary to make a hole in a tile. Only in this case will the segments be broken with pliers immediately, without bending back and forth.
Main stages of work
The first step is to make a mount for the grinder. To do this, the author cuts off two metal plates, drills holes in them and attaches them to the gearbox housing using bolts.
After this, you will need to cut another plate and weld it to the first two plates.
Next, the author welds a steel strip to the resulting fastening, the end of which is fixed to the body of the angle grinder using a clamp.
A bolt will need to be welded to the angle grinder mount (in the center of the top plate).
In the next step, the author cuts a piece of a round tube. You need to put a sleeve (from a larger diameter pipe) on the tube with a fixing bolt, and weld nuts to the ends. The author welds two pieces of tube to the bushing.
Next, you need to make another bushing with a lock. It must be welded to a round magnet (can be removed from the old speaker).
Then you can start assembling the device. For convenience, the author screws the handle from the angle grinder into the tube. We install the stand on a sheet of metal, set the desired size and you can cut out a circle.
How to hold an angle grinder correctly
Many people have an angle grinder, but most people do not know how to use it correctly and how to hold it.
This leads not only to work failure, but also to serious injuries. An angle grinder is a rather dangerous power tool. The circle should be installed with the pattern facing up and clamped with a special nut.
The person with the leading right hand holds the grinder by the handle with his right hand. In this case, the circle should be located on the left side of the machine, and the protective cover should cover it on top. The rotation occurs in such a way that during cutting, sparks fly towards the worker. If the grinder's circle jams and the grinder breaks out of your hands, then it will not go towards the carver, but in the opposite direction.
The left hand holds the machine by the handle, which is screwed into a threaded hole on the body. There are several of them for special cases of use, but the correct position of the handle is only the upper one.
This position of the machine requires the use of protective equipment. To protect the eyes and the exposed part of the face, use safety glasses, or even better, a protective mask. To protect exposed parts of the body from sparks and small fragments during the cutting process, it is necessary to wear a suit made of thick material.
Turntable manufacturing process
There is also a second way to cut a circle evenly. For this, a previously made rack is used, and it will also be necessary to make a rotating platform.
First, the author cuts a piece of a thick-walled round pipe into which two bearings must be pressed and welded.
After this, a piece of pipe with bearings will need to be welded to a square plate. Four mounting holes must be drilled in the plate.
The author attaches the resulting turntable base to the workbench using bolts.
Next, the author disassembles the second round magnet. A piece of round steel must be welded to the metal plate, the diameter of which is equal to the internal diameter of the bearings in the pipe.
Then the magnet itself needs to be glued back to the plate (the author uses quick-drying glue for this).
The author cuts a circle from a sheet of metal. A magnet with a metal rod is installed in the center. After this, four sections of profile pipe must be welded to the circle.
In each section of the profile you need to drill one hole and then weld the nuts.
The author tightens the bolts into the nuts. Then pieces of a round rod are welded to the bolt heads (you can use square pieces). We insert profile sections of smaller diameter and fix them.
How to cut smoothly
To cut something evenly with a grinder, you need to make the correct markings. For example, before cutting a piece of pipe, you need to mark the size with a marker or thin chalk. Then we take a sheet of paper with a straight edge and wrap the pipe around the mark. We will get a paper pipe on top of a metal one. The border of the paper will be the exact trajectory along which part of the pipe will be cut off.
For these purposes, you can also use construction tape, which makes it easier to wrap the pipe and secure it. Draw a cutting line along the edge of the paper or tape. We remove the paper, heal the pipe in a vice and cut it with a grinder.
You can cut a corner, profile or sheet in a similar way. Just don’t forget that you can’t change the position of the machine while cutting. Misalignment of the circle will lead to jamming or breakage. Do not press too hard on the circle, especially thin ones. The deformation will immediately be reflected by curvature. The machine should eat into the material itself, you just need to hold it.
The evenness of the cut also depends on the correct selection of the wheel. It is difficult to achieve an even trajectory when cutting off part of a thick-walled pipe with a thin circle.
How to cut a round hole in tile or metal with a grinder - Review
How to cut a round hole with a grinder? Quite often, the question of how to make a hole in a tile accurately and quickly can take home craftsmen who have little experience by surprise. But in fact, there are quite a lot of interesting implementation options. Indeed, the need to create a hole in ceramic tiles may appear at any stage of repair work, even long before everything begins.
This, as well as the diameter of the circle being made, will largely determine how to act in each situation and which tool is best to use to make a round hole in the tile.
For reference
We remind you that the outer diameter of the annular drill and the pipe being processed must be strictly the same. As we know, when laying water and sewer pipes, it becomes necessary to route them through various obstacles, such as walls, floors and other elements of building structures.
But before making holes for the pipe, you need to familiarize yourself with the known methods for implementing similar operations, which often affect not only the load-bearing structures of the building, but also their finishing. In the specific conditions of pipeline laying, a variety of techniques can be used, which are intended to be considered in our article.
What to work with?
Using hand tools
If you do not have electric tools and you do not know what to use to make a hole in the tile, then you can use the simplest method - a tile cutter and tongs (or pliers).
The sequence of actions will be as follows:
- Before you start cutting a hole in a tile, you should mark the boundaries of the future hole on its surface.
- To make the material softer, you should soak it in water for a short time beforehand.
- If you use a glass cutter, make sure to follow the markings and do not tear the cutter from the base. To be able to cut a groove, you should apply enough force to the handle, but so that the tile is intact and does not crack (this is especially true if you have a glossy glazed tile).
- Along the cutting line, tap the groove with the back of the tool so that it is as deep as possible.
- Using pliers, break off the material, piece by piece, until you are left with an even cut along the markings.
- If jagged edges remain, the cut circle should be sanded using fine-grain sandpaper.
The method is labor-intensive, but it will be a great help if you don’t have the right tool at hand. Now let's look at how to use an electric jigsaw.
Using an electric jigsaw
A tool such as an electric jigsaw, which has a diamond wire, has proven itself quite successfully on ceramic material. When using it, it is possible to create any end-to-end shape in the tile, both in the central part of the tile and on the edge. The latter is sometimes required to install an outlet. But for the first case, it would be great to have an electric drill and a drill on hand to cut holes in the tile in the place where the outlet will be located.
So, how can you make a round hole with an electric jigsaw?
- Draw a round hole on the outside.
- Immediately after this, you should start cutting it out if the element to be cut is located near the edge.
- In order for the hole to be centrally located, you should first use a drill to drill a small diameter hole on the ceramic in the place where there will be space for installing the socket. A cutting thread should be passed through it and the tool should be brought to the edge of the cutout.
- Slowly insert the device along the marking line. You should gradually retreat inward from the line, while trying not to capture additional areas. You should use the same method to cut the hole with a standard hacksaw, but then do not count on good quality of the cut.
As you can see, the method is quite simple and convenient.
Grinder and its use
The grinder is an absolutely excellent tool. Often, thoughts about how to create a hole in the tiles appear precisely at the moment when laying the tiles is required and it is necessary to place it under the pipes, toilet and faucet. The grinder makes it possible to process ceramics when they are not yet attached to the wall. such a tool will also be appropriate for performing figured cutting on the edge of a tile square.
How to cut a hole in a tile using a grinder:
- Mark a line that will serve as a guide when cutting.
- The grinder should be equipped with a diamond disc, which is used for the dry method.
- You should start cutting from the side where you feel most comfortable. Insert the instrument slowly, moving it slightly away from you to the side.
- If it is inconvenient to work, make a semicircle, and then start moving with the tool in a different direction. But keep in mind that in this case you should make sure that the cutting points coincide.
The grinder is the most convenient for creating round holes.
Scouring tiles
The second option for creating tiled holes assumes that the tile will be fixed to the wall. in this case, you should use the classic method, in which the wall is scored with a drill. When working on cladding material, use either a cone drill or a typical twist drill.
To create holes in a tile using a simple drill, you will need to do the following:
- To reduce the sliding of the cutter, you should cover the ceramic surface to be treated in the drilling area using masking tape. This will make it possible to keep everything in its original position.
- Place a point where you want to drill.
- Drill with a rotary drill at low speed.
- To avoid overheating of the nozzle, you should wet it a little from time to time. You can also spray the trim, but only after you have gone a little deeper into the wall so that the drill does not slip off. If you need to create a large hole, you should do it a little differently. The beginning of the work will be similar, but after that you should replace the drill with another one with a larger diameter. We recommend gradually widening the drill, and this will help reduce the risk of chipping to zero.
Please note that there is another way to create a larger notch. For the border of the future hole, use a thin drill to make many holes. After this, you should carefully knock out the central part and sand the nicks.
How and what to use to make even circular holes in a sheet of metal?
My father-in-law has a problem. You need to put a sheet of metal on the roof, and make a series of round holes in it. Metal thickness 0.5 mm. How to do this and with what power tool? I really need some good advice. Surely someone has already done something like this.
Master Joe wrote: How to do this and with what power tool?
That is, the manual one no longer works at all? At least the diameter was announced
up to 40 mm conical drill, then scissors, best of all are notched ones, but you can also use simple ones for metal, and whoever recommended a bit - try it yourself, or better yet, make a video on how to do it, even if the sheet is flat, drilling it with a bit is a circus, but there is one option: bits on the tiles, you can use it for small diamonds and rub them slowly so it won’t bite
the lyricist wrote: whoever recommended the ronka - try it yourself
So we tried it more than once. The crown must have a centering drill. Mark the center and drill.
the lyricist wrote: even if the sheet is smooth, drilling it with a bit is a circus,
well, maybe a circus for you
Master Joe wrote: You need to put a sheet of metal on the roof
Will it lie at a 90 angle to the pipe?
Master Joe wrote: make a series of round holes
if the plane of the sheet to the pipe axis is not 90 degrees, then the hole should be oval
In general, I used a convenient small grinder to cut thicker sheets with minimal clearance for a chimney pipe diameter of 150.
Master Joe wrote: You need to put a sheet of metal on the roof and make a series of round holes in it.
Hole diameter? Here's a video to help you. [
]("Manual hydraulic press hammer SOROKIN 7.151")
The diameter of the holes is 50 mm.
I looked at the video, it says about the metal thickness of 2-3 mm, but about 5-7 mm - no information.
Master Joe wrote: I watched the video, it says about the metal thickness of 2-3 mm, but about 5-7 mm - no information.
Master Joe, so how thick is the metal?
I apologize if I expressed myself unclearly. Metal thickness is 5-7 mm, hole diameter is 5 cm.
Master Joe wrote: You need to put a sheet of metal on the roof
Master Joe wrote: Metal thickness 5-7 mm
And this, by any chance, is not the roof of an armored car? From “cheap but cheerful”, look for such a crown. And drill at low speeds, otherwise you will immediately burn the crown at such a thickness.
Master Joe wrote: I apologize if I was unclear. Metal thickness is 5-7 mm, hole diameter is 5 cm.
I think it’s still unclear. 5mm and 7mm metal thicknesses are very different things. and you’ll have to use a crane to drag such a fool onto the roof. and the ceilings must be from Sh-24 or higher. but then this is not the roof, but the top of the bunker. therefore, explain for what purposes, the exact thickness, etc. as long as the level of questions is not higher than the average kindergarten group.
taels wrote: Is this, by any chance, the roof of an armored car?
sanya1965 wrote: but then this is not the roof, but the top of the bunker.
Sorry for the offtopic, just a week ago, in the news:
German police detained an electrician who built a bunker, fearing the Russian Federation
MOSCOW, November 22 – RIA Novosti. German police have detained a 59-year-old electrician who built a bunker that he calculated could withstand a nuclear explosion and amassed an arsenal of weapons, fearing war with the Russian Federation.
According to the publication, the detainee equipped a shelter by expanding and strengthening the basement of his house in the small town of Kelheim near Regensburg, Bavaria. It took the police three days to break into the bunker and fully examine it and the entire arsenal of weapons found.
According to the publication, 2 machine guns, 80 rifles and shotguns, 60 pistols, 20 thousand cartridges and 40 kilograms of substances for making explosives were found in the shelter. The electrician also stocked up on food and built a ventilation and water purification system.
“He was afraid of the threat from a major Eastern European power. He was afraid of Russia. We don't know when he started construction. “He did everything himself,” the publication quotes a local police representative as saying.
According to the police, there is no reason to believe that the electrician is mentally ill. His connections with extremist groups have also not been identified. Currently, the detainee is accused of illegal possession of weapons and explosives.
Master Joe wrote: My father-in-law has a problem. You need to put a sheet of metal on the roof,
Master Joe! Your father-in-law is not an electrician, by any chance?
Working with special attachments
So, what else can you use to make a round hole? In addition to standard glass and tiled surfaces, there are other alternative attachments for the drill. Diamond-coated bits can be used if you need to cut out a socket outlet, tap out a faucet in a bathroom, or other areas. Drilling is performed by rotating the crown, which is placed on the guide drill. The accuracy of creating an opening will be largely determined by the properties of diamond-type sputtering and the size of the grains. The disadvantage of this method is that the cost of the crown is quite high.
Using a crown, the hole is made as follows:
- Place some masking tape on the ceramic.
- The cutting contours are drawn.
- Attach the tool with a crown, and then begin to smoothly insert it deeper and deeper.
- To prevent overheating, the crown should be periodically moistened.
A tile drill, otherwise called a “ballerina”, makes it possible to create round holes with a large diameter. The principle of operation of such a device is reduced to the following - the electric tool is activated, which is reflected in the drill simultaneously with the cutter, which is movable and mounted on a rod.
Where to buy tools and accessories for metal cutting
You can buy various devices for cutting metal (diamond wheels for metal, hacksaw blades, discs, etc.) and the necessary power tools on our website. In the RINCOM catalog you will find a huge number of metal-cutting tools from domestic and foreign manufacturers. We offer competitive prices and fast delivery to all regions of the Russian Federation.
You can place an order on the website or by phone. Don't miss your chance and make a profitable purchase!
Source
Metal marking
Before cutting a circle in metal, you need to apply markings. To do this you will need a mallet, a center punch, a compass and a marker.
Place the workpiece on a flat surface.
Mark the center of the hole using a punch and a mallet.
Using a compass, draw a circle of the desired diameter on the metal.
Trace the outline with a marker.
The result was clear markings.
Photo No. 1: metal marking
Note! The cutting line should be on the outside of the circle. This is necessary in order to obtain a part of the required diameter.
How to cut tiles and porcelain stoneware with a grinder without chipping
To avoid chipping when cutting tiles, it must be moistened with water. This will promptly reduce the temperature, which causes destruction. In this way, you can not only cut the tiles, but also cut out the necessary fragments. Another method is to use a stone cutting wheel. This circle does not crack or chip.
The situation with porcelain stoneware is a little more complicated. Porcelain tiles are somewhat thicker than regular tiles and are stronger. A manual tile cutter becomes dull very quickly without achieving results. Therefore, you can cut porcelain stoneware around the stone.
We make a contour cut along the drawn cutting line. Then another, a third. Until the uncut thickness of the material is less than the cut thickness. We move the porcelain tile to the edge of the table and break it with a sharp, but not very strong movement.
How to cut a circle in metal with a jigsaw
A jigsaw can be used to cut a circle in a sheet of metal of small or medium thickness. The process looks like this.
Considering the thickness of the metal, select a suitable jigsaw blade.
Equip the power tool with the attachment.
Before cutting a circle in a sheet of metal, mark the workpiece.
Using an electric drill, drill a hole to start cutting out the circle.
Turn on the jigsaw and get to work. Cut a circle in the metal strictly along the contour.
Important! Consider the following features of using jigsaws to cut circles in metal.
The fewer teeth on the blades, the better. The cutting line will be more accurate.
Cutting circles in sheets of metal with a jigsaw is carried out in a reciprocating mode.
Carefully control the angle of the blade to avoid errors and inaccuracies.
When cutting a circle in metal, the likelihood of blade breakage increases significantly. Buy some cutting tools just in case.
Photo No. 3: cutting a circle in metal with a jigsaw
One more moment! Do not forget about the need to use coolant.
Drill a hole in metal
Drilling through holes in metal workpieces is done with various tools using special techniques. Many specialists, when performing engineering work, have to drill holes in metal structures quite often. These objects have high elasticity, which forces the use of special cutting devices when drilling.
Types of drills and devices for drilling in metal
The necessary equipment for drilling metal products are electric and hand drills, as well as drilling machines. The working part of such devices is a drill of different shapes:
- spiral;
- screw;
- crown-shaped;
- conical;
- flat;
- cannon;
- rifle;
- centering;
- stepped.
Each drill is individually marked, where the tip indicates the cross-sectional diameter and the type of alloy from which it is made. To drill a hole of the required diameter, you need a drill a few tenths of a millimeter narrower.
Drills are also classified by length:
- short;
- elongated;
- long.
Drilling in some materials may require a specially sharpened diamond-tipped drill bit. Twist drills may not be able to handle products made from thin sheet alloys.
In some cases, to drill deep holes, the product must be fixed in a vice, stops, jigs, or corners with fasteners.
This is done for safety reasons and to obtain high quality holes.
Modes for drilling holes in metal products
For drilling through holes in metal products, preliminary preparation for the process is extremely important. The drill must be correctly secured and guided in the tool.
You need to adjust the rotation speed and other parameters. For products that are too strong, a low drill speed is recommended.
An indicator of correct drilling should be uniform, long chips.
Types of holes and methods for drilling them
Some manufacturing jobs often require the following types of holes in metal workpieces:
- Through. They completely pierce metal workpieces. It is important to protect the surface of the machine from accidental exit of the drill beyond the product to avoid damage to the drill and the occurrence of burrs on the blank. Workbenches with holes, where it is possible to place a wooden spacer under the workpiece, are ideal for such types of work. Holes in thin blanks are drilled with flat drills, because a twist drill can noticeably destroy the edges of the product.
- Deaf. They are carried out to the required depth without penetrating the product right through. In this case, an important point is measuring the depth, which can be conveniently done by limiting the length of the drill by the stop of the sleeve or the drill chuck with a locking stop. Professional machines are equipped with automatic feeding systems for a given depth of penetration, which allows you to fix the depth of the drill.
- Deep. This type of hole includes those drills whose length is five times the diameter. When drilling deep holes, it is necessary to periodically remove the resulting chips using additional lubricants. Often it is necessary to enforce measures to cool the drill and the workpiece itself, the temperature of which rapidly rises to too high levels as a result of friction. This applies to workpieces made of high-strength alloys. For deep holes, twist drills are used.
- Wide diameter. Drilling large-diameter holes in products of large proportions is a very responsible and labor-intensive process. For such holes, conical, crown-shaped or stepped drills are used. Specialists carry out drilling at low tool speeds, trying to ensure the safety of the edges of the workpiece.
- Complex shape. Sometimes it is necessary to drill through or blind holes in workpieces of different densities for internal threads. The technology has to be divided into two actions: preliminary preparation of the site and the drilling itself.
- Half-hearted. Half blanks are drilled, filling the cavities with wood. Stepped holes can be obtained using one of two techniques: reaming (passing a drill of a smaller diameter to the entire depth of the workpiece, followed by drilling with drills of a larger diameter) and reducing the diameter (drilling a hole of a larger diameter to the required depth, followed by replacing a drill with a smaller diameter). As a result, the hole is clearly centered.
Safety when drilling holes in metal workpieces
When drilling holes in metal workpieces, you should be very careful to avoid rapid destruction of the drill. Following simple rules when drilling will ensure safety and guarantee a high-quality product upon completion of the work:
- On the eve of drilling, you must carefully check the fixation of all fastening devices on the machine.
- You can start work in special clothing to prevent any elements from getting under the moving parts of the machine. Protect your eyes from metal shavings with special glasses.
- When the drill tip enters a metal workpiece, it should already be rotating at low speeds to avoid dulling.
- The drill should be pulled out of the drilled hole gradually, reducing the speed, but not stopping completely.
- When the drill tip does not penetrate into the workpiece, you will have to check the strength of the metal. When running a file over the surface, it is possible to determine the degree of strength. If there is no roughness left on the alloy, you need to choose a drill with a diamond tip or from a harder material, and drill at low speeds.
- Drills of small diameter, which are difficult to fix in the chuck, are recommended to be wrapped with brass wire on the tail to increase the diameter of the girth.
- If you are working with a polished workpiece, you can put a felt washer on the base of the drill to avoid damage when it comes into contact with the drill chuck.
- To fix metal workpieces made of polished or chrome-plated steel, fabric or leather spacers are used.
- When drilling deep holes, a small piece of compressed foam placed on the drill will ensure that small metal shavings are blown away. Also, foam plastic will make it possible to deepen the drill to the required level when producing blind holes.
The power of electric drills must be taken into account when drilling holes in metal workpieces of varying hardness. Manufacturers of electric tools mark devices by indicating technical characteristics on their housing. For drills of different power, drills of the appropriate diameter are required.
https://www.youtube.com/watch?v=ZjueKzIhTVs
You can entrust any metalworking work, including drilling, to the specialists of the Proflazermet company. We ourselves will determine the required hole diameter and select the appropriate tool, of which we have a large selection. As a result, you will get the perfect solution in a short time.
| [td]» Articles » Professionally about metalworking » Drilling machines |
We recommend purchasing:
Installations for automatic welding of longitudinal seams of shells - in stock!
High performance, convenience, ease of operation and reliability in operation.
Welding screens and protective curtains are in stock!
Radiation protection when welding and cutting. Big choice. Delivery throughout Russia!
Depending on the required quality and number of workpieces to be processed, holes are drilled using markings or a jig. During the work process, the following basic rules must be observed:
- when drilling through holes in workpieces, it is necessary to pay attention to the method of securing them; if the workpiece is mounted on a table, then you need to place it on a support to ensure free exit for the drill after processing is completed;
- the drill should be brought to the workpiece only after turning on the spindle rotation so that when it touches the surface of the workpiece, the load on it is small, otherwise the cutting edges of the drill may be damaged;
- Do not stop spindle rotation while the drill is in the hole being machined. First you need to remove the drill, and then stop rotating the spindle or stop the machine, otherwise the drill may be damaged;
- if a grinding noise or vibrations occur during drilling resulting from jamming, misalignment or wear of the drill, you should immediately remove it from the workpiece and then stop the machine;
- When drilling deep holes (l>5d, where l is the depth of the hole, mm; d is the diameter of the hole, mm), it is necessary to periodically remove the drill from the hole being machined to remove chips, as well as to lubricate the drill. This significantly reduces the likelihood of drill breakage and premature dulling;
- a hole with a diameter of more than 25 mm in solid metal is recommended to be drilled in two transitions (with reaming or countersinking);
- drilling should be performed only according to the modes specified in the technological maps or in the tables of reference books, as well as according to the recommendations of the foreman (technologist);
- When drilling holes in workpieces made of steel or viscous materials, it is imperative to use coolant to protect the cutting tool from premature wear and increased cutting conditions.
Drilling by marking is used in single and small-scale production, when the manufacture of jigs is not economically justified due to the small number of processed parts. In this case, the driller receives marked blanks with control circles marked on them and the center of the future hole (Fig. 6.21, a). In some cases, the marking is made by a driller.
Drilling according to the markings is carried out in two stages: first, preliminary drilling, and then final. Pre-drilling is carried out with manual feed, drilling a small hole (0.25d). After this, the spindle and drill are retracted, the chips are removed, and the alignment of the circle of the overdrilled hole with the marking circle is checked.
If the preliminary hole is drilled correctly (Fig. 6.21, b), drilling should be continued and completed, and if the hole has gone to the side (Fig. 6.
21, c), then make the appropriate adjustment: cut two or three grooves 2 with a narrow chisel (crossmeisel) on the side of the center where you want to move the drill (Fig. 6.21, d).
The grooves guide the drill to the location designated by the center punch. After correcting the offset, continue drilling to the end.
Drilling on the jig
To guide the cutting tool and fix the workpiece according to the requirements of the technological process, various jigs are used.
Constant mounting bases of the device and jig bushings that provide direction to the drill increase the accuracy of processing.
When drilling along a jig, the driller performs several simple techniques (installs the jig, the workpiece and removes them, turns the spindle feed on and off).
Drilling through and blind holes. There are mainly two types of holes in workpieces: through holes, passing through the entire thickness of the part, and blind holes, drilled only to a certain depth.
The process of drilling through holes is different from the process of drilling blind holes. When drilling through holes, when the drill comes out of the hole, the resistance of the workpiece material decreases abruptly. If you do not reduce the feed speed of the drill at this time, it may become jammed and break.
This happens especially often when drilling holes in thin workpieces, through intermittent holes and holes located at right angles to one another. Therefore, drilling a through hole is carried out with a high mechanical feed speed of the spindle.
At the end of drilling, you need to turn off the feed speed and drill the hole manually at a speed lower than mechanical.
When drilling with manual tool feed, the feed speed before the drill leaves the hole should also be reduced somewhat, drilling should be done smoothly.
There are three main methods of drilling blind holes.
If the machine on which a blind hole is drilled has any device for automatically turning off the spindle feed speed when the drill reaches a given depth (reading rulers, dials, hard stops, automatic stops, etc.), then when setting up to perform this operation it is necessary to adjust to the specified drilling depth.
If the machine does not have such devices, then to determine the achieved drilling depth, you can use a special chuck (Fig. 6.22, a) with an adjustable stop.
The thrust sleeve 2 of the chuck can be moved and installed relative to the body 1 with the drill at a given processing depth.
The machine spindle moves down until the end of the bushing 2 stops at the end of the jig bushing 3 (when drilling along the jig) or into the surface of the workpiece. This chuck ensures hole depth accuracy within 0.1...0.5 mm.
If greater accuracy of drilling depth is not required and there is no specified chuck, then you can use a stop in the form of a sleeve attached to the drill (Fig. 6.22, b), or mark the depth of the hole on the drill with chalk. In the latter case, the spindle is fed until the drill goes deep into the workpiece to the mark.
The drilling depth of a blind hole is periodically checked with a depth gauge, but this method requires additional time, since you have to remove the drill from the hole, remove the chips and, after measuring, reinsert it into the hole.
How to cut a circle in metal with a grinder
Here are the step-by-step instructions.
Before using a grinder to cut a circle in metal, mark the workpiece.
Make numerous cuts around the perimeter of the intended circle.
Carefully cut the part along the contour.
Sand the circle and hole to obtain perfect surfaces.
To cut an even circle from metal with a grinder, take into account the following recommendations from the craftsmen.
If available, use diamond blades for metal or discs with carbide teeth.
To cut out as even a circle as possible from sheet metal with a grinder, work at low speeds.
Treat cut areas with anti-corrosion compounds.
Photo No. 4: cutting a circle in metal with a grinder
How to quickly cut a perfect circle using a grinder
There is hardly a better way for a home craftsman than this to make a round hole in a metal or other part. The grinder will help you make an even cut and the hole will turn out almost perfect, even in a thick steel workpiece. Another option is to use circular drilling, but this is a fairly routine operation and is suitable if you do not have an angle grinder at home. A cutting torch or welding machine will not provide a smooth, neat edge and are best left for when rough work is needed. There are a couple of tricks to make the cut even. More on this below step by step.
Browse products for inventors. Link to the store.
How to cut a circle in metal with a welding machine
The technology looks like this.
Before cutting a circle in a sheet of metal with a welding machine, make markings.
Set the current to maximum.
Place the arc on the contour and hold it until you get a hole.
Draw an arc along the markings until you cut out a whole circle in the metal.
Note! A welding machine with a maximum current of 150 amperes can cut sheet metal up to 4 mm thick. To work with thick workpieces, you will need a power tool with increased power.
Welding machines use thin electrodes to cut circles in metal. This reduces time costs. However, thin electrodes have to be changed frequently. This necessitates heating the metal after installing new consumables.
Photo No. 5: powerful household welding machine (maximum current - 400 A)
how to cut even, large-diameter holes in stainless steel sheets?
It is necessary to make 4 even holes f230 in a stainless steel sheet 2 mm thick. The laser is no longer needed. In our collective farm, according to the decree, you can find a laser. what are the proposals?
Stamp for cutting holes: "> there is a little understanding and a familiar turner and there is no need to buy
but about the collective farm, you don’t need to make heavy vehicles
the lyricist wrote: Stamp for cutting holes: "> there is a little understanding and a familiar turner and there is no need to buy
How smooth? Something other than abrasive crown cutting
and metal nibblers don’t see anything. These ones take 2.5 mm stainless steel" >
goblin32 wrote: It is necessary to make 4 even holes f230 in a stainless steel sheet 2 mm thick. The laser is no longer needed. In our collective farm, according to the decree, you can find a laser. what are the proposals?
A small grinder, a marking compass and a semicircular file. The accuracy is as good as a laser.
goblin32 wrote: It is necessary to make 4 even holes f230 in a stainless steel sheet 2 mm thick. The laser is no longer needed. In our collective farm, according to the decree, you can find a laser. what are the proposals?
For some reason, none of the previous speakers mentioned email. jigsaw, probably no one had any practical experience. You need a good jigsaw, with a metal gear-sole attachment, and choose the right file. (4 pcs.) By periodically lubricating the file, swearing and swearing, one hole can be made in 30-40 minutes. (At low speeds!) Accuracy ±0.5 mm. quite achievable, you can adjust it more accurately with a file.
Using artisanal methods, especially
Somehow very doubtful.
Source
How to cut a circle in metal with a cutting torch
A cutting torch is the best tool for cutting circles in metal. With this tool you can work with both thin and thick workpieces. This cutting method offers maximum productivity and precision. Let's describe the technology.
Before cutting an even circle of metal using a gas cutter, mark the workpiece.
Slowly and carefully cut a circle in the metal along the outlined outline.
Photo No. 6: cutting metal with a gas cutter
Main types of metal cutting
Metal cutting is the process of separating a material into parts. This method is used to cut metal sheets or sections of long products. The impact of the cutting tool on the metal creates blanks for further processing. Based on the developed drawings, the surface configuration is formed. To process metal by cutting you need equipment. These can be hand tools, mechanical machines, or devices that heat the material.
Oxygen gas cutting
Mechanical metalworking
A highly sharpened blade made from the hardest steel is used. Usually, it first undergoes heat treatment - hardening. After this, its chemical structure and granularity change, and intermolecular bonds become stronger. A press or other indirect impact using force is also required. Examples could be:
- band saw (it can be made at home);
- guillotine - works on the principle of lowering the cutting part with acceleration;
- Circular Saw.
Below we will take a closer look at some of the tools.
Waterjet cutting of metal
The waterjet cutting method is based on the impact of a jet of water mixed with abrasive particles on the workpiece. The pressure of the supplied liquid is 5000 atm. The advantage of this type of metal cutting is the ability to obtain a variety of lines. Alloys of a certain grade with a small sheet thickness are processed.
How to cut an even circle with a regular angle grinder
Sources:
https://chistayrabota.ru/kak-vyrezat-shajbu-iz-listovogo-metalla/ https://fobosworld.ru/rezka-listovogo-metalla-svoimi-rukami-rovno-lyubye-formy/
How to evenly cut a circle from metal with a grinder
To cut an even circle from sheet metal using a grinder, the master recommends using a simple homemade device that can be easily made from a profile pipe and a metal plate.
First of all, cut a piece of square profile pipe of suitable length. Drill two holes in the workpiece.
Insert bolts into the drilled holes. At one end of the profile pipe we attach a metal plate with a groove. We fix it with a nut.
If you need a simple sander that can be quickly removed from the table, then consider a collapsible sander, which can easily be made from an electric drill.
Methods for cutting a circle from thin metal
Metal can be thin or thick and durable, so a variety of tools are used to cut it.
The choice of materials and cutting technology also depends on what diameter the circle is needed and how even it should be.
Using a jigsaw
If you need a perfectly even circle, you can use an electric jigsaw to cut it out.
The work is carried out in several stages:
Cutting using this tool does not take much time and effort. Moreover, using a jigsaw you can get a circle with perfect edges. But this tool is used only for working with metal of minimal or medium thickness (for example, 2 - 3 mm).
Using an angle grinder
The grinder is used when working with thin metal. You can create a round hole with this tool by following these step-by-step tips:
When processing a cut circle using a grinder, you should be careful that the disk is inside the hole and, at the same time, is located in the same plane with the work sheet.