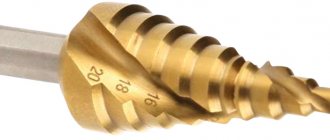
Drills are special tools that allow you to quickly make holes in materials. To fix them, a chuck located on a drill or screwdriver is used. For the manufacture of such special tools, grades of hard steel are used. Thanks to this, they can be actively used when working with materials such as metal, stone, concrete, brick, wood.
Almost every person in the workshop has a set of drills (usually for working with metal). However, in some cases, the user may only use thin drills to perform a variety of jobs. For example, if you need to make a large hole in a sheet of metal, but there are no large-diameter tools available. There are a large number of different tricks, the use of which will allow you to use thin drills more effectively when performing a variety of jobs.
Drill with three drills at once to create a large diameter hole
Situations arise when a craftsman needs to make a hole of a large diameter, and there are tools at hand that allow him to do such work. In this case, you can use several small diameter drills.
To do this, you need to use three thin drills and fasten them together using regular electrical tape. It is worth noting that their diameter should not differ much from each other. To get the most even hole possible, the drills must be aligned with each other while twisting. If at least one drill from the common bundle protrudes slightly forward, it will become the so-called axis of rotation of the entire structure. As a result, the diameter of the hole made will be slightly larger than the originally planned size.
Then the entire bunch must be fixed in the chuck of an electric drill. It must be positioned in such a way as to ensure reliable grip of the entire structure in the chuck. At the same time, we should not forget that the length of the tools used must be sufficient to make through holes in the material.
If the ligament is poorly fixed in the chuck, the drill bits will begin to move apart and break during rotation. For repeated use of such a tool, it must be correctly and securely fixed in the chuck of the power tool.
When using a bundle, it is necessary to set a low rotation speed of the electric drill chuck. During work, it is necessary to periodically stop and remove all accumulated debris from the hole being made. This method, which involves the use of a binder, is best suited for making large-diameter holes in wood and soft metals (copper, aluminum).
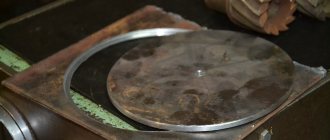
Homemade drilling machine for thin drills
Homemade drilling machine for thin drills
Nikolay wrote:
I'm interested in a drilling machine... what brand is it and how much does it cost? I would very much like to see in the future an article dedicated separately to this machine, or rather to its detailed description and manufacturing process.
Responding to Nikolai’s request, I decided to describe the design of my drilling machine. Unfortunately, this machine is not a budget solution, since quite expensive components were used in its manufacture. https://oldoctober.com
The drilling machine in question was made many years ago in order to drill thin holes with a diameter of up to 0.3mm.
Once upon a time, in the era of matrix printers, when repairing matrix heads, it was necessary to drill fairly precise holes of small diameters.
When drilling printed circuit boards, of course, such thin holes are not needed, but drills with a diameter of 0.5 - 0.7 mm are also quite gentle and this machine can extend their life.
The highlight of this machine is the ADP-1262 asynchronous AC motor with a “squirrel wheel” rotor. The rotor of this motor is a hollow aluminum glass with a wall thickness of about 0.5 mm. The stator occupies the rest of the space. The stator has a narrow cylindrical slot in which the rotor rotates with a gap of a few tenths of a millimeter.
I do not recommend disassembling such an engine without sufficient experience in working with precision mechanics. One careless movement and the glass will be deformed, after which you can say goodbye to the engine. https://oldoctober.com
Naturally, the weight of such a rotor is so small that its inertia can be neglected, especially considering the mass of the clamping chuck.
In addition, the engine has a very smooth characteristic. As the engine speed decreases, the torque on the shaft also decreases. All this ensures the safety of thin drills when jammed and when the permissible torque on the cutting edge is exceeded.
A 6B10 three-jaw chuck is used as a drill holder, which allows clamping drills with a diameter of up to 6 mm.
The bed is assembled from two parts. The stand pos. 1 and the rack and pinion mechanism pos. 2 are borrowed from the MBS-1 microscope. The base of item 3 is cut from a steel sheet 10 mm thick.
The engine is secured with a clamp, which in turn is attached to the feed mechanism with four screws. The screws are indicated by arrows in the figure. The holes are located at the vertices of the square, so the engine can be positioned not only vertically, but also horizontally.
The cartridge is secured using a shaped bushing, on the outside of which a No. 1 cone is machined, and inside there is a hole machined for a transitional fit equal to the diameter of the engine shaft (6mm).
The bushing is turned on a lathe in one step. That is, during the turning of the cone and the turning of the hole (not drilling), the workpiece was fixed in the machine and only then cut off.
For reliable fixation and selection of possible misalignment, the bushing has six M3 threaded holes for locking screws. There are six recesses made in the motor shaft, into which these locking screws fit. The holes are staggered, which allows you to select misalignment even if it arises as a result of wear of the mating surfaces. The screws are secured with locking paint.
A flange with a slot is attached to the upper extension of the engine shaft, which, together with a bar fixed to the engine body, represents a locking mechanism. This mechanism allows you to tighten the cartridge without using a key (by hand).
The use of a key asymmetricizes the chuck clamping mechanism and leads to uneven wear of the latter, which can cause the drill to run out. When using thin drills with thick shanks, this can cause noticeable eccentricity of the working surface of the drill.
At the upper end of the engine there is a duralumin casing (marked with an arrow), inside of which there is a phase-shifting capacitor and an engine switch.
To control the torque on the motor shaft, LATR is used.
The motor allows the rated supply voltage to be doubled, which allows the use of drills up to 8 mm, with shanks machined up to 6 mm, when drilling thin sheet plastic, fiberglass and other materials, the drilling of which does not require large moments on the working edge of the drill.
Attention! The twofold excess was taken not from passport data, but from practice.
October 15, 2010 (22:12) in Do it yourself
oldoctober.com
How to drill in the right place
To drill in the right place, you need to use a special device called a core. It is made of durable steel grades, has a cylindrical shape and has a small point at its end. Before performing work, you need to take a core, place its tip on the surface, and hit its opposite end with a hammer. As a result, a recess is formed on the surface of the material in which it is necessary to drill.
How to avoid dulling drills
During use, a metal drill may become dull if it begins to get very hot when rotating. As a result of such heating, the strength of such a tool is lost. It is worth noting that the heating process occurs due to friction, therefore, the faster the amplitude of rotation of the drill chuck, the stronger the heating will be.
Therefore, in order to prevent such a tool from overheating during work, it is recommended to make holes in metal surfaces at low speeds (no more than 1 thousand revolutions per minute). If it is necessary to drill a thick workpiece, then it is recommended to use a special lubricant or paste that will provide additional cooling of the tool. Lubricant can be added directly to the place where drilling is carried out. You can also dip the drills themselves in lubricants or pastes. If you don’t have special lubricants at hand, then you can use ordinary machine oil.
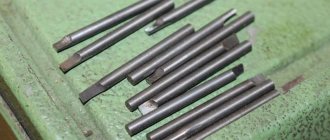
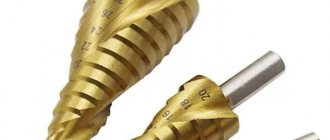
Carbide drills from 0.3 to 1.2 mm in a set.
To expand the functionality of the DREMEL 4000-4/65 mini-drill (engraver), we purchased carbide drills in a set from 0.3 to 1.2 mm. Similar reviews are here and here. The drills came in a regular envelope, wrapped in a thin bubble wrap. The drills themselves differ from those on the seller’s page for the better because they have a landing limiter and a convenient storage box. There are no identification marks on the box, but it is exactly the same as in other reviews. I suppose you can put on a label that was made in Japan, or you can leave it off. Drill sizes: from 0.3mm to 1.2mm in increments of 0.1mm. shank diameter 3.15mm. Fits a 3.2mm collet or chuck. Analysis of the colors of the restrictive rings suggested that this was Chinese ancient wisdom and I could not understand it. On the shank there are secret marks indicating the diameter of the drill, the length of the drill itself and probably something else, on each drill it looks like they were done differently in different places. The experiments carried out showed excellent drilling of both ordinary steel and stainless steel. I did not experiment with drilling a file for fear that my hand would tremble and the drill would break; I drilled it manually. In the future I plan to drill using a Dremel Workstation 220. This is what it looks like already installed. Pros. Externally they look great. Nice storage box made of soft transparent plastic. A range of sizes to suit every taste. There is a limiter on the collet for ease of installation. They drill perfectly. (probably this should be the first ) Cons We don’t have it on sale, and if a drill breaks, you’ll have to look for it online.
Well, how would it be without a cat? And it’s Spring in our yard. Planning to buy +78 Add to favorites Liked review +44 +89 mysku.ru
How to drill thick workpieces
To process workpieces that are too thick, it is recommended to use tools of different diameters in combination. For example, if you need to make a large hole in a thick piece, then you can use a thin drill first. Once a small hole has been punched in the workpiece, it can be gradually expanded using thicker drill bits. That is, in this case, to drill one hole in a thick workpiece, tools of different diameters are used alternately. During operation, the user gradually increases their diameter to the required size.
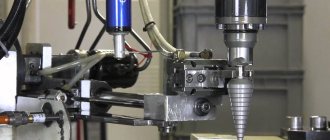
Mini drill 12 volts with a set of drills
Subscription
- China stores
- BANGGOOD.COM
- Tools
Greetings!
I present a review of a useful device - a small but powerful drill with a collet chuck. It is stated that it works on 12 volts, but it works fine on 5 volts. Details, many photos, measurements, examples of drilling vandalism, as well as a comparative video below. The packaging is very modest. Engine Plus is where the point is. Collet chuck. The collet is part of the chuck. Plus - versatility. The downside is that if you use drills from the minimum diameter to the maximum, then I think the jaws will eventually break off. The flask with drills did not survive the difficulties of postal delivery. Drills 0.8/0.9/1.0/1.1/1.2/1.3/1.4/1.5mm, two pieces each. Shaft 2.4 mm. The casing can be removed from the engine. The drills were placed in such a box. As it turned out later, the option is not the most successful - when turned over, the smallest drills slip between the compartments. But it'll do for now. Let's check the diameter of the drills Hidden text
With a collet on the shaft The smallest drill The largest is 1.5 mm. It's hard to put in and even harder to take out. I'll solder the wires. I'll connect it first to a universal power supply. These convenient plugs with terminal blocks will help me. Current consumption in idle mode In operation The drill is crazy)) And it heats up noticeably Vandalism Now I’ll solder the USB plug and power it from 5 volts Sources of five volts The universal power supply works fine Video Now I’ll try from the chargers One charger reacts to the interference created by the drill and does not work A the second is normal Five-volt vandalism It definitely didn’t work any worse, so you can power it from five volts. You just need to find a power source that does not respond to interference from the engine. As a result, we have a pretty good drill. The included drills aren't the worst. The textolite drilled a lot and didn’t dull anything. One drill actually choked on the south bridge on the motherboard)) That's probably it)) Thanks for your attention! Planning to buy +104 Add to favorites Liked review +67 +144
mysku.ru
Lubricating the area to be drilled
In order to successfully drill through any material made of metal (stainless steel, steel, cast iron) in a short period of time, it is recommended to use special lubricants. The area in which drilling will be carried out is treated with lubricant before performing work. Thanks to this, the drill used glides better and does not heat up too much. For example, to process stainless steel, you can make your own special lubricant from machine oil and colloidal sulfur. To do this, you need to take pieces of sulfur, grind them and mix them with oil. In this case, during material processing, lubricant must be supplied to the drilling area on a constant basis.
There are many different ways to use fine drill bits to make large holes in thick, strong materials. During their use, it is recommended to set low speed on the electric drill. Also, when using power tools, when carrying out such work, safety precautions should be observed. It is necessary to use safety glasses or a mask, and wear gloves to avoid accidental injury.