Today on the construction market, measuring instruments are presented in a wide range from rulers to laser systems. Let's look at ways to find a 90-degree angle using a tape measure without additional equipment other than a calculator and pencil. Let's look at three methods that allow you to solve the problem without introducing errors. Read to the end and you will learn how you can build an angle of 45 or 30 degrees using the same techniques.
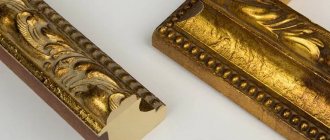
Kitchen set with a 90 degree turn Source fidexpo.ru
Where you need a 90 degree angle between walls
Floor or ceiling tiles, pieces of furniture, and a classic bathroom have a strict rectangular geometric shape.
Installation of such items is usually carried out close to the walls. In the case of a plumbing room, additional steps must be taken to fill the discrepancies between the edge of the equipment and the vertical surface when the angle is not 90 degrees apart. Curvilinear gaps along the cabinet or tabletop force you to be careful in use, do not look aesthetically pleasing and attract unnecessary attention. The same applies to tiled layouts
At the same time, it will be impossible to hide the significant narrowing of the masonry even visually.
The way out of the situation involves only three solutions. This is visual camouflage with materials that fill the void, the manufacture of furniture to individual sizes with its overall increase in price, or the alignment of wall corners with wallpaper, tiles, panels, and objects. The last option is considered the most effective, since it is durable, greatly simplifies the choice regarding finishing and furnishings, and you don’t have to adjust or seal anything else.
Original masking of an uneven angle Source blogspot.com
Combat degrees: why our grandfathers won
A warship is sailing. Or rather, a warship is coming, because ships do not float, but walk. The navigator plots a course on the map. And suddenly an adversary appears. Anxiety!
The navigator puts the map aside. He takes out a maneuverable tablet. Now he uses it to track the position of the ship relative to one enemy or several opponents at once.
It's all degrees here. Which of the adversaries is visible from what angle? The angle is a decisive value. It is necessary to take into account both angles and their sines and cosines.
Anyone who went to school remembers that the sine and cosine of an angle cannot be greater than one. No matter what you do, you can’t get more than one.
But during the war years, the navigator of a warship sometimes had cosines of angles up to four! That’s why we won because we did the impossible! Even with cosines limited by proper math!
So let us remember, contrary to mathematics: during the war, the cosines of angles can reach up to “four”. This is also why our grandfathers won!
Corner filling technology
Based on their appearance, they distinguish between external (external), internal and curved corners. Each type has its own forming and finishing technology. You should especially consider the option of plastering the corner of the wall where it meets the ceiling.
External
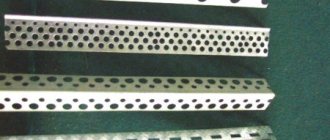
To simplify the process of puttingtying an external right corner with your own hands, it is convenient to use special corner pads with perforated shelves. They are made of galvanized steel or plastic. Plastic corners are more practical because... are not subject to corrosion, traces of which may appear on the wall surface over time if metal is used.
The order of work is as follows:
- apply a thin layer of putty along the entire height of the corner;
- attach the perforated corner to the surface and press it into the solution;
- using a building level, check the vertical position and overall correctness of the fit;
- in case of deviations, level the position of the corner by applying putty under it;
- wait until the solution sets and then apply the putty solution to the surface of the wall on both sides of the corner.
After the putty has dried, treat the surface with an abrasive mesh and saturate it with primer 2 times. Cement mortars may exhibit slight shrinkage, which can be compensated for by applying a thin layer of the mixture and sanding again.
Internal corners
Puttying internal corners is somewhat more difficult. Especially in cases where their size differs from 90°. When performing work, remember that the putty layer should not be more than 2-3 mm. Large differences can be leveled only by classical plastering.
Putty is applied from the corner towards the plane of the wall. Very often the angular vertical is piled up or down. Therefore, during finishing, the surface must be constantly checked for this parameter. In this case, each of the walls is plastered separately.
Getting the perfect angle by applying mortar and leveling with a spatula is very difficult. The desired result is achieved by finishing sanding each wall separately. Grouting should be done using a plaster abrasive mesh No. 100-120.
Curvilinear corners of arches
Manufacturers of building materials produce flexible plaster corners especially for arched areas. One of their shelves has slits across the entire width, and allows for straight line bending. Otherwise, the technologies for puttying curved surfaces are no different from finishing external corners.
Where walls meet the ceiling
The corners between the walls and ceiling are also internal. The peculiarity of their finishing is that putty is done only after plastering of the walls is completed and perforated plaster corners are not used. The solution should be applied to the ceiling in a minimum layer.
The leveling process is mainly aimed at obtaining a flat wall surface, since floor slabs are usually flat anyway. If the slabs do not match in installation height, then it is best to consider the option of a suspended or suspended ceiling, in which case puttying will not be required.
The heart is unloaded
With a significant load on the lower extremities, a large volume of blood enters them. The heart is forced to pump blood under high pressure in order to deliver it to all tissues. Consequently, in order to provide the required volume of blood under increased load, the heart is forced to contract more often. When we lie with our legs raised up, the heart muscle rests. Blood flow to the heart increases, and between contractions the chambers of the heart are filled with more of it. The more the myocardium stretches during filling, the stronger the heart muscle contracts. Therefore, in the “legs up” position, your pulse slows down. This position is especially useful for people prone to low blood pressure and headaches.
However, if you have been diagnosed with heart failure, arterial hypertension and arrhythmia, it is better not to practice this exercise. The effect may be the opposite - you will experience an attack of palpitations and shortness of breath. People with serious heart pathology are recommended to lie with the head end of the bed elevated.
How to achieve right angles
Before leveling the internal walls, you need to decide not only how to do it, plaster or drywall, but also the requirements for the corner: it must have a clear, even seam or, in addition, a straight one.
Note that after the builders there are practically no right angles in the apartment. Some of them are always blunt, more than 90 degrees, and some are sharp. Therefore, knowledge of how to align wall corners at 90 degrees is necessary for beginners. The whole process is not complicated if you know the algorithm of work (many professionals and authors of articles on the Internet are of the opinion that a beginner cannot properly plaster the corners of walls on his own).
1. The first wall is plastered. The whole process is described in detail in the works: “Plastering walls using beacons with your own hands” and “How to properly plaster a brick wall?” Let us briefly recall the stages of work:
- the wall surface is freed from old wallpaper or paint, if necessary, and from previously applied plaster;
- all cracks, potholes and chips are sealed, grease stains and soot marks are removed;
- beacons are installed;
- the wall is treated with a primer and then plastered;
- finishing treatment of the applied plaster layer is carried out.
2. The adjacent wall is also prepared for the installation of beacons: it is cleaned of old finishing and plastered.
3. Beacons are installed - it is at this stage that a 90-degree angle is achieved between the adjacent and plastered wall. Let's look at the whole process step by step:
- A hole is drilled at both ends of the adjacent (not opposite) wall at a distance of 10 cm from the corner and 10-20 cm from the ceiling, a dowel is driven into it and a self-tapping screw is screwed in. 3-5 cm of hardware should remain on the surface;
- A homemade plumb line is hung on the head of the self-tapping screw and below, along its line, at a height of 10-20 cm from the floor, a dowel is also driven in and the self-tapping screw is screwed in;
- Along the plumb line, the lower self-tapping screw is brought into the same plane as the upper one;
- A fishing line or thick thread is stretched horizontally and diagonally between the screws;
- Using a construction square, along the stretched lines, the plane of the wall that protrudes into the room is located;
- Using a screwdriver, by screwing in and unscrewing screws, a zero plane is formed when at least one point the thread touches the wall (not necessarily physical contact, conditional enough);
- The angle formed between the plastered wall and the zero plane of the adjacent wall is measured with a square. If there is no 90 degrees, by screwing in (obtuse angle) or unscrewing (angle less than 90 degrees) the hardware, the zero plane moves horizontally until a strictly right angle is reached;
- By unscrewing all the screws by the same number of turns, a plane of plaster is formed - it retreats from the top point of the wall by 3 cm;
- The lines of passage of the beacons are marked - the distance between them should be less than the existing rule;
- Guide profiles are installed.
Checking the angle with a construction square.
The technology for installing beacons is discussed in detail, with drawings explaining the entire process, in the work: “How to install beacons on a wall for plaster?”
4. The wall is plastered.
The next corner is aligned using the same pattern. It will be a little more difficult when forming the plaster plane of the last wall. Here you will have to control not just one corner adjacent to the plastered wall, but both at once. Having gained experience in drawing a plane at a right angle in one wall joint, it will not be difficult to do the same work on the fourth wall - the principle is the same.
Calms the nervous system and restores brain function
By redistributing blood flow in an inverted position, you direct more blood, oxygen and glucose to the brain. This can solve several problems at once - eliminate headaches, cure insomnia and eliminate nervous tension. This position also “trains” the nervous system, restoring its ability to quickly regulate blood pressure and even improves memory.
Important!
If you have high intracranial pressure, you should not lie in this position.
Interesting fact!
Inversion therapy is practiced by many famous people. For example, actor Jackie Chan and author of the novel “The Da Vinci Code” Dan Brown. According to the latter, the inverted position helps him “regain clarity of mind.”
About the use of perforated corner
If you decide to level and finish the walls yourself, but have never done repair work before, then you simply need a perforated galvanized plaster corner. Every master knows that this small subtlety in work brings great results!
So, the corner is used in the following areas:
- for partitions and walls that need to be plastered and leveled;
- for corners (external, internal) that need to be made stronger;
- for arches, boxes, so that they are strong and even (not crumbled).
Since most partitions, arches, boxes, and trims are made of plasterboard, it becomes clear that it can crumble around the edges if it is not secured and plastered. You just need a corner for this.
There are two types of plaster corners:
- straight;
- arched.
Well, corners can already be used for many categories of interior finishing, but they all relate to plastering and puttying work.
Electrical degrees: deviation between voltage and current
Well, sine? Well, cosine? And so what? Let's ask any person, for example, near a beer kiosk, what sine is and how long ago he used cosine after school. What will we hear in response?! Well, that’s exactly what we’ll hear.
At the same time, we constantly live, one might say, under a degree, or rather, under a cosine! Every day we use electricity: we press buttons and switches, and that’s it – everything lights up, spins, works.
For electricity to fulfill its purpose, it requires electrical voltage and electrical current. Both “substances” must be together and at the same time. But these two quantities can have a deviation angle between them, measured by “cosine phi,” as the power engineers express it in their professional language.
If the deviation of voltage from current is zero degrees, then electrical power will be obtained by multiplying the voltage value by the current value.
Let's say we connect an electric heater. It begins to emit heat equal in power to this very value: voltage 220V (two hundred and twenty volts) multiplied by current, say, 5A (five amperes) equals 1KW (1 kilowatt) of power. It's getting warm!
If there is a deviation between voltage and current, at least by 1 degree, then you will have to multiply not only the voltage and current, but also the resulting result additionally multiplied by the cosine of the deviation angle. Zero degrees of deviation - cosine is equal to one, multiplying by one does not change anything. But the cosine of just 1 degree of possible deviation is already less than one. Not by much, but less. This means that our battery will be weaker to heat.
The greater the deviation of electrical voltage from electric current, the greater the degrees of the so-called “phi” angle between them. The weaker the batteries will heat, the worse the light bulbs will become, and in general there will be less electricity.
And don’t say now that cosine is an abstraction that we left at school forever...
Plastering external corners
You can make even corners by laying a leveling layer on the corners using plastic or metal corners for plaster. Using this method, you can make a right angle or an unfolded one (more than 90 degrees). In the latter case, the steel profiles are carefully unbent to achieve the desired size. If the walls are smooth, the grooves are made without auxiliary corner profiles.
Without using a counter-switch
Let's look at how to make a straight, even angle yourself without a profile corner. In such cases, a smooth-planed edged board or a strip of thick plywood is used as formwork and a guide for plastering wall corners. The board is first covered with tape so that it can be easily separated from the set solution.
The edge of the board acts as a beacon
The prepared board is installed and fixed with self-tapping screws on one of the surfaces to be plastered, extending it to the required distance above the other side to be plastered. The edge of the board can be used as a beacon. After the composition has set (or preferably after two days), the board is removed, the plaster is applied to the surface, fixing the board on the previously plastered side.
With perforated aluminum profile
You will need to purchase ready-made corners for plaster - metal or plastic. It is not difficult to draw the correct external (extended or right) angle using a profile.
- Plastering the corners begins with applying the mortar with a spatula.
- A profile is applied to the appendage and pressed to the base.
- The plaster composition that has leaked through the holes is removed and smoothed with a spatula.
- The correct installation (verticality) of the profile is checked and corrected using the rule with a level.
Such external corners, equipped with a metal profile, after curing the solution and a little grinding (removing lumps) can be used as beacons.
Do-it-yourself foundation markings
The quality of construction depends to a large extent on how correctly the markings for the foundation were done.
When doing this work, it is important to maintain all right angles with maximum precision. Do-it-yourself foundation marking for a private house can be done in several ways. The most commonly used method is the “Egyptian” triangle and the two-curve method.
Therefore, in this article we will consider them.
The most commonly used methods are the Egyptian triangle method and the two curve method. Therefore, in this article we will consider them.
What tools will you need?
You can mark the foundation yourself using the following tools:
- Roulettes;
- Cord;
- Hydraulic level and plumb line;
- In addition, you will need wooden pegs.
Where to start marking?
So, how to mark the foundation? First, you need to determine two starting points by driving pegs into the corners of the future building, located on the same straight line from the side of its longest wall. Next, you will need to draw perpendiculars from them, thus marking the outer contour of the adjacent walls.
"Egyptian Triangle". The simplest method
Marking the foundation with your own hands can most quickly be done using the “golden” triangle method, which has a side length ratio of 5 * 3 * 4. The event is carried out in several stages:
1. First you need to find a long rope and tie four knots on it. The first is at the end, the second is at a distance of 3 m, the third is four meters from the second and the last is five meters from the third; 2. After this, the very first and very last nodes are connected with a nail. A nail should be driven into each of the intermediate nodes; 3. In this case, the long side of the resulting triangle must be positioned along the line between two already driven pegs; 4. The required perpendicular is drawn along the short side; 5. On the resulting straight line, drive in the third peg at a distance equal to the width of the building.
Leveling with plaster
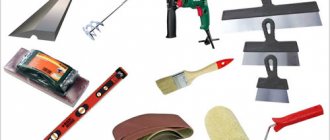
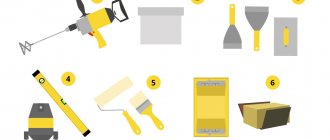
List of required materials and tools:
- lighthouses (metal or wooden);
- grinder for cutting beacons or metal scissors;
- dowels (wood screws);
- primer;
- construction mixer (drill);
- a clean container for mixing the mixture;
- gypsum dry plaster;
- rule;
- plumb line (level);
- roulette;
- gloves;
- abrasive mesh (sandpaper);
- spatulas (straight, wide, angled).
- First, you need to prepare the walls for plastering, and before applying the solution, the entire surface must be primed. This is done to remove dust and increase the adhesion of materials.
- The next stage involves fastening the beacons to the walls using fasteners at a distance of the width of the rule. In this case, it is necessary to make an indentation from the corners at a distance of 6–8 cm.
- Next, you need to use a plumb line (level) to determine all vertical deviations and make marks on the ceiling and floor, which will later guide you during the alignment process.
- Start applying plaster on one side, filling the space between the fixed beacons (wooden blocks, metal profile). Distribute the solution evenly, and after it has dried, you can proceed to leveling the second wall.
- At the stage of forming corner joints, after completely filling all surfaces using an internal (external) corner spatula, you can obtain even corners. To do this, you need to run a tool soaked in water over the applied putty, forming a clear right angle of 90 degrees. Then it is necessary to remove the excess plaster mixture with a wide metal spatula, moving in different directions and thereby forming a smooth transition.
- The final stage of leveling is to remove the beacons and fill the void with putty.
- After the corners and walls have completely dried, they must be sanded with a special abrasive mesh or fine-grained sandpaper.
- Next, you need to prime all wall surfaces (preferably with a deep penetration primer).
Why is it necessary to display beacons?
The use of beacons for plaster is justified if:
- the surface to be finished is “filled up”, that is, it has a slope up/down or to the right/left. In this case, the limitation on deviation from the vertical or horizontal should be no more than 5...12 mm, otherwise the plaster layer will be too thick. It is permissible to plaster walls with large deviations based on reinforcing mesh;
- there are depressions or protrusions on the surface. It is easier to fill local depressions with a cement-sand mixture without plastering the entire wall; it is advisable to remove the protrusions using a grinder or other tool. If depressions and protrusions are located over the entire surface, it is worth applying mass finishing;
- unevenness of the wall due to the characteristics of the base material. An example is poorly executed brickwork or a cut stone wall.
The use of beacons for plastering walls makes it possible to smooth out unevenness, ensure the verticality of the wall, and straighten “strewn” corners.
Perforated corners for alignment
Leveling angles are the optimal solution for repairs. They are perforated products with an aluminum base. They can be used to seal both external and internal corners. The design of the product will protect the surface from various damages.
The procedure for such alignment consists of the following steps:
- After purchase, the structure is cut to the specified length.
- The plaster solution is prepared until a homogeneous mass is created.
- The mixture is applied to the corner. When aligning the internal corners, the composition is distributed along the entire length. For external treatment, the amount of solution is adjusted according to requirements.
- The corner is being installed; you will need to carefully monitor the evenness of the installation.
- Excess mixture is removed using a spatula.
- After installing the corners, they will need to be aligned with the wall.
Installation of corner aluminum structures To ensure that the corners do not stand out against the background of the wall, it is necessary to apply the solution at a distance of about 50 or 80 cm from the corner. The entire mixture should be evenly distributed and smoothed over the surface using a wide spatula. After the solution has dried, the wall is primed. For greater efficiency, you need to use putty, which will hide all defects. You can see the aluminum structures in the following photo.
Tool.
Plastering walls using beacons will require basic tools that are difficult to replace:
- Rule. Wide (10-12cm) rigid aluminum “rail” at least 130-150cm long. Allows you to accurately assess the condition of the plaster layer, its curvature, depressions and bulges.
- Half-grater. A wooden, plastic or steel “board” with a handle. Half grater length approx. 50-70cm. Used to level the mortar on the wall.
- Grater. The same as a grater, but small in size (20cm). Convenient in hard-to-reach places, as well as for leveling, covering and grouting.
- A corner is a metal or wooden device in the shape of a right triangle. Used to control evenness, and also as a template for plastering and drawing plaster mortar. Typically used.
The larger the instrument, the more reliable the measurement result. For plastering work, a square with a leg length of 100 cm is most convenient, since it is easier to make a 90-degree angle with plaster, using the maximum area of the adjacent walls as a guide.
- Trowel, spatula. A trowel is needed to apply the mortar onto the wall. If the amount of work is small, it can be replaced with a spatula.
- Plumb line, building level. Using a plumb line, the work of studying the slope of the walls and installing beacons can be done faster (if you work together), since the rope can be stretched to the entire height of the room.
The level (spirit level) is more convenient, but it is short, which makes work difficult. However, it is difficult to do without it.
In addition, you may need devices and tools for preparing mortar - a trough, a sand shovel, buckets. If the plaster inserts are not related to the arrangement of corners, but only to their alignment, the solution is prepared in a bucket, stirring with a mixer (an attachment for an electric drill) or a spatula - onto the floor of the bucket of solution.
Pythagorean theorem
The theorem is based on the statement that in a right triangle, the sum of the squares of the lengths of the legs is equal to the square of the length of the hypotenuse
. This is written as a formula:
Sides a and b are legs, between which the angle is exactly 90 degrees. Therefore, side c is the hypotenuse. By substituting two known quantities into this formula, we can calculate the third, unknown one. Therefore, we can mark right angles and also check them.
The Pythagorean theorem is also known as the “Egyptian triangle”. This is a triangle with sides 3, 4 and 5, and it does not matter in what units the lengths are. Between sides 3 and 4 is exactly ninety degrees. Let's check this statement with the above formula: a²+b²=c² = (3×3)+(4×4) = 9+16 = (5×5) = 25 - everything converges!
Now let's put the theorem into practice.
External corner of walls - how to achieve an even joint?
GCR is not used for external leveling work. Only dry building mixtures are suitable for external corners.
- First you need to check the outer corners for evenness. Any irregularities that appear must be removed with a hammer.
- Another step is to prime the walls using special deep impregnation compounds.
- To strengthen external corner joints, it is necessary to use metal corners with holes, which will strengthen the joint and help avoid damage. They are pressed into the gypsum solution and subsequently leveled with putty.
- Excess mixture must be removed using a spatula. Afterwards, make sure that the metal profile is installed accurately and vertically.
- Using plaster beacons on both sides, the corner is leveled and puttied.
Different ways to align external corners are discussed in the video below:
Muscles rest and energy returns
When you raise your legs, you tighten the muscles and tendons of the thigh and lower leg. Gravity, while you lie upside down, tones your muscles as if you were tensing them while doing light exercise. But this is not the only benefit of this position.
To keep our body upright, four muscle groups tense throughout the day:
- The first group
is the muscles of the back of the thigh, which extend the ankle joint. - The second group
is the muscles of the anterior thigh that extend the knee joint. - The third group
is the muscles of the pelvis and lower back, which keep the hip joint straight. - The fourth group
is the erector spinae muscles.
You do not feel the work of these muscles, but the feeling of weakness in the evening is due to the fact that acidic substances have accumulated in the muscle tissue. To normalize the acid-base balance, muscles secrete lactate, a salt of lactic acid. Despite the popular belief that lactate is harmful, a 2016 study at the University of California showed that muscles can reuse it as an energy source if it is reduced in the liver to glucose and returned as one of its breakdown products back to the muscles with blood. Read more about the study by following the link in the bibliography. But for lactate to turn into glucose, it must enter the blood, reach the liver and return back to the muscles. You can speed up the process of flushing lactate from your muscles by lying with your feet up. Firstly, this way you will relax your muscles, and secondly, it will facilitate the outflow of blood.
Interesting fact!
Lactate is formed in the muscles, even if you have not experienced any stress, but, for example, just sat in an office chair all day.
Video description
This video shows in detail the installation of beacons without plaster:
Alignment of walls along the support strips is carried out in at least two stages, regardless of the thickness of the layer. First, pour the solution into the formed void and remove the excess using the rule. Additional application of plaster may be necessary to fill significant differences. The solution settles under its own weight, and due to the rough structure, voids, scratches, and holes are formed. Therefore, when the applied mass begins to set, the sagging is cut off as a rule, and defects are corrected with a thick solution.
Plastering on beacons Source ivd.ru
Forming an internal corner
It is more convenient to start leveling the inner corner of the wall after forming the main plane. This approach extends the completion time for repairs by 1-2 days, but the result is of higher quality, especially if the area of the room is large/inconvenient (small) or the project is being implemented by a novice master.
The walls are leveled using a proven vertical level and rules for forming a plane. A frame is installed under the drywall, and beacons are installed under the plaster. When the wall is ready, you can begin to apply markings for subsequent work with adjacent surfaces.
With any leveling material, the process begins from the bottom up, as this is more convenient. Therefore, the markings are applied to the floor.
Marking using a plumb line Source tekhelit.ru
Aligning wall corners with plasterboard
When leveling the corners of walls with plasterboard, you can use two methods of its installation - frameless and frame. The choice of method depends on the curvature of the walls; if this indicator is within 4-7 mm, then the frameless method can be used. If the curvature is more than 20 mm, then it is better to use the frame method.
With the frame method, better sound insulation indicators are observed, the possibility of organizing good thermal insulation and, in general, the structure is much stronger. And the frameless method is simpler and faster, since the drywall is fastened using polyurethane foam. But it is also suitable in simpler cases.
First, we will look at the frameless method, and then we will dwell in more detail on the frame method.
The first thing after cleaning the surface is to prime it properly. A deep penetration primer works best. You can find it at any hardware store.
After the surface to be treated has dried, you need to cut a sheet of drywall that will meet all the required dimensions, attach it to the surface, and finally adjust the dimensions
This is important to ensure that the connections are seamless.
The next step is to apply a layer of polyurethane foam to a sheet of drywall, then apply it to the wall, lightly press it and remove it. As a result of this action, a little foam will remain on the wall. This is done for better grip.
Now you need to apply another layer of foam and let it dry a little (5 minutes) and then apply the sheet to the wall.
The last stage is leveling the structure with a profile or a regular straight lath. A level wouldn't hurt either. You can also adjust the angle using pre-installed inserts of the required size (pieces of ordinary foam plastic) attached to the base walls of the corner.
After the foam has dried, any excess that has come out must be removed with a knife without damaging the drywall.
Now let’s move on to considering the frame method, which is more complicated than the frameless method, but is better suited for high ceilings and alignment of corners with large deviations from the base walls. In addition, the corner will be stronger and more durable.
When aligning external and internal corners of walls using the frame method, there are some peculiarities, so we will consider them separately.
How to level an internal corner with drywall
To level the internal corner with plasterboard using the frame method, you need to build a frame.
For this purpose, PS rack profiles are used. They are connected by crossbars using metal screws, every 20-30 cm. For internal corners, the frame is mounted separately, and then attached to the base surfaces. Working right away in a corner is difficult - there is little room for maneuver.
It is important that the frame is mounted only on a flat surface. Drywall itself is perfect for this purpose - its sheets are just large and even.
True, they are easy to damage in the process, so be careful, or take extra drywall.
Having assembled one side, we attach the next row of profiles perpendicularly (or at another selected angle). And we also connect them with crossbars
It is important to ensure that all the sharp ends of the screws are directed towards the walls or along them, and on the inside of the corner of the frame there is an even lattice on both sides formed by the planes of the profiles - we will attach drywall to them
As a result, we get a kind of hard angle. This corner will need to be attached to a perimental profile fixed to the wall along the floor and ceiling. And with high ceiling heights - in the middle too. This is done directly, or with the help of crossbars, in places where the frame departs greatly from the base walls.
Only after this entire preparatory stage will you be able to begin assembling the innermost corner from plasterboard, the installation of which on the frame is carried out with the same metal screws. The heads of the screws are slightly recessed into the sheet of drywall and subsequently puttied.
And here it should be noted that under the influence of ubiquitous moisture vapor, self-tapping screws can rust over time. And rust can show through the finish. Therefore, it is advisable to insulate the caps before puttingty. For example, apply nitro paint, nail polish, BF glue or something like that - not water-based.
And you don't need to let them dry out. When dry, these substances form smooth surfaces to which putty does not adhere well. Therefore, you need to putty immediately - when wet. Then the grip will be good and there will be no rust.
Roulette marker
With a little modification to a cheap tape measure, one tool makes an excellent marking tool. Take the leg of a compass, which is used with simple pencils, and secure it to the outside of the tape measure.
This design can be made removable, or even adapted for a separate tape measure.
This device is very convenient for making various marks or using it as a surface thicknesser.
And when using a screw, circles of the desired diameter are easily drawn.
If you're working with drywall or other surfaces that can be safely scratched, then the tape measure may be worth repurposing for another possibility. Use a file to make notches on the toe.
After which, using this hook, marks are easily made on the surface. In this case, it is no longer even necessary to have a pencil at hand.
How to correctly draw corner surfaces?
Many craftsmen use their own techniques to correctly create corners with plaster. These methods have been developed by them over the years of work. You must first select a technique depending on the location of the element - external or internal. Then determine the method, since additional materials and tools will be required.
The main thing is to adhere to technology so that the corners are smooth and securely fastened.
How to plaster so that it turns out smooth?
This method is used with a permissible deviation in length of no more than 1-5%. If the value exceeds the specified threshold, then another method is chosen, for example, using a metal profile and plasterboard sheets. Instructions for creating an even 90 degree angle:
- Completely clean the wall from the layer of previous coating, ensuring that the surface is even and free of foreign inclusions. It is necessary to mark with a plumb line and a building level, and pull the nylon thread.
- The primer is applied with a brush, roller or spray gun, and the wall is completely dried for 6-12 hours.
- Depending on the technique used, beacons will be installed or the surface will be plastered without additional equipment.
- After the first plaster layer, depending on its evenness, a second layer can be applied or the surface can be finished leveled.
- It is necessary to rub down the last layer to even out possible unevenness or marks from the spatula.
- If the corner is made smooth, no additional measures will be required after using the perforated corner.
Important: Perforated corner profiles only fit on thick plaster.
Selecting Electrodes
Electrodes
The quality of the connection depends on what electrodes are used to weld the profile pipe. An electrode of small diameter will not ensure the strength of the seam, and excessive thickness will lead to burning of the pipe. A suitable electrode should maintain an even arc and prevent oxidation processes.
The choice of electrode diameter depends on the size of the pipe walls. For thin metal up to 2 mm, an electrode Ø 1.5 mm is suitable; for thicker metal 2–3 mm, an electrode Ø 2 mm is required. For metal with a more impressive thickness - 4–6 mm, you will need an electrode Ø 4 mm.
Welding assembly table
Parts for welding are fixed on a special table or devices made for this purpose. Dirt and lubricants must be removed from them. A spot gripping of the metal is performed to secure the structure. After alignment, the main process is performed. The welding arc is conducted at a speed that allows the edges to melt, but the metal does not have time to flow inside.
For thin-walled pipes, welding is carried out in one step; to connect thick metal, several passes will be required to weld all layers. Bevelling allows you to make multiple seams and reduce stress on the metal. The arc welding mode is affected by: current strength, polarity, electrode diameter, voltage, type of current. The current strength can range from 20 to 90 amperes, it is calculated based on the thickness of the electrode. When working with thin metal, direct current with reverse polarity is recommended.