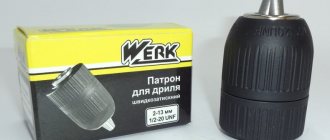
Types of chucks for hammer drills
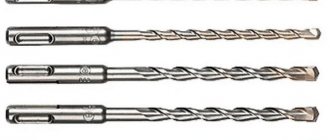
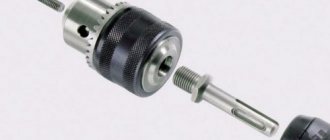
In most tools, regardless of the manufacturer: Bosch or Makita, SDS standard cartridges are installed: SDS-plus and SDS-max. The first is used on light hammer drills; it accepts nozzles with shanks with a diameter of 10 mm, which fit into the device 40 mm. It is fixed by two balls that fit into closed grooves of the nozzle, located one opposite the other. The force is transmitted through a pair of wedges that have contact with the shank with an area of 75 mm2.
Disassembled cone for a hammer drill
SDS-max components are installed on powerful semi-professional and industrial rotary hammers. They differ from SDS+:
- number of open grooves - three;
- contact area – increased to 389 mm2;
- immersion depth of the nozzle is 90 mm.
Less common are the SDS-quick and SDS-top standards. To work with hex and cylindrical shank bits, the SDS can accept a classic gear chuck, like a drill. It allows you to use ordinary drills for wood, metal, glass, mixers for mixing solutions from bulk materials with a round shank. It even works with a bat.
Sometimes jaw chucks or quick-release chucks and double-clutch chucks are installed instead of SDS.
Tools
0 votes
+
Vote for!
—
Vote against!
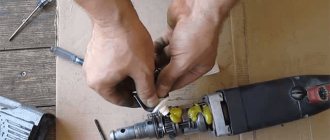
For professionals in their field, replacing or repairing a hammer drill chuck is not difficult. However, what should those who are not involved in construction and renovation at a professional level do? Since any man has held a drill in his hands at least once in his life, he should be aware of the process of removing and replacing its chuck. In this case, the reasons can be very different, from slow operation of the toothed rim to a major breakdown. How to change the cartridge on a rotary hammer? Let's look at the replacement in more detail.
Content:
- How to remove a chuck from a hammer drill
- How to disassemble a hammer drill chuck
- How to replace a cartridge on a hammer drill
How to remove a chuck from a hammer drill
At the first stage, it is worth determining which cartridge is used directly in your hammer drill. They come in cam, SDS collet and quick-clamping types. The latter, in turn, come in single- and double-sleeve versions. In a jaw chuck, the drill is secured with a key, which cannot be said about SDS collet and quick-release chucks. In order to replace the drill in the SDS collet chuck, you just need to turn it.
Replacing a chuck on a hammer drill begins with examining the fasteners. It can be held in place by a screw rod or a spindle. In most cases, removing the cartridge is not difficult. However, sometimes there is a stronger fixation, which will require patience and additional tools. In a simplified version, a firmly fixed cartridge is removed using a hammer, wrench and screwdriver. The removal process is as follows:
– tap the screw head to loosen the fixation;
– unscrew using a screwdriver;
– clamping the chuck in a wrench/vice and turning the spindle.
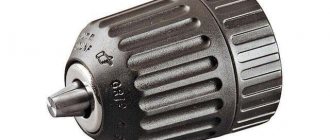
The device of the hammer drill cartridge
Almost any construction tool is universal, and hammer drills are no exception. There are many different attachments, adapters, and cartridges for them. The basis for any type of work is the cartridge. The hammer drill adapter is used to install a drill bit that has been removed from a conventional drill. Nozzles and drills have a huge variety and are selected in accordance with the tasks.
Always keep a replacement hammer drill chuck at home, as one can fail at any time. It is also worth noting that it is preferable to use different cartridges for each type of work. The main types of cartridges include:
– quick-release: suitable for those who often change attachments during work;
– key: designed for large drills.
Hobbyists often wonder why so many types of cartridges are needed. Let us remember that there are rotary hammers with higher and lower power. If the tool is powerful, then you need to think about securely attaching the drill and attachments. A cartridge such as the SDS-max is designed for a deep landing, which means the likelihood that the drill will fly off during operation is minimized. The same is with less powerful hammer drills, which are designed for “jewelry” work. In this case, more emphasis is placed not on fixation, but on accuracy.
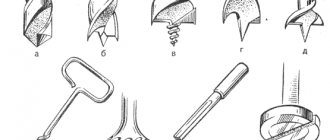
In order to know how to repair a hammer drill cartridge, you need to study its structure. But how does the hammer drill chuck work?
At one time, the drill was attached using movable cams, but progress does not stand still. In SDS, drills are fixed by 2 guide wedges and 2 locking balls. SDS-plus and SDS-max differ only in the number of guide wedges (the latter has 1 more). Thus, the fastening is very reliable and fast.
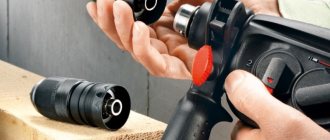
Fixing the attachment itself has also been simplified: you just need to insert the selected attachment into the cartridge socket, press lightly and wait for a click. Thus, the nozzle is well fixed. Removing the drill is also not particularly difficult: press the movable cover and the drill is removed.
Additionally, the hammer drill may include:
– speed regulator;
– electronic reverse
– brush reverse;
– quick replacement system (quick-change chuck for rotary hammer);
– immobilizer;
– indicators (show the degree of wear of parts);
– anti-vibration system;
– friction clutch (protection against jamming).
How to disassemble a hammer drill chuck
When disassembling the cartridge, it is necessary to take into account the manufacturer, because disassembling the hammer drill cartridge will differ significantly. Today the list of the most popular includes:
– chuck for bosch hammer drill;
– chuck for makita hammer drill;
– chuck for rotary hammer interskol.
Let's look at disassembly using the example of a cartridge for a Bosch hammer drill:
1. The plastic part is moved aside and the rubber seal is removed.
2. Using a screwdriver, carefully remove the fixing ring.
3. Next is the locking washer.
4. Behind the puck we will see the second ring. It should be turned and removed, also prying it off with a screwdriver.
5. Behind the plastic part we see an SDS clamp, consisting of a spring, a ball and a washer. The ball is removed first, then the washer and spring.
The cartridge is disassembled for various purposes: repair, replacement of individual parts, cleaning, lubrication, etc. The chuck for a hammer drill from Makita and other manufacturers is disassembled in approximately the same way, with the exception of isolated nuances that are taken into account based on the design of the chuck.
After disassembling and doing everything that was planned for working with the parts of the cartridge, a logical question arises: how to assemble the hammer drill cartridge? Just follow the disassembly instructions, starting from the last step and ending with the first (do everything exactly the other way around).
How to replace a cartridge on a hammer drill
We already wrote above that not every cartridge is suitable for every drill. We also looked at the process of removing and even disassembling the cartridge. To install a new cartridge, follow these steps:
– screwing the chuck onto the drill (twist until it stops);
– insert the screw into the socket;
– tighten the screw using a screwdriver (also until it stops).
Take your choice of hammer drill chuck seriously. They come in a wide range of prices, but don't waste your money buying a chuck that may not be suitable for your drill. The ideal option would be to take the tool with you if it’s a market, or ask for help from a consultant if it’s an online store.
How to disassemble a hammer drill chuck
To assess the technical condition, service or replace the clamping device, you need to disassemble the hammer drill chuck. Work gloves are first put on - they minimize the contamination of hands with dirt, construction dust, and grease. The plug of the tool must be pulled out of the socket.
- The slider or rear clutch of the chuck is retracted towards the tool. If it is installed vertically - down.
Pull the coupling down
- A straight screwdriver is inserted between the boot and the slider and turned in any direction, or the boot is pryed off with it.
Removing the cover
- A puller removes the retaining ring holding the bearing.
Using a circlip puller
- The slider is moved down again and the metal washer for the boot is removed.
Removing the gasket
- The second retaining ring is pulled out from the seat. It is larger in diameter than the first one. The plastic boot is removed.
Removing the polymer cover
- A ball is shaken out of the hole.
- The spring is removed.
- All parts are thoroughly cleaned of stuck dirt and dust with a dry cloth or napkin.
Afterwards, it is advisable to wash the components in kerosene. There will be a lot of plaque if, instead of lubricating the shank, the lubricant is sometimes applied inside the cartridge, which is absolutely not allowed.
- Four cotter pins are removed from the seats. The easiest way to do this is with a magnet.
Removing fasteners
- The inner part of the mechanism is pulled out from the base, where the attachments are inserted.
- Using a straight screwdriver, remove the oil seal from the sleeve and remove the sealing rubber.
Assembling the hammer drill chuck
To assemble the device, the steps performed during dismantling are repeated in reverse order.
- Washed, cleaned or new parts are lubricated with silicone lubricant like WD-40.
Lubrication of rubbing parts
- The oil seal and rubber seal are put in place. The inner part is placed in the sleeve so that the holes for the cotter pins match.
- All four fastening elements are installed in place.
Installation of cotter pins
- A spring is installed, followed by a washer that secures the ball. With its protrusion it turns towards the ball socket.
Correct installation
- The spring is pressed with a washer, and the ball is put in place.
Installing the washer
- A slider is put on top of the mechanics. It is pressed with a locking ring.
- A washer for the boot is installed, and then secured with a small retaining ring.
Second retaining ring
- The slider lowers, and with a slight force the boot is put in place.
You can install the attachment and check the quality of maintenance of the cartridge. In cartridges from different manufacturers, the disassembly process may differ slightly due to the presence of additional washers and gaskets.
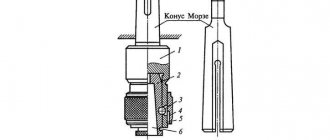
Device
Diagram of the chuck in disassembled form
The purpose of the chuck is to securely hold the working tool (drill) during operation and ensure a quick change of equipment if necessary.
The first prototypes of modern devices appeared in the first half of the 20th century.
The engineers eventually came to the conclusion that the simpler the clamping structure, the more reliable it is.
But over time, different modifications began to be developed, each of them with its own pros and cons.
An important feature of the hammer drill chuck is its maximum closedness. This ensures that particles of concrete and other materials do not get inside.
Components of the most common clamping devices:
- The axle has a bushing with many splines pressed onto it.
- A ring with a conical spring that fits onto the bushing.
- Locking balls that are located between the ring and the bushing.
- A protective casing made of plastic or rubber protects the cartridge from the penetration of foreign particles.
This type was developed by technicians from the German company Bosh. It is called an SDS chuck, the letters are the first in those words that describe the principle of changing attachments (German): “Insert, turn - secure.”
How to remove a chuck from a hammer drill
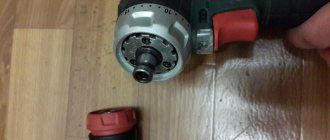
To remove most SDS chucks from a rotary hammer, the base located behind it is moved axially towards the electric motor, and the clamping device is easily removed, because it is attached according to the principle of holding the drill. (First 12 seconds of video)
Some models, such as those from Makita, use two-clutch clamping devices. To remove them, the base of the chuck located behind it must be turned counterclockwise 1/8 of a turn so that the arrow points to the icon of the disconnected clamping unit. As a result, he will be freed.
When using a keyless chuck in a hammer drill, you will have to use a screwdriver. The cams are opened to the limit, a straight screwdriver is used to unscrew the fixing screw with a left-hand thread - unscrew it clockwise.
Rotate counterclockwise
The cartridge itself is unscrewed counterclockwise by hand after fixing the shaft with a pin. If not removed, a large hex key is inserted into it and clamped. Afterwards, one strong blow is applied to the key with a wooden object, so as not to deform the tool, counterclockwise.
Clamped hexagon
Alternatively, hold the hex socket between the jaws and unscrew the cartridge using the appropriate wrench.
Key Usage
If the screw does not come out, you need to knock on it to loosen the fixation - a screwdriver is inserted into the slot and several gentle blows are applied to it. If traces of corrosion are visible near or on the fixing bolt, lubricate it with liquid lubricant.
The jaw chuck, which is inserted into the hammer drill through an adapter, is removed like any attachment: the rear coupling of the SDS equipment is moved towards the electric motor in the direction of the axis, and the clamping device is removed.
Replacing the raster bushing (chuck) on a Bosch GBH 2 26 DRE / How to change the chuck to 2-26
Removing the hammer drill chuck. Photo 4
What remains for our client to do is to clean the parts of the cartridge mechanism if you are performing technical service, you need to clean it from dirt and dust, lubricate it, and finally assemble the device in the reverse order.
To become more thoroughly familiar with the question of what it really is, how to remove a chuck from a rotary hammer or drill, how to properly disassemble it, perform technical service or minor repairs, there is an option to study not only theoretical information, but also watch the corresponding video.
At a theoretical level, on a rotary hammer chuck of the SDS-max category, there is an option to install a tool with a shank for SDS-plus chucks, and there are tools with an even smaller diameter of the seat. To solve this problem, a special attachment (adapter) is used, which can now always be bought on almost any construction market. Although it is strictly not recommended to use such adapters for a rotary hammer, because the introduction of a tool of the smallest diameter on heavy-duty rotary hammers will quickly render it unusable.
You, tools for rotary hammers are sold immediately in packages and cannot even be restored after failure. With all this, it is harmful to confuse it with ordinary drills, which differ from it in the shape of the sharpening and the structure of the spiral.
Source
Hammer chuck repair
A couple of parts of the clamping device can be replaced with similar ones: a worn-out ball, a rubber gasket and a spring that has lost its original properties, for example, flexibility. Sometimes, for example, when the nozzle jams or gets stuck, the spring tendril jumps out of its seat.
The antenna is inserted into place
If the remaining components wear out, the hammer drill chuck cannot be repaired; it must be replaced with a new one. You will have to look for a ball with a spring not in tool stores and construction markets, but in service centers where devices are serviced and repaired. Another option is to order a spare part on a Chinese trading platform. It is often easier to replace the cartridge with a new one than to repair it. It's a little more expensive, but more reliable and faster.
Uncharacteristic malfunction of the Bosch rotary hammer
Bosch rotary hammers are very reliable. But there are malfunctions that are practically not encountered in practice. Below is one of them.
Bosch rotary hammer drills, but does not chisel
If the hammer drill has stopped hammering, but still allows you to drill, the most likely reason may be the destruction of a “drunk bearing”. This malfunction does not occur often and is not easy to find.
To fix it, you don’t need to go to a repair shop. Any person with the slightest knowledge of mechanics can fix such a malfunction.
New drunken bearing
First you need to disassemble the Bosch hammer drill down to the intermediate shaft. The disassembly procedure is given above.
By removing the intermediate shaft, you will get to the “drunk bearing”. The destruction of a rolling bearing is indicated by a broken race, scattered balls, or pieces of the race.
You take out the bearing, remove dirt and all parts of the destroyed mechanism.
You buy a new “drunk bearing”, and, having lubricated all the parts with new grease, replace and reassemble in the reverse order of the disassembly steps.
Replacing a hammer drill chuck
Sometimes old spare parts have to be replaced with new ones due to significant wear or careless operation. Replacing a chuck on a hammer drill begins with removing the old clamping device. After dismantling it, the new equipment is installed in place in the reverse order of disassembly.
It is necessary to replace a damaged cartridge on a rotary hammer if its components are worn out: there is play, nozzles fall out, or the device jams. Most often, the locking plates that secure the balls and the body itself are affected. The retaining spring weakens less often. Sometimes, to correct a problem on a construction site, a thin washer is placed under it.