A screwdriver is a very necessary tool. It is available in the workshop of almost any home craftsman. However, nothing in this world lasts forever. Sooner or later, this instrument requires some attention and even repair. One of its sensitive elements is the cartridge. It is this that sometimes has to be removed, disassembled and repaired. This is the issue we will focus on today. In addition, we will talk about the types of screwdrivers that currently exist. This will allow you to choose the chuck replacement method that best suits your model.
Screwdriver: briefly about the design of its chuck
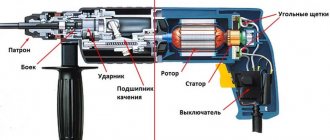
To be able to remove the screwdriver chuck, you need to understand the structure of this unit. This element is mounted on a shaft, which sets it in motion and at the same time serves as a place for its attachment.
Don't have a screwdriver yet? Definitely buy it! And they choose him like this...
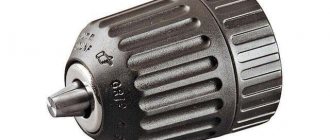
Cartridges are usually equipped with a cylindrical shell. Under it there are clamping cams, as well as adjusting sleeves. When they jam, it is almost impossible or very difficult to get the working part. In this case, you have to remove the clamp, which makes further work on repairing or servicing the tool easier. This is done in order to perform lubrication, cleaning or preventive inspection.
The cartridge is secured in several ways. And in each specific case the problem has to be solved differently.
Chuck device
The cartridges can be:
- cam, which is fixed with an L-shaped key inserted perpendicularly;
- quick-clamping, in which, for fixation, one of the body cylinders is clamped by hand, and the other rotates around its axis.
Cam chucks are less convenient, but the connection they provide is more reliable. The adjusting sleeve, rotated with a key, ensures compression of the steel cams until they are completely closed.
Screwdriver malfunctions can be located not only in the chuck. You can eliminate them as follows...
Quick-release chucks are tightened faster. No key is required for this.
Types of keyless chucks
Such cartridges are:
- single-socket, in which the bit is installed with only one hand, because one of the elements of its body is immobilized automatically;
- double-coupling, both parts of which are movable. Therefore, you will need both hands when installing the bat.
When replacing a screwdriver chuck, it should be taken into account that single-socket products are used only on tools equipped with locking devices.
Screwdriver: ways to fix the chuck on its shaft
The following methods are used to secure cartridges:
- threaded;
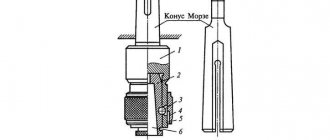
- using a Morse taper, when a conical shank is inserted into the spindle hole. This method is the most effective.
Additional strength of the connections is achieved by installing a fixing screw.
Your screwdriver will become more functional if you have such attachments and accessories...
Repair methods
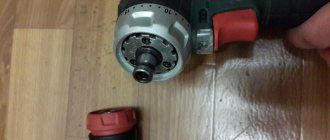
Experts recommend, regardless of the reason why the screwdriver jams, what to do first: introduce universal lubricant such as WD-40 into the internal cavity of the chuck, including the surface of the jaws. After 10-15 minutes, use a rubber hammer (or a regular one, through a gasket) to tap the cartridge and jaws with moderate force.
If the bit is jammed in the chuck of a Bosch, Texas, Praktika, etc. screwdriver, then (after lubrication) the use of two adjustable wrenches effectively solves the problem. One clamps the base of the cartridge, the other carefully rotates its upper part. To avoid damage to the surface and the unit itself, soft but dense pads such as leather should be used.
If your efforts lead to nothing, workshop specialists will be able to restore the functionality of the tool with minimal financial costs and extremely quickly.
Having various technical devices at home is simply necessary. We are talking about tools such as a drill and a screwdriver. They are indispensable when performing various small household jobs. But like any equipment, they can also have malfunctions and break down. For example, in a screwdriver, one of the most unstable parts is the chuck. In this article we will look at how to remove and replace the cartridge in this device.
How to dismantle a screwdriver chuck
This is done not only when there is a need for urgent repairs. This is also done for maintenance. Parts must be constantly lubricated and cleaned. Moreover, this should be done even if the screwdriver has not been used for a long time. If maintenance is not carried out regularly, the tool can quickly fail.
You can unscrew the cartridge in various ways.
The choice of method depends on the design of the unit and the method of its fastening. ATTENTION!!!
If you want to learn more about woodworking tools and the crafts you can make with them, be sure to check out this link.
Sleeve equipped with a screw fastening
In such a chuck the screw is located between the jaws. You can get to its head only when the cams are spread apart. Taking a Phillips screwdriver, unscrew it by turning it clockwise. After this, a hex key is inserted into the cams and they begin to move it in the opposite direction. Movements should be made quite sharply. At the first moment you will have to make quite a significant effort. If the force on the key is insufficient, you can use a hammer.
Morse cone
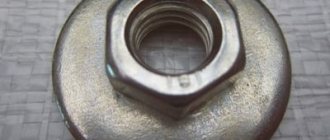
If there is a Morse taper, the shank is knocked out of the conical hole using a hammer. If this cannot be done, the tool is disassembled and the shaft and chuck are removed from it. The clamping cylinder is then removed using a pipe wrench. In this assembly, ordinary nuts are rarely used.
How to choose bits for a screwdriver? The answer is here! Click!
Threaded connection
For work, use a 10 mm L-shaped hexagon. This key must be inserted into the cams, clamped tightly and turned. To make this operation more convenient, the hexagon should be securely fixed in the hand or in some kind of support. And then turn on the drill at low speeds for only a split second. As a rule, this is enough to loosen the connection and unhindered dismantling of the sleeve. If this method fails, the tool is disassembled in order to approach the joint from the other side.
Standard sizes and markings
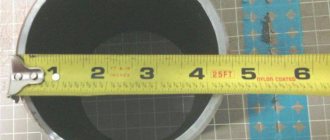
Before disassembling the screwdriver, it is necessary to determine the type of cylinder mounting. The marking will tell you this. An inscription of the form 1-6В14 indicates the type of fixation Morse taper, where the numbers before the letter are the diameter of the bit shank in millimeters, and after that the size of the conical hole. There are 9 articles – from B7 to B45.
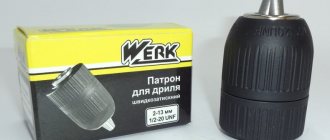
For cartridges with threaded fastening, markings of the form 1.5-13 M12x1.25 are provided. Here the numbers before the letter also show the permissible diameter of the tail of the bit, and after the letter there are thread sizes in millimeters.
Important! Foreign screwdrivers use markings in inches - it looks like this: 2-13 1/2 - 20 UNF. 1/2 means inch, and 20 means the number of threads per inch.
Threaded cylinder
Screwdriver: how to disassemble its cartridge
To get inside, you must remove the plug. If the case is plastic, this is done easily: pry it off with a sharp object.
It is knocked out of the metal body using a hammer. To do this, hit the base of the clamping sleeve so as not to damage it. To get to the base, a fairly large bolt is placed between the cams. Then the cams are moved so that the bolt takes a perpendicular position relative to the base, but is not rigidly clamped and is able to move both up and down. Then the head of the bolt protruding above the cartridge is hit with a hammer.
After this, the cartridge can be quite easily disassembled. After repair or maintenance is completed, the assembly is reassembled, paying special attention to the position of the cams.
Types of malfunction
Typical cases in which the chuck of a Metabo, DeWALT, etc. screwdriver jams:
- when trying to use a drill of the maximum permissible size, the cams are moved to the maximum, after which it is impossible to bring them together with the application of standard forces;
- It is not possible to remove a drill or bit clamped in the chuck - the cams do not move apart. Often, they are clamped unevenly, which impairs the fixation of the drill.
Less commonly, jamming of the jaws occurs during their free movement during compression or expansion - usually this is facilitated by particles of debris, scale, shavings, etc., trapped under the figured part of one of the cams.
How to change a drill bit in a drill - we can do it ourselves!
It is not always possible to remove a drill from the chuck in the usual way - as a result of heavy load or improper fixation, it can jam the chuck. How to get a drill out of a drill without damaging the fastener and the tool itself? First of all, try to cool the cartridge thoroughly. Sometimes this is enough for the cams to release the drill a little and you can pull it out.
The most proven method for removing a stuck tool is to tap the cams.
. To do this, the free end of the drill is fixed in a vice, a wooden strip is applied to the chuck, through which tapping is carried out. This vibration can cause the chuck to loosen its grip and release the tool. This method will be useful for both owners of classic fasteners and owners of quick-release fasteners. Sometimes removal becomes possible after lubricating the drill with machine oil or the popular WD-40 lubricant.
The latter method is better, because thanks to the spray, the substance will quickly reach the desired points of contact between the drill and the chuck. In any case, after lubricating you will need to wait a little for the substance to penetrate deeper. Sometimes, in particularly difficult cases, the problem is solved only after dipping the entire cartridge in machine or vegetable oil. If neither one nor the other is at hand, you can make a “bath” for your drill from gasoline. You need to keep the cartridge in the liquid for at least an hour. By combining methods, you will be able to remove a jammed drill even faster.
Disassembling a drill chuck with a quick-release nut
To repair a tool, you must first disassemble it.
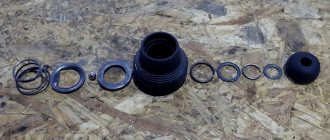
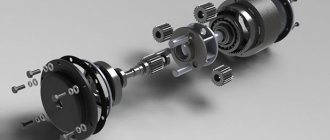
To clean the jaws and lubricate the moving parts and threads of the cartridge, it must be disassembled. Disassembly is necessary to repair and replace failed parts. Here is a short list and sequence of operations for disassembling the jaw chuck:
- The removed cartridge with the conical part up, lined with wooden spacers, is clamped by the coupling in a vice.
- Use a gas wrench to carefully unscrew the notched nut.
- The bearing is pulled out. The puck comes out.
- The cartridge is removed from the vice.
- The adjusting sleeve is twisted from the base by hand. If it does not give in (jammed), then the cartridge turns over and is again compressed by the clutch in a vice. A little machine oil is poured onto the threaded part of the coupling and base. Then, using a gas wrench, the base is skillfully unscrewed from the coupling.
- If there is a retaining ring or nut at the bottom, they are removed.
- The cams are pulled out of the guide rings and removed from the base cone.
- All parts of the drill chuck are carefully inspected. If worn, deformed or broken parts are identified, they are rejected and replaced.
- The jaw chuck is assembled in the reverse order. At the same time, all moving parts are lubricated with a special grease. It is best to use the lubricant recommended by the manufacturer.
The procedure for disassembling cartridges of other models may be different. It depends on the type of chuck, its design and the manufacturer of the drill. To disassemble the drill chuck yourself, you need to fulfill three conditions:
- have the necessary set of tools available;
- have plumbing skills;
- to be a person with a stable, balanced psyche.