Types and causes of drill jamming in an electric drill
There are several reasons why an electric drill may jam.
- Marriage
The most obvious reason for the breakdown is a manufacturing defect; this problem most often occurs in very cheap and low-quality drills. That is, tools from Bosch, Makita, Metabo, Interskol companies will be less likely to be defective. That is why such equipment is popular.
- Violations of the rules for using the tool
Even the most reliable tool can fail if used incorrectly. And here it doesn’t matter who the manufacturer is - the same Bosch or Makita are even more susceptible to breakdowns if operating rules are violated.
This reason is not tied to a specific brand or tool parameter, but some brands provide for this point and provide protection from an inexperienced user.
- Chuck malfunction
If the tool is used or stored incorrectly, the main part of the drill can easily break. This is a very common problem, but it cannot be called a marriage.
Attention! Most often, the device breaks down due to user negligence.
In the first two cases, it is most likely impossible to repair the instrument at home. In the case of the third problem, you can do everything yourself. But first you need to determine the type of cartridge.
Reasons why it is difficult to remove the drill
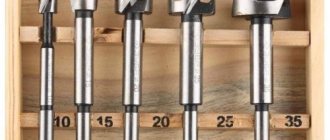
Types of drills: a - spiral centerless; b - spiral with a center and cutters; c - spiral with a screw center; g – feather center; d - center; e - gimlet; g – countersinking; z - groove; and - cork.
When working with a drill, sometimes difficulties arise when replacing a drill due to the removal of a previously used drill from the chuck. This problem can vary in severity, depending on the cause. The simplest and most common reason is the application of excessive force when clamping the drill, if there are no limiting mechanisms in the design of the chuck. This phenomenon most often occurs when the impact method is used to tighten the drill at the final stage, for example, using a mallet. Drill jamming can also occur if it is forcefully tightened when it is incorrectly placed in the space between the cams. This is typical when using a small diameter drill.
A more complex tool jamming mechanism can occur when using a low-quality drill. So, if it is made of a soft material, then when it rotates, metal shavings may appear, removed from the surface, which clog the gap between the cams and the drill, as well as between the cams. This can make it difficult to open the jaws when trying to loosen the drill. Difficulties in removal may arise if the drill sinks too deeply into the chuck during operation. The task becomes more complicated if the drill, in addition to such jamming, also breaks at the level of the upper end of the cartridge.
The cause of breakage of the drill in the drill chuck may be a violation of the drilling mode.
The cause of destruction, in addition to the use of low-quality material, can be a violation of the drilling mode: unexpected tilt of the drill, excessive vertical load, an attempt to drill heavy-duty material, etc.
Finally, the reason that it is not possible to remove the drill may be the jamming of the cartridge itself. Several possible reasons should be highlighted. The first reason, not related to the failure of the cartridge, is explained by the ingress of foreign particles that impede movement into the area of the threaded connection of the control element and the housing. Such particles can be dirt, metal dust or small shavings, etc. In this case, it is not possible to ensure rotation of the adjusting sleeve or key.
The reason that you cannot get the drill out may be a failure of the chuck. This can be caused by either a manufacturing defect or temporary wear of the cams or the control element. The reason may also be the failure of the spring locking mechanism, which does not release the control element when the button is pressed.
Types of drill heads
Before you figure out how to remove a drill from a drill, you should understand what fastening mechanisms manufacturers use.
There are only two main types:
- Key or toothed
The key type is very reliable, but as the name suggests, a special key is needed to tighten it. It activates special cams that firmly fix the drill. This type is the most reliable, but the drill fastening time leaves much to be desired.
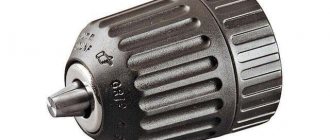
Gear chuck
- Quick-clamping
Quick-release sockets are keyless and are tightened by the user's manual efforts.
Keyless chucks are divided into two more types:
- Double coupling
It consists of two couplings, which means you need two free hands to fix it. One of the advantages is that such couplings are more reliable and require less effort for fastening.
Double coupling quick-release
- Single coupling
Single-coupling ones are much more convenient, since only one hand is used for fastening. This type of chuck ensures no backlash, but more force must be applied to tighten it.
Single coupling quick-release
Attaching the drill to the drill
Drill device diagram.
To install the chuck on the drill shaft, a hole is made in its lower part along the diameter of the shaft. Fastening can be due to a threaded connection or holes with a taper and a tight fit of the cartridge on a shaft with a reverse taper.
The drill is inserted in the center into the space between the cams. When the cams converge (rotation of the adjusting element clockwise), the drill is secured in the chuck, and when the cams diverge, on the contrary, it is released. To ensure reliable fastening, it is necessary to apply considerable force when rotating the adjusting element.
Based on the method of securing the drill, chucks are divided into conventional (key) and quick-release chucks. In keys, the adjusting ring is moved and tightened using a special wrench. When the key is rotated clockwise, the drill is secured in the chuck. The quick-clamp has an adjusting sleeve, the surface of which is corrugated for ease of rotation by hand. By manually rotating the sleeve clockwise, the drill is secured in the chuck.
Keyless chucks come in two types: single-sleeve and double-sleeve. If the design provides only one sleeve, then it rotates relative to the drill body, which must be fixed motionless during installation. When using two sleeves, one of them is movable, adjustable, and the other is stationary. The adjustment sleeve is rotated relative to the second sleeve, which must be fixed when installing the drill. In the design of the chuck, to limit the tightening force, additional elements can be used in the form of a ratchet (located inside) or a locking spring mechanism with a button (the button fits into a special socket on the outside).
How to release the keyless chuck
To release the double-clutch chuck, you need to turn the clutch so as not to break the ratchet. To do this, you need to use various plumbing products. keys, otherwise you will have to completely disassemble the drill and unscrew the head. This means that you need to unscrew the screws on the body and, remembering the location of the parts, go through the drill.
With a single-coupling structural element, the procedure does not change, that is, try to first unscrew it with the help of a plumber. key, and then simply disassemble the drill and remove the chuck, disassembling it.
If the drill is expensive, you need to make several cuts. Dirt that gets inside and causes the mechanisms to get stuck can also be a problem. It could be sand, soil with water or rust. In this case, you need to remove the insides of the drill and thoroughly clean it, and then start removing various pebbles and pieces of grass.
Note! It is better to film or record a video of all stages of disassembling the tool on your phone, as there is a chance of forgetting something or starting to pull out the wrong parts.
Rotating the double-sleeve chuck
How to release a double-sleeve chuck
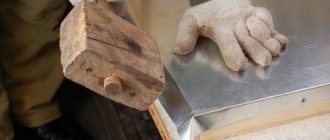
Unlike a key cartridge, this type of cartridge does not have teeth and, accordingly, a stop. Its rings are relatively smooth. In this case, the ideal solution is a removable “magazine” holder, which often comes complete with modern drills. You will also need a hammer:
- Use the holder to grasp the upper coupling (ring) closest to the drill and fix it as securely as possible.
- Clamp the drill with a vice, clamp, in your hands or between your knees.
- Strike the “magazine” handle forcefully in the direction in which the upper coupling normally rotates.
One blow is enough - the ring moves and the drill is released quite easily. To make sliding easier, it is permissible to drop a little oil or grease between the chuck jaws or under the clutch.
How to release the key chuck
The key cartridge is much easier to release. First, you should try to free the drill in the usual way, simply by increasing the handle of the key and asking for help.
If the part is jammed tightly, you need to sort out the drill, then remove the head and replace it with a new one. If the drill is expensive and you need to get it anyway, you should disassemble or saw the chuck itself.
You can also find dirt that has gotten into the drill and is preventing it from spinning. Then you need to remove all components and remove dirt from the cartridge.
How to remove a drill with a working chuck
If everything is in order, then in theory there should be no problems with getting it out. Therefore, this section is rather dedicated to users who are completely ignorant of power tools, since the operation itself is elementary. But there are still a lot of people, so maybe someone will need this information.
In this situation, you will need a special key to unlock the key chuck, or straight hands to loosen its quick-clamping counterpart.
Huge selection of power tools and gas-powered equipment at low prices. Free delivery to your region. Payment upon receipt or online.
In the first case, you need to insert the key into one of the recesses on the cartridge and start rotating it counterclockwise. Unwinding occurs due to the existing teeth on both objects.
In the second, the drill should be turned on in reverse mode (reverse rotation). With one hand we hold the outer body of the cartridge, and with the other we press the start button. If your machine is not equipped with reverse, then this is not very good - in fact, this should not happen, since only key cartridges are installed on such devices. But still, if this happens, then you need to somehow fix the drill axis (for example, with an open-end wrench) and rotate the outer body of the chuck counterclockwise. In general, it would be better to remove such a cartridge here and install a key one.
How to spin a drill without a key
How to unscrew a drill without a key? Many people ask this question, especially when the key is lost, which happens quite often.
You need to get two screwdrivers: a Phillips and a flathead. The first step is to insert a Phillips screwdriver into the key hole and a flat-head screwdriver into the groove for the teeth. Then they pull the screwdriver in the direction of unwinding, and the Phillips acts as a lever. In this case, with a minimum of effort, you can unscrew the head and solve the problem of how to unscrew the drill without a key.
Unscrewing the key chuck
How to change a drill bit in a drill without a key
As is clear from the subtitle, here we are talking about the main cartridges.
A frequently used method is to insert a Phillips screwdriver or a nail of suitable diameter, which is inserted into any of the existing grooves on the cartridge, thereby fixing its first half. The other half can be tested by twisting it by hand. Usually this way it turns out to be quite easy to unwind.
But, if you can’t unscrew it like that, then you can use a gas wrench or a vice instead of your hand. Using them, you will be able to make the necessary effort, which will most likely be enough to complete the rotation.
If these steps still don't work, try what's described in the next section.
Using a vice
Coupling or quick-release elements can be unscrewed using a vice. To do this, firmly secure the vice, then tighten the coupling(s) into it.
If the drill is switchable and it is possible to turn it in the other direction, then start turning it slowly, increasing the power, and with a small probability the chuck may become wedged.
When the drill turns only in one direction, you need to wedge it manually, with your hands or a plumber. keys.
Note! You cannot immediately accelerate the drill to maximum speed, because there is a chance of breaking the vice or breaking the chuck.
How to correctly insert a drill into a drill and how to remove it?
In any living space, at some point a situation arises when something needs to be reworked: hanging a picture, screwing on shelves or doing wiring. But you can’t just pierce most concrete and brick walls with a nail and you can’t screw a self-tapping screw into them. Therefore, you have to resort to using an electric drill. This is a comfortable device that allows you to make a hole of the desired diameter in the wall thanks to the abundance of drills: for concrete, metal, glass, plastic, tiles or wood. But to successfully use an electric drill, you need to know the main rules for using this equipment.
Using Spring Wire
The opposite problem can also happen when the drill bit gets stuck in the workpiece. In this case, unscrewing the drill is not too difficult, but problems may arise with the available tools. There are several steps you need to take:
- Use a welding machine to heat the stuck part.
- Make grooves at opposite ends.
- Place the spring wire into the spiral groove.
- Start twisting the stuck drill until it starts to unscrew itself.
- Start removing the drill.
It is worth noting that you need to take out the drill slowly and slowly, since the work requires precision.
In order to avoid getting into such situations and not wondering how to remove a drill from a stuck drill chuck, you need to use the tool according to the instructions and follow all the rules. Well, if such a situation happens, you can re-read the article again and no longer wonder: the drill is stuck in the drill, how to get it out.
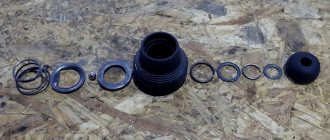
Drill chuck design
Drill chuck design.
In all types of drills, the drill is installed in a special chuck. With this tool, the drill is mounted on a rotating shaft, and the rotational movement necessary for drilling is transmitted to it. In a type of drill such as a hammer drill, it also provides translational (impact) movement of the drill. Almost all drills use cam-type mechanisms.
The jaw chuck consists of a hollow cylinder-shaped body through which an adjusting sleeve or ring moves. Inside the housing there are cams with a conical cut, which move along guides that ensure the translational movement of the cams when the adjusting element rotates. Due to the taper, the cams evenly converge relative to each other when moving upward or diverge evenly when moving downward.
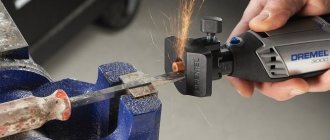
About the advantages and disadvantages of nozzles
Among the advantages, it is worth noting the efficiency indicators of such a grindstone mounted on a drill. It is important to remember that these tools are not intended for intensive use. Without placing excessively high demands on these devices, we can say that they are quite effective in fulfilling their intended purpose. In other words, for home workshops, this is an ideal tool that will allow drills to be sharpened quickly and correctly at any time.
In addition, such products have a low cost, which is a definite advantage when purchasing them. They are easy to operate, and their use does not require any specific skills in sharpening cutting or drilling tools.
According to the experts, in addition to its advantages, the device also has disadvantages:
- Most often, attachments perform editing of the cutting part of a “squat” tool, rather than sharpening it. When using the device for full sharpening of “dead” tools, the emery wheel will last a relatively short time;
- when used, reliable fixation on the power tool is not ensured;
- often the sharpening angles are standard in the device and cannot be changed;
- there is a possibility of the rotating chuck getting caught on the internal surfaces of the adapter coupling. To exclude this, you should select the appropriate diameters and try on the device during the purchase process;
- inconvenience of holding and turning on the drill while working with one hand, and directing the drill with the other. To ensure greater comfort, it is recommended to use brackets that allow you to fix the power tool.
READ How to Correctly Drill a Concrete Wall with an Impact Drill
To sum up the advantages and disadvantages of drill attachments, we can note that they are practical when used for work in a home workshop; they are not suitable for production tasks.
Operating procedure
The lathe allows you to quickly and efficiently form turns on any type of pipe. In order to do this you need to know how to cut a thread correctly:
- The pipe should be clamped securely using a vice or other device.
- It is necessary to remove the outer chamfer from the already prepared and cleaned pipe.
- Insert a holder with a predetermined diameter into the holder.
- Thoroughly lubricate the pipe and threading tool with lubricant.
- The lectern is attached to the pipe in this way so that its position is perpendicular to the axis of the product. If the thread-cutting tool is installed even with a slight misalignment, then the threads may break or the value of its diameter may change.
- The tool holder must be rotated clockwise. This will ensure that a right-hand cut is created on the product.
- After making 3-5 turns, the device is untwisted in the opposite direction, during the process metal shavings will be removed.
- You need to rotate the tool very smoothly, and without making sudden jerks.
- It is important to remember to periodically lubricate the cutters and the internal surface of the joint with lubricant.
- After the last turn is created, the lerka returns to the top, and then goes through the finished turns again.
Please note that the connection length should not be more than 10 mm. This distance is standard for the vast majority of residential piping systems.
How to drill metal
Drilling metal surfaces has its own characteristics. First of all, you need to choose a drill designed for these purposes. A wood or stone drill bit is not suitable for metal, stainless steel or cast iron. These drills differ not only in the grade of steel, but also in the sharpening angle of the cutting edge.
When working, there is no need to rotate the drill at high speed; the drill will slide along the surface without catching the material. The optimal speed when drilling metal is low, when the naked eye can see how thin chips are formed. The pressure on the drill can be significant, but within reasonable limits so that the drill . When drilling steel and cast iron, it is recommended to lubricate the drill with machine oil for cooling.
To ensure that the drill catches on solid material, it is recommended to make a recess at the drilling point with a plumber's core. The drill will not move to the side.
How to insert a drill correctly?
To correctly insert the drill into the chuck, you need to know the following. The hole intended for clamping the tool is no more than 2 cm deep. The deeper the drill is set, the more securely it will hold in the chuck. There are two types of chuck clamping mechanisms:
- manual, tightened by hand;
- key, wrapped with a key.
In recent years, household drill models have been equipped with a manual (quick-release) chuck - it is simpler in design and quicker to operate.
To install the drill in the chuck you need to follow these steps:
- Turn the cartridge counterclockwise. The jaws should move apart to a distance slightly larger than the diameter of the drill.
- Insert the drill bit between the jaws until it stops.
- Smoothly turn the chuck clockwise, making sure that the drill is clamped evenly on all sides.
- Tighten the jaws by hand or with a wrench.
Attention! Before drilling, turn on the drill and look at the drill bit. A correctly installed tool does not hit and looks like a smooth line.
How to drill wood
Wood is a soft and easy-to-drill material that can be easily processed and sanded. When drilling wooden products, it is recommended to use special wood drills.
It is best to start work with markings, marking the location for the hole with a pencil. Next, resting the end of the drill on the intended point, turn on the maximum rotation speed and smoothly immerse the drill into the wood. If the hole is deep, from time to time you need to pull the rotating drill to the surface so that it can free itself from the chips.
Often in modern life you may be faced with the need to make a hole in plastic. Basically, plastic is drilled in the same way as wood, since it is a soft material. Some synthetic materials (for example, ebonite, textolite, caprolon) have great hardness. To process such plastics, it is better to use drills designed for metal.
How to drill concrete
When drilling concrete, stone or brick, a lot of dust is released, and small fragments can fly out from under the drill. It is necessary to use a respirator to protect the respiratory system and goggles to protect the eyes.
Advice. You can reduce the amount of dust by moistening the workpiece or drilling site with water.
If you need to drill concrete, then the best option would be to use drills equipped with a pobedit tip at the end. These drills do the job best and can be sharpened periodically as needed.
The impact mode is included in the design of the drill for drilling stone objects. You need to use the shock mode carefully. If you are drilling into tiles, you should not turn it on, as the impact will inevitably lead to cracking of the ceramics. The same can be said about hollow brick - it is dense, but fragile.
The recommended drill speed is medium. It is necessary to regulate the pressure on the drill body based on the properties of the material. But in any case, movements should be smooth and measured.
Attention! When drilling stone and concrete, the drill becomes very hot. Before replacing the tool, wait until it has cooled down to avoid burns.
Installing a working tool on a hammer drill
As mentioned above, the hammer drill must be checked for functionality before installing the drill. To perform such a check, the operating mode of the hammer drill is set to drilling without a fight. If, after pressing the start button of the device, you hear and feel that its engine is running smoothly and without jolts, then the hammer drill can be used for its intended purpose, having first inserted a drill or auger into it.
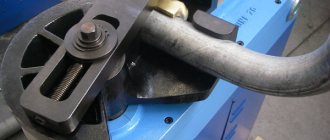
To secure a drill with a cylindrical shank in a rotary hammer, use an adapter with a jaw-type chuck
Before inserting the drill into the hammer drill, it is necessary to treat the shank of the working tool with a special lubricant that will protect it from corrosion. The procedure for installing a drill in a hammer drill is as follows.
- The back of the hammer drill is installed on the floor or other hard surface.
- The movable part of the clamping device is pulled back.
- The tool is inserted into the hammer drill until it stops. In this case, the drill or drill, which must be inserted into the hammer drill, must be held vertically. If you neglect this requirement, you may encounter the fact that the tool will fly out or even break, and this may also lead to failure of the hammer drill itself.
You should press until it clicks, then pull the drill; if it doesn’t come out, everything is fine.
Considering the fact that the chucks on modern rotary hammers have a fairly simple principle of operation, questions about how to remove a drill from a rotary hammer, as a rule, do not arise.
After removing a used tool from a hammer drill to replace it with another, it is advisable to immediately clean its shank from grease and construction dust. In this case, the shank of the drill that you are going to insert must also be cleaned and pre-lubricated. The tool replaced in this way will not harm the clamping mechanism of the hammer drill and will last much longer.
Lubrication extends the service life of both the drill itself and the hammer drill
Using a hammer drill, you can not only get a drilled structural element, but also perform processing using a special chisel. You can also install a mixer as the working body of such a device.
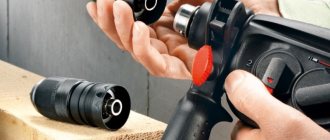
Home craftsmen often also have questions about how to insert a drill into a screwdriver or how to change the chuck on a hammer drill. Solving the first question is quite simple, since the design of the screwdriver uses cartridges of the same design as those on drills and rotary hammers. But the question of how to properly replace a cartridge on a hammer drill should be approached with knowledge: it is not easy to carry out such a procedure without certain knowledge and skills.
How to correctly insert a drill into a drill and how to remove it?
In any living space, at some point a situation arises when something needs to be reworked: hanging a picture, screwing on shelves or doing wiring. But you can’t just pierce most concrete and brick walls with a nail and you can’t screw a self-tapping screw into them. Therefore, you have to resort to using an electric drill. This is a comfortable device that allows you to make a hole of the desired diameter in the wall thanks to the abundance of drills: for concrete, metal, glass, plastic, tiles or wood. But to successfully use an electric drill, you need to know the main rules for using this equipment.
Recommendations for work
Before cutting a thread, you should know certain rules for working with the tool.
If they are not followed, the thread may turn out to be of poor quality, and the threading tool will not last long or may even be damaged during cutting. There are a number of requirements not only for the tool, but also for carrying out work of this type:
- work should always be performed only with the help of a serviceable and sufficiently sharp tool;
- Before starting work, the metal pipe is pre-prepared - old paint, rust and dirt are removed from the cutting site. The surface is cleaned to bare metal;
- using a file or grinder, an external chamfer is made at the end of the pipe;
- When creating turns, it is necessary to periodically lubricate the cutters and the working surface of the pipe. For this purpose, a lubricant or a special composition is used. They are applied both before starting work and during the process.
How to find which drill bit for thread without a table?
Suppose you need to cut an M10x1.5 thread.
- Let's find out the nominal thread diameter: 10 mm.
- Find out the nominal thread pitch: 1.5 mm
- Subtract the second value from the first: 10-1.5 = 8.5 mm
- The result is 8.5 mm!
Having mastered this method, you can easily and simply select the right drill bit for cutting threads.
How to remove a drill bit from a drill?
If you need to change a drill that has become unusable, or because of a change in the nature of the work you need to install another one, then the process is even more simple than when installing a drill.
There is also a step-by-step annotation for this case.
- Turn off and unplug the electric drill.
- Depending on the chuck, use a wrench or turn the clutch by hand, turning it counterclockwise, thereby loosening the chuck. Try not to handle the drill, as it may remain hot for some time after use.
- Having removed the previous drill from the chuck, replace it with another one and continue working or put the tool away for storage.
If you can't turn the chuck the first time, don't rush to the workshop; in most cases it's quite easy to apply more effort.
Replacing the drill
To implement this procedure, you first need to get an old drill according to the scheme described a little higher, and then install a new one. Electric drills with quick-release chucks often have problems due to the fact that the drill is aggressively stuck and cannot be unscrewed from the coupling. In this case, you can use a piece of fabric that will give greater adhesion to the coupling and try to unscrew it. If this method does not help, then you need to firmly fix the drill with your hand and tap the chuck tangentially in the direction of unwinding with the palm of your other hand, continuing to fix the tool.