The device of the chuck for a hammer drill
Since its creation, the hammer drill has undergone many modifications, thanks to which it has gained particular popularity among both professional craftsmen and the common man.
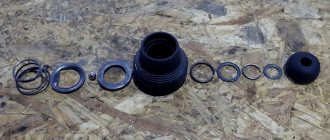
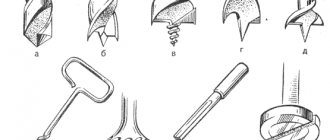
At the moment, all tools of this type are equipped with an SDS system chuck, the design of which includes the following components:
- The central axis has the form of a sleeve with splines.
- A ring is put on the sleeve.
- The ring, in turn, is acted upon by a spring.
- Between the ring and the bushing you can see several moving balls.
Also, any cartridge has an outer protective cover. The selected nozzle is inserted with the rear end. In this case, the master needs to apply moderate pressure on the cover itself, after which the locking balls and spring move.
The ball clears the opening for the tail part of the nozzle. A characteristic click is an indicator of successful fixation.
Main types of cartridges
The hammer drill is designed for a huge variety of jobs: drilling concrete walls and partitions, wooden structures, metal sheets. Accordingly, for each type of work performed, a certain type of nozzle and type of chuck are required.
Depending on this criterion, the following types of cartridges are distinguished:
- SDS plus is one of the most popular versions of chucks for rotary hammers. Such designs are excellent for use in household tools. The shanks for such a cartridge are 4 cm long and 0.1 cm in diameter.
- For professional tools with power above 1.1 kW, chucks from the SDS max series are used. Nozzles for such structures have a length of 9 cm and a rod diameter of 1.8 cm. The working area reaches 6 cm. Special crowns are used to drill holes more than 6 cm in diameter. Among the significant design features, it should be noted the presence of three splines, which allows the master to work with a hammer drill with an impact force of 30 joules.
- Sometimes, but quite rarely, you can find top series cartridges, for which drills are 1.4 cm thick and 7 cm long.
- In some stores and workshops you can see chucks for cylindrical shanks. Instead of grooves, such structures have slots and protrusions.
- The hex series of chucks were originally designed to hold chisels and picks, but their versatile design allows them to be used with drill bits as well.
For a series of chucks such as spline, special attachments are required. There is a seal on the shank of such nozzles that ensures movement of the working part.
What is SDS
SDS (SDS) is an acronym made up of the first letters of the words Steck, Dreh, Sitzt, which translated from German mean “insert, turn, secured.” It is on this simple, but at the same time ingenious principle that the SDS cartridge, developed by Bosch engineers in the 80s of the last century, works. Today, 90% of all manufactured rotary hammers are equipped with these easy-to-use devices, which ensure high reliability of fixing the working tool.
SDS chucks are often called quick-release chucks, but they should not be confused with devices in which clamping is achieved by rotating the couplings. Unlike traditional quick-release chucks, the SDS clamp does not need to be rotated to secure the tool; you just need to hold it with your hand.
To understand the design of a hammer drill chuck of this type, as well as the principle of its operation, just look at the tool shank, which is designed to be fixed in such a device, or the SDS adapter. This shank has 4 grooves, two of which are open at the end of the shank, and the other two are closed. Open grooves act as guides; they ensure the correct position of the tool when it enters the chuck. The closed grooves, in turn, ensure the fixation of the shank in the hammer drill chuck.
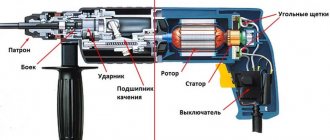
Scheme of the impact mechanism of a rotary hammer
In the inner part of the SDS cartridge there are special balls that perform two functions simultaneously. At the moment when the tool is just inserted into the hammer drill, the balls along which the guide grooves move ensure its correct position. After the tool is inserted all the way, such balls fix it, for which it is necessary to turn it a little until the balls enter the closed grooves of the shank. To make using the SDS chuck even easier, it is recommended that the tool shank not only be thoroughly cleaned after each use, but also lubricated.
It should be borne in mind that due to the design features of SDS chucks, the tool that is fixed in them is subject to slight radial runout at idle, which does not in any way affect the accuracy of the processing performed. Meanwhile, the presence of a small play between the shank and the inner surface of the chuck protects the latter from the impact to which drills are exposed during the operation of the hammer drill.
To protect against contamination, all hammer drill chucks are equipped with rubber boots.
Collet type chucks
Not all rotary hammers belong to the modern SDS system. Today you can find tools with collet-type clamps, among which it should be noted:
- Key type cartridges. Such a fixing part allows the installation of a shank with a cylindrical rear part. Special slotted keys drive the cams, which ensures reliable fixation of the nozzle. Among the disadvantages, it should be noted the complexity and time consumption of installing and removing the working part.
- Among the collet-type models, quick-release chucks are also known. The principle of operation and design of such a part are similar to the clamps on screwdrivers.
Both types of cartridges should not be used in impact hammer drills, since the parts will quickly fail.
Types of products
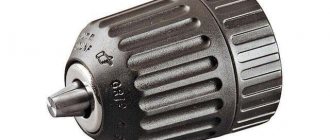
Key and keyless chucks
Regardless of the size of the chuck, they are all divided into two types: quick-change and key. Initially, tetrahedral, hexagonal and cylindrical jaw configurations were used to clamp replaceable equipment. They are still used on some models. These are mainly professional devices with high power. Clamping of the replaceable part in such units is carried out with a specialized key. This makes it possible to achieve a high degree of fixation.
More than 10 years ago, SDS clamps replaced traditional devices. The SDS system units are equipped with a quick clamping system without the use of special tools. The operator can install the replacement element into the SDS quickly, which in turn increases productivity.
The drill chuck for a hammer drill, manufactured using the SDS system, has high strength. It is unpretentious in operation, easy to maintain and repair. Thanks to this, SDS hammer drill chucks are very popular among novice builders and professionals.
Important: during operation, a large amount of construction dust enters the mechanism, so it is necessary to regularly clean and lubricate the device manufactured using the SDS system.
Depending on the diameter of the seat and drill, SDS clamps are divided into several types. The most common of them are presented below.
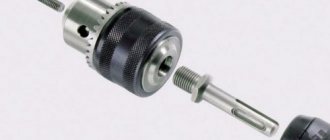
SDS chuck on a rotary hammer - diagram
SDS-plus
SDS-plus clamp
The multifunctional hammer drill chuck is the most common type of SDS device. This type of clamp has a 10mm shank for fastening. The diameter of the replacement parts varies from 4 to 26 millimeters. The depth to which the equipment enters the chuck is 40 mm. This prevents it from falling out during operation.
SDS-plus drill chucks for hammer drills are designed for installation on light and medium-class power tools. This type of clamp can withstand a load of up to 5 J. They have a quick-release mechanism and are widely used in domestic conditions.
SDS-max
Like the previous type, the SDS-max has a four-segment gripper. The locking mechanism has four grooves that are necessary to securely hold replaceable equipment. Two of them accommodate the guides of the removable element. The other two have locking balls for retention.
The characteristics of the SDS-max cartridge are as follows:
Characteristics of the SDS-max drill
- shank thickness – 18 millimeters;
- working diameter of the tool – up to 60 mm;
- maximum impact force – about 30 J;
- grip depth – 90 millimeters.
This type of SDS is widely used on high power tools. These are professional models that allow you to perform a wide range of drilling and drilling work. Basically, such models are equipped with special stands and stops for safe use.
SDS-top
According to the principle of operation, this type is no different from the ones described above. The product is equipped with a four-segment gripper. Its only difference is that the diameter of the shanks is 14 millimeters.
SDS-top drill
Today, the chuck for a hammer drill for an SDS-top drill is used quite rarely. This is due to the fact that SDS-plus manufacturers have improved the quality of the alloys from which the product is made, and this type is almost universal today.
In addition to these types, there are others. Such products are installed for specific purposes. They may differ in their characteristics and strength properties. Their low popularity is due to more difficult conditions for replacing consumables.
Makita products
Components produced by the Japanese manufacturer are in high demand among users. They have a number of advantages:
- Versatility. Makita hammer drill chucks are suitable for tools from manufacturers from around the world.
- Variety of sizes. Makita produces quick-release and key clamps of various sizes. This allows you to use a variety of consumables.
- Quality. High-strength metal alloys are used in production. The clamps can withstand high loads.
Makita rotary hammer with chucks and drills
Bosch products
Bosch products are lightweight and durable. They are compatible not only with the company's products, but also with power tools from many other manufacturers. The company divides its products for specific purposes, such as: drilling concrete, wood, metal, etc. For ease of use, each type has its own standard sizes and design features. Bosch clamps are in great demand among craftsmen.
From the above it follows that today there is a large selection of chucks for hammer drills. Quick-release mechanisms are especially popular for domestic and professional purposes.
Bosch rotary hammer with chucks and drills
Video on the topic: How to fix a drill in a hammer drill
Publications on the topic
Hammer for home use - how to choose
Using concrete drill bits for drills
Review of the technical capabilities of the Interskol P-26/800ER rotary hammer
Removing and replacing the cartridge
A very difficult situation arises when a hammer drill ceases to perform its functions during repair or construction work. One possible cause of the malfunction is a broken cartridge. In this case, the technician needs to remove and replace the part. Among the reasons for cartridge malfunction are:
- Complete wear of the locking balls or rollers. In this case, the cartridge does not secure the nozzle properly. Sometimes there are combined reasons, when the spring mechanism sags or the ring wears out.
- A completely different situation occurs when the cartridge is not held on the working part of the hammer drill. In this case, wear may occur on the brackets that are used to secure the chuck to the tool body.
In the latter scenario, a detailed selection of a new cartridge will be required, taking into account all its technical characteristics, design features, type of fastening and type of clamping device, groove, roller.
Instructions on how to remove the cartridge at home:
- The instrument body is carefully inspected for external mechanical damage.
- Using a screwdriver, slightly pry up the protective cover of the chuck (on various models of rotary hammers, this part can be located on the top or side surface of the body).
- The next step is to remove the retaining ring and remove the plate that lies below the ring.
- Next, remove the outer cover.
At this stage, all components of the chuck are visible, and the technician has the opportunity to find the cause of the tool malfunction.
Signs of wear may include cracks, chips, or pronounced irregularities on the surface of the retaining ring. If grease interferes with visual inspection, you should first remove it with a rag.
Replacement
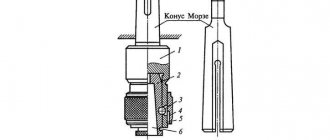
Before disassembling the drill chuck, you need to find out the type of fastening on the shaft: conical or threaded connection. If the thread is left-handed, then manufacturers prudently install a locking screw. It can also be metric or inch.
The conical connection method is formed by using a Morse cone (popularly called instrumental). Installation of the cartridge on such a shaft is carried out with little effort for tightness. This option is often found in the case of screwdrivers.
The table shows a step-by-step algorithm for dismantling drill cartridges.
| Action | Details |
| Threaded connection | |
| Locking screw | Twisting. |
| Cartridge | The way to unscrew the chuck on a drill is counterclockwise using a gas wrench. If necessary, the shaft can be clamped with a vice. Additionally, the device is inspected for serviceability. |
| Jammed drill | You will need a hammer to remove the nozzle. You need to apply several gentle blows from above to the fists. |
| Cone connection | |
| Technically | In order to disassemble the drill chuck, the tool includes a special device. |
| According to folk | The drill is secured with the drill pointing down. The back of the tool is struck evenly with a hammer. In this way, the cartridge is knocked out of the shaft. |
In the case of threads, installation of the cartridge is performed in the reverse order with the same actions as those carried out during dismantling. In the second case, you first need to put the cone in order. Here you will need sandpaper (can be used on fabric) and a file for burrs. After this, the clamping device is also installed using percussive movements, only with a mallet.
Chuck reassembly process
After repairs and replacement of the relevant parts of the cartridge, new lubricant will be applied. The reassembly process is carried out in the following sequence:
- A spring is placed on the central axis.
- The next step is to lay the plate (if a defect is found, the plate should be replaced).
- The locking ball is pre-coated with lubricant, and only then is it installed in the sleeve hole.
- The thrust ring is reinstalled.
After installing the protective cover, it is additionally secured with a locking ring. The last step is to install the boot.