Design and main types of cartridges
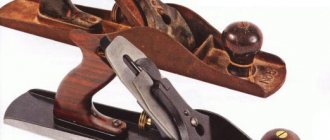
A chuck or head is a metal cylinder that is attached to the screwdriver shaft. Its task is to reliably fix the working bits under the fasteners. The cartridge is fixed to the shaft using a thread or a special cone. According to the type of fastening, clamping elements are divided into:
- quick-clamping;
- self-clamping;
- gear-crown, they are also cam.
The difference between the first two types is only in the way the bit is clamped. In a quick-release chuck, the shank is twisted and clamped manually. Modern drills and screwdrivers use clamps to fix shanks with a diameter of 0.8-25 mm.
Quick-release
A BZP type device consists of the following parts:
- nut with teeth;
- clamping bearing;
- washer;
- sleeve;
- sponges;
- sleeve.
BZP heads are divided into single-coupling and double-coupling. The first type is used in screwdrivers with a locking device. Thanks to it, the clamping device can be rotated with one hand, since the second part of the housing is fixed motionless. With double-clutch cylinders, both hands are used.
In a self-clamping sleeve, the bit with the drill is automatically clamped while turning. The risk of turning the drill when working with such a screwdriver is almost zero. When the cams are loosened and tightened, the device makes a clicking sound.
Self-clamping
You cannot tighten the jaw chuck by hand - you need an L-shaped wrench. It is inserted into the groove perpendicularly. The ZVP type, that is, a toothed chuck, is considered less convenient to install, but provides a more reliable clamping of the bit. This is a type of cam type clamping cylinder. This head consists of three main elements - a cylindrical body, a rotating outer ring and an internal cam mechanism. The mechanism, made of durable steel, consists of 3 cams, which close together when the ring rotates.
Cam
Features of cartridge removal
The chuck may completely fall apart, becoming unusable - the jaws in it are not able to perform their task, it is impossible to clamp the drill - or begin to play. The instability of the element does not allow you to hold the bat tightly. Drills constantly fly out during operation.
There is a thread cut inside the cartridge or there is a special cone for mounting on the shaft. Structurally, the element is divided into three types:
- quick-release;
- self-clamping;
- key or toothed.
Keyless chucks are considered the most popular: the tail is clamped by manually rotating the screwdriver sleeve. The main differences between the types are that in one case the nozzles are fixed by hand, in the other you cannot do without a key. Manual clamps are a huge time saver because the user does not have to pick up the key. The main purpose of the chuck is to ensure tight contact between the working bit and the rest of the mechanical parts of the tool. The key type copes with this better, which is why it is considered more reliable.
Quick-clamping
The design does not imply the presence of a function for clamping the equipment when tightening the chuck - the bit is not fixed in it as reliably, unlike the self-clamping type. The keyless chuck consists of:
- jamming element;
- housings;
- bushings;
- clamping ring.
The quick-release type is divided into two more types:
- single-coupler;
- double coupling
If the user buys the first type, then there should be a special lock in the box with the screwdriver - it allows you to change the equipment without turning the chuck. Double-machine types allow you to install a bit without additional devices, which is more convenient when you frequently need to change the drill. The equipment is removed by fixing one ring of the cartridge by hand and turning the other.
Self-clamping
This type is noticeably different from the quick-clamping type. It's all about an interesting function that allows you to additionally clamp the bit while turning the screwdriver. Self-clamping and quick-clamping types can be distinguished by a characteristic click when the jaws are relaxed or tightened.
Options for attaching to the screwdriver shaft
The chuck is attached to the tool shaft by:
- thread. To do this, the threads of the cylinder and shaft must match. A metal cylinder is screwed onto a shaft.
- fixing screw. The fastening also requires tightening, and the screw itself only strengthens the contact between the cartridge sleeve and the shaft. It has notches for a Phillips screwdriver and a left-hand thread.
- Morse cone. One of the oldest fastening methods. The screwdriver shaft has a cone shape, and the same groove is made inside the sleeve. When the outer and inner cones fit together, the head is securely seated on the shaft.
Morse taper devices
Is it possible to disassemble a removed cartridge for repair?
Not all types of cartridges are disassembled, but conical ones can usually be tried to disassemble.
There is an interesting way to disassemble a cone cartridge without barbaric methods such as sawing or cutting with a grinder.
- The jaws are brought together inside the cartridge.
- A plate of elastic material - polystyrene foam, polystyrene foam - with a thickness of at least 15...20 mm is pressed to the front surface of the cartridge using a board or thick metal sheet (bar).
- Press the drill itself tightly onto a flat surface (table) and turn on the impact mode. If such a mode is not provided in the tool, the chuck is first screwed (removed) from the drill and mounted on the hammer drill. After 10...15 seconds of operation of the device in impact mode, the cartridge can be disassembled for repair.
Taking into account the fact that after repair the performance of the cartridge is usually not fully restored, it is still better to replace the part with a new one with a similar marking. At the same time, it is important to remember: even if you manage to understand without problems how to remove a cartridge from a Soviet drill of a model from about 1950, you may not be able to install a new imported one on it - there is a mismatch both in the diameter of the thread and in the her pace and type.
As an example, it is shown how to remove the chuck from a Makita drill and what the thread looks like in the connection between the chuck and the shaft.
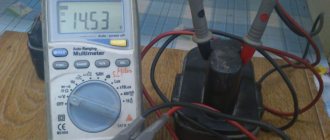
Standard sizes and markings
Before disassembling the screwdriver, it is necessary to determine the type of cylinder mounting. The marking will tell you this. An inscription of the form 1-6В14 indicates the type of fixation Morse taper, where the numbers before the letter are the diameter of the bit shank in millimeters, and after that the size of the conical hole. There are 9 articles – from B7 to B45.
For cartridges with threaded fastening, markings of the form 1.5-13 M12x1.25 are provided. Here the numbers before the letter also show the permissible diameter of the tail of the bit, and after the letter there are thread sizes in millimeters.
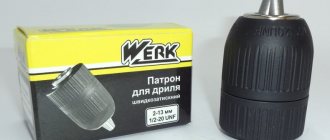
Important! Foreign screwdrivers use markings in inches - it looks like this: 2-13 1/2 - 20 UNF. 1/2 means inch, and 20 means the number of threads per inch.
Threaded cylinder
How to choose a new one
You need to choose according to the product model and type of components. If the screwdriver is branded, then you should contact a service center. Specialists will provide the necessary details. Here are some recommendations for choosing a new cartridge:
- if bits are changed frequently, it is better to choose a quick-release type to increase productivity;
- a key type of part is necessary if the diameter of the drills used is large;
- when choosing a cone, it is important to remember: the larger the part, the higher its number in accordance with GOST 9953-82;
- if a foreign-made part is selected, then the dimensions on it are indicated in inches.
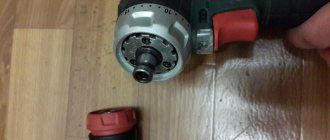
How to remove the head from a screwdriver
It is recommended that the cylinder be removed periodically for routine cleaning and lubrication of parts to extend the life of the power tool. The removal method depends on the type of attachment to the shaft and the model of the screwdriver. Read more about how to remove the chuck of different types of fastening from Makita, Metabo, Bosch screwdrivers.
Removed head
On a note! You only need to disconnect the cylinder from the shaft with a screwdriver that has cooled down after work.
With fixing screw
Removing the head with the fixing screw is carried out in the following order:
- The screw is located between the clamping jaws. You need to open them completely and unscrew the screw clockwise with a Phillips screwdriver.
- After this, a suitable size hex wrench is placed in the cams. It must be turned sharply and strongly counterclockwise.
- If the clutch of the cylinder with the shaft is very strong and the key does not help to separate it, you will have to additionally help with gentle blows of the hammer.
The screw is here
With Morse taper
Sleeves of this type are disconnected from the screwdriver by knocking the shank out of the conical socket with a hammer. But this standard method may not give results. Then you need to disassemble the screwdriver. The shaft with gearbox and chuck is removed, and then the clamping cylinder should be unscrewed with a pipe wrench. Nuts on a sleeve with a Morse taper are an extremely rare phenomenon.
With threaded fastening
You will need a 10mm L-shaped hex key. It must be placed between the cams, securely fastened and rotated. Next, you should start the screwdriver at low speed and immediately turn it off, pressed against a support - for example, a table or wall. It is against the support that the free part of the L-shaped hexagon should hit a couple of moments after starting the power tool. As a rule, after this the fastening is loosened and the cylinder is carefully removed.
Removing the head with a threaded fastening is shown in the video:
Advice! If none of the three options helps, the screwdriver must be disassembled.
Removal from a disassembled gearbox
If the screwdriver gearbox fails, you will need to remove the cylinder to get to it. This is done like this:
- Unscrew the fixing bolt inside the sleeve.
- Find the gearbox, put the head on the back side of it, and securely fix it. The head diameter is usually 19 mm.
- With your other hand, carefully unscrew the cylinder counterclockwise.
How to remove a keyless chuck from a threaded drill
A feature of the threaded connection of the chuck with the shaft is the left-hand thread of the fixing screw. This is done so that, by rotating the drill and “biting” into the material, the shaft simultaneously tightens the chuck mount. Therefore, the answer to the question of how to remove a self-clamping chuck from a drill of this type is simple - you need to rotate the chuck, firmly holding the body, clockwise.
Usually, simple rotation is not enough; you have to tap the joint so that the tightly tightened thread opens up a little and makes it possible to rotate the connection freely.
The process of how to remove a self-clamping chuck from a drill is shown in more detail in the video.
- Since there is a retaining screw inside the chuck, it must be accessed. To do this, the jaws (cams) of the cartridge are spread as wide as possible, and a screwdriver is inserted inside. Using clockwise movements, it is unscrewed from the socket. It is impossible to immediately determine the type of head, so you must first illuminate the inside of the cartridge and, most likely, try two or three different screwdriver bits.
- After removing the screw, the cartridge is easily unscrewed from the shaft.
Some models do not have a locking screw. Then the cartridge simply screws together, but more effort will have to be made. It is necessary to secure a key or other part convenient for work in the jaws, and use an open-end wrench to fix the shaft.
Next, we rotate the tools in different directions (as shown in the photo).
WD40 helps a lot in its operation - it is used to spray both the shaft and the fixing screw inside the chuck. This is especially useful if the screw head is clogged and its type (cross slot, straight slot) is not determined. After treating with WD40, the splines are easy to clean, and the threads are better.
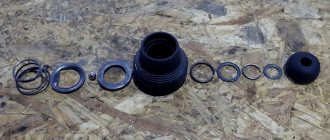
How to disassemble a cartridge
Once the cylinder is removed from the screwdriver, you can begin disassembly. The first step is to remove the plug in the base. For a plug made of plastic, careful prying with a knife is enough, but the metal part must be knocked out by hitting the base of the cartridge and turning it by hand.
You need to hit here
This requires a large bolt. It is placed in the sleeve and lightly clamped with fists to fix it in the center. At the same time, he should not get stuck, but move freely back and forth. The head of the bolt should protrude 2-3 cm from the cylinder. Then a gentle but pointed blow is applied to the bolt with a hammer, and then the metal plug is removed.
Next, the actual disassembly of the screwdriver chuck begins. The design of any cylinder consists of unchanged main parts:
- sleeves;
- grounds;
- washers;
- bearing;
- nuts
The structure of a drill and types of cartridges for it
The cartridge is a seat. He holds the main working element of the tool - a drill, a drill, a screwdriver. There are special attachments for grinding or cleaning surfaces. They are fixed on a round or multifaceted pin, which is also placed in the device.
Depending on the design features, the following types of products are distinguished:
- conical;
- gear-crown;
- quick-clamping
Why do you need to disassemble the cartridge?
The clamping fixture must provide high precision hole drilling. However, after some time the seats wear out. This causes the cartridge to start hitting.
This means that the working area of the drill shifts in different directions during operation. In this case, the formation of the hole has certain deviations in location and diameter. Wear of the cams makes it impossible to properly fix the drills, which causes them to stop under load. The solution is to replace the worn element with a new one.
Second parsing option
If it was not possible to disassemble the cylinder using the indicated method, it is worth trying another one. Many models of screwdrivers are not designed for unwinding, so this option will not work and will only harm the chuck. One of the disassembly methods involves the use of a hammer drill or drill. The action instructions are as follows:
- Take a hammer drill or impact drill, insert a bolt or broken drill with a diameter of up to 12 mm into the tool.
- Place the head on the bolt or drill with the side opposite the jaws.
- Unclench your cams, rest the cylinder against a solid, stable base - a wall, floor, etc. Between the cartridge and the support there must be a shock-absorbing layer - rubber or foam.
Disassembly using a hammer drill
- Start the hammer drill or drill in impact mode.
The vibrations will cause the sleeve to fly off the sleeve, revealing the remaining parts. After cleaning or replacing elements, the head can be easily reassembled.
Important! When assembling, it is important not to confuse the location of the cams.
Which drill chuck is better?
The drill chuck plays the role of an adapter between the drill and the working tool. For any task or for each type of drill, you need to select the optimal chuck option. Working hours and workload are also important.
What is the most influential factor on the operation of a cartridge and what factors can cause it to fail? Replacing a cartridge in the field can be difficult if you don't have a spare.
- Quality of materials. The “Chinese” cartridge can fail during heavily loaded operations. Therefore, it is better to purchase high-quality models.
- If the drill or the chuck itself falls out, time is lost. When drilling at height, safety is at risk. In case of a loose conical fit with a loose fastening, measures must be taken in advance.
- Drill chuck runout. If this occurs, you should disassemble the drill chuck, check for contamination or adjust the fastenings. If bent, it usually cannot be repaired manually; it is best to replace it with a new one.
- Collets or jaws jamming. To rectify the situation, you will need to disassemble the cartridge (remove the cartridge itself if you know how and have already changed it). Cleaning, lubrication and assembly are carried out.
The most popular varieties besides the key one are: quick-clamping (or “bzp”) and self-clamping.
Disassembling the quick-release head
BZP or self-clamping cartridges can only be disassembled up to a certain stage, since beyond that, irreversible damage can be caused to the device. The analysis proceeds according to the following algorithm:
- The groove between the two halves of the plastic coupling must be pushed apart along the entire circumference using a knife or flat-head screwdriver using gentle prying movements. The main thing is not to damage the case.
- Once the coupling is in place, the lower part can be easily removed by hand.
- After this, the cams are moved apart until they stop, and a long bolt is inserted into the cylinder.
- You need to hit it with a hammer until the upper half of the coupling falls off.
- There is no need to disassemble further. The cartridge does not have a body; it can be coated in all places.
Reassembly proceeds in the following sequence:
- Upper part of the coupling.
- Using a hammer, press the corkscrew washer into the groove between the coupling and the cylinder through a wooden board.
Groove for corkscrew washer
- Manually put on the lower part of the coupling - the cartridge is assembled.
A detailed analysis of the quick-clamping cylinder is shown in the video:
The nuances of removing, disassembling and replacing heads on screwdrivers from different manufacturers
The design of the screwdriver chuck is such that the procedure for its removal, disassembly and replacement is generally the same and standard for all models. The differences are only in the subtleties for each company.
- Makita
Household tools from this manufacturer are often equipped with a plastic head. It should be removed carefully, because the risk of damage is higher than that of a metal sleeve. Quick-clamping devices on Makita screwdrivers are usually single-socket.
- Bosch
The cylinders on Bosch screwdrivers are designed similarly to Makita and are removed and disassembled in the same way. The only difference is that Bosch has a fixing screw in the cylinder. It must be unscrewed clockwise.
- Bison
To replace the cartridge, you need to unscrew it clockwise from the shaft.
Removing the head on screwdrivers of the Interskol, Hitachi, DeWalt, Metabo, and Vikhr models is not very diverse. The procedure is:
- Unscrew the fixing screw using a Phillips screwdriver. It is recommended to lightly lubricate the pre-unscrewed element with WD-40. This will not only loosen the strong clamp, but will also dissolve any rust if there is any.
- Clamp an L-shaped hex key of 10 mm or more with the short side into the chuck.
- On the long side of the hexagon, it is worth applying one pointed blow with a hammer in a clockwise direction. It is necessary to hit the hexagon, and not the cylinder itself: this can break the clamping device and deform the screwdriver shaft.
- After the impact, you can unscrew the cartridge by hand.
You only need to hit the hexagon
How to remove and change the cartridge
There are several ways to remove it from the screwdriver. It is worth considering them in more detail.
The first method is the simplest and most often used:
- you need to take a hex key;
- clamp the key with the short end in a special hole;
- turn on the tool for a second so that the hexagon hits the second end on the table;
- rotate the key, loosening the fastening, to pull it out.
The second method is used by professionals:
- the chuck jaws are sequentially unclenched;
- unscrew the screw that is inside the part (if it is not visible, then it is covered with dirt);
- hold the hexagon in the cam;
- turn the key to loosen the cartridge;
- If you can’t turn the hexagon, you can hit the key with a hammer.
Sometimes none of the above methods can be used. Then you need to disassemble the screwdriver to remove the spindle, gearbox and chuck. When disassembling, it is important to remember where and what part should be located, so that later you can assemble everything correctly.
With a Makita screwdriver
Tools from this manufacturer have a fixing screw installed. After unscrewing the screw, you need to press the button for the spindle stop. Having enclosed the tool in a vice, you need to squeeze the hexagon in your fists. By hitting the key with a hammer, you can safely unscrew the cartridge and remove it from the shaft.
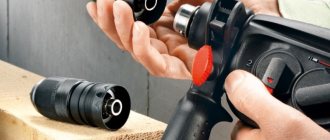
With a Bosch screwdriver
These products also have a fixing screw, but there are features of working with tools from this manufacturer. The cartridge is disconnected as follows:
- the hexagon is installed in the cams and scrolls a couple of clicks;
- the spindle stop button is pressed and the chuck lock is removed at the same time;
- The part is removed from the screwdriver.
It is necessary to perform actions sequentially so as not to break the components of the tool.
How to repair a clamping cylinder
Often the reason for removing and disassembling the screwdriver head is to repair individual parts and eliminate defects. Read more about how to do it yourself at home.
With backlash
If the deviation of the sleeve during operation does not exceed 1 mm, then this is not critical. If there is more play, you will need to disassemble the device. Repairing a screwdriver chuck for this case is performed as follows:
- Unscrew the fasteners on the top cover of the tool and remove it.
- Disconnect the engine from the gearbox and carefully check all fastenings.
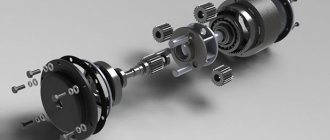
- Disassemble the gearbox. If the bushing fails, then it is the cause of the strong play. This part must be removed manually and replaced with a new one.
Disassembled gearbox
- Next, you need to lubricate all the rubbing elements and assemble the gearbox back in a clear sequence: bushing - shaft - bearings - retaining ring.
- The gearbox is attached in place to the engine.
- The top cover of the screwdriver is screwed back.
When the cylinder runs out
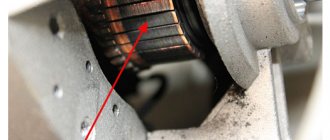
If there is beating of the chuck in the screwdriver, the reason also lies in the gearbox. It must be dismantled, disconnected from the electric motor, disassembled, and carefully inspect all the parts. A broken cartridge case is a consequence:
- violations of shaft geometry;
- wear of gears, pins;
- failure of the shaft bearing.
After identifying the broken elements, you need to purchase new ones, install everything correctly, assemble the gearbox back and attach it to the engine.
When jammed
Another common problem is that the cartridge begins to jam. This is caused by the jaws losing full clamping over time. To repair the head, there are several methods:
- Carefully lubricate the cylinder in all places - perhaps this is the only reason.
- Squeeze the cartridge in your hand and hit it hard 1-2 times on a hard wooden object - a beam or a stable table.
- Compress the body with a vice and the cylinder with a gas wrench. Place the screwdriver against the table with the chuck and turn it on.
Often the head jams after it becomes clogged with sawdust and other small debris. If there is a suspicion of clogging, the cylinder should be thoroughly heated with a hair dryer, or even better, held over an open fire for several minutes. The part is then thoroughly lubricated.
When scrolling
If the cartridge rotates, then the problem is most likely due to the abrasion of the teeth on the locking coupling. The problem is solved like this:
- Remove the coupling.
- In place of the ground teeth you need to drill small holes.
On the left is the coupling and its teeth.
- Insert screws into the holes. Their protruding parts are removed with pliers.
- Return the coupling to its place and check how the cylinder now moves.
Types of fastening
In screwdrivers or drills, the device for holding the tool for fastening the tool can be secured in two ways - on a thread or a cone.
To secure it in the first way, a thread is made on the shaft of the tool and the internal cavity of this product. To install it, either metric or inch threads can be used. You can find out which thread is used to install this equipment by looking at the markings, which are usually stamped on the body of the device. For example, if the inscription reads 1-15M13×1.3, then this means that this product has an internal M13 thread, and the numbers 1 – 15 indicate the maximum dimensions of the tool that the equipment can fix.
If an inch thread is used to fix this technological equipment, but the abbreviation UNF is applied to the body. That is why, before replacing it, it is necessary to check the compliance of the markings and dimensions in this device.
The second way to install it on the instrument is to use a Morse taper. The end of the tool shaft is made in the form of a cone. The counter part is formed in the body of the technological equipment. It is fixed on the shaft. It is marked as follows - B10, B12, B16, B18. This is the fixation method most often used for screwdrivers.