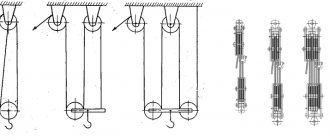
It will take a little physical effort and tools available in any workshop to return this battered instrument to its former working form.
Most of us have one or more old planes that have been collecting dust on our shelves for years. Recently, hand tool expert John Olson took on the task of sprucing up one of these planes, the Stanley Model No. 5, released about a century ago. It occupies an intermediate position between a finishing plane (sander) and a jointer and serves for the primary processing of boards. The Five is still one of the most common models, and spare ones are not in short supply. Even if your plane is different from this, it can also be improved using the steps shown below.
How to replace knives on an electric planer
To remove old bits, you need a set of wrenches.
A screwdriver may also come in handy. How to do:
- turn the drum of the electrical appliance so that the bolts become accessible;
- loosen the fixation;
- remove the working attachment;
- insert new blades into the vacated grooves;
- secure them with bolts.
Important! To avoid imbalance, all cutting parts must be replaced at once. It's time for adjustments
To do this you need a complete hexagon and a metal ruler
Now it's time for adjustment. To do this, you need a complete hexagon and a metal ruler.
How to adjust electric planer blades:
- Place the instrument on the table so that its drum faces upward.
- If necessary, wipe off resin from cutting accessories.
- Set the minimum planing depth.
- Place the blade in the slot between the soles.
- Place a ruler on the back plate.
- See if its edge touches the consumable. If not, raise the bar. To do this, you can slightly loosen the fasteners using the hexagon from the kit.
- Tighten fasteners.
All this needs to be done for each nozzle. For balance, the distance between the knives should be the same.
Correctly sharpening the knives of an electric planer yourself is not so difficult. If the situation is not critical, you can do everything manually using a sharpening stone. If the blade is completely dull, a special device is needed. You can purchase it or make it yourself.
Types of planes
A plane is a hand-held tool for working wood, allowing you to bring the surface of a product with your own hands to the required quality and size. Having the entire set of types of this tool, you can not only process the surface, but also make various carpentry crafts.
The planer has a whole arsenal of types:
- sherhebel;
- jointer;
- semi-jointer;
- mole cricket;
- sander;
- tzinubel;
- end;
- single;
- double.
- zenzubel;
- federgubel;
- folding belt;
- stabgobel or stabgaltel;
- tongue and groove;
- mold;
- primer;
- humpback
Having a full set of hand tools, if desired, you can make works of wood of any complexity. At the same time, an important factor for successful work is sharpening planer knives with your own hands, which is an expensive production service.
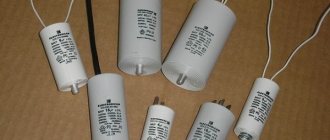
Components
The electric planer is powered by connection to a network with alternating current, frequency 50 Hz and voltage 220 V. The safety of craftsmen working with the tool is ensured by a double layer of insulation. Therefore, a protective shutdown mechanism and grounding are not required.
commutator single-phase motor; cutters with flat knives; flat belt drive; frame; mechanism controlling planing depth; front movable support; lever; conductive cable with plug.
The main parts of an electric planer.
The electric motor housing must be attached to the equipment housing. Double insulation is ensured by insulating the armature shaft of the electric motor and using plastic to make the housing. The engine is cooled by a fan, which sucks air through slots on the housing cover. Air passes through the engine and is exhausted through holes in the intermediate shield.
A cutter with 2 flat knives is a cutting element of the structure. The knives are secured with bolts and a wedge. The cutter, using a belt drive from an electric motor, rotates in 2 bearings, which are pressed into the cover and body of the structure. The belt drive parts are driven and driven pulleys, which are connected by an endless belt 15 mm wide and 2 mm thick.
You can adjust the planing depth from 0 to 2 mm by turning the additional handle. The movable support will move along the guides of the unit body. The handles and electric motor are mounted on a common plate. It is moved by adjusting screws, ensuring the tension of the drive belt drive. The belt deflection should not exceed 2-4 mm. The main handle has a built-in radio interference suppressor and a latching switch.
Electric planer malfunctions
Essentially, an electric planer is a simple tool, but you shouldn’t repair it yourself, especially if the technician doesn’t understand household electrical appliances. It is better to give the device to repair specialists if the warranty period has not expired or contact a service center. Tool malfunctions are often associated with the use of:
- Low-power tool for industrial processing. Excessive load causes the motor to overheat.
- For roughing. Knots should be removed with another tool.
Common causes that can be covered under warranty:
- blade wear;
- tool sparking;
- drive belt failure;
- adjustment of the electric planer.
Why does a chainsaw smoke as soon as it starts, and then stops, is this normal or not?
A chainsaw is a simple device that, with proper care, can last a long time. At the same time, the saw is a tool subject to various loads and, therefore, breakdowns still occur. You will learn about what caused a certain malfunction and how to fix it from this article.
Necessary skills and tools for repair
Most of the malfunctions of gasoline chain saws can be fixed with your own hands. True, this requires an understanding of the structure of the chainsaw and how the components function among themselves. As for the tools, the most often needed are:
- screwdrivers (slotted and power);
- combination wrench included in the kit or regular wrenches with heads of various sizes.
Repair it yourself or send it to a service center
It is worth understanding that not every problem can be solved on your own. Not every chainsaw owner has a compression gauge at home or a special device that allows you to create a vacuum and the required pressure, for example, to check the crankcase for leaks. In this case, you simply cannot avoid contacting specialized specialists.
Troubleshooting algorithm
If you are absolutely sure that you can assemble the chainsaw after disassembling, then a screwdriver is in your hands. To determine the true cause of the problem, it is necessary to analyze the condition and behavior of the saw.
Engine
In most cases, the following problems occur in engine operation:
- the engine stopped starting;
- the engine starts, but after a while it stalls;
- the engine is not able to develop the required power;
- The engine is extremely unstable.
How to check crankshaft seals
The presence of oil seal leaks can only be checked by getting to the crankshaft itself and carefully examining it for leaks. You can see how to do this correctly in the video:
How to check compression on a chainsaw
At a compression level below 8 atmospheres, the engine will not have enough power, which means the chainsaw will not be able to fully function.
To measure compression you need:
- Remove the protective cover and unscrew the spark plug.
- Insert the tip of the compression gauge into the hole where the spark plug should be located.
- Using the starting cord, rotate the piston and remember the maximum readings of the measuring device.
How to properly install a piston on a chainsaw
The work of replacing the piston for most models of modern chainsaws is carried out according to the following algorithm:
- The top and side covers are removed.
- The candle is unscrewed.
- The stoppers are removed from the shock absorbers and the handle is disconnected from the body.
- The drive sprocket and starter are removed.
- A piston stopper is installed in the spark plug hole and the nut securing the flywheel and clutch is unscrewed.
- The flywheel, clutch, and worm drive of the oil pump, located immediately behind the clutch mechanism, are removed.
- The screws securing the carburetor and air filter are unscrewed, after which these components are removed along with the engine control lever.
- The ignition coil is removed, as well as the muffler.
- The saw is turned upside down and, by unscrewing the screws securing it to the body, the engine is disconnected.
- The pan is unscrewed and the piston is removed.
- Since the piston is removed only together with the crankshaft, to disconnect it it is necessary to remove the retaining rings.
- The old piston is replaced with a new one, but as carefully as possible. This is caused by the high fragility of compression rings.
- The crankcase is put in place, and sealant is used instead of a gasket.
All subsequent actions are carried out according to the reverse algorithm of disassembly.
How the device works
Working posture when working with an electric planer.
The main element of an electric planer is a rotating drum on which flat knives are attached. It is necessary to select an electric motor for the equipment with a power of at least 580-900 W at a speed of 1000 rpm. since the texture of the wood being processed may be uneven, and the surface of the planed parts must be smooth.
The rotational movement from the motor is transmitted to the cutter using a toothed drive belt. The base of the equipment is made of cast aluminum. It is divided into 2 parts, in front and behind the cutter. The front part is adjustable in height, allows you to set the required chip thickness and moves along the untreated surface of the wood. The back part is stationary and moves along the planed surface.
The rotating drum of a large number of models is open on one side. The side limiter installed in most models allows you to select the width of the quarter. The unit can additionally be equipped with a protective folding cover on the side surface, which can be removed by selecting a quarter.
To disassemble the electric planer, remove:
- device cover;
- retaining rings;
- gear parasitic, driving and driven wheels;
- dowels
Schematic diagram of the operation of a thickness planer
Why make a thickness planer with your own hands?
The scheme of work should be clear to most home craftsmen even without visualization, but for ease of understanding the tasks of making a surface planer yourself, it will not be superfluous.
There are two motivations for making any equipment yourself:
- desire for self-realization;
- desire for savings.
All the rest follow from those listed. And you can save a lot of things:
- first of all, money due to the abolition of auxiliary functions, which can be completely dispensed with in a home workshop;
- in the second - electricity by reducing the number of electric drives;
- thirdly, space in the workshop due to optimization and adjustment of dimensions.
If we talk about a full-fledged thickness planer, then, based on the three-dimensional drawing located below, its components can be reduced to the following list:
- electric drive from an electric motor with a power of 1.5 - 2.5 kW on a two-knife drum rotating at a speed of 5 - 10 thousand rpm;
- manual chain adjustment of the work table level;
- manual chain coupled feeding of the workpiece by two lingering pressure rollers.
But you yourself decide on the concept of your surface planer. Let's look at 3 approaches to implementing the idea of making your own thickness planer.
Safety requirements
If you use the tool correctly, you can quickly and efficiently complete a fairly large amount of work. However, if you do not adhere to safety requirements, you can suffer significant injuries.
- Before work, the workpiece must be securely fixed, otherwise it may move or even fly off during work.
- During the technical inspection of the blades and their adjustment, the electric planer must be de-energized by unplugging the cord and plug from the socket, because accidental starting can lead to very unfavorable consequences.
- You need to start processing only after the knives have started and warmed up, that is, the cutting elements must accelerate to the required speed.
- The instrument must be placed exclusively on its side.
Adviсe
In order for the electric jigsaw to work flawlessly for as long as possible, you should follow simple operating rules. Namely:
Do not over-tighten the blade clamps
This can lead to thread breakage and premature failure;
It is necessary to pay attention to the condition of the saw blade. Its dullness can lead not only to loss of sawing quality, charring of the ends of the workpiece, but also to overheating and failure of the electric motor;
lubricate the jigsaw roller according to the manufacturer's recommendations
Otherwise, it's a sign of overheating and engine jamming;
Do not press too hard on the instrument. In this case, the saw clamp may be damaged;
do not overheat the tool. Since the electric motor is air-cooled, the frequency of its continuous operation is 20-30 minutes, depending on the power and model.
Hobby: how to choose a hand plane and set it up for work
What man doesn't love making things with his own hands? This is a process comparable to meditation, and for the result to be no less pleasant, it is important to select a tool and have everything you need at hand. Today we'll answer some of the most common questions about how to complete your home toolkit, and we'll be talking about the old trusty hand plane.
The main one is plane No. 4 (the plane number is usually indicated on the tool itself). The number 3 plane is practically the same and is usually considered a beginner's or women's plane, so its presence in the master's home set, by and large, is not entirely necessary.
Starting from number 5, it’s not quite planes in their pure form, but rather semi-jointers, which usually include tools with a sole up to 60 cm. Number five is quite versatile and is suitable for a variety of tasks, for which English craftsmen, for example, They gave him the name Jack (Jack in English folklore is considered a jack of all trades). Its fundamental difference from the “four” is the longer sole. “Six” is a semi-jointer that already has all the features of a jointer, for example, a wide, long sole. It is usually used to level large surfaces when it is required that it be level, but perfection is not needed. If the strength and weight are enough, choose number 6, otherwise take the “five”.
There are also numbers 7 and 8, but their presence in the home set is at the discretion of the master. “Seven” is still a full-fledged semi-jointer, and “eight” is such a specific tool with a large and long sole for craftsmen with great strength and weight.
If you move in the other direction from the main plane No. 4, then the next plane you need in your set is the so-called end plane, the smallest of the entire family. Its sole is 2 times smaller than that of the “four”, it easily fits in one hand. The main advantage of this plane is precisely its ergonomics - the fact that it fits so comfortably in the hand, while the master’s hands are as close as possible to the area of action of the tool. The closer, the more accurate the movements.
Thus, the minimum set of hand planes for a home craftsman would be a set consisting of a “four”, an end plane and a number 5 or 6 - depending on your personal preferences. The remaining intermediate options are purchased as needed and depending on the work performed. Now let's move on to the setup.
How to set up a plane for work
When buying a new plane, don’t be lazy and immediately buy a screwdriver for it. There are 2 screws on the plane that are involved in setting up the tool - the corresponding slotted screwdriver should be selected. Preference should be given to screwdrivers with a short handle - they will be more convenient to adjust.
When buying a plane, make sure that the so-called eye does not dangle. Then, at home, you need to tighten all the screws on the instrument, since they could have become loose during transportation and storage of the product - due to temperature changes, shaking, etc. The most popular now are double hand planes designed for fine planing. Their knife consists of two parts - the knife itself and the chipbreaker, the gap between them needs to be adjusted so that it is minimal, about a millimeter.
And one more trick in setting: the top screw of the plane, which controls the eccentric, or latch, must be tightened so much that the latch is done with force, but with one finger. If you do not tighten it enough, then the plane knife, or as it is popularly called, the piece of iron, will crawl inside during operation and will cease to perform its function. If you tighten this screw, as many people like to do, then adjusting the knife will become more difficult, and you need to adjust it after adjusting the screws, when the plane is already in a state ready for work.
To adjust the knife, you need to use the latch to adjust it so that it protrudes from the hole in the sole by 1-2 millimeters. Usually the knife is first set with a small margin, its shoulders and angle are adjusted, and then it is gradually removed, visually leaving the desired protrusion. To do this, in each subsequent position you need to look along the sole of the plane until you reach the required 1-2 millimeters of the length of the knife looking out from the opening of the sole.
source
Necessary tool
The fundamental structure of this element is the same on all modern chainsaws. However, the technical execution differs, so different brands and models may require different tools.
To remove the clutch on all chainsaws you need:
- A screwdriver for removing the locking ring of the gear cover from the shaft,
- Depending on the model, you will need a regular wrench to unscrew the centrifugal mechanism itself (drum), or a wrench with two cotter pins, like the one used to tighten the nuts on an angle grinder.
- The stopper is required in order to fix the flywheel shaft (crankshaft) on which the centrifugal mechanism is screwed.
It is not advisable to use hard metal; it can damage the piston. Weak materials such as plastic should also not be used. They can break, crumble and get into the cylinder windows, carburetor cavity or crankcase. Then you will need to completely disassemble the engine to get them out, and these are unnecessary problems.
Don't have a puller? Then we use the rope as a stopper
The most common type of stopper is a piece of rope. The spark plug is unscrewed, the piston is brought closer to the top dead center (TDC), a piece of rope is inserted into the spark plug hole and sealed. The piston is gently fixed, while the shaft on which the coupling basket is screwed does not rotate, which allows the threaded connection to be unscrewed.
This is what the original stopper from Stihl looks like, but you can just as easily use a free option - a rope from a starter with knots. 1-2 knots are enough.
Factory and household running-in of chainsaws
Run-in is conventionally divided into two types: household, carried out by the owner of the chainsaw after purchase, and factory, which the tool undergoes after production and assembly at the manufacturer.
Factory running-in is carried out by the manufacturer - during this period the piston group is broken in, and all parameters of the chainsaw are monitored by specialists. High-price chainsaws are usually equipped with chrome-plated pistons, which extends their service life and increases wear resistance.
Oil and gasoline: features of fuel preparation
Two-stroke engines on various chainsaws do not run on pure gasoline, but on a mixture of motor oil and gasoline. If the operating instructions for the tool do not indicate the exact proportion of gasoline and oil, prepare the mixture in a ratio of 25:1; by default, use AI-92 gasoline and oil for two-stroke air-cooled engines, for example, Oleo-Mac Prosint 2T, Stihl HP, Vitals Semisynthetic, CHAMPION JASO FD or others.
During the first break-in phase, use a 40:1 or 50:1 ratio, that is, reduce the proportion of oil in the mixture, if the owner's manual does not indicate how much oil and gasoline is needed. It is prohibited to use waste oils, poor quality oils, counterfeits, diesel oils and various homemade substitutes for running in and further operation of the chainsaw. The use of low-quality lubricants will lead to rapid failure of the chainsaw engine and its saw part.
Even a properly prepared fuel mixture should not be stored for more than a month inside the saw’s gas tank or more than two months in a canister. Do not prepare large quantities of fuel; it is better to prepare a fresh mixture before using the tool.
Preparing for the first launch
Preparation for the first start is carried out by visually inspecting the tool, checking the correct assembly and installation of all parts of the chainsaw.
The first start of the chainsaw is carried out according to the following approximate scheme:
- after preparing the fuel mixture, pour it into the tank;
- the brake handle is retracted, placing the chain brake in the non-working position;
- open the air damper;
- the ignition is turned on;
- holding the chainsaw by the handle with one hand, pull the starter cord with the other hand;
- When the engine starts, you should press the speed button and wait until the saw reaches full throttle, and then release it to idle.
Carburetor adjustment
For stable operation of the chainsaw, sooner or later you will need to adjust the carburetor
Please note that carburetor adjustments while the saw is under warranty are performed by service center specialists
After starting the saw, adjusting screws are used to adjust the carburetor.
Figure 1. Location of carburetor adjustment screws.
Sequence of actions when adjusting the carburetor:
- after starting, screws L and H are turned all the way, and then each screw is unscrewed one and a half turns in the opposite direction;
- then let the chainsaw run for about 5-10 minutes;
- idle speed is set with screw T;
- If the setting is done correctly, the chain will not rotate on the bar at idle.
Recommendations for the initial break-in stage
At the initial stage of running in a chainsaw, adhere to the following rules:
- the bar and chain should always be lubricated with special saw lubricant;
- It is forbidden to run in the entire saw at idle speed, since when the engine is running, oil must flow to the sawing parts of the chainsaw, but this does not happen in idle mode;
- when the first 5-7 hours have been completed, drain the remaining fuel mixture from the chainsaw and mix a fresh mixture;
- try not to overload the tool during the first 4-5 fuel fills, work in moderate mode, and also refrain from sawing logs with a diameter of more than 40 cm.
Features of running in Chinese chainsaws
In general, the process of running in Chinese saws is not much different from running in branded chainsaws from well-known manufacturers, especially when it comes to new generation saws manufactured in modern Chinese factories.
When testing a Chinese chainsaw, we advise you to pay attention to:
- oil quality (do not use cheap oils and lubricants, Chinese chainsaws are sensitive to cheap fuels and lubricants);
- It is not advisable to adjust the carburetor yourself even after the warranty expires;
- if any part can be replaced, replace it without a doubt, Chinese chainsaws are difficult to repair, and installing a new spare part will save you the time needed to work with the chainsaw.
We recommend watching videos from owners of chainsaws of similar models to get a better idea of the nuances of how Chinese chainsaws work.
How to insert a blade into a jigsaw
During the sawing process, the teeth of the blade wear out and the quality of the cut deteriorates. In order to correct the situation, they need to be replaced. Let's look at how to change the blade on the main types of blade fastening.
By the way, if you still don’t have an electric jigsaw, then before purchasing we recommend that you read the detailed instructions that will help you choose a jigsaw to solve your problems. Also, the article will be useful for those who decide to change the instrument to a new one.
We also recommend that you get acquainted with the current rating of the 10 best jigsaws; only the most popular models in terms of quality and reliability are included in the TOP.
How to change if the clamp is radial type
Replacing the blade on a radial-type saw holder will not take much time and effort. This takes literally one minute. To replace the file you need to do the following:
- Remove the saw guard.
- Turn the lock clockwise and, without releasing it, remove the blade.
- Turn the lock again, insert a new blade, and then mount the protective cover.
After watching the video, you can follow the replacement process from start to finish and learn how to do it yourself.
How to install in a case with a bolted clamp
The process of replacing a file in such a saw holder is the most labor-intensive. Depending on the jigsaw model, you will need a wrench, screwdriver or hexagon for this. To perform the replacement, you must perform the following steps:
- Using a screwdriver, unscrew the bolts securing the blade. There is no need to unscrew them completely. Simply loosen the fastening.
- Remove the old blade and insert the new one.
- Tighten the fixing bolts.
After this, you can begin to carry out work.
After watching the video, you can see in more detail the replacement process on a saw holder with a bolted clamp.
How to change on a quick-release fastener
In jigsaws with a saw blade holder of this type, replacement is very quick and easy. To do this, you need to follow a simple algorithm:
- Remove the protective cover.
- By pressing the locking key, pull out the old blade and install the new one until you hear a characteristic click.
- Release the key and mount the protective cover in place.
How to insert blade on Makita 4350 FCT
Like most modern electric jigsaws, the Makita 4350 FCT is equipped with a radial saw holder. Therefore, replacing the canvas on it will not take much time and effort. In order to do this, you must perform the following steps:
- Move the protective cover to its highest position. After turning the blade lock 90⁰, remove the old one and insert the new one. The blade shank should fit into the mounting hole until it clicks.
- Release the lock and return the protective cover to its original position.
How to properly align knives on an electric planer?
- 25-01-2015
- 17
- 994
In the age of modernization, the market is rich in various construction tools that simplify and speed up the work process. Also, not a single repair or construction can be done without an electric planer.
Each tool has additional components, but for a plane these additional elements are knives, with which the wood is processed. These knives are double-sided and come in a set of two pieces.
If the cutting elements become difficult to remove chips, it means that they have become inoperative and need to be sharpened.
But, before you start disassembling the tool, you need to know how to position the knives on the electric planer
In this regard, it is important to study in detail the principles of disassembling a plane
Installing knives: recommendations
The cutting elements are mounted on the plane drum, which rotates. The purpose of the knives is to plan the top layers of wood during the processing of products. This design is equipped with one or two cutting elements.
The knives standing last are rotary; if necessary, their position can be easily changed if one of the sides is dull. Electric planer knives are made from tungsten carbide or tool steel.
Products made of steel can be re-sharpened.
The blades have different configurations and are divided by shape:
- Straight - they are installed when selecting quarters and when processing small parts.
- Rounded - used when planing wide areas of parts, since the transitions between planed lines are made smoothly.
- Wave-shaped - similar knives are used when simulating antiquity on wood.
Diagram of options for sharpening a plane knife: a – on a whetstone, b – on a whetstone, c – position of the cutter blade chamfer when sharpening on a whetstone, d – sharpening on a whetstone disk using a stop device.
Before you start working with an electric planer, you need to make sure that the knives are installed correctly. If any errors were found, then you need to correctly align the knives on the electric planer.
The cutting part of the element should be located parallel to the sole of the plane and protrude slightly upward.
Typically, the cutting part of the knife protrudes 0.5 mm above the level of the sole. But the sherhebel, which is used for the first rough planing, its cutting edge, is produced by at least 1 mm. Adjustments can be made without problems.
In this case, it is important to alternately turn the small and large adjusting screw to the right and left until the cutting part is in place. These screws are located on the back of the platform designed for the electric planer blade.
After all the manipulations, the knife is installed in the tool itself and fixed with centering fasteners on the top plate. If the electric planer is new, then, as a rule, its knives are adjusted, but when using the tool, the settings get lost.
It is also important to remember that immediately after setting it up, it is not recommended to work immediately on the parts without first trying the tool on an unnecessary board
Regulation
Each time before starting work, you should check whether the knife is installed correctly. Its cutting edge should barely protrude outward and at the same time be strictly parallel to the sole of the plane. To determine how the knife is adjusted, the tool is raised with the sole up to eye level. The cutting edge of the knife should protrude above the sole by an average of 0.5 mm. In Scherhebel, which is intended for initial rough planing, the release of the cutting edge is noticeably larger - up to 1 mm. Adjusting the position of the knife in modern planes is very simple. It is necessary to sequentially turn the large and small adjusting screws, which are located behind the knife platform, to the right and left until the cutting edge reaches the desired position. This position is then secured using the centering lever and guide screw on the top pressure plate. With a new tool, the position of the knife is usually already adjusted. However, after prolonged use, the setting may become slightly off. Therefore, if you take up the plane after a long break, first check that everything is in order. You should not immediately start processing parts with a newly adjusted plane; first try it on an unnecessary section of the board. This is how professionals check whether the knife is installed correctly: the sole of the plane should be at eye level.
Correction of the “frog” anatomy
Turn the “frog” so that the lever does not interfere with the work, and sand part of the plane. Then move the lever to the other side and sand the rest.
In order for the “frog” to reliably hold the blade at a certain angle, it must have tight contact with both the blade and the body. Place the “frog” on the contact pad in the case - it should fit tightly and remain absolutely stable. Even the slightest sway is unacceptable. If you feel some instability, apply a little car engine valve grinding paste (available at car dealerships) to the underside of the frog. Having secured the body in a vice, move the “frog” back and forth along the contact pad until it stands stable. Wash off all dirt and paste residues with white spirit. Then flatten the top side of the frog where the blade fits. Place a sheet of 120-grit sandpaper on a flat piece of glass and lightly secure the glass using a bench vise, stops, and wood blocks. Move the adjustment lever aside and sand the front surface of the frog on the edge of a sheet of sandpaper (Photo E). Check your results often. When the entire surface is shiny, move on to 220-grit sandpaper to remove any rough marks.
Now it's time to work on the chipbreaker and blade
Irregularities at the leading edge of the chipbreaker create gaps in which chips get stuck, and this affects the quality of the planing.
The chipbreaker (as its name suggests) breaks the chips at a certain point, thereby preventing the formation of cracks in the wood under the wedging action of the blade. A damaged or worn chipbreaker (photo F) will hinder the planing process, preventing proper chip removal and a smooth surface. Carefully correct the shape of the leading edge of the chipbreaker by following the steps shown in (photos G and H).
Using the edge of a bench to hold the chipbreaker at an angle, sand the inside of the leading edge using 120 and 220 grit sandpaper.
Place the chipbreaker in the sharpening fixture at an angle so that the sharpening plane is tangent to the bend line, and sand the leading edge with 120 and 220 grit sandpaper.
Then start sharpening the blade (old or new) using your usual method. Having various sizes of sandpaper on hand, John used it to chamfer the blade at an angle of 25°, using 120-grit abrasives in succession; 220 and 320 grits, and then sanded the micro-bevel on the cutting edge at a 30° angle with 2000 grit sandpaper (Photos I and J).
Sand the back side using 220 grit paper; 320 and 2000. A sheet of fine-grain paper is held in place by friction.
Sharpen using paper No. 120 until a continuous chamfer is formed. Then make several movements in succession with 220-grit abrasives; 320 and 2000 units.
The new chainsaw does not start after running in
Sometimes, after a new chainsaw has been run-in, the tool has stood for a while and has completely cooled down, attempts to start it do not give any results, it simply does not start. A common reason for this situation is that the carburetor was not adjusted after break-in. A ground-in engine does not require enriched fuel to operate, and this can often cause fuel overflow, which in turn will affect engine starting. The following algorithm of actions will help deal with this problem:
- Unscrew the spark plug and inspect it. A wet spark plug is a confirmation of fuel overflow; to be on the safe side, you should immediately check the spark plug for sparking to rule out other possible causes.
- Turning the chainsaw over and turning off the ignition, pull the starter handle several times, this is necessary to remove excess fuel from the system that has accumulated there during unsuccessful starting attempts.
- Reinstall the spark plug.
- Adjust screw H, to do this, tighten it completely, then turn it out one turn.
- Launch the tool.
As a rule, after carrying out the above steps, the chainsaw starts and works without any deviations from the norm.
Fuel system
Malfunctions of the fuel system are also quite often the main reason that prevents a chainsaw from working as efficiently as possible. First of all, you need to check the quality of the fuel mixture.
Gasoline leaks from a chainsaw
If gasoline drops periodically appear on the body of the chainsaw, then it is necessary to check the tightness of the fuel tank. Over time, it may dry out. Or the gasket has become “stiff” and it can no longer perform its direct function.
If full-fledged gasoline streams appear, then there is a high probability that you will have to change the burst hose connecting the carburetor and the fuel tank.
Gasoline does not enter the chainsaw cylinder
There are several reasons why the fuel mixture stopped flowing into the cylinder:
- The air filter is clogged.
- The carburetor settings have been lost.
- The carburetor membrane is no longer intact.
- The channels through which gasoline is transported are clogged.
Chainsaw won't idle
In this case, you should start looking for a problem with the filter elements. For the most part, it is precisely because of the reduced capacity of the air and gasoline filters that the idle speed begins to “float”.
If everything is in order with the filters, then you need to check the components of the gas supply system, and also make sure that there are no spontaneous changes in the carburetor settings.
Cleaning, polishing, dirt, sweat... and electrolysis?
All this cannot be avoided - to clean a rusty plane, you will have to sweat. John's preferred cleaning method is using fine steel wool and Work Rust Free, which gets into every nook and cranny (photo B).
Allow the rust remover to soak in for 30 seconds before scraping off the residue with a steel wool swab. Then wipe the surfaces with white spirit.
A drill with a polishing attachment will help you quickly clean brass nuts to a shine.
To combat stubborn rust and paint marks, it is better to use fine-grained sandpaper or a drill with abrasive, brush and polishing attachments (photo C).
If these methods seem too slow, try electrolysis.
Algorithm for replacing knives on an electric planer
To remove the knives from the electric planer and replace them with new ones (or properly sharpened ones), you will need a set of wrenches, and also, in some cases, a screwdriver. There is no need to completely assemble and disassemble the electric plane to change working attachments. Replacement is performed in the following sequence:
- rotate the drum, placing it in such a position to gain access to the knife mounting bolts;
- loosen, but not completely, these bolt clamps;
- remove the working attachment manually or using a flat screwdriver;
- the rest of the blades are treated in a similar way;
- place new knives in the sockets, securing them with bolts;
- put them in the correct position.
The main point is the need to place the blades exactly in the sockets and securely fix them so that they do not fall out while using the tool. Due to the fact that different models of electric planers may have different attachments for working attachments, it is recommended that you first read the operating instructions for the equipment you are using.
When there are two cutting attachments installed on the drum of an electric planer, both need to be changed at once. This will prevent the occurrence of an imbalance, which results in a decrease in the quality of lumber processing and failure of the electric planer.
Malfunctions of Chinese chainsaws: review of popular ones and ways to solve them
Buying a cheap chainsaw made in China is not particularly difficult: a huge number of gas-powered tools from the Middle Kingdom are available in markets, construction hypermarkets and online stores. However, a low price almost always hides poor quality.
The most popular malfunctions of Chinese chainsaws include:
- Poor performance of the lubrication system. Clogged oil channels are cleaned, and if the oil pump fails, replacement is necessary.
- The starter cable breaks.
- Breakage of the plastic starter axis. To replace it, a regular metal bolt will do.
If there is the slightest suspicion that the chainsaw is not working properly, you should immediately carry out a full diagnostic of the tool. Only with proper operation and timely maintenance can you count on a long service life of the chainsaw.
Paint will prevent rust from returning
Masking tape covers areas that are not to be painted. Carefully trim off the excess tape with a knife, starting from the middle and moving the blade along the edge.
In the old days, most plane manufacturers protected metal parts from corrosion using special paints, the composition of which was kept secret and lost. Instead, John uses modern paints with anti-corrosion properties, such as Rustoleum Black.
First of all, you should protect the sole, cheeks of the body and the contact pad for installing the “frog” with masking tape (photo D). Tape the flat areas where the blade meets the frog and body, as well as the bottom of the clamp that contacts the chipbreaker. Then spray apply two to three coats of paint to all exposed surfaces of the body, frog, and clamp. Let the paint dry completely and remove the masking tape.
Finishing the job: body and sole
Guide the file at a slight angle, removing more material from the tap hole side, so as not to increase the width of the mouth.
In planes of this design, a convexity at the leading edge of the chipbreaker promotes close contact with the blade, increasing its stability during operation. But it partially closes the lumen of the tap hole, making it difficult for the chips to escape. John solves this problem by widening the gap in the sole (mouth). Using a square, draw a line parallel to the front edge of the mouth. Clamp the body in a vice and use a file to grind off some metal from the front edge (photo K). The line serves as a guide to help keep the edges of the mouth straight.
In order to level the plane of the plane, the stresses in its body must be the same as during the planing process. Therefore, you need to completely assemble the plane without extending the blade by the sole, and start sanding again using sandpaper.
By holding the plane correctly, as when planing, and moving it back and forth, you involuntarily make pendulum movements. This is useful for real work, but sanding creates a bulge in the middle of the sole and wears down the toe and heel faster. John prefers to keep turning the plane to keep the sole flat. , follow the steps shown in photo L - O.
Now all that remains is to clean everything once again with a soft cloth moistened with white spirit. Apply a thin coat of paste wax to the freshly sanded flange and cheeks to protect them from corrosion and set up your restored plane for planing. Congratulations! You have become the owner of an excellent tool that will last for many years.
Check the sanding results frequently. After a few movements, shiny spots will indicate the degree of wear on the sole.
Once the sole is completely level, finish sanding by removing all marks using sandpaper No. 220 and No. 320.
To ensure that the body cheeks are perpendicular to the sole, sand them by pressing the sole against the edge of a piece of hardwood.
Components
The power supply of the electric gun allows it to be connected to an alternating current network, frequency 50 Hz and voltage 220 V. The safety of craftsmen working with the tool is ensured by a double layer of insulation. Therefore, a safety mechanism and grounding are not needed.
Construction details:
- single-phase motor assembly;
- flat blade knives;
- one-time transfer;
- body;
- A mechanism that controls the depth of planning;
- advanced mobile support;
- pen;
- conductive cable with plug.
Main parts of an electric gun.
The motor housing must be attached to the equipment body.
Components
The electric planer is powered by connection to a network with alternating current, frequency 50 Hz and voltage 220 V. The safety of craftsmen working with the tool is ensured by a double layer of insulation. Therefore, a protective shutdown mechanism and grounding are not required.
- commutator single-phase motor;
- cutters with flat knives;
- flat belt drive;
- frame;
- mechanism controlling planing depth;
- front movable support;
- lever;
- conductive cable with plug.
The main parts of an electric planer.
The electric motor housing must be attached to the equipment housing. Double insulation is ensured by insulating the armature shaft of the electric motor and using plastic to make the housing. The engine is cooled by a fan, which sucks air through slots on the housing cover. Air passes through the engine and is exhausted through holes in the intermediate shield.
A cutter with 2 flat knives is a cutting element of the structure. The knives are secured with bolts and a wedge. The cutter, using a belt drive from an electric motor, rotates in 2 bearings, which are pressed into the cover and body of the structure. The belt drive parts are driven and driven pulleys, which are connected by an endless belt 15 mm wide and 2 mm thick.
You can adjust the planing depth from 0 to 2 mm by turning the additional handle. The movable support will move along the guides of the unit body. The handles and electric motor are mounted on a common plate. It is moved by adjusting screws, ensuring the tension of the drive belt drive. The belt deflection should not exceed 2-4 mm. The main handle has a built-in radio interference suppressor and a latching switch.
Step-by-step instructions for disassembling a rotary hammer
To eliminate any malfunction, except when the socket breaks, the device must be disassembled. The design of rotary hammers from manufacturers of different brands, including Energomash PE, Diold, Hammer, Stanley, Fatmax, Caliber, is similar, and therefore the disassembly schemes are similar. Experts do not recommend disassembling it completely; it will be difficult to reassemble. The process requires following step-by-step instructions.
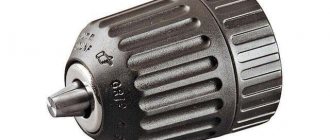
Removing the cartridge
When disassembling the hammer drill, carefully inspect each removed part. To avoid problems later on how to properly assemble the hammer drill, it is recommended to photograph the process. If no external defects are found, they begin to dismantle the cartridge. First, remove the rubber boot, remove the retaining ring using a screwdriver, then remove the plastic boot.
Next they pull out:
- washer;
- plate;
- spring;
- ball.
If these parts are worn out, the drill will not hold in the chuck. Some cartridge models may contain additional washers and balls.
Disassembling the hammer drill chuck
Disassembling the case
Before disassembling the case, first remove the mode switch. It is put in “Strike” mode. If there is none, go to the “Blow + Drilling” position. Press the button, which is located on the switch handle, turn it just below the icon where the hammer is depicted. There should be a kind of clicking sound. Using a screwdriver, pull the switch towards you and remove it. In some models of rotary hammers, it is screwed to the body using screws.
Disassembling the electrical part
If you suspect a breakdown related to electrical components and elements, the tool will also have to be disassembled. Remove the back cover by unscrewing the screws that hold it in place. Unscrew the fasteners holding the wire. The wires, the start button, and the wires attached to the stator are pulled out of the fastenings. Unscrew the mounting bolts and take out the brushes. The housing is separated using a flat-head screwdriver. The rotor is removed from the gearbox. If it is necessary to replace bearings, use a special puller.
In the body of the electrical part of the tool there is an air intake, which is also removed. Disconnect the stator. It is easier to pull it out if you tap the body with something wooden.
When disassembling a barrel hammer drill, in which the electric drive is located vertically, first remove the handle, then the bolts that hold the motor.
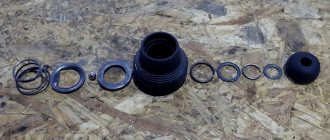
Construction drawings
Drawings of the frame to which all the parts of the structure being created will be attached are given below.
The part being processed will rest on the surface of the plate, secured with 10 bolts to a frame welded from steel angles. There is a groove cut in it for a drum with knives. To guide the workpieces and prevent their lateral movement, a square is also attached to the base plate with M8 screws.
The shaft with knives (working drum) will be attached under the table top with M6 screws. To do this, bearings will be placed at its ends, which will be fixed to the plate with special fasteners. The movement from the electric motor to the working drum will be carried out due to a belt drive.
The motor is installed inside the frame on a shelf made of two steel strips, with holes drilled in them of the appropriate diameter for the frame mounting bolts.
It should be taken into account that the slots for the engine mounts (mounting grooves) need to be made several centimeters wide (2-3) in order to be able to tension the transmission belt.
Types of saw holders
Depending on the types of structures, the following types of saw holders are distinguished:
- quick-release;
- radial;
- Bolt-on clamp mounting.
Quick release mount
The most popular option. Used on most modern models of electric jigsaws. They became widespread due to the ease of installation of the saw blade, for which you only need to press the locking key and remove the blade.
Radial clamp
It is the easiest to use. Equipped with a spring that returns the locking cams to their original position after replacing the blade. This type of clamp is equipped with the latest models of jigsaws.
Safety requirements
If you use the tool correctly, you can quickly and efficiently complete a fairly large amount of work. However, if you do not adhere to safety requirements, you can suffer significant injuries.
- Before work, the workpiece must be securely fixed, otherwise it may move or even fly off during work.
- During the technical inspection of the blades and their adjustment, the electric planer must be de-energized by unplugging the cord and plug from the socket, because accidental starting can lead to very unfavorable consequences.
- You need to start processing only after the knives have started and warmed up, that is, the cutting elements must accelerate to the required speed.
- The instrument must be placed exclusively on its side.
Safety rules when working with an electric planer
Before starting work, you need to make sure that the plane is in good working order. Damage to the power cord or cracks in the housing is a good reason for repair rather than work. The workpiece being processed must be carefully checked for the absence of nails, screws and other metal objects. Reliable fixation of a part is not an idle recommendation, but a vital necessity. In case of insufficient fastening, injuries and wounds cannot be avoided. During operation, the operator must be in a stable and comfortable position. Nothing should distract him from his work. You can only use standard knives that fit the plane in size. Increased vibration during operation is evidence of unbalanced knives that need to be replaced. Work clothes and shoes should be comfortable and fit tightly to the body. Hanging sleeves and too loose mittens are not allowed. The use of safety glasses is a necessary condition for safe work.
When do you need to adjust or replace electric planer knives?
The knives on an electric planer wear out over time. They need to be removed and sharpened or replaced altogether, and then installed back on the drum. Newly installed cutting attachments need to be adjusted in order to process lumber as efficiently as possible. The blades of new power tools also need to be pre-adjusted before use.
The following signs indicate that adjustment is necessary:
- change in sound when processing workpieces;
- vibration of the tool during operation;
- deterioration in the quality of planing lumber (formation of waves, chips, grooves, protruding fibers and other defects);
- increase in effort spent on work.
If, after adjusting the blade blades, the symptoms discussed above do not disappear, then more serious repairs to the power tool will be required.
Setting the correct position of the cutting attachments is carried out according to the following parameters:
- the height of the part of the blade that protrudes above the sole of the power tool;
- the size of the side protrusion of the knife intended for picking out quarters.
By correctly adjusting the position of the knife blades on the drum, high final quality of lumber processing is achieved.
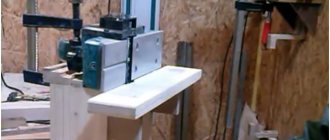
Structural elements of a homemade electric planer
Electric planers appeared in the mid-20th century and became widespread. They have practically supplanted their manual counterparts. Thanks to their use, painstaking work has turned into more productive work. At the same time, the final quality of processing is high if this power tool is used correctly.
Factory products are represented by a wide variety of models, which, despite their different appearance, consist of structural units common to all. These electric planes work in two ways:
- using them as portable hand power tools;
- secured on a table or workbench in a stationary position (upside down - with the drum facing up).
The creation of a permanently fixed electric planer is considered the most suitable (simple) for independent practical implementation. The assembled device will have structural elements common to factory-produced products, such as:
- an electric motor, which is the drive mechanism of a homemade device;
- a protective cover that protects the worker’s hands from moving blades;
- on/off button;
- a drum with knives mounted on it, intended for planing wood;
- a transmission mechanism by which the movement of the electric motor shaft is transmitted to the drum with blades.
The role of the base of the homemade device will be performed by a slab with a flat surface, for example, made of metal, plywood or boards, or a table (workbench). In the latter case, you will not need to make legs for the machine. If the drum is attached to the stove, you will need to make a frame. It must be of a suitable height: match the height of the craftsman working with wood to ensure comfortable work.
How to properly adjust knives
Adjusting the knives on the drum yourself is not a big problem. To set the position of the tool blades before work, you will need:
- hex wrench included with the plane;
- metal ruler or piece of glass of suitable size.
The setup is carried out by performing all operations in this sequence.
- Turn the electric planer over, placing it upside down on a table or workbench.
- If necessary, remove resin deposits from the nozzles using a solvent.
- Set the front part of the sole to a position that provides the minimum planing depth.
- Rotate any blade, placing it in the slot between the plates.
- A ruler is placed on the surface of the base plate. If the cutting edge does not touch it, then the knife bar is raised to the desired level, loosening (slightly) the fastening bolts using a hexagon.
- After alignment, tighten the fasteners.
- The procedure is repeated with all attachments, while setting gaps of the same size to prevent imbalance of the drum and vibration of the power tool during operation.
- By turning the drum by hand, determine the ease of its rotation.
- Check the correctness of the settings on the unnecessary workpiece.
What you need for DIY repairs
You will need a screwdriver with slots that exactly fit the cover screws. This is important, since an unsuitable screwdriver can twist the slots, and then it will not be possible to unscrew the screws. Instead of a screwdriver, you can use a screwdriver with a suitable bit.
The splines on different planes can be simple (slot-strip), cross-slots of different sizes, with an internal hexagon or an asterisk. In the latter case, the kit should include a special key for the original splines. If you don’t have one, you can choose a suitable one from universal sets.
To replace the bearing, you will need a box or socket wrench for the pulley lock nut.
Algorithm for replacing knives on an electric planer
To remove the knives from the electric planer and replace them with new ones (or properly sharpened ones), you will need a set of wrenches, and also, in some cases, a screwdriver. There is no need to completely assemble and disassemble the electric plane to change working attachments. Replacement is performed in the following sequence:
- rotate the drum, placing it in such a position to gain access to the knife mounting bolts;
- loosen, but not completely, these bolt clamps;
- remove the working attachment manually or using a flat screwdriver;
- the rest of the blades are treated in a similar way;
- place new knives in the sockets, securing them with bolts;
- put them in the correct position.
The main point is the need to place the blades exactly in the sockets and securely fix them so that they do not fall out while using the tool. Due to the fact that different models of electric planers may have different attachments for working attachments, it is recommended that you first read the operating instructions for the equipment you are using.
When there are two cutting attachments installed on the drum of an electric planer, both need to be changed at once. This will prevent the occurrence of an imbalance, which results in a decrease in the quality of lumber processing and failure of the electric planer.
How to tighten a belt
Cheap simple electric planers do not have a function for adjusting belt tension. For it to exist, the electric motor must be fixed not rigidly in the holes, but in the grooves. The grooves make it possible to move the motor along with the drive pulley forward or backward to tighten or loosen the belt.
In order to remove the old one and put a new belt on the plane, you need to:
- Loosen the engine mounts. Move the engine towards the drum, loosening the belt tension.
- Remove the old belt, inspect for defects, and if there are cracks or any other defects, replace with a new one.
- Tighten the belt again.
If there are no tension grooves, the belt is simply pulled off by turning the pulleys. The new one is also pulled on by hand, with force. First, the belt is always put on a small pulley, then partially on a larger one. By pressing the belt and turning the pulley, the belt is put in place.
If the electric planer belt is too stiff and does not stretch, you can try heating it in hot water at a temperature of 40-50 C for a minute. The belt must not be overheated, as it may lose its properties, become rough or deformed.