Why is a homemade element better than a factory one?
Due to the large number of fakes, it is very difficult to find a truly high-quality spare part today. And if such a part is found, the price for it will be simply exorbitant. Moreover, most of the complaints concern the elements of the exhaust systems. The muffler rusts and burns out very quickly. Its service life does not exceed 1-2 years. It doesn’t matter how intensively you use your car. It burns out not from mileage, but from time. Even if the car is driven once a week, this will not add life to the muffler. It will still have to be changed in a year or two.
After this time, car enthusiasts have a question about the need to replace or repair this part. If you repair the muffler yourself or make it from scratch, you can be sure that it will last much longer. After all, we will not skimp on important materials. Also, by making a muffler with your own hands, you can add your own configuration to the exhaust system. For example, make a forward flow to increase engine power. However, driving long distances with such a “can” will be uncomfortable. Therefore, you can remake the system in a different way by adding an additional resonator to it. This way the machine will run much quieter.
What is a direct-flow muffler, how does it differ from a regular muffler?
Direct-flow mufflers have become a special case of sports exhaust. As the name suggests, the principles of reversing the air flow and moving exhaust gases through a complex labyrinth of pipes and partitions are not used inside such products.
The entire flow of the spent mixture of nitrogen, carbon dioxide and water vapor passes through a large cross-section pipe, and a reduction in the sound level is achieved by other, less effective methods.
In direct flow, resonance phenomena are partially used, in particular to give the exhaust sound a characteristic bass timbre, characteristic of multi-liter sports engines running on a rich mixture with wide valve timing.
Getting this in a civilian car is difficult and expensive, but providing the desired sound is quite possible. Including with my own hands.
Material and manufacturing method
Before you make a muffler with your own hands, you need to decide on the budget and the option for reworking the exhaust system. There are several tuning methods:
- Modification of a new factory muffler.
- Making your own. By the way, you can make a muffler with your own hands using both stainless steel and ordinary steel.
Experts do not recommend using old mufflers or other parts of the exhaust system that have already been used. In this case, even if they look good (after all, they can be repainted before selling), the inside will be covered with corrosion or even burnt out. Remember that with each engine start, the metal in the system heats up and changes its properties. It’s easy to guess what condition a muffler will be in if it’s been used for about 2-3 years on a car. Therefore, do not fall for the tricks of “lightly used” sellers and do not buy a used muffler. Best of all, make it yourself.
A less expensive solution from a financial point of view would be tuning the standard muffler. Making a part with your own hands from stainless steel is a very reliable, but expensive option. However, such an element will be more durable and will not burn out at the most inopportune moment.
Manufacturing procedure
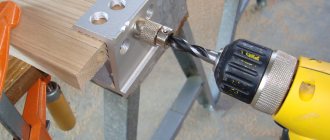
To learn how to make a whistle for a muffler with your own hands, you need to make a list of the required tools and materials. You will need:
- an angle grinder or an electric jigsaw with a blade for cutting metal;
- automotive tools;
- sandpaper;
- electric drill;
- cardboard;
- stainless steel 1 mm thick.
Knowing how a car muffler works, a turbo whistle is made as follows:
- a part template is made from cardboard;
- the template is unfolded and outlined;
- following the example of cardboard, a fragment of the desired shape is cut out on steel using a jigsaw;
- the workpiece is bent, the joint is secured with rivets or a welding machine;
- the part is cleaned and polished to a shine, and then placed on the muffler with your own hands.
How to make a muffler attachment with your own hands? Why not?
How to make a muffler attachment with your own hands
we will tell you, but before you buy or start making it, you should ask what it will give after installation on the car. In some cases, such innovations do not bring any positive results. Therefore, before you start inventing something new, you should first think about the feasibility of the innovation.
The exhaust system of any car, more than any other, is subject to the aggressive effects of external operating conditions of the car. Exhaust gases have a high temperature at the exit of the engine, thereby heating the elements that lead them out of the engine. The ingress of moisture or dirt leads to accelerated wear due to the appearance of pockets of corrosion. One of the first to suffer from this problem is the exhaust pipe of the mufflers. Installing a nozzle brightens up the sad look of a rusty pipe.
The aesthetic part cannot be called the main goal of such modernization, since there is also the “other” side of the coin. By increasing the diameter of the exhaust pipe, it is possible to improve the removal of exhaust gases, and this will increase the filling of the cylinders with the fuel mixture, and with it the power and dynamic performance of the car. Research shows that it is possible to reduce the concentration of exhaust gases due to better combustion of the combustible mixture in the cylinders.
Some drivers pay more attention to the decorative functions of such products. There are cars that have LED lighting built into the nozzles. At night, colored exhaust gases are visible. Such products can be purchased in retail chains, and those who are “friendly” with plumbing tools, in addition to the desire, and have the material for the product, can try to make it themselves.
After weighing all the pros and cons, the decision was made to independently manufacture such a product. First of all, you need to prepare the necessary tools and consumables. As a last resort, it is best to use a stainless steel sheet. It has a slightly higher cost, but it is more resistant to aggressive environments. In addition to this, you will also need:
- To make a model of the nozzle, a piece of cardboard;
A “grinder” or an electric jigsaw, they also need to have cutting discs or blades for cutting metal;
Hand or electric drill;
Sandpaper of various grits and materials for polishing metal products.
With the extension of the rear bumper, the exhaust was not visible at all. I have long wanted a nozzle for myself, but due to the crooked pipe and low bumper it was difficult to find something. And then not long ago I drove 200 km/h in Riga and melted the rear skirt since there is no catalytic converter, the exhaust is sooooo hot)))
Sitting at home on the weekend, I decided to do something, namely, try to build a nozzle.
I was thinking about doing a double shotgun
But thinking that it was bad to place it there, I decided to refuse in favor of an order and more))))
Climbing around in the barn I found a piece of ordinary chernukha pipe for 70 and a bend for 40.
I didn’t take any photos of the process because I didn’t think anything would work out. Made cuts on the pipe
We remake the muffler with our own hands
When choosing this tuning method, it is best to completely redo the exhaust system. To do this, purchase a pipe of the required size (most often its diameter is from 30 to 52 millimeters). Of course, the thin-walled tube that comes to the car from the factory will be very difficult to find. Therefore, we use thin-walled tap water as an analogue.
The housing for the muffler is made from a car fire extinguisher. Moreover, the outlet and inlet holes should be shifted relative to each other. The ends of thin-walled pipes should be inserted 60 percent inside the container. Numerous holes should also be made in them. As for partitions that are installed in factory versions, it is not necessary to weld them. Using the same principle, you can make a muffler for a carbine yourself.
Do-it-yourself welding of a new resonator
This is not a difficult task.
It is necessary to make the resonator body from steel, produced in the form of sheets, then weld the partitions, and also insert pipes with holes. It is necessary to place mineral basalt wool into the resonator cavity, and then weld the end. For a car with an engine capacity of 1600 cc. cm, a pipe with a diameter of 52 mm is sufficient. After welding is completed, the seams are processed. You need to paint the resonator with heat-resistant paint. Before installing the exhaust system elements, you should take a closer look at the pipes between the muffler and the resonator. In bends, the aggressive influence of exhaust gases increases, which is why burnouts may occur. It is necessary to brew them if found.
Upon completion of the above work, the exhaust system is assembled and attached.
The most important thing is the installation of gaskets. After this, the problem will be eliminated for a certain period of time.
The vehicle and exhaust system parts should be inspected from time to time. Fasteners and suspension require the most attention. Vibration worsens the rigidity of connections.
Professionals recommend introducing an anti-corrosion mixture into the muffler before installation. As a result, it is possible to extend the operating time of the vehicle.
Pay attention to weight
Due to the fact that the water pipe weighs an order of magnitude more than the one that comes with the part from the factory, you will have to strengthen the fastenings. In addition, you should insert the flexible corrugation into place that goes after the exhaust manifold.
Thanks to such changes, the noise level will be significantly reduced, and the service life of the part will be more than 2 years. By the way, the heavier the pipe, the less vibration it will emit.
Powder fire extinguisher muffler
Modification of a standard muffler is possible on the basis of a powder fire extinguisher whose service life has expired.
Necessary materials
Additionally, you should prepare:
- welding electrodes 1.5 - 2.5 mm;
- electric welding machine;
- compact grinder with cutting wheels for metal;
- parts of the old muffler;
- two pieces of steel pipe with an internal diameter of two inches.
Stage-by-stage execution of work
The manufacturing process is as follows.
- Prepare a pipe of a suitable size with a diameter of 30 - 52 mm. It is unlikely that you will be able to find thin-walled factory-type pipe, so just use tap pipe.
- Unscrew the cap from the fire extinguisher and get rid of the remaining powder.
- Enlarge the hole until the pipe you prepared fits snugly into it.
- A similar hole must be made on the other side of the cylinder, but it should be slightly shifted towards the wall of the fire extinguisher.
- Use a grinder to create perforations on the end sections located inside the pipes (12 - 15 cm).
- Insert the pipes into the cylinder, calculating the opposite arrangement of the perforated sections opposite each other. The ends should be inserted 60% into the balloon.
- Weld the joints on both sides of the cylinder in a circular direction. Be careful not to burn the metal of the fire extinguisher.
- Remove the fasteners from the old fire extinguisher and weld them onto the resulting homemade structure. Please note that the water pipe is heavier than the factory car pipe, so provide reinforcement for the fastening. On the other hand, the heavier the pipe, the quieter the muffler.
- To reduce noise levels and increase the service life of the structure by two years, insert a flexible corrugation into place after the exhaust manifold. The housing can be filled with glass wool to further reduce noise.
- If you are making a muffler from stainless steel, provide for the possibility of disassembling the structure. It can be partially dismountable, and you will have the opportunity to periodically clean the cavities and make repairs if necessary.
- Be sure to check the tightness and reliability of the welds by plugging one of the pipes and filling it with water upside down. There should not be even a slight leak.
- Drain the water and use a compressor to blow out the product and remove any remaining moisture.
- The design is ready for installation on a car.
We also advise you to carefully read our expert’s article, which describes in detail how the muffler resonator is designed.
You may also be interested in an article by our specialist, in which he talks about how to choose a thermal tape for a muffler.
Adviсe
In order to reduce the noise of a homemade muffler, it is recommended to fill its body with some material such as glass wool. It is also recommended to make a condensate drain hole at the bottom of the muffler. Thus, it will not rust prematurely and make extraneous noise.
If this is a muffler made with your own hands from stainless steel, it is important to think through its design. Make it partially collapsible. This way you will periodically clean the pipe cavities from dirt and change the filler if necessary. Thanks to the collapsible design, the service life of the part will increase several times. Do-it-yourself installation and replacement of the muffler is done in standard places. The main thing is to strengthen them, since the weight of the structure increases slightly.
Welding a muffler with argon - what are the features?
This is a modern technology that allows you to connect parts made of steel and metal alloys. The operation is carried out in several stages. First, the surface is prepared (cleaned with a metal cutter and degreased). Next, the parts are connected using tacks. A metal rod is then placed along the seam line. At the final stage, the rod and the part itself are welded. During welding, argon gas is used. Oxygen does not enter the part because argon enters the welding area under high pressure.
Painting issue
Is it worth painting the muffler? There is no clear answer to this question. Most car enthusiasts say that the paint for it should be fire-resistant. Otherwise, it will simply burn. The ideal solution would be to make a muffler made of stainless steel. You can see an example in the photo below.
Using stainless steel will close the issue of painting once and for all. Well, you can paint the muffler on the carbine with your own hands with matte black paint. The main thing is that it is resistant to high temperatures.
Why does the muffler deteriorate over time?
The metal of the exhaust system works in difficult conditions. Car exhaust contains water vapor heated to a very high temperature and a number of more aggressive chemicals.
These are ideal conditions for corrosion to occur, especially under conditions of large temperature differences between engine operation under load and long periods of stoppage. The situation is aggravated by external corrosion, since the mufflers are located under the bottom of the car and are subject to attack by all the chemicals that are picked up by the wheels from the road.
Manufacturers of exhaust systems try to protect their products with all kinds of coatings, from aluminum powders to galvanizing, and also make mufflers from different types of heat-resistant and stainless steel.
Related article: Why water drips from a car muffler
Naturally, this approach is very limited both because of the high cost of the material and because of the technological difficulties of welding work on stainless steel. Therefore, not all exhaust pipes, resonators, catalyst housings and mufflers of production cars are made this way.
How to use?
Do-it-yourself cold welding of a muffler is done as follows. First, the surface goes through a preparation procedure. The area should be cleaned with sandpaper. After this, the surface is degreased using white spirit, gasoline or another solvent. Next, you should prepare the adhesive composition. Cut off the required amount of sealant and knead it. In the case of using liquid analogues, mix them thoroughly. Next, apply glue to the damaged area of the muffler and level the mixture.
Please note that the composition hardens within a few minutes, so all work with the sealant must be done very quickly.
Finally, you need to wait until the mixture dries completely. Depending on the brand of the manufacturer, this takes from 1 hour to a day.
Types and their differences
There are several types of mufflers and each has its own individual characteristics. Each is described in detail below.
Reflective
They are sometimes called reactive. The operating principle is based on multiple reflections of sound. This is achieved by changing the diameter of the tubes or the number of branches.
Resonator
These are the same jets, but with a slightly modified design. Sound attenuation is achieved thanks to the weakly damped resonances of its elements.
There are several types of mufflers
Restrictive
This is the simplest type of device, based on replacing a large hole with a small one. Which significantly reduces engine power.
Absorption
A simple but not very effective muffler, the action of which is based on the absorption of sound waves in a noise-absorbing material. Usually this is basalt wool laid around the gas outlet pipe.
How else can you reduce exhaust system noise?
To do this, you can install an additional muffler resonator. You can make it from scratch, like the muffler itself, or you can make it again from a fire extinguisher. However, the material of this part is not particularly designed for high temperatures. But, as practice shows, such resonators are quite effective in operation.
The most important thing when making an additional resonator is to place the tubes correctly. They must be offset relative to each other (everything is similar to making a muffler). To swirl the exhaust gases, holes are made in the pipe. Thus, the gas pressure level decreases and they do not create much noise at the outlet. As you can see, making a resonator for a muffler with your own hands is not so difficult.
The weight of the newly manufactured element should also be taken into account. If it is heavier than the standard one, you will have to strengthen the fastenings on the bottom, otherwise the part may come off right on the move. It is not necessary to fill the inside of the resonator, nor is it necessary to install partitions.
So, we found out how to make a muffler with our own hands.
Forward flow is an opportunity to increase the power of a car’s engine, add aggressiveness to the car and improve jerkiness. You can assemble and install it yourself by studying the step-by-step instructions.
Homemade muffler with a pleasant sound
I don’t know how it is now, but many people used to know that an old car fire extinguisher is an excellent preparation for direct flow.
The story is simple: what I didn’t do with the original muffler can on the pita was of little use. I changed the muffler stuffing, made a flute like a Yamaha one, but still the sound was disgusting, rattling and loud, in general - a barrel organ.
It is possible to install a full-fledged direct flow from the pit, but you need to shorten it, digest the fasteners, but you understand: there was no particular desire to buy a barrel for 5 rubles and still digest it all, but the desire to get rid of the original muffler still did not leave.
And so back to the fire extinguisher. One was lying gathering dust in the garage a long time ago, but to make a direct flow you need two... And so, one fine May morning, on a small river, among the snags on the surface, the desired second fire extinguisher was spotted. Exactly the same as the first one, and now there were two of them. Well, you yourself understand what this led to.
In general, let's go)))
We take the most attractive tool in the garage, affectionately called “Binder,” and saw the bottoms of the fire extinguishers straight.
Next, take a forty pipe, cut the gas distribution slots with a grinder, or, if you’re not too lazy, drill a billion holes. Then we weld one end of the pipe to the part of the muffler where the outlet will be.
You don’t even need to do anything with the outlet hole: the mounting location for the fire extinguisher spray is just perfect and the diameter is just right.
Now we stomp into the kitchen and tear open the casing of the ZIL refrigerator, tearing out the glass wool from there. Just wear thick clothing and gloves when working with glass wool, otherwise you will itch for two days, and if during these two days you want to relieve yourself, then... yes, it will itch there too... In general, we take glass wool and stuff the outlet part of the jar as tightly as possible.
Then we proceed to the entrance part. The thread in it needs to be cut so that the magpie pipe passes through, and, of course, we also fill it with glass wool, the denser the better.
Well, well, the only thing left to do is weld both parts together and weld the pipe to fit it with the standard muffler.
I didn’t bother with the fastenings to the frame, and why should I? I made two points of attachment to the luggage frames (it couldn’t be stronger): this fastening withstood a revolution on the asphalt and the can became a junk)))
The end of the jar is at your own discretion. I made pipes of a smaller diameter, and it looks quite good)
The sound, let me tell you, turned out surprisingly great! Even though it’s forward flow! At idle you can’t hear it at all, even the electronics are louder, but when driving it’s just the most beautiful sound - a soft growl without a dull metallic rumble and yelling.
Well, here’s the final look) The plastic doesn’t burn, the sound is pleasant, nothing was done to the original pipe. What else does?)))
About direct flow or PG
A direct-flow muffler (PG) is an improved alternative to a stock exhaust, which is not capable of ensuring a quick and timely release of gases from the engine system (ICE). The standard exhaust system especially suffers (chokes) after installing a sports camshaft or after boring the cylinder head cylinders (in other words, on a forced engine).
A straight-through muffler is designed to improve the exhaust system
The GHG is designed to modernize the exhaust system, which increases gas emissions. In addition, a correctly installed PG will provide an increase in internal combustion engine power by 10–15 hp. However, you need to be prepared for drastic changes: everything will need to be replaced, from the catalyst to the tip.
Increasing the power of a power unit using a PG, unfortunately, also has a “other side of the coin”, associated primarily with a loud sound attack of about 120 dB. This is the norm for sports cars, but hardly for civilian ones. And this explains the mass of cases of fines issued by law enforcement inspectors to the owners of such cars.
To minimize this modernization flaw, craftsmen use various methods to reduce sound. Installing a flute muffler, oval or round resonator are all types of methods to improve the performance of a forward flow muffler. “Form and content” can make it quiet.
For example, craftsmen say that a square resonator installed in the middle of the path (the path for gases to escape into the aircraft) reduces noise much better than an oval or round one. And in general, it’s better not to use a round one, but to use an oval one as a last resort, since it has a larger volume of cans and, accordingly, a quieter sound.
Oval resonators from Volvo S60R and Saab have proven themselves to be quite good.
Before thoroughly understanding what GHG is, you should remember the functioning of the vehicle exhaust system. Many motorists do not even suspect how many tasks it performs, although it does not seem so at first glance.
The forward flow kit is a ready-made option for tuning
Of course, the main task of the exhaust is to remove gases. But an equally important function is to ensure timely and high-quality ventilation of the internal combustion engine cylinders.
Ventilation of the cylinders is carried out as follows. When the valves of one cylinder of the internal combustion engine are closed, a vacuum is created in the exhaust manifold. It moves through the system at high speed, and, having been reflected from obstacles, returns to the collector. At the moment the gases leave the cylinder, a reduced pressure is created here, which promotes better ventilation and purge.
Among other things, the exhaust system (ES) is designed to combat noise. This is what the muffler is designed for.
Compared to a conventional standard muffler, the PG does not have many separate sections inside. Accordingly, it has a more simplified design. It is this fact that allows craftsmen to make it at home or in the garage.
But is it even worth it for an ordinary motorist to change the standard muffler to a PG one? Certainly not. If he does not prefer active driving, does not intend to use the car for sporting purposes, does not have complexes about a “gray” car that does not stand out from the general traffic flow, then he should not carry out modernization.
On the contrary, if the bassy and thoroughbred roar of the engine resonates in the soul of the car enthusiast, then the installation of direct flow must be carried out. Moreover, this gives many advantages of the following nature:
- the power of the internal combustion engine increases due to increased throughput;
- The service life of the entire aircraft is extended due to the use of high-quality materials.
As for the disadvantages of modernization, these are:
- problems with the law due to loud noise (can be excluded if the installation of GHGs is carried out using a new system);
- possible difficulties with service maintenance;
- greater sensitivity of the power unit to low temperatures;
- decreased clearance.
Do not confuse forward flow with a muffler. The fact is that the entire exhaust system is called direct flow, and in most cases only part of it is subject to modernization - the muffler.
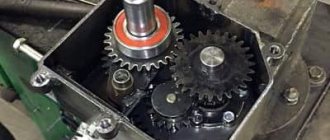
Muffler design and functions
People who are not interested in automotive topics believe that there is nothing special about this element. However, this point of view is absolutely wrong. To understand this, you should consider a cross-section of the car muffler design. The exhaust pipe is an integral element of the vehicle and performs a very important function. The main purpose of the device is to suppress the noise that occurs as a result of the combustion of the fuel mixture inside the combustion chamber. Several thousand explosions occur in each individual cylinder in just one minute. A running engine creates a lot of noise. A regular moped without an exhaust pipe sounds unpleasant, while a car makes 10 times more noise.
A properly designed and installed muffler can eliminate this noise almost completely. Thanks to its special design, it perfectly dampens acoustic vibrations with resonator chambers, which are necessarily adjusted to the frequency of a specific motor. There are usually several such chambers, and their design is very diverse and depends on the intricacies of the exhaust pipe design.
something lately I’ve been getting more and more lazy to write entries in the on-board log = (I just made a new release, but I’m too lazy to write...)))
install a turbo supercharger, I made a downpipe with 63 pipes, although the entire exhaust I had before was 51, I wanted something more, that’s why I started with 63 right away so as not to redo it 100 times...
It was decided to cook from ZIL pipes, so we bought the Right and Left intake pipe ZIL 130, they are different in size, so that there would be something to choose bends from =)
Before that, I had 51 outlets with connections just like the standard classics, that is, these flarings where it constantly turns sour, where the pipes spin and sag, disassembling and reassembling it all is the worst thing... so I decided to cook a new system with flanges ! since this is still a 63mm release, you need to steal the clearance from below to a minimum, which means that the flanges are best suited for me with 2 bolts... in order not to have problems with gaskets, so as not to cut them from something yourself, then you need to start from them search)) I went to Google for advice, looked for the simplest solutions, as it turned out these were gaskets from a regular GAZ ZMZ 405 with a catalyst! Once I got to the market, I found them without problems in the first store, the price was 35 UAH, in my opinion not expensive, especially when they sell 3 pieces for 100))
The gasket has a diameter of almost 64mm, it seems, but it still didn’t fit on the pipe, so now I need flanges for them! I didn’t even look for flanges separately, so I had to do it myself) the flanges were made so that they fit onto the pipe from the outside, so that it would be convenient to work with them, since I don’t have any machines, but Stasik22’s dad is a turner, so I had to make the flanges on a lathe machine)) thickness 6mm...
after some minor modifications with a grinder and a drill we have this
The next thing that didn’t suit me about the factory system was the cushions on which everything rests... firstly, they are of no use at all for the muffler, they are frail and there are few of them there, they don’t hold up properly, well, the whole system is attached only near the gearbox and then it’s right on the muffler, the middle not suspended anywhere, this is not correct... I always wanted to install double-sided cushions that work in both tension and compression, in short, like on all NORMAL cars...))
I missed something, I took a photo of them, but I bought 4 pillows at the market that I liked, they are very similar to these (photo from the Internet)
Then I was interested in the exhaust system diagram itself, what to install, where and how in the CORRECT way... of course, for a pipe motor, the best thing is definitely a larger piece of pipe after the snail, shorter and into the atmosphere, but still I don’t have cramps, I need to drive on public roads , and I myself don’t want my head to feel like a tavern after an hour of driving in a car))) I started looking at ready-made exhaust systems from famous manufacturers for turbo cars, systems made to order, I’ve seen enough, I had to wear a bib like my little one!)) ) damn, what cool things people do... and sophisticated systems, and TIG welding everywhere, stainless steel, shooters, dampers that change the geometry of the system, homemade attachments that are cooler than market ones... in short, one frustration... ((( I started thinking about how to make a system with a damper and a variable loudness, but when you sit at the computer and dream and when you climb under the car, you look at how much space there is in the Zhiguli and what a 63mm pipe under the car is, you understand that you need to forget about all this and do as usual...(((the next thing was the system components, everything systems not made with feet had a resonator somewhere in the middle of the highway (sometimes a little closer to the engine) and a terminal muffler... well, that’s what I thought, if it’s not a large volume, then the resonator can fit between the elastic coupling and the outboard one in order to press it closer to the cardan, so that it wouldn’t hang low, then I went again and looked at it all with my own eyes, took a piece of 63 pipe, applied it and realized that this was nonsense... the car is not so high that the ground clearance would spread out, there is no place to just put it there...
since everything is going so well that nothing turns out the way you want, then there is only one option left - a completely straight can and as large a volume as possible to drown out the hum, so that it doesn’t scream loudly, otherwise you’ll drive along the highway later and won’t want anything else...) especially since we increase the diameter of the pipe, and the larger the diameter, the louder the system works, which means we will make the maximum muffler!)
How to make forward flow quieter
To reduce exhaust volume, devices are used that reduce the flow area of the exhaust pipe of the muffler. Let's look at the damper and flute commonly used on cars.
Damper installation
The damper is installed either before or after the muffler. The volume of the forward exhaust will be clearly reduced only when the damper is completely closed. Technological clearances of 3-5% remain for the passage of exhaust gases - so the engine does not stall. In this regard, engine power is significantly reduced due to blockage of the exhaust system.
the damper is made by hand
A damper is also used to switch from a direct-flow to a return-flow muffler and vice versa, if necessary. In this case, a new muffler is installed parallel to the old one, and the damper is mounted in front of them. This scheme is already used on some brands of cars from the factory.
mechanical adjustment of the damper is carried out on the move by the driver from the cab
You can drive a short distance with the throttle closed, but driving constantly is unacceptable for the engine.
the damper is installed in front of the muffler
Making and installing a flute
The flute (silencer) has more preferable characteristics. It dampens the exhaust pipe clearance much less than a damper. You can buy a flute, knowing the internal diameter of the outlet pipe, or make it yourself. Various silencer designs are shown in the photo.
Flute mounting options
Possible versions of the flute.
- External - for outlet pipe diameters up to 50–60 mm.
method of attaching a flute to a small diameter exhaust pipe
a properly designed flute “helps” you ride more quietly
the sound becomes “more pleasant” to the ears of the traffic inspector
Tools and materials for making a flute
- Bulgarian;
- electric drill;
- welding machine;
- spanners.
It is better to choose blanks from stainless steel with a thickness of 0.8–1.2 mm, which guarantees long service life. Blanks made of “ferrous” metals are acceptable with a thickness of 2.0–2.5 mm or less if we plan to use the flute for short periods. As blanks we use two pieces of pipe and sheet metal for the flange.
Making a flute with your own hands
The order of work performed:
- We adjust all parts to the required dimensions. We measure the dimensions of the flange and larger pipe “on site”.
- We drill holes.
the notch divides the gas exhaust into two streams, which reduces the exhaust volume
To further relieve the exhaust system from excess exhaust gas pressure, holes are drilled in the flange.
additional holes allow for a freer exhaust
the flow of exhaust gases is suppressed due to unloading holes and counterflow
There is no need to paint stainless steel
Videos about the flute
Video: sound of exhaust through forward flow without flute
Video: sound of a flute on the same car
General description of the resonator device
The muffler resonator is a multi-layered and complex part. Each layer has its own task. At the moment the exhaust gas penetrates inside, it must pass through the reflectors. Due to friction against the reflectors, the exhaust gas elements go out and diverge into two different streams. The resonators (intake and exhaust) have an equal amount of work because they pass exhaust through the entire system.
If we talk about how a muffler differs from a resonator in appearance, it is size. Many people call the resonator a “small muffler”. High thermal load leads to frequent interruptions in operation. In order to prevent breakdowns, the driver must regularly inspect the exhaust system and provide timely maintenance. When performing diagnostics, you must remember what exactly affects the smooth operation of the exhaust system:
- quality characteristics of the resonator;
- physical data of the pipe in diameter;
- muffler cleanliness.
It is important to note that the muffler resonator has an extremely complex operating principle. The operation of the device is carried out through the use of a large number of closed cavities connected to the pipeline by many holes. It has two sections of different volumes, they are separated by a special mesh device.
Gas flows under different pressures move through the covers covering the holes. The pressure is different due to the fact that the vehicle engine operates at a variable speed. For the exhaust system to work properly, the pressure distribution must occur in the same way. As a result, the exhaust system encounters less resistance, which does not affect engine power. In the closed space of the resonator, all flows of various quantities are brought into a balanced state. In some chambers there is a simultaneous narrowing and expansion of flows. Thanks to special holes located in the part, the flow of exhaust is neutralized. The holes in the resonators can be straight.
Some motorists install a resonator instead of a muffler, thus increasing the vehicle's power by about 10%. In addition, in this case you don’t have to worry about the quality of the fuel. But it's important to remember! The purity of the exhaust gases in this case will not meet the high Euro-4/5 standards.
Opening the jar
It happens that the exhaust system operates loudly, but no obvious signs of rot or cracks are detected.
In this case, we can assume that the muffler has burned out inside. This may be a perforated tube or its partitions. Therefore, to accurately determine the diagnosis, we mark the necessary fields and open part of the “can” using a grinder. We bend the excess sheet of metal and cut out or re-weld the bar. At the end of the work, we bend the sheet again and scald it on all sides.
Types of automotive resonators
Resonators on different vehicles differ in:
- Sizes. They can be long or short, round or oval.
- The alloys from which they are made.
- Internal design, its complexity. Simple ones are called monoblock. Complex - combined.
The biggest differences are between resonators for two-stroke and four-stroke internal combustion engines. The first ones are simple and even primitive, the second ones are much more complicated. Moreover, the further the car progresses, the more complex, but more effective exhaust systems, including resonators, become.
Resonator device
Each vehicle model, be it a car, tractor, moped or any other, has its own unique exhaust system design. What is common in the devices of all resonators:
- inlet and outlet pipes;
- expanded stream processing capacity;
- tubes with holes and divisions into chambers inside;
- in some models, sound-absorbing heat-resistant material, most often basalt fiber.
The advanced and well-designed designs of modern resonators have an important property. Due to the peculiarities of the circulation of exhaust gases inside the cavity of the resonator, at a certain moment a vacuum is created between the exhausts. It is extremely short in time, but it helps to pull gases from the part of the system located closer to the internal combustion engine. This helps to avoid contamination from carbon deposits and to some extent increases the power of the internal combustion engine.