Very often, when repairing furniture or assembling it, you need to accurately drill holes for the firmmat, dowel and other fasteners. If you drill a sheet of chipboard, it is almost impossible to do this with a simple drill, since the hole breaks and it is not always possible to make a right angle. Therefore, for such work you must have a tool called a conductor.
Classification of conductors
The main function of jigs is to ensure straightness in drilling wooden surfaces throughout the entire depth of the hole. Such devices are used quite often in metal processing and, as a rule, are supplied directly with the machine. Due to the need to create such holes in furniture production in large quantities, such devices are in great demand among craftsmen.
There are the following types of conductors:
- Invoices. This type does not require fixation before starting work. They are practical and simple, but they should only be used with one hand unless the drill is mounted on a special stand. You can make such a conductor yourself easily and simply, but it must be used in chipboards.
- Rotary. With their help, you can make two holes in planes that are adjacent to each other. This operation is performed thanks to a folding bracket.
- Jig for drilling holes at an angle. This option is used in highly specialized industries. It can be used to drill holes at an angle. Sometimes used in conjunction with slip-on conductors.
- Sliding. They are designed to drill holes in multiple locations while keeping the original settings the same. They are mainly used by professionals and require little experience to operate successfully.
If the jig has sufficient rigidity, then it can be used not only on flat planes, but also for curved pipes, etc. In this case, it is secured with a clamp. But under no circumstances should it be used for fastening on wooden surfaces, as it can damage the furniture. You can buy it in a store, or you can also make it yourself.
The jig is in fact a template for making holes, with the help of which such work can be done with maximum accuracy. Due to the simplicity of the structure, they are often used not only in the areas of furniture production. In particular, they are actively used in the field of mechanical engineering for drilling holes in various workpieces, etc. We should not forget about the furniture industry, where such a device is used for various needs when assembling furniture fittings.
Third stage
At this stage we will need aluminum tubes. You can buy them at a regular hardware store, but there they are sold from two meters. We glue these tubes to a wooden blank using epoxy or regular superglue. There is no need to skimp on glue; the more you apply it, the better the part will stick.
Leave the workpiece to dry.
Features of self-production
When designing a conductor for confirmation, it is necessary to correctly calculate what functions it will have to perform in the future. It should be done for the most commonly used fasteners in the house. If such a device is required by furniture makers for constant work, then it is better to buy a factory model, which is distinguished by great precision. In addition, manufacturers often include additional fasteners, stops and templates in the kit.
Color matters
Even by the appearance of the drill, you can determine its properties and qualities.
- The gray color indicates that this is an ordinary simple drill, without any additional processing.
- Cherny reports that the drill has been treated with hot steam and has increased wear resistance.
- Yellow means that the drill has been quenched and tempered (a procedure to relieve internal stress). Such products are even more wear-resistant, but are afraid of overheating.
- A bright golden color is usually characteristic of drills treated with titanium nitride, which reduces contact friction in the drilling area and perfectly hardens the surface of the tool.
Design for confirmations and dowels
A furniture jig for drilling holes for dowels and confirmations is a very necessary device for furniture makers. Especially if chipboard material is used.
For these purposes, two types of conductor are used:
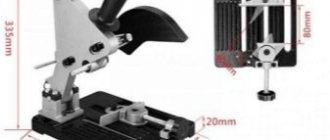
- Dowel jig with clamp fastening with many functions. The basis of this design is a corner made of thick aluminum. Since the device is quite long, there is an additional fastener in the middle. When turning the angle ninety degrees, the increased thickness of the device helps a lot. The bushings on the structure are located at the distance most often used for confirmations and dowels in furniture production.
- A two-slider jig, which is used to make a hole in two parts fastened together. The design consists of two strips that are connected by fasteners. It has several holes, so you can install devices at different widths.
Drill sharpening
Drill bits may become dull with frequent use. You can sharpen the tool yourself or contact a specialist. If you decide to do this yourself and do not have the skills, it is better to practice on an old instrument. When sharpening, the main thing is not to violate the desired geometry and adhere to a certain degree. Sharpening can be done manually or on an electric machine.
- Metal analogues of drills are made of softer metal. They can be sharpened manually using a file.
- Using an electric machine, the drill overheats greatly. This can be avoided by constantly dipping it in water. Or organize a stream of water pouring onto the tip of the drill.
Scope of use
Furniture jigs are devices that no furniture maker can do without while working. Such devices allow you to avoid the main problem in furniture production, namely the drill entering at the wrong angle. If you make such a mistake, it is very difficult or even impossible to correct it later. Such a device not only makes it possible to correctly direct the drill during operation, but also allows the tool to constantly maintain the desired trajectory (flat, perpendicular or at an angle).
Such devices are used both in the design and production of furniture, and during assembly, when there is a need to make holes for fastening elements together. Often, for such actions, conductors are used for firmmats or dowels, without which it is impossible to make straight holes. Also, you cannot do without this device if you need to make holes at an angle or in the end of a thin slab (it is especially important to use the device when working with chipboards).
When drilling holes using this design, the process itself is quick and simple. The fastener allows you to do work at any distance from the edge of the slab, as well as regardless of its width.
In the furniture industry, dowels are often used as fasteners. But at the same time, this option has already existed for a long time, and their use requires the presence of a drilling jig when working. The only condition and at the same time a problem is the fact that the parts being connected to each other must have a right angle during operation. Therefore, such elements must be located exactly perpendicular to each other. When making holes for dowels and adding parts, it will be very difficult to do without a jig.
Make your own wooden kitchen step by step
To make wooden furniture for the kitchen with your own hands, you first need to decide what kind of wood you will work with as the main material. The modern market offers more than 40 types of wood - hard and soft. Hardwoods include oak, beech, walnut, yew - their wood is more durable, but they are also more difficult to process, so they are ideal for making solid wood and slabs. Among the soft ones, you can choose pine, spruce, poplar - they have a smaller margin of safety, but they are easy to process and can be used to construct shelves, small cabinets and individual decorative elements. And, of course, the selected material must be of high quality, thoroughly dried and dense, without knots, cracks or layers. In a wooden house, a DIY kitchen made from the same type of wood as the house itself will look especially good.
General principles of drilling + (Video)
As already mentioned, drilling is the most common activity for a repairman, and therefore it is important to immediately learn a few basic rules associated with this activity.
- Use of suitable tools. There are many drills, each of which is designed for a specific type of material. Therefore, you should not try to drill concrete with a wood drill and vice versa. It is also important to consider the conditions in which the tool will be used. For example, industrial drills cannot be used for interior repairs (this is simply unsafe). It is also important to take into account resistance to moisture: for outdoor work you will need a tool of class IP34 if the climate in the area is humid and IP32 if you have to work in good weather. IPX2/ can be used indoors
- Correct markup. Before starting any work, it is important to carefully and accurately mark the drilling locations with a marker. You can also put paper tape under the marker to prevent the drill from slipping on the material.
- Selecting the required drilling speed. Here everything depends equally on both the material and the diameter of the blade. If we are talking about very thin drills (with a diameter of less than 3 mm), then you need to work at low speeds, less than four hundred per minute. For other drills, the following rule applies: the thinner the drill, the higher the drilling speed required.
It is also important to ensure that the handle is securely attached to the shaft of the hand drill. The drill must also not be allowed to skew.
How to drill a hole straight + (Video)
A fairly common problem is that the drill slips off the mark and the hole is not made in the right place. Paper tape glued to the top of the tree can help combat this. Also, sometimes similar difficulties arise if you have to work with an overly thick drill. Then you should first make a recess in the material with a thinner drill, and then drill, resting against the mark you made.
It is important to pay attention to the quality of sharpening. If the edges are not sharp enough or sharpened unevenly, problems with drilling accuracy may occur.
At what speed should you drill?
One of the important parameters when drilling is the number of revolutions per minute. The speed at which you need to drill depends on the type of material and the type of drill. There is a general rule: the harder the material and the thicker the joint, the lower the number of revolutions per minute should be. As for the specific numbers, they can be seen in the table below.
| drill diameter, mm | soft wood | solid wood | plastic (acrylic) | copper | aluminum | steel | Notes |
| 1.5-4.8 | 3000 | 3000 | 2500 | 3000 | 3000 | 3000 | When drilling metal thicker than 3 cm, lubricate the drill thoroughly with oil. |
| 6.4-9.5 | 3000 | 1500 | 2000 | 120 | 2500 | 1000 | |
| 11.1-15.9 | 1500 | 750 | 1500 | 750 | 1500 | 600 | |
| 17.4-25.4 | 750 | 500 | — | 400 | 1000 | 350 |
This table is for conventional twist drills. For specific options (Frostner drill, etc.), the drilling speeds for various materials are slightly different from those given above.