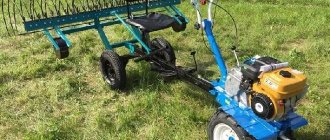
Do-it-yourself household feed granulator drawings
Do-it-yourself household feed granulator, drawings of equipment with an electric drive, V-belt drive and flat matrix.
Before we begin designing the equipment, we will make a simple calculation.
It should be remembered that:
- The maximum gear ratio of the V-belt drive is no more than 6.
- wrap angle on the small pulley – at least 120°
From the standard range according to GOST 17383-73, we select pulley diameters
Drive pulley (D1), diameter 56 (mm) Driven pulley (D2), diameter 315 (mm)
Calculate the length of the belt
according to the formula: L = 2a + l1 + l2
l – circumference, determined by the formula: l = πDα/360
α1 = 136.57° α2 = 223.43° a = 325.16 (mm)
Let's substitute the values and get:
L = 2 x 325.16 + (3.14 x 56 x 136.57 / 360) + (3.14 x 315 x 223.43 / 360) = 1330.89 (mm)
From the standard range we choose belts Z-1320.
The optimal rotation speed of a flat matrix is 100...150 (rpm). Knowing the gear ratio (D2 / D1 = 315 / 56 = 5.625), we select the AIR 100L8 electric motor.
Let's substitute the values into the formula and get the revolutions of the granulator matrix:
ωр = 750 / 5.625 ≈ 133 (rpm)
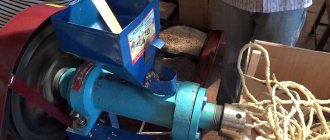
Do-it-yourself granulator from a meat grinder: household for animal feed
Hello dear readers and subscribers of the blog, Andrey Noak is in touch with you! Today we will talk about how to make a granulator from a meat grinder with your own hands.
Introduction
Recently, home craftsmen have been modernizing and adapting more and more household appliances for the benefit of the household; for example, the engine from a washing machine can be attached to a lathe.
So they didn’t bypass the meat grinder. We decided to make a granulator out of it. I’ll say right away that it won’t be able to granulate anything solid, not under the right loads. Under increased load the rod will break, a household motor may not be able to withstand it, etc...
This granulator is ideal for feed:
- Mix several herbs for rabbits;
- Make some kind of compound feed for other pets.
What do we need
For our granulator from a meat grinder you will need:
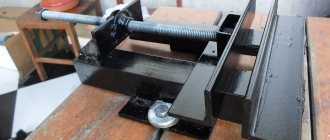
- A sturdy table or workbench. You can either weld it from a corner or simply place our machine on a durable workbench;
- Meat grinder;
- Lathe;
- Drilling machine;
- A blank for making a matrix, approximately 6 cm thick. But I don’t know your feed right now and that’s why I’m talking approximately. Here, for each specific case, you need to make a matrix separately;
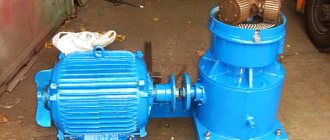
- An electric motor, perhaps from some kind of household appliance, for example, from a washing machine or from a vacuum cleaner. It is worth remembering that it will be more practical to install a 220 Volt engine, and 380 is more economical and profitable. 380 Volt engines are more powerful compared to 220 Volt analogues;
- Belt for connecting the meat grinder and the engine. When the meat grinder jams, the belt should slip, so there is no need to use a toothed belt;
- Two pulleys with a ratio of 1 to 2. We will lower the gear ratio to increase power and reduce the number of revolutions.
Step-by-step instructions for assembling a homemade granulator
The first thing we need to start with is, like any other event, creating drawings. On the drawings we describe how and what will happen.
What kind of engine will we have, how will it be located, and what do we generally need to make a mini granulator press. We draw everything out on paper so that there are fewer mismatches later.
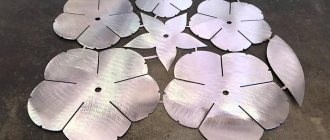
In addition, do not forget that you will need to make a matrix, a lid and a knife for the meat grinder. To do this, you will need to take the dimensions from the mesh and make a matrix of the same diameter.
When making the matrix, you need to take into account that it should fit almost closely to the worm. Therefore, part of the matrix should be recessed.
If the ribs in the meat grinder get in the way for this operation, they should be removed.
So we begin assembling the granulator from the place where it will be located. We will need our sturdy table. We firmly attach our future press to it. Durable means bolted, for this you will need to drill holes in the legs.
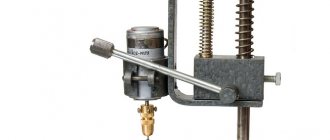
After this we make the matrix. How to do it correctly is shown in the video below:
Next, you will need to sharpen a new cover for the matrix, since the old one most likely will not fit due to its increased thickness.
You need to sharpen the lid with an allowance so that if you decide to increase the thickness of the matrix, you do not need to make a new lid again.
After the lid is machined, you can weld pieces of 6 mm wire to it or cut grooves with a grinder. This way it will be easier to twist it by hand.
There are many versions of a pellet knife, and here are just a few of them:
- There is no need for a knife at all;
- You can drill a hole in the screw of the meat grinder and make a screw there, at the end of which a knife will be attached;
- You can weld a thin bolt onto which the knife is screwed.
Ultimately, it's up to you to decide. Our next step is to install the pulleys. Here I think there should be no problems if you are a person with a head.
The last step is to install the engine and tension the belt. We remember that you need to tension the belt so that it can slip if something happens, and the engine does not burn out at this moment.
We carry out commissioning and completion of our mechanism.
My services
If you want to build your own large-scale production or want to receive high-quality information about the production, heating or sale of pellets, then you can contact me at “SUPPORT” and always receive high-quality and up-to-date information.
I can provide advice on ENplus certification, help with the sale of your products, and help you choose equipment for pellets. And the most interesting thing is that I will even help you visit a real experimental production of pellets.
Write and we will organize everything!
Also, just recently I came out with a cool little book that explains why most companies deliver lines with defects. Which ones? And you will learn this from the book. Read more about it in the “MY BOOKS” section.
Good luck and see you again, Andrey Noak was with you!
A household feed granulator consists of the following elements
- V-belt transmission housing (base).
- Granulator matrix drive.
- Granulator rollers.
- Loading hopper.
- Electric motor AIR 100L8.
- Movable plate for mounting the electric motor.
- Belt tension device.
- V-belt transmission.
- Frame.
- Shaft.
- Spatula.
- Matrix.
- Washer.
- Hexagon socket screw DIN 4762 - M8 x 20.
- Spring lock washer DIN 128 - A8.
- Prismatic key DIN 6885 - A8 x 7 x 22.
- Nut DIN 44232 - M8.
- Hexagon socket screw DIN 912 - M8x1 x 30.
- Single row angular contact bearing DIN 625 - 6307 with protective washers or 66307 according to GOST 831-75 (35 x 80 x 21).
- Lock washer DIN 6731 - 32.
- Special nut DIN 1804 – M32x1.5.
- Prismatic key DIN 6885 - A8 x 7 x 50.
In addition, let's watch a two-part video showing the assembly procedure for a household feed granulator with a flat matrix.
What is a granulator
A granulator is a device for converting crumbly feed into capsules.
Suitable for pressing:
- crushed grain (wheat, barley, oats, corn);
- grass meal;
- hay;
- bran;
- cake;
- crushed peas.
The technological properties of the feed are improved, sticking is eliminated, and flowability increases. The digestibility of granules is higher than regular feed. The ability to use vitamin and antimicrobial additives improves the quality of the product.
You may also be interested in information about how much feed a laying hen needs per day.
The video shows how the granulator works:
This food is convenient to use:
- during automatic distribution;
- transportation;
- storage.
The size of the pellets depends on the livestock industry:
- for poultry farming – up to 5 mm;
- for piglets – up to 8 mm;
- adult pigs – up to 10 mm;
- cattle - 10-15 mm.
Granulator device
The granulator is similar in design to an electric meat grinder with one difference: the knife is located on the outside, behind the matrix grid.
During the granulation process, the raw material mass is loaded into a hopper, from which it is pushed under pressure through a mixture heated to 110 degrees. matrix. The movement of the screw ensures that the mixture is pushed, creating pressure and pressing the crushed and moistened raw materials against the matrix.
Upon reaching a critical volume value, the compressed raw material is forced through the holes of the matrix. A special cutter cuts the granules to the required size. Plastic capsules cool down, maintaining their shape.
You may also be interested in information about how to keep Indian ducks at home.
The operating principle consists of sequential operations:
- supplying crushed feed from the hopper to the rotating shaft;
- compression;
- pressing through the matrix;
- cutting with a knife;
- entering the receiving bowl.
The diameter of the holes in the grid determines the diameter of the capsules. Depending on the power of the electric motor, the diameter can be from 5 to 10-15 mm. The distance at which the knife is installed after the grate determines the length of the granules.
The video shows how the granulator works and works:
Main parts of the granulator:
- loading hopper;
- screw;
- matrix;
- knife;
- drive shaft;
- gearbox;
- electric motor;
- bed;
- receiving bunker.
But how to breed ducks at home for beginners and what you should pay attention to is indicated here.
All parts of the device are made of metal.
The specific characteristics of the thickness and diameter of the matrix, the diameter of the screw, and the power of the electric motor are determined together.
The units offered by manufacturers can be used for preparing not only feed, but also pellets (fuel pellets made from sawdust).
Main characteristics of granulators offered by manufacturers:
- Engine power 2.2 kW. Feed productivity is 60-100 kg/hour. Matrix diameter 120 mm. Weight 80 kg.
- Engine power 4 kW. Feed productivity is 150-220 kg/hour. Matrix diameter 150 mm. Weight 115 kg.
- Engine power 7 kW. Feed productivity 300 kg/hour. Matrix diameter 200 mm. Weight 200 kg.
- Engine power 11 kW. Feed productivity 400 kg/hour. Matrix diameter 230 mm. Weight 290 kg.
- Engine power 15 kW. Feed productivity 600 kg/hour. Matrix diameter 260 mm. Weight 330 kg.
The maximum power of manufactured units is 30 kW with a productivity of more than 1000 kg per hour. The weight of the installation is more than 500 kg.
But what the blue favorite duck looks like and how to properly breed it at home is indicated here.
Device cost
- with a 2.2 kW electric motor – from 53,000 rubles;
- 7 kW – from 83,000 rubles;
- 15 kW – from 190,000 rub.
Advantages of industrial granulators:
- reliability;
- duration of operation;
- versatility;
- efficiency;
- safety;
- convenient service.
The high cost of units manufactured in industrial conditions forces livestock breeders to make devices in a handicraft way, using improvised means.
But you can read here how broilers are raised without feed and what feed should be used.
Do-it-yourself feed extruder from a meat grinder - Metalist's Guide
An extruder is a tool that allows you to process large volumes of cereals, fruits and vegetables, which are turned into complete feed.
In farming, such a device is indispensable, especially when feeding young animals that need feed for normal growth.
But the problem is high prices.
Not all farmers can afford to buy such a tool. As a solution, you can make your own feed extruder.
How does a feed extruder work?
Before you make an extruder with your own hands, you need to understand the principle of its operation. The operating principle of the extruder includes the following stages:
- grains, vegetables and fruits are loaded into the tank of the device;
- here they enter the crushing compartment, where the raw materials are subjected to high pressure (about 60 atmospheres);
- Then the feed is processed at high temperature (in most extruders it reaches 1.5 thousand degrees);
- the resulting composition is compacted and comes out in the form of a long rod with a thickness of 3 cm;
- the rod is cut into smaller pieces, after which it is completely ready for use.
Operation of grain extruder
The main advantage of food processed by such a device is that it is very quickly and completely absorbed by the animal.
Under the influence of high temperatures and strong pressure, the structure of the original components breaks down into simpler components, which are individually absorbed much better.
All market compound feeds are made according to this principle.
What does a feed extruder consist of?
The structure of this device is quite simple. It is based on a frame that connects all units and ensures the stability of their operation. A hopper is installed on the frame, into which all the components of the feed are supplied, and a mechanism drive.
Next there is a dosing auger and a delivery auger, through which small portions of cereals are fed into the receiving chamber. The whole process is organized by a motor with a gearbox. When leaving the device, the finished feed rods are automatically cut off with a special knife or manually.
What is a homemade feed extruder made of?
The main snag when assembling the device at home is the need to purchase most of the parts, since the design is quite complex. First of all, an accurate drawing is needed.
You can either download it from the Internet (here you can find all imaginable models) or use ready-made instructions from the factory model. The drawing must convey as accurately as possible the dimensions of the components and all the necessary material. Once the drawing is ready and all the important points have been thought through, you can proceed to collecting materials.
Extruder device diagram
In order to make your own homemade extruder with low power, you need the following basic materials:
- First of all, you need an electric motor . The average engine power should be 2.2 kW;
- You will also need gears from YuMZ . If there are none, you can purchase gears from other tractor transmissions;
- Next we purchase a gearbox ;
- A hydraulic cylinder is also needed , or rather only a rod from it. The diameter of the rod must be at least 5 cm;
- wire or spring with a cross-sectional diameter of 0.8 cm;
- welding tool, lathe and other necessary tools.
Assembling a homemade extruder
First of all, let's start making a screw for the device. It consists of a cylinder and a body. To make the cylinder, gears from the tractor transmission are used. They are tightly welded together. If standard gears were used, then the diameter of the resulting part should be somewhere around 62 mm.
https://www..com/watch?v=SwmZBzoCAjI
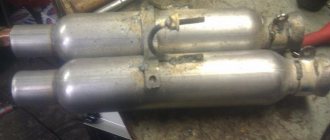
Next we work with the body. The basis for it will be the previously prepared rod from the hydraulic cylinder.
A wire is wound around the rod in the form of a spiral (if you have a long enough spring that matches the diameter, you can use it).
The wire on the rod must be placed so that the distance between the turns of the spiral gradually decreases towards the end of the part. The initial clearance is 25 mm, after which there is a gradual decrease to 20 mm.
As soon as the wire (spring) is correctly secured, we grab it with a welding machine. The welding must be very strong, since the part will be subject to serious loads. Next, the auger is carefully inspected for irregularities and extra protrusions.
All detected defects are erased using a file or grinding machine. The screw can also be turned on a lathe, if you have one. The part will be of higher quality, and the work will be much less. In addition, the channels will be much deeper, which will simplify grain feeding.
Homemade screw for extruder
How to make a housing for an auger? Any piece of pipe of suitable diameter will be suitable for this component. The auger cylinder is placed inside it.
It must be connected to the extruder head and the gearbox that drives the screw. To do this, we turn two bushings on a lathe. Then we connect all the parts.
At the junction between the gearbox and the auger shaft, it is necessary to additionally install a bearing.
Next, a special die and several tubes are welded to the head of the device. Now the basic preparations are completed and you can proceed to the actual assembly of the mechanism.
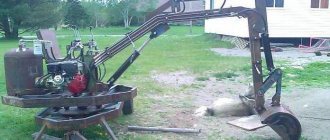
First of all, you need to make a strong frame on which the device will be installed. There are no specific instructions here. Its design depends on the features of the homemade extruder.
The main requirements for the frame are stability, stability and strength. The first two points can be achieved by making a wider base, which, after assembly, is screwed to the floor with bolts with a larger diameter.
The frame can be assembled from corners welded together.
We install the engine and gearbox with a screw and head welded to it on the frame. The transmission of torque to the gearbox will be carried out by a belt. It connects the trigger mechanism, gearbox and electric motor.
We fix the grain hopper onto the installed auger. This part can be any metal container with a hole in the bottom. In the absence of one, an ordinary iron bucket will do.
The hopper is fixed so that the grain easily passes into the auger, where it is pushed and compressed. The grain reaches its peak of pressing in the spinneret, which produces ready-made feed.
The thickness of the resulting feed rod will depend on the diameter of the die.
We install the frame in the selected part of the room, after which we weld all parts of the device. The self-made extruder is ready.
Last checks and first launch
The resulting extruder is a fairly powerful electrical device, which requires careful checking of all components and assemblies before direct operation. For safety reasons, you should adhere to the following inspection plan:
Starting an extruder with grain
- The first point is to re-check the reliability of all seams and connections . If individual components are connected using bolts, tighten them as much as possible.
- Next comes checking the evenness of the surface on which the device is installed.
- The next step is to launch the mechanism. The mechanism should run idle for some time. This will allow you to warm it up before work. To check whether the extruder is warm enough, you can put flour into it. The readiness of the device for operation can be determined by the shape of the processed raw materials.
- If all the preparatory processes went well, you can proceed to testing with grain . Cereals should be fed into the bunker gradually and steadily. Interruptions in flow lead to negative idle, which harms the machine. But, an excess of raw materials will lead to work “through force”, which can damage the mechanisms.
- The finished product should be constantly twisted. This will remove gaps in the die and increase the density of the feed.
- Under no circumstances should you suddenly stop the device after active operation. If the required amount of grain has already been processed, add flour or sunflower seed waste to the bin again. During processing, such material collects cereal oils and unprocessed residues released during processing, which contaminate the mechanisms.
- Gradually reduce the engine speed until it cools down. After stopping, you need some more time for the machine to cool down, otherwise there is a risk of getting burned on the hot extruder mechanisms.
Operation of a homemade grain extruder (video)
DIY household granulator
When making a granulator with your own hands, the first thing you should do is choose a motor. A granulator made at home allows you to provide yourself with sawdust pellets for heating a private home if your boiler runs on solid fuel.
Self-made pellets are not only an environmentally friendly fuel, but also an excellent way to provide yourself with heat almost free of charge.
https://www.youtube.com/watch?v=SwmZBzoCAjI
The ability to create pellets at home, provided that there is a sawmill nearby, is an excellent way to dispose of waste during production, and, accordingly, save on firewood.
The production of granules is a process used in many industries, in particular for the processing of polymers. In large-scale production, an extruder is used to create, for example, pipes from polymers.
With the help of such a device, the production of granules is automated and quite easy. However, due to the high cost of this device, many people prefer to build it themselves.
The principle of operation of a self-made granulator is not much different from the factory version - special rollers press the crushed raw materials through the holes of the matrix.
The granulator consists of the following elements:
- Support and housing;
- Matrix with cone-shaped holes;
- Toothed rollers or auger;
- Tin sheets;
- Reservoir for raw materials;
- Electric motor;
- Gearbox;
- Shaft.
Before you start using the granulator, you should familiarize yourself with the principle of its operation by studying the instructions
It is most convenient to buy the matrix, rollers and screw separately, since their manufacture, as a rule, requires special machines and skills in handling them. These items are sold at a low price. You can also use bulletin boards.
How to make it yourself
To manufacture a granulator on your own, you will need special equipment:
The power of the compactor will depend on the electric motor used.
In the video - do it yourself:
Granulator design option
A pipe and welded bushings of different diameters can be used as a body. The minimum thickness of steel walls is 8 mm. To make an auger, you will need an axle shaft and a rod with a diameter of 1 cm. Having secured the axle shaft on a workbench, weld one end of the rod and make a winding on the axle shaft with an arbitrary pitch. The workpiece must be scalded on both sides, the seams must be cleaned with a grinder and thermally hardened.
Homemade feed granulator drawings
Do-it-yourself household feed granulator, drawings of equipment with an electric drive, V-belt drive and flat matrix.
Before we begin designing the equipment, we will make a simple calculation.
It should be remembered that:
- The maximum gear ratio of the V-belt drive is no more than 6.
- wrap angle on the small pulley – at least 120°
From the standard range according to GOST 17383-73, we select pulley diameters
Drive pulley (D1), diameter 56 (mm) Driven pulley (D2), diameter 315 (mm)
Calculate the length of the belt
according to the formula: L = 2a + l1 + l2
l – circumference, determined by the formula: l = πDα/360
α1 = 136.57° α2 = 223.43° a = 325.16 (mm)
Let's substitute the values and get:
L = 2 x 325.16 + (3.14 x 56 x 136.57 / 360) + (3.14 x 315 x 223.43 / 360) = 1330.89 (mm)
From the standard range we choose belts Z-1320.
The optimal rotation speed of a flat matrix is 100...150 (rpm). Knowing the gear ratio (D2 / D1 = 315 / 56 = 5.625), we select the AIR 100L8 electric motor.
Let's substitute the values into the formula and get the revolutions of the granulator matrix:
ωр = 750 / 5.625 ≈ 133 (rpm)
Extruder for feed: drawings and useful recommendations
A simple to use feed extruder makes it possible to independently produce compound feed for animals.
This device is considered an indispensable assistant both in large-scale agriculture and in small farms for raising animals and birds. In specialized stores, such equipment costs decent money.
To save money, you can assemble the unit yourself; drawings and recommendations from specialists will serve as an auxiliary informant in this matter.
What it is
An extruder is used to process grain crops into compound feed, which is much easier to digest in the stomach of animals. Processing is carried out using a press under a pressure of 60 atmospheres and at high temperature. The result is a product shaped like 20-30 mm corn sticks, but with a dense structure.
Extruded feed
Apparatuses for preparing feed exist with different power ratings, and the volume of product produced depends on it. For a small farm, a device with a productivity of 25-45 kg/h is perfect - the price of such a device starts from 47 thousand rubles. But a large farm will require more powerful models capable of producing up to 1.5 tons per hour and they cost from 160 thousand rubles.
Extruder device
Due to high prices, equipment for processing products into mixed feed, even second-hand, is available to a narrow circle of consumers. But if you make an extruder for feed with your own hands, you can save a lot. Only in this case you need to study in detail the structure of the unit, the principle of operation, and also have all the necessary spare parts available.
Diagram of a large extruder
Components of the complex
The design of the device includes the following elements:
- frame - serves as the basis, all the details are fixed on it;
- drive unit;
- belt;
- loading capacity;
- cuff;
- dosing screw with separate drive;
- gearbox;
- receiving tank;
- motor;
- injection screw conveyor;
- Control block;
- carved blade;
- washer;
- adjustment key.
Operating principle
In a homemade extruder, the main function is performed by the pressing mechanism. The element includes a discharge screw unit mounted in the cylinder. The blade block gives the product the shape of oblong sticks.
The functions of the electrical appliance are not limited to pressing feed. With its help, you can grind grain, carry out heat treatment and disinfection of feed, and mix different components into a single mass.
The design of the injection screw includes:
- outer part;
- internal;
- heating washers;
- outgoing auger.
Each unit is installed on a stud with a left-hand threaded part and covered with a housing made of metal material. Thanks to the keys, the revolutions flow from the main shaft to the combined auger. All components are firmly fixed to the frame.
Detailed extruder design (download)
The housing element is equipped with a hole, and the receiving part is mounted to it. The internal area is equipped with longitudinal grooves, due to which all feed components are mixed along the longitudinal side of the axis.
A pellet regulator is installed on the output part; its design includes:
- matrix block;
- output housing;
- blade pressed by a spring element to the matrix block.
The rotation of the shaft with the blade is carried out by means of a rein. You can monitor the temperature using a thermocouple mounted on the frame. The grain extruder operates from electrical voltage. But there are already modifications that run on fuel.
Making an extruder for feed with your own hands
If you have the necessary material, parts and tools, you can make an extruder with your own hands. Let's look at how to get a low-performance model.
Blueprints
To do this you will need:
- electric motor with a power of 2.2 kW at 3,000 rpm;
- gears from a tractor box - parts from YuMZ would be an excellent option;
- spring 8 mm;
- rod with a cross section of 5 cm;
- welding equipment.
Step-by-step work on making a feed extruder with your own hands:
- To obtain a cylinder, you will need to weld the tractor gears together. As a result, a spare part with a cross-section of 625 mm should be produced. Next, a spring with a diameter of 8 mm is mounted on the hydraulic cylindrical rod. Weld all the parts; if the seam is uneven, treat the area with a grinder.
Tractor gear
- Using turning equipment, grind 2 axle boxes that will be used for the auger and gearbox. Weld the auger, shaft element and axleboxes into a single piece, and do not forget to insert a bearing between the last parts.
Blanks in the form of axle boxes
- The equipment head is mounted on the screw; it will act as a regulator of the die to which the nozzles are welded.
Workpiece on auger
- The auger is covered with a housing, all parts are assembled and fixed to the frame, an electric motor, belts and a starting part are also mounted. A loading container is installed on top.
In general terms, a homemade extruder is similar in external and functional characteristics to a household electric meat grinder.
VIDEO: Making a screw granulator with your own hands (Part 1)