In order for the house and yard to be reliably protected from prying eyes and intruders, the fence must be high and reliable. A fence made of corrugated sheets fulfills both of these conditions. The cost of its installation is not high, considering that the installation can be done, without the use of a welding machine, with your own hands. In order for the metal fence to serve for a long time and not be scratched, it is better to use rubber linings for the washers for fastenings on the outer front side of the fence.
Installation of the fence support part
Corrugated sheeting is a material made of profiled sheet steel with a protective coating. Anyone can install a fence from it. To do this, you do not need to have any special skills or abilities; it is enough to acquire the required amount of material and arm yourself with simple tools.
The process of installing the supporting part of a corrugated fence looks like this:
- First, mark the perimeter of the territory that will be fenced. To do this you will need a nylon thread, wooden pegs, and a tape measure. Drive the pegs into the ground in the places where the supports will stand. Stretch the thread between the pegs. It is important that the distance between the pegs is the same.
- In places where pegs are installed, dig or drill holes approximately 1-1.3 meters deep. For greater stability of the pillars, it is recommended to fill the bottom with 10-20 cm of crushed stone or gravel and compact it thoroughly.
- Next, install a metal pole in each hole. Supports can be made of metal pipes (round, square or rectangular), channels and even railway rails. The height of the supporting structures depends on the height of the future fence. Usually it is made from 2 to 2.5 m, and the pillars are made 1 m longer, since it will be concreted into the foundation. The installation of the pillars is carried out using a building level to ensure that they stand level.
The supporting pillars at the corners should be more stable, so it is recommended to make them larger in diameter.
Now you need to make a solution for concreting the supporting bases. For this you will need cement, sand and crushed stone or gravel. Mix the solution with a concrete mixer; if you don’t have one, then mix it manually in a bucket or any other container. Mixing proportions are usually indicated on the packaging of the cement mixture.
Fill the holes with supports with concrete to ground level and leave to dry. In order for the foundation to be reliable and strong, and the pillars to stand level, it is necessary to allow the concrete to harden well. This will take from 3 to 5 days.
We perform arc welding
Initially, you should bring the products into a specially prepared room. All ends of the pipes that will be connected are degreased. The chamfer remover is used only if the thickness of the profile pipe is more than 4 mm. After using this device, you can make a seam in several layers. It will be quite durable.
If the pipe thickness is less, one welding seam will be enough. All parts must be secured in a table specially designed for this purpose. If it is not there, then use the help of one or more people. Welding of the profile pipe will be carried out efficiently.
A certain thickness of the material, brand and cross-sectional thickness of the electrode sets the voltage with which the welding process must be performed.
The slag should be knocked down from time to time to avoid premature corrosion.
Advantages of X-brackets
Fastenings for mounting a fence made of corrugated sheets are different, but the most convenient is a cross-shaped bracket. With the help of the X-bracket, installation of fence sections is easy and without the use of welding.
The installation principle is simple: attach the sections to the supporting posts with metal screws.
To install corrugated fencing with your own hands, it is enough to have the following tools and materials in your arsenal:
- X-brackets - special cross-shaped fasteners;
- consumables (nuts, washers, metal screws);
- metal corners or channels on which the sections will be attached;
- screwdriver;
- roulette;
- a set of keys.
The advantages of using an X-bracket for mounting are obvious:
- minimal set of tools;
- there is no need to use welding;
- strength and reliability of fastenings;
- high speed of installation work;
- it is possible to level the overall structure of the fence by tightening the fastenings;
- low cost.
The frame installation process is as follows:
- Mark the places for fastening the transverse pipes (angles) on the load-bearing supports. To do this, use a tape measure to measure 0.2 m from the top of each post, and 0.3 m from the bottom.
- Attach the X-bracket to the support and screw the self-tapping screw through the front hole. Do the same with all the pillars. For supports at the corners of the perimeter, use corner brackets; for gates and gates, use end brackets.
- Now hang metal crossbars on top and bottom of the post mounts. Each crossbar must fit exactly into the mounting groove on 2 supports standing next to each other.
- Next, mount the next span in such a way that the crossbar from the first element is connected through the X-bracket to the previous one. At the joints, fix the crossbars with a T-shaped profile using self-tapping screws. In this way, connect all the crossbars sequentially along the entire perimeter of the future fence.
After the frame is mounted, you can begin covering the fence with corrugated sheets. This is the final stage of fence installation. You can't do it alone, so you need to get someone to help. The plating process looks like this. Press the sheet of corrugated sheet tightly against two load-bearing supports horizontally and fix them to them and the crossbars using a screwdriver and self-tapping screws. In this case, one person holds and presses the sheet tightly, and the second is engaged in fastening.
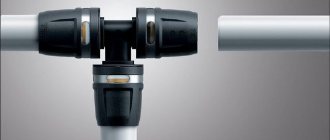
Options for fasteners for connecting pipes
Profile pipes are used for assembling frame structures. Pipe profiles with square, rectangular and shaped sections are not used when laying pipelines due to the fact that strong internal resistance arises in them.
To connect profile pipes without welding, various crab connectors, couplings, flanges and clamps are used. Such fastenings can be divided into two categories:
- floating, which include ties and clips;
- rigid ones are connecting crabs, flanges, fittings, brackets.
Crabs for installing pipe rolling are a system of clamps and can have a planar and volumetric connection. The first type of fastener for a profile pipe comes in three types:
- T-shaped, allowing you to connect three pipes of small diameters. Thanks to this, the installation of the structure is carried out according to a simple and understandable scheme.
- L-shaped, used for corner connection of two pipes.
- X-shaped, providing reliable fixation of three and four pipes in a cross-shaped manner in the middle of the metal structure.
Volumetric connection is ensured thanks to three- and four-part crab systems, when pipes are connected at an angle of 90° in different planes along the X, Y and Z axes.
Fitting fasteners are used to connect rolled pipes when there is a need to create bends and branches. They can mainly be found in the assembly of water supply networks, but their varieties have also found application in the installation of various metal structures and buildings made from pipe profiles. They come in several types:
- Couplings and flanges. They are used to ensure reliable joining of rolled pipes in a straight line. There are round and square sections.
- Turns and knees. Necessary to ensure the connection of pipes with different directional axes.
- Tees and crosses. Used on branches of the structure. This type of fitting allows you to connect profiles with different section sizes.
Technology basis
In principle, the construction of a fence from corrugated sheets without welding is no different from classical technology, except that to connect the longitudinal and transverse elements of the frame, it is not welding that is used, but alternative fastening methods. Which ones depend on the manufacturer. Each plant producing fences from corrugated sheets strives to invent and patent its own fastening system: for some it is brackets from two X-shaped welded channels, for others it is special galvanized clamps or plate holders for bolts.
In addition to individual auxiliary fastening devices, you can also order posts with already welded “ears” for fastening - in a word, there are many opportunities for those who want to install a fence made of corrugated sheets with their own hands and without welding.
The profile pipes of the fence frame are connected to each other in the same way as with corrugated sheeting - with bolts or roofing screws. By the way, the use of special auxiliary devices - brackets, clamps, plates - also strengthens the places where the sheets are attached to the support, which is another advantage.
How to connect profile pipes: without welding and threading
For those who have at least once changed the pipes of the water supply system, the most reliable and fastest connection method is welding. But the welding process differs greatly from the process of welding pipeline elements consisting of plastic. The main materials, in the latter case, are fittings and couplings.
What is the advantage of profile pipes?
- Firstly, metal pipes of various profiles are quite resistant to damage. In addition, the pricing policy for their cost is very acceptable, and such properties as strength and reliability are attracting more and more attention.
- Secondly, compared to other types of pipes, they are quite light. But this does not mean that they are only suitable for certain jobs. With their help you can make any design.
Today the market offers a lot of varieties of profile pipes, as well as their sections. Each type is selected individually.
Varieties of the welding process
Working conditions, types of connectors and pipe material are the determining criteria for its varieties.
The welding process occurs using:
- gas apparatus;
- hands;
- electric current;
- metal electrodes;
- inert gases;
- flux-cored wire.
By the way, in addition to the above types, welding using flux-cored wire is in great demand.
What welding process is suitable for profile pipes?
First, we need to say that in order to weld profile pipes, you need to determine the correct type of welding. Welding using inert gas, suitable for profile pipes made of steel that does not rust. Short-arc welding is used if the steel thickness exceeds 0.8 mm. If the thickness varies up to 3 mm, then it is better to make the connection by arc welding. When the thickness of a steel product is 3 mm or more, you need to choose electrodes that melt. In most cases, this type is used for industrial purposes.
Naturally, after completing the welding process, it is imperative to check the level of quality of the work done. Based on external signs, you need to evaluate the welded pipe and make sure there are no defective elements.
Types of electrodes
Regarding profile products, they are divided into those that melt and those that do not melt. Such electrodes are used depending on the material from which the pipes are made.
Electrodes that have the property of not melting require the presence of a special wire. Using them, you can connect two different pipes with the same diameter dimensions into one. During the welding process, the coating of the profile products becomes smooth. When melted, the pipe and the connecting unit merge into one product. This type of welding is quite labor-intensive, since it is necessary not to lose the properties of the material, but to achieve their preservation in their original form. It is recommended to first ensure that the edges become smooth, which will ensure that the ends are perpendicular. You need to navigate by the type of chips.
It should be noted that there are electrodes for working with cast iron and copper products. If we compare the strength of welding works of metal products and plastic ones, then preference cannot be given to anyone. In terms of the functions that welded metal and plastic products must perform, they are no different.
Why give preference to welding work?
1. Firstly, connection work is carried out using highly technical and high-quality equipment in the arsenal. This fact provides a guarantee that there will be no leaks in the future.
2. Secondly, this process will not take much time and effort.
3. Thirdly, the cost of installation work is affordable.
4. Fourthly, the joints do not affect quality and functionality. In addition, joints during welding work reach minimum values.
Do not be afraid of welding work in the apartment. This process is quite simple and reliable. It is not necessary to use the services of professional welders; two people can handle this work, one of whom will be an assistant. The main thing is to adhere to the requirements of the job and do everything right.
Requirements for connecting parts
The quality of the connecting parts also greatly influences how strong and durable a fence made from corrugated sheets will be without welding. Here are the mandatory requirements for them:
- Versatility of shape, allowing the use of parts with fences on flat terrain and on a slope
- Corrosion protection (galvanization, polymer painting and other processing methods)
- Protection against dismantling – for example by grinding the heads of the fastening screws
- Exact match to the shape and dimensions of horizontal and vertical pipes (this is why it is recommended to order the fence frame along with connecting parts)
Frame installation without welding
We’ll tell you how to install corrugated sheets yourself without welding, using the example of the simplest and fastest technology using holder plates. To implement this method, you will need logs made of a metal profile with a cross-section of 40×20 mm with walls 2 mm thick (ideally, the length of the fence span should match the length of the crossbars). As for the height of the fence, if it is no more than 2 meters, two rows of crossbars are enough, and if higher, then three.
To fasten the sheets to the frame and the frame elements themselves to each other, we will use holder plates, as well as bolts or roofing screws (the latter option is preferable since it does not require pre-drilling holes). However, the use of self-tapping screws is critical, first of all, for fastening sheets of corrugated sheets, and to connect the crossbars to the posts, ordinary bolts are sufficient.
After installing the pillars using classical technology, it’s time to start fixing the lags - crossbars. To do this, it is necessary to drill holes of the required diameter in advance at the joints of the profile, and then proceed with assembly, laying the crossbars so that their widest part rests on the support.
Here's how to install crossbars using X-shaped brackets:
Here are two basic rules for the location of the crossbars:
- The upper and lower crossbars should be positioned so that the distance between them and the upper and lower edges of the calculated position of the corrugated sheet is 20-30 cm
- If three crossbars are planned, then the central one should be located approximately in the middle of the support
If bolts rather than self-tapping screws were chosen to fasten the corrugated sheets, it is necessary to pre-drill holes of a suitable diameter in the corrugated sheet and crossbars. Self-tapping screws require a simpler installation procedure, using a low-speed screwdriver.
Generally accepted rules for piping installation
Installation is carried out manually. The crowbar serves as a lever for positioning the pipes; a wooden spacer must be provided between them and the crowbar. If the lever cannot fulfill its purpose, professionals recommend using a jack.
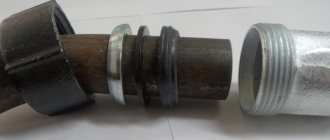
Upon completion of the pipeline installation, it is necessary to check the correct placement of the sealing gasket in the socket. A thin metal plate, 0.5 to 0.8 mm thick, is inserted between the smooth end and the socket. The plate must be in contact with the rubber ring. Then it moves around the circumference of the pipe, and at the end the location of the ring in the socket is checked: the distance from the plate to it should be the same along the entire circumference.
If the pipeline is installed at sub-zero temperatures, it is necessary to carry out the work with extreme caution and use only silicone lubricant. If the pipeline is installed using the socket method in a residential (warm) room, then liquid soap can be used as a lubricant for their smooth end and socket
Disadvantages of fences without welding
At the same time, the technology alternative to welding also has some disadvantages. In particular, these are:
- The need for additional protection from vandals (say, by grinding the heads of the screws or using screws with a non-standard head)
- In general, increased requirements for fasteners, which must provide a tight and durable connection
- The need for exact matching of fasteners to crossbars, posts and the fasteners used.
Many homeowners believe that it is impossible to install a metal fence without welding. Therefore, short-lived wooden fences are built. However, to erect a fence without welding from corrugated sheets, it is enough to use detachable types of fasteners. Since the work does not require complex equipment, even a beginner can perform all operations with his own hands. This does not require large financial expenses.
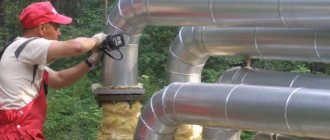
Gas welding of pipes
Experts less often connect pipes using gas welding, preferring to use electric arc welding. The reason is that the use of a gas welding machine increases the cost of work, is more dangerous due to acetylene, and requires thorough training of a specialist. However, gas installations are also used in such work. And this is due, first of all, to the inability to connect to the power supply network.
In practice, there are two methods for using gas welding equipment:
- The welder moves the filler material following the torch from left to right. This technology is usually called “right”. The advantages of the method are excellent heating of the materials being joined and excellent visibility of the working area. As a result, gas consumption is reduced and the worker’s productivity increases. However, this method of operation is acceptable for pipes with a wall thickness of 5 millimeters or more.
- The “left” method is characterized by the fact that the filler material moves in front of the burner in the direction from right to left. It is in demand when working with thin-walled pipes.
It is customary to distinguish several stages of welding profile pipes using a gas torch. Initially you will need to purchase materials:
- oxygen and acetylene cylinders;
- filler material;
- gearbox;
- gas burner with tips;
- flux;
- gas supply hoses.
It is necessary to pay attention to the fact that the gas installation is unsuitable for use when it is necessary to weld a thin-walled profile pipe. The metal will melt too quickly and the tightness of the joint will be questionable
At the first stage, you need to prepare the surface: degrease and clean from foreign matter. The workpieces are firmly fixed on the work table. The edges are treated with a paste-like flux, which prevents oxidation of the metal during the welding process. Experienced welders recommend making bevels on the edges of pipes at an angle of 30 degrees. This will allow you to make several high quality welds.
The flame is formed as a result of the combustion of a mixture of oxygen and acetylene. The filler material is supplied to the joint and moves ahead of the burner flame. The burner temperature is sufficient to melt both the additive and the metal of the workpiece. As a result, the melts combine to form a weld. The burner should be moved from right to left. The opposite direction is used when the walls of the pipelines are thick. In this case, the wire is fed after the torch, and not in front of it
It is very important for high-quality welding to choose the optimal electrode diameter
During operation, it is necessary to control the geometry of the structure. Due to the high temperature of the burner, it is easy to make a mistake and heat one side more than the other. This may disrupt the symmetry of the workpiece arrangement. Therefore, you need to carefully monitor this and correct the situation if necessary.
Source
Preparatory work
To calculate how much material is required for a metal profile fence, you need to determine the length of its perimeter. To do this, wooden pegs are driven into its corners. If the perimeter has ledges, then pegs are also driven in at the turning points. Before marking, it is recommended to check the site plan so as not to inadvertently appropriate part of the neighbor’s territory.
At a height of 10 - 20 cm from the ground, string is pulled between the pegs. It should not sag, but also not be too tight. After measuring the string, the required length of the fence perimeter and straight sections is found.
We perform gas welding
After preparing and degreasing the surfaces, apply flux paste. It will prevent oxide from forming. It is important to adhere to a certain bevel angle of the edges. It is usually 30˚.
How to weld a profile pipe correctly? The answer is simple - by feeding the additive evenly from start to finish in front of the flame. The burner will gently melt materials and connect pipes.
Gas welding has a distinctive feature. If the wall thickness exceeds 6 mm, the burner is moved from side to side. Thus, the level of acetylene consumption is reduced. And the parts are more firmly attached to each other.
Video - Horizontal gas seam:
Calculation of the required material
The required amount of materials for building a fence from corrugated sheets without welding is simply calculated:
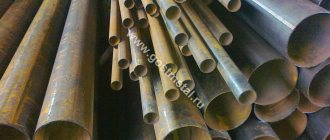
- For support pillars, it is recommended to use profile pipes 60×60×2 mm. Wooden posts rot quickly, so they are often chosen for temporary fencing. The pillars are installed at intervals of 2 - 3 m from each other. To determine their number, the distance between the corner supports is divided by the span length. The length of one post is equal to the height of the fence plus 1 meter, which will be buried in the ground.
- The veins (joists, cross members) are made from a 40×20×2 mm profile pipe. If wooden posts are installed, then the crossbars are made of wood. Ideally, the length of the lags should be equal to the distance between the supports so that the joining occurs on them, but this rarely happens. In practice, calculations are based on the length of straight sections, cutting off the excess. For fences up to 2 m high, two rows of crossbars are installed, and if higher, three.
- The thickness of the corrugated sheet should be at least 0.5 mm, and the wave height should be 20 mm. Metal of this thickness does not deform under the influence of significant wind loads. Since the sheets are overlapped on one wave, this should be taken into account when calculating their quantity.
- A fence made of corrugated sheets is mounted without welding using brackets secured to the posts with bolts. They should not have protruding parts that could damage the protective coating.
- To prevent moisture from penetrating inside the supports, their ends are covered with plastic plugs.
- To give the profiled sheets rigidity, their upper edge is edged with a U-shaped strip.
- The corrugated sheets are fastened with roofing screws.
- To concrete the supports you will need sand, crushed stone, and cement.
Features and characteristics
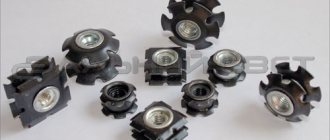
Crabs are staples with a fastening system. They are made of galvanized sheet metal, the thickness of which must be at least 1.5 mm. They mainly found their application in the installation of rolled pipes with a cross-section of 20x20, 20x30, 40x40 and 20x40 mm. Fastening is carried out using clamping force. The bolts are tightened on the crab itself, and not on the pipes being connected. Because of this, this design has low tensile strength, that is, the fixed pipe, with some effort, can be removed from the connecting element.
An outdoor metal structure constructed using fastening crabs is continuously exposed to adverse conditions (wind, precipitation, temperature changes, frost). Gradually this will lead to loosening and loss of stability of the structure. Therefore, fasteners must be periodically checked, tightened and, if necessary, repaired.
This type of fastener allows you to create a frame structure that can be assembled and disassembled when necessary.
Among the disadvantages of connecting crabs, one can note the impossibility of their use in the installation of pipes with a large diameter. Parts can only be joined at an angle of 90°.
Fixing veins to posts
The brackets for attaching the crossbars to the posts are X-shaped, the edges of which are bent in the shape of the letter P. Logs from a profile pipe are inserted into them. On the front side and curved parts there are holes for self-tapping screws or bolts. To assemble the fence you will need:
- standard brackets for fastening crossbars on straight sections;
- angular, installed at turns;
- end ones, used for mounting joists on gate and gate supports.
Sometimes the veins are attached to the posts using corners, but such structures are less durable and unsightly in appearance.
Before assembling the frame without welding, the installation locations of the brackets are marked on the supports. To do this, strings are stretched between them below the upper edge of the pillars by 20 cm and above the soil level by 30 cm. If it is necessary to install a third crossbar, its position is marked in the middle part of the supports. Then proceed to installation:
- The brackets are applied to the marks and screwed through the holes on the front side to the posts with self-tapping screws. Bolting is more durable, but labor-intensive. Corner brackets are installed at turns, and end brackets are installed at gates and gates.
- An uncut profile pipe 40×20×2 mm with a wide flange to the stand is inserted into the grooves of two adjacent supports and secured through holes in the bent parts of the bracket. The second lag is mounted in the same way.
- The next two veins, after installation on the posts, are connected to the installed ones. The joint is secured with a U-shaped bracket made from a profile. In this way, logs are installed around the entire perimeter.
- The assembled frame is cleaned, coated with a primer, and painted in 2 layers of metal enamel.
This method allows you to save a significant amount of material. At the same time, the strength of the frame is not reduced. If you join crossbars on poles, as some craftsmen recommend, you will have to cut the pipes to fit the spans. The end result is an expensive pile of scrap metal, which has nowhere to be stored and is a shame to throw away.
Method number 1. Crab elements
Universal fasteners designed for connecting rectangular/square profile pipes. Each “crab” consists of several parts, which are bolted together during installation. The parts of the “crab” are made of 1.5 mm metal with a durable polymer or zinc coating.
There are these types of crab elements:
- volumetric (designed to connect three pipes in the corners or four inside);
- T-shaped (designed to connect three pipes);
- X-shaped (designed to fix four pipes);
- L-shaped (designed to connect two profiles).
Home craftsmen use crab systems to assemble without welding:
- greenhouses, greenhouses;
- racks, benches;
- Summer shower;
- pet cages, aviaries;
- gazebos, canopies;
- supports for climbing plants, lightweight fencing.
On a note! Crab systems are also used for temporary connection of parts when repairing welded structures. In general, this is a fairly reliable connection method, hardly inferior to welding in strength.
- long service life (up to 50 years);
- structures can be assembled/disassembled many times;
- affordable cost of crab elements;
- Even an unskilled worker can handle the assembly;
- versatility.
- pipes larger than 40x40 mm cannot be connected;
- joints must be protected from corrosion, as moisture accumulates in them;
- pipes can only be connected at an angle of 90 degrees;
- if a large tensile load occurs, pipes may be pulled out of the crab elements;
- The nuts need to be tightened regularly.
Fastening corrugated sheets
The sheets are fastened with self-tapping screws or bolts. In the second option, you will have to drill holes in the crossbars and profiled sheets. When installing it yourself without welding, it is recommended to use a low-speed screwdriver.
The covering starts from the corner. It is important to correctly install the first sheet, checking its horizontal and vertical position with a building level, since subsequent ones will be aligned with it. It will be difficult to perform this operation alone, so you will need an assistant. The properly aligned sheet is secured with clamps with rubber jaws. Fixation to the veins is carried out at several points where the waves meet. The following sheets are installed with an overlap, one wave each.
Having finished covering the entire perimeter, they begin to thoroughly fasten the sheets. To do this, self-tapping screws are screwed in in increments of two waves. If there are fewer attachment points, the corrugated sheet, bending under gusts of wind, will knock on the crossbars, shaking the structure. To ensure that the screws are positioned in an even line, a fishing line is stretched between the edges of the straight section at the level of the joists. If the polymer coating is scratched during operation, the damage must be painted over so that it does not rust.
Final works
To ensure that a self-installed fence made from corrugated sheets has a finished look, a U-shaped strip is placed on the upper edge of the sheets. With it, the fence will be safer and prettier. Forged products installed on top of the fence increase its attractiveness and prevent intruders from climbing over the fence.
Plastic plugs are driven into the ends of the supports with light blows. To protect the pillars from moisture getting inside, decorative covers of various shapes and colors are also used. They are easy to choose in accordance with the design of the site.
A self-made metal fence will reliably protect the area from stray animals and uninvited guests. With the right color, it will fit perfectly into any landscape design, complementing or highlighting the decoration of the house. Manufacturers have mastered the production of profiled sheets with imitation of valuable wood species. You can do all the work yourself without involving specialists. All you need is desire and time.
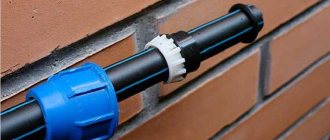
Clamps
If you need to fasten a profile pipe to a fence, use clamps with bolts that consist of two parts. One half is installed on the wall or ceiling. The position of the inserted pipe is fixed with the second half by tightening the bolts.
This connection is called a clip.
If the dimensions are correctly selected, installation is carried out without sagging. Adjustable clamps can be used to fasten profiles of any cross-section. During installation, it should be taken into account that the clamps for fastening the steel profile pipe must be made of the same material, and the polymer pipe must be made of plastic.