There can be many reasons.
Does not develop speed, or speed drops due to a breakdown of the speed control unit,
The problems with the grinder brushes are that they spark, there is a drop in speed and it does not develop power, the brushes can be replaced, sometimes you can do without replacement, just clean the brush assembly of the angle grinder (grinder grinder) from dust and dirt.
And you may have to replace the brush holder springs.
There are also more “banal” reasons, my angle grinder lost momentum due to the fact that the wire of the grinder was damaged, or from constant kinks, or somewhere it was touched by a cutting wheel.
The contact was not of good quality, it warmed up under load, and the speed dropped.
Turn off the angle grinder, “feel” the wire with your hands, and find the problem area.
Next, we cut the wire, strip the ends, twist it and insulate it with electrical tape.
But in any case, before you start looking for a problem and methods for eliminating it, you need to remember where the problems started, what preceded it.
The grinder, being the most popular tool in the house, is subjected to considerable loads and intensive use. Because of this, after some time it happens that when starting the engine, jerks, a burning smell and other malfunctions appear, suggesting that the angle grinder (angle grinder) has broken down. But you shouldn’t immediately take the device for repairs or buy a new one. Most malfunctions of this device can be resolved independently.
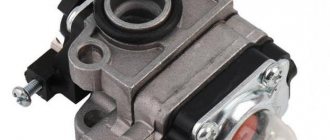
Design and electrical circuit of the grinder
Over the many years of existence of such a tool as an angle grinder, its appearance, as well as its internal structure, have remained virtually unchanged. To repair an angle grinder with your own hands, you need to know the structure of its mechanical part, as well as its electrical part.
If you look at the figure below, you can see what parts the angle grinder consists of.
- Wheel for adjusting the spindle speed of the unit.
- An electric motor consisting of a rotor and a stator.
- Start button. Sometimes a soft start system is connected to it.
- Housing made of impact-resistant plastic.
- Button for fixing the spindle (used when changing tools).
- Safety coupling. Protects the engine from overload when the tool jams.
- Protective cover. Covers the tool and protects the user from flying particles of the material being processed, and also prevents injury to a person when the tool, for example, an abrasive disc, is destroyed.
- Nut that clamps the tool. It is unscrewed using a special key that comes with the power tool. There are also quick-release nuts that can be unscrewed without a key.
- The gearbox housing and the gearbox itself. It consists of a block of gears that transmit rotational movements from the rotor to the spindle with the tool.
The figure below shows the electrical circuit of the angle grinder.
The electrical part of the angle grinder has the following elements:
- electrical cable with plug for connecting to the mains;
- start button;
- stator;
- electric brushes (carbon or graphite);
- collector;
- armature (rotor).
The following figure shows the connection diagram for the angle grinder, namely its engine.
All components of an electric motor perform specific functions.
- The rotor is the shaft on which the coils and commutator are located. The rotor, rotating in the magnetic field of the stator, transmits rotational motion to the angle grinder gearbox.
- Collector. It is the part of the rotor to which all control cables are connected. Electrical signals from the control unit to the engine pass through the collector. It is to the collector that the electric brushes are connected.
- Electric brushes. Their main task is to transmit electric current from the power cable to the collector.
- Stator. It is a coil with a certain number of turns. The task of the stator is to create a magnetic field, which, interacting with the armature, sets the latter in motion.
Angle grinder device
The design of the angle grinder consists of an electric drive , the torque of which is transmitted through a gearbox to the spindle with the working tool. On professional-level grinders, additional soft starters, regulators and speed stabilizers .
Grinder device DIOLD MSHU-1.5-01 with speed control (6). Photo 220Volt
Soft start creates comfortable and safe working conditions with the angle grinder, reduces the possibility of failure of the main working elements of the angle grinder (see angle grinders with soft start). The presence of a speed control option expands the possibilities of using an angle grinder (see about angle grinder speed), creates conditions for the absence of work with overloads, which increases the duration of its continuous operation (angle grinders with speed control here).
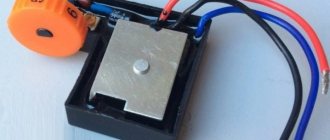
Speed controller
A speed (speed) regulator is present in angle grinders, where the quality of the material being processed depends on the rotational speed of the tool. For example, when processed at high speeds, plastic may begin to melt due to heating. For cleaning and grinding surfaces, a working tool is used that works effectively at certain spindle speeds.
The adjustment is made manually by changing the value of the variable resistance built into the device circuit. In addition to the variable resistor, the circuit includes an electronic unit that controls the amount of current. Electronic control of this electrical parameter when the speed, and therefore power, decreases, will maintain the amount of torque on the working spindle and ensure the functioning of the angle grinder.
Electrical connection diagram for a thyristor and triac VTA 12-600, with three or two terminals
A typical electrical circuit of the angle grinder speed controller is shown in the photo:
Typical electrical circuit diagram of the speed controller. Photo source
Here the main element is a triac (VT12) . This scheme is used to adjust the speed of high-power . The opening/closing of the triac is additionally controlled using thyristors (D83) . Therefore, the triac has three working terminals : 1,2 - ensure the passage of current from the network to the load, 3 - controls its opening/closing.
The circuit for adjusting the speed of low-power angle grinders can only be performed using thyristors . They simultaneously act both as organs that lock the chain and as controls. There is no need for a third conclusion here. The schematic diagram is shown in the photo:
Scheme of a thyristor power regulator. Photo source
The diode bridge (VD1) makes it possible to regulate the voltage on both half-cycles of alternating current using only one thyristor.
With soft start
Some specialized ICs can have current feedback, overload protection and soft start at the same time. These qualities are possessed by the U2010B chip, which forms the basic component of the circuit presented below:
Regulator circuit on the U2010B chip. Photo source
A special feature of the device is the absence of a tachometer, which allows you to avoid complicating the design of the angle grinder. The block is included in the circuit as an intermediate device between the electrical connector and the electric drive.
No power loss
The simplest and cheapest method of adjusting the speed of an angle grinder is based on changing the voltage . However, at low speeds the torque decreases significantly, and the angle grinder cannot perform its functions. Another method, more expensive and complex, is based on the use of microprocessor control . Information for the operation of the circuit with a microprocessor is provided by a tachometer mounted on the rotor shaft. Feedback through the tachometer provides almost 100% retention of torque when engine speed drops.
The main malfunctions of an angle grinder and their causes
According to statistics, most cases of angle grinder failure are associated with the electrical part of the device. Some damage may be minor, which allows you to repair the angle grinder yourself. But, for example, if the motor windings burn out, only a specialist can repair an angle grinder.
Grinder won't turn on
The reasons that the angle grinder does not turn on may be the following:
- the electrical plug is faulty;
- the electrical cable is faulty;
- the start button is broken;
- the contact between the power cable and the button is broken;
- break in the contact wire of the electric brush;
- severe wear of electric brushes;
- failure of the rotor or stator windings.
The angle grinder does not develop speed
The reasons why the angle grinder does not gain momentum can be different.
- Damage to the speed control unit. To check this version, you need to connect the device’s motor directly, bypassing the regulator, and check the operation of the device.
- Failure of the electrical cable due to constant kinks or mechanical damage. Because of this, the damaged wire begins to heat up under load, and engine speed drops.
- Collector contamination with dust. Contaminants must be removed with alcohol.
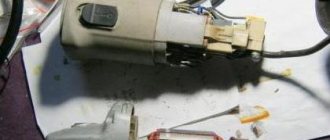
- Problems with brushes. They may be worn out or have a short contact wire as shown in the following photo.
The Bulgarian is behaving strangely or is it just brushes. Mini review of BOSCH PWS 8 125 CE and GWS 850 CE. From experience.
If the grinder does not gain momentum
, loses power or behaves strangely. Symptoms of brush failure on an angle grinder.
A failure in the operation of the motor speed control system can be eliminated by passing current around the circuit using a small piece of wire. But we must remember that after this the engine speed will be maximum, so check whether it is designed for a mains voltage of 220 V.
One of the most common malfunctions in which it is possible to repair an angle grinder with your own hands is considered to be a break or short circuit of turns in the stator or armature windings. They can occur due to overheating of the tool or overload in the network.
Malfunctions of stators and armatures can be divided into types:
armature commutator failure;
The simplest but most effective method for diagnosing faults is a careful external examination for further use of the engine element or necessary repairs. After this, you can begin repairing the angle grinder’s anchor with your own hands.
In the event that an external inspection does not produce results, you cannot do without special instruments: an ohmmeter, a current indicator, an LATR. Experienced craftsmen use the PUNS-5 device.
- Interturn electrical short circuit, sparking across the entire surface of the brushes, which increases with increasing voltage.
With a small voltage, the armature begins to rotate in opposite directions, and in different positions, this indicates an interturn short circuit.
A spark appearing on the brushes, which increases with increasing voltage, indicates that the wire may have broken or there is poor contact with the commutator.
Stator breakdown An impulsive increase in the spark on one of the brushes when the voltage increases - short-circuiting the insulation of the wiring located in the stator winding.
The formation of too many sparks near the commutator may indicate poor armature balancing. In operating condition, as the voltage increases, the engine speed should increase smoothly, there is practically no vibration. If resonance occurs during operation, it means the balancing is incorrect.
Methods for finding a faulty electric motor using an ohmmeter
- The resistance is measured between the collector contacts (normally it is the same for each measurement) or through the contact, when the armature winding is specially made this way to eliminate losses on odd harmonics.
The resistance between the metal of the magnetic circuit and the collector should be several megohms to check that there is no breakdown on the product body.
Summarizing the results of the article, it can be noted that repairing an angle grinder with your own hands . It’s not such a terrible problem if you approach it with the right knowledge.
Source
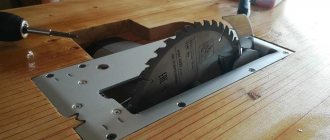
How to disassemble an angle grinder for diagnostics
In order to diagnose the electrical part of the angle grinder, as well as eliminate mechanical breakdowns of the device, you will need to disassemble it. Disassembly is carried out according to the following algorithm.
- Using a wrench, remove the disk or other attachment from the spindle of the unit.
- Unscrew the handle.
- Remove the protective cover.
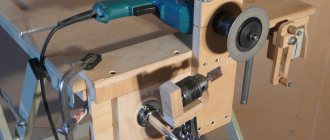
- Open the special windows located on the sides of the angle grinder casing and remove the electric brushes, having first disconnected the terminals.
- Unscrew the gear housing from the angle grinder motor housing.
- Pull the gear housing lightly and remove it from the housing. In this case, the gear unit will be removed along with the rotor.
- After removing the armature, the motor stator will remain in the casing, which can also be easily removed for diagnostics after unscrewing the fasteners.
- To disassemble the gearbox, unscrew the screws holding the cover. After removing the cover, you will see the gears of the gearbox.
- To remove the anchor from the angle grinder, you will need to unscrew the nut located inside the gearbox.
- In order to remove the bearing from the armature, it is recommended to use a special puller. Otherwise, the shaft may be damaged.
How to disassemble an angle grinder
How to disassemble an angle grinder? It's not such a difficult process. This does not require special knowledge, but everything must be done carefully and with caution. Each owner needs to know how to disassemble any working tool, since from time to time it needs internal cleaning from dirt and dust, and its service life depends on this.
Today on the market you can choose different types of grinders, which differ in performance characteristics, size, and quality. Manufacturers are also different. Whatever model of grinding machine you get for yourself, they all have the same model for assembling parts.
Having prepared the screwdriver, you can start disassembling:
When disassembling an angle grinder, it is important to understand the order in which parts are removed in order to assemble it correctly.
Diagnostics of the electrical part of an angle grinder
As mentioned above, most often an angle grinder refuses to work due to breakdowns of the electrical part of the unit. To correctly diagnose the electrical circuits of a tool, electrical equipment repair technicians use a special device - a tester.
If you press the start button of the unit and it does not work, then in 90% of cases the cause of the breakdown is not so serious that you cannot repair the angle grinder yourself.
Experts advise adhering to the basic rule of repairing power tools: moving from simple to complex.
The first step is to check the electrical cable and the plug at its end. If it is collapsible, then unscrew it and check the reliability of the contacts. Otherwise, you will have to disassemble the angle grinder (remove the casing of the device) and “ring” the cable with a tester, and also make sure that the current is suitable for the contacts of the “Start” button. If the device shows a break, the cable should be replaced with a new one.
Grinder repair: main types of faults
Over time, all types of electrical tools can fail. Often the cause of such breakdowns is violations of operating rules or poor quality of tool components.
One such tool is an angle grinder or grinder. If the tool does not function, then you should not immediately buy a new one, since such products can be repaired.
To repair an angle grinder, you need to know its design, as well as its operating principle.
How does an angle grinder work?
Repairing an angle grinder with your own hands begins with finding the cause of the malfunction. To do this, it is necessary to find out the operating principle and design of the tool.
The operating principle of the device is based on the conversion of electrical energy into mechanical energy.
Mechanical energy represents rotational movements, which drive the working shaft of the tool with the corresponding attachments.
This means that the grinder consists of two parts: electrical and mechanical. Failure can occur in any node, so it is important to know the structural elements of both parts. The main elements of the grinder include:
- Plastic case.
- The electric motor is two-phase.
- Gearbox.
- Power button.
- Sliding bearings.
- Brush unit.
- Power cord.
- Speed regulator (for some models).
The case is made of impact-resistant plastic. The housing design combines an electrical circuit with mechanics. The motor rotor rotates by applying electric current. Sliding bearings provide rotating movement of the rotor shaft. At the end of the shaft there is a toroidal gear.
It drives a flat gear, which is located at an angle of 90 degrees with respect to the shaft. Thus, the work of the angle grinder is carried out. In addition to the two plain bearings on which the rotor shaft rotates, the angle grinder has another bearing assembly.
It is located on the working shaft of the mechanical part of the tool.
Prevention and Maintenance
To avoid repairing the grinder, you should periodically diagnose it. First of all, it is important to take care of the mechanical part, which suffers from a lack of lubrication and the occurrence of dust and moisture. There are special lubricants for grinders, both domestic and foreign. Moreover, the lubricant for the gearbox and bearings is different.
The main recommendations for extending the life of an angle grinder are the following:
- Maintain the tool regularly.
- Comply with operating and storage standards.
- Avoid long-term loads, especially for household models.
- Replace worn mechanisms in a timely manner.
From the above it follows that, despite the complex design of such a tool as an angle grinder, extending its service life or making repairs will not be difficult.
Repair of an angle grinder: main types of faults Link to main publication
Source: https://InstrumentyvDom.ru/elektro/remont-bolgarki
Mechanical breakdowns and their elimination
Mechanical failures of angle grinders include the following.
- Worn motor armature bearings. Typically, when the bearings wear out, you may experience strong vibration while the machine is operating. In addition, grinding and other noises may be heard. Sooner or later, the bearing will collapse, and the spilled balls will fall on the gears of the gearbox. If this happens, then in addition to the bearing, the gears will also have to be replaced. Of course, it is better not to wait for this problem, but to replace it at the first sign of bearing failure. How to get to this part of the angle grinder was described above.
- Worn ball bearing or plain bearing of the gearbox. As in the previous case, when you turn on the device, vibration will be felt and noise will be heard that is unusual for the normal operation of an angle grinder. To prevent further damage to the gearbox, it is necessary to replace the faulty part.
- Reducer gear wear. Gears wear out quickly due to insufficient lubrication. For the same reason, the gearbox heats up. It is necessary to monitor the condition of the lubricant inside the gearbox and change it if necessary. How to disassemble the gearbox was described above. You need to use lubricant specially designed for angle grinder gearboxes, and you can buy it at points where this tool is sold. If for any reason the teeth of at least one gear are broken, then the entire set of gears (a pair) needs to be replaced.
Why won't the grinder turn on?
Most angle grinder problems are related to the electrical part. The tool may not turn on for the following reasons:
It is advisable to solve problems with an electric motor in a specialized workshop that employs qualified specialists and has modern diagnostic equipment and repair tools.
Why does the grinder heat up?
The electric motor overheats in the following cases:
- Incorrect operating mode. As a result of too high loads, the motor windings burn out.
- Destruction of armature bearings. The result is difficulty in operating the engine and, as a result, overheating.
- Clogged ventilation ducts through which air flows to the electric motor, acting as a cooler.
- Closing the turns of the stator and rotor windings.
The angle grinder gearbox overheats due to lack of lubrication or its poor quality.
Why does the grinder spark strongly in the area of the brushes?
During normal operation, a small, uniform spark is observed inside the housing. If it is too strong, the brushes must be replaced. The problem occurs in the following situations:
- Damage to the armature winding - an interturn short circuit has occurred or a section of the winding has broken.
- Loss of contact between the winding and the collector plates.
- Violation of insulation between the collector lamellas.
- Severely worn “grinder” bearings , which provoke the beating of the angle grinder’s armature, causing the brushes to spark and burn strongly.
- Using brushes whose characteristics do not correspond to the speed and voltage in the network.
- Motor overheating due to continuous operation for too long.
Reasons for strong vibrations of the grinder
The source of this problem may be:
- Poor quality of the cutting or grinding wheel, their uneven wear.
- Contamination of mechanisms or severe wear of the mechanical part - bearings, shaft seat.
- Brushes are dirty.
If your grinder stops working, if it makes noise, vibrates a lot or overheats, it is recommended to contact a service center, which will not only fix the current problem, but also diagnose all components of the tool.
Grinder repair
Repairing an angle grinder with your own hands is a completely solvable problem. The main thing is to take your time, understand the design, remember all the incidents in which it broke, find what could have worn out during operation, make diagnostics and start repairing it.
Then there are more serious faults, and therefore repairs require certain knowledge and skills.
— breakage or licking of gear teeth of the gearbox; — jamming of bearings; — failure of the armature or stator; — failure of the control electronics; — failure of the collector; — deformation of the body;
When determining the mechanical defects of an angle grinder, more attention should be paid to the condition of the plinitar (large gear), shank (gear on the shaft) and bushings. Uneven wear of the teeth or wobbly shafts indicates immediate replacement of worn parts.
Breaking out the spindle lock button. The reason is just one careless movement, namely pressing (deliberately or accidentally) on the button when the disk is spinning. From time to time, breakdowns occur due to attempts to remove a jammed disk using a button. Many grinders have slots on the spindle where the disk is attached specifically for an ordinary open-end wrench; look at your own grinder, most likely you have this too. So, it’s better to use them and an open-end wrench than the disk lock button.
Failure of the electric motor. This often happens with tools that work in dust and are forced to rest in the sand or on the ground: the sucked dust grinds down the winding. In general, you can destroy the motor without dust - by strong overloads, especially if the tool is low-power. Therefore, in small angle grinders, not only the armature, but also the stator often burns out. In small angle grinders, the electrical speed control unit also breaks down. If you use an angle grinder to cut very dusty materials, namely slate, a stocking placed on the ventilation slots in the body helps to protect the tool.
Bearings. Another unhealthy place for grinders (and like other rotating power tools). Few cars have strong immunity to dust, and high rotation speeds mean rapid wear and tear. In general, bearings are not the worst failure, they just change. But it is important to make a replacement just in time, otherwise there is a greater possibility of a more severe breakdown, the repair of which is comparable to the purchase
Stator If, when turned on, the disk begins to gain speed and accelerates very much, there is definitely a turn short circuit on the stator winding. Stator repair is a more severe type of failure and requires appropriate skills. If you are not confident in your own abilities, then it is better to entrust this to experts or use the services of a repair shop.
We begin the repair of the angle grinder stator by cutting off the frontal parts of the winding, the remains of which are removed. Next, we make a new winding using a template sandwiched between two large plates on an axis that can be plugged into an electric drill. The main thing is to achieve a similar number of turns, made with the appropriate density and maintain the thickness of the wire. We insert two coils into the stator housing, make the conclusions from the same winding wire, insulating them with flexible tubes of the appropriate diameter.
Gearbox Models with power up to 1100 W usually use spur gears mounted on the armature, but grinders with higher power, for example, 1500 W, require helical gears. Both options have a conical shape, since the axis of the gearbox rod intersects with the armature shaft, and transmission is possible only by angular engagement of the teeth. Typically, repairing an angle grinder gearbox consists solely of replacing gears. If a disc gear is broken, it will be very difficult to remove it for replacement; this unit is most ideally fixed in the gearbox.
Speed regulator Almost all modern models of drills, jigsaws, and screwdrivers have a speed regulator. But not all grinders (grinders) are equipped with such a mechanism. In principle, a regulator is not needed for cutting metal with a cutting stone, but for grinding it is simply not replaceable. The proposed homemade regulator circuit is very simple and reliable. There are few parts and they are not expensive. If you already have an angle grinder without a standard speed controller, then you can simply improve it.
You can also assemble it separately in a box with an outlet and use it as a carrier with a power regulator. Or you can immediately assemble the regulator in the body of the angle grinder and remove the resistor handle.
READ Replacement of the Body Ushm Interskol 150 1300
Brushes not installed correctly
If the brushes are placed deviating from the norm towards the commutator surface, a significantly larger amount of graphite dust appears during operation. Misaligned brushes need to be corrected.
Typical malfunctions of angle grinders and methods of diagnosis and repair
Do-it-yourself repair of an angle grinder begins with determining the cause of the breakdown. If it is not possible to find the cause, then you should follow the method of eliminating breakdowns from ordinary to complex. To repair it yourself, you need to first identify where the breakdown is located - in the electronic or mechanical part.
Mechanical failures include:
- Gearbox malfunction. The helical gear is mounted on the rotor shaft, so if the motor is running, but there is no rotational movement of the working part, then the reason lies specifically in the gear mechanism. In order to see what happened to the gears, it is enough to disassemble the tool body. The cause of gearbox failure in most cases is the licking of the teeth of the large shank gear. The reasons for this are varied:
- lack of lubricant;
- huge loads on the tool;
- low quality devices;
- incorrect operation.
One way or another, after identifying a malfunction, it should be corrected immediately. This can be done by replacing the faulty gear. In most cases, you can find them on sale paired with a helical tooth, which is mounted on the shaft. It is recommended to replace two gears in a pair, after which they must be carefully lubricated with a special lubricant.
- Bearing failure. You can find a breakdown by the corresponding sound that will appear when you start the product. This sound will manifest itself in the form of a rustling sound, which indicates wear of the bearings. A prerequisite for accelerated bearing wear is dust getting inside the tool. In most cases, the bearing located on the working part of the tool behind the plate gear suffers. How to repair a bearing on an angle grinder? First you need to find, if it is intact, then you can clean it from dirt with kerosene, then lubricate it, and put it back in place. If the bearing has served its purpose, then it should be replaced.
- The lock button is faulty. If the locking button malfunctions, there is a problem with installing the appropriate disk for the job on the tool. Damage to this button may occur due to wear-out or when starting the angle grinder with the button pressed. To eliminate this breakdown, it will be useful to disassemble the tool and then replace the product. Many craftsmen, if the button is faulty, jam the working shaft manually using an open-end wrench.
- Damage to the network cable. If the power cable is damaged, the power supply to the power tool is cut off, so the angle grinder
will not work. The cable can be damaged for various reasons (squeezing, squeezing, cutting), but finding the breakdown is not difficult. You will need to use a tester that is used to test the wiring. In this case, you will need to disassemble the instrument. - Control button failure. The design of grinders can have a regular button to start the tool, or they can have a soft start. In an ordinary button, in most cases, the contacts oxidize or become clogged, which can simply be cleaned with sandpaper. In buttons with speed control, the reason is often hidden in damage to the contact plates. The device can be disassembled and then checked for integrity. If a warped contact plate is found, then the starting unit will need to be replaced.
- Problem with the brush mechanism. Brushes are consumables that have a fairly long service life. If your tool is many years old, then it is worth disassembling it and looking at the brushes. If they are erased, then they need to be changed, which is not at all difficult to do. If the brushes are still of sufficient length, then the reason may be in the commutator mechanism, which has obvious signs of oxidation or contamination. It should be cleaned, then check the functionality of the tool.
- Rotor and stator malfunction. During operation of the tool with heavy loads, the stator or rotor winding may burn out. You can find the fault using a multimeter in resistance mode. A balanced option is to take the assembled engine to a repair shop, where the cause of the breakdown will be identified and corrected. Usually the burnt winding is rewound, but everything depends on the scale of the fault.
These are the main types of defects in the mechanical part of the instrument, the elimination of which does not cause problems. Now let's pay attention to the more complex part - the electronic one. The following types of breakdowns may occur in the electronic part:
Short circuit in the armature winding
The consequence of this deficiency is uneven sparking on the collector. It will be stronger on some records than on others. Due to the presence of an interturn short circuit, the current in certain sections of the rotor winding will be stronger than in others.
Rewinding the rotor or replacing it will eliminate the problem.
Poor contact between brushes and commutator
The electric motor spends part of its operating time in overheating mode. Under such conditions, carbon deposits appear on the collector. Poor contact leads to increased sparking of the brushes and even more carbon deposits.
It is necessary to clean the surface of the commutator with fine-grain sandpaper. To increase the stripping effect, use a screwdriver. Clamp the motor rotor into the chuck and remove carbon deposits with sandpaper at low speeds. Afterwards you need to completely polish it on a felt wheel.
Sources:
https://elektro-ryad.com/%D0%BF%D0%BE%D1%87%D0%B5%D0%BC%D1%83-%D0%B1%D0%BE%D0%BB%D0% B3%D0%B0%D1%80%D0%BA%D0%B0-%D0%B8%D1%81%D0%BA%D1%80%D0%B8%D1%82/ https://vending-doctor .ru/izgotovlenie/pochemu-bolgarka-ne-nabiraet-oboroty.html