For reference
Burnishing is the treatment of the free surface of an iron alloy by exposure to air, steam or other agents at a suitable temperature, resulting in the formation of a thin blue film of oxides on the surface. This improves appearance and corrosion resistance. This heat treatment is typically used for sheets, strips and finished parts. It is also used when heating springs after manufacturing to improve their properties.
General characteristics:
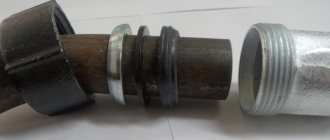
The driving nut consists of the following parts: a central threaded sleeve made of carbon steel with zinc coating and two rows of petals made of spring steel with subsequent hardening and blued surface.
The names of flap or castle nuts are due to their specific shape. The outer edges of the petals are bent to one side at an angle of 45 degrees and have a number of technological slots to improve their springy properties
Two rows of crown washers made of spring steel ensure high accuracy of installation along the pipe axis and reliable fastening. The process of turning the nut in the pipe is prevented, which allows installation without fixing the nut with an additional tool. Before installing the drive nut, a hole must be drilled.
There is no need for welding work - there are no traces of welding, assembly speed and labor productivity increase.
Repair without welding
The fact is that the blade usually breaks near the blade, and not deep in the handle - usually in the area of the guard - the transition of the handle to the blade. In this case, the owner has two parts of the blade in his hands: the blade itself, which does not have any methods of fastening without welding, and a separate shank, which remains in the handle.
Step by step repair
It often happens that the shank cannot even be removed without damaging the handle. Thus, elongation is impossible here due to the lack of it, and the easiest way to repair a knife would be to weld a new or old remaining shank.
However, if you still want to keep the blade, but it is impossible to use welding, you can often get out of this situation by making a new shank from part of the remaining blade.
To do this, they usually resort to shortening it:
- Before work, the blade must be released, then a profile can be cut out of it on a milling machine for a new shank.
- Make the necessary slots and holes for attaching the handle.
- Re-harden and temper - and now, the new knife is ready.
This is usually done with blades that are a flat plate with thinning in the area of the cutting edge, and not with triangular or tetrahedral ones.
If you want to make a shank from a broken dagger-type blade, you will most likely have to resort to the forged method - part of the blade in the tail section is unforged and given the required shape, then released and processed mechanically.
Shank lengthening process.
Types of driving nuts, availability and prices.
Round pipe:
| № | Name | Photo | Dimensions, mm | Price, rub | ||
| Pipe, mm | Thread | 1000 pcs | ||||
| 1.1 | M6/18 | 18x1.2 | M6 | 14,90 | 12,60 | |
| 1.2 | M6/19 | 19x1.5 | M6 | 15,40 | 13,15 | |
| 1.3 | M6/20 | 20x1.2 | M6 | 13,90 | 12,00 | |
| 1.31 | M6/22 | 22x1.5 | M6 | 15,10 | 13,70 | |
| 1.4 | M6/25 | 25x1.2 | M6 | 16,90 | 15,30 | |
| 1.5 | M6/28 | 28x1.2 | M6 | 17,90 | 16,40 | |
| 1.6 | M8/28 | 28x1.2 | M8 | 17,90 | 16,40 | |
| 1.7 | M6/30 | 30x1.2 | M6 | 19,20 | 16,80 | |
| 1.8 | M8/30 | 30x1.2 | M8 | 19,20 | 16,80 | |
Square pipe:
| № | Name | Photo | Dimensions, mm | Price, rub | ||
| Pipe, mm | Thread | 1000 pcs | ||||
| 2.1 | M6/20x20 | 20x20x1 | M6 | 16,30 | 14,80 | |
| 2.2 | M6/25x25 | 25x25x1.2 | M6 | 18,30 | 16,80 | |
Support nuts for profile pipes, nut for adjusting leg:
| № | Name | Photo | Dimensions, mm | Price, rub | ||
| Pipe, mm | Thread | 1000 pcs | ||||
| 3.1 | Op/M8/25x25 | 25x25x1.5 | M8 | 16,20 | 14,20 | |
| 3.2 | Op/M8/30x30 | 30x30x1.5 | M8 | 19,40 | 17,20 | |
| 3.3 | Op/M8/40x40 | 40x40x1.5 | M8 | 21,60 | 19,70 | |
The size of the driven nut is calculated using the following formula: Outer diameter of the nut = wall thickness x 2 + (0.3 ≈ 0.7) mm.
The table shows a list of driving nuts available in stock. If necessary, we can supply nuts of the sizes you need.
Round pipe:
| № | Name | Dimensions, mm | Price, rub | ||
| Pipe, mm | Thread | 1000 pcs | |||
| 1.1 | M6/18 | 18x1.2 | M6 | 14,90 | 12,60 |
| 1.2 | M6/19 | 19x1.5 | M6 | 15,40 | 13,15 |
| 1.3 | M6/20 | 20x1.2 | M6 | 13,90 | 12,00 |
| 1.31 | M6/22 | 22x1.5 | M6 | 15,10 | 13,70 |
| 1.4 | M6/25 | 25x1.2 | M6 | 16,90 | 15,30 |
| 1.5 | M6/28 | 28x1.2 | M6 | 17,90 | 16,40 |
| 1.6 | M8/28 | 28x1.2 | M8 | 17,90 | 16,40 |
| 1.7 | M6/30 | 30x1.2 | M6 | 19,20 | 16,80 |
| 1.8 | M8/30 | 30x1.2 | M8 | 19,20 | 16,80 |
Russian Standards
- GOST 9066. Studs for flange connections…
- GOST 22032. Studs M2 - M48, screwed into holes...
©elesant.ru
More articles
- Basic standards for electrical installation work
- Introductory machine. Calculation, selection of an introductory machine for an apartment
- Built-in, overhead and hanging floor panels
- Charging the diesel generator battery
- Paper insulated cables
- Cable metal tray
- How to choose a stylish floor lamp
- How to properly install electrical wiring in a bathhouse
- How to reduce prices for electrical work
- Distribution panel complete set, circuit breakers, connection terminals
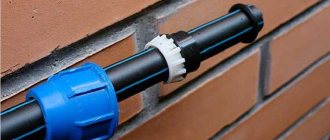
Application area
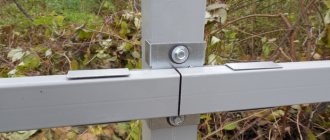
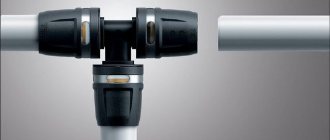
Thin-walled furniture pipe is widely used in the production of beds, chairs, tables, folding beds, all kinds of fences and barriers, tents and canopies, sports and medical equipment, in the form of handles and stands for industrial and household appliances. Most often, the pipes in these products are connected by welding. This connection is reliable and quite cheap. But it has one big drawback - this connection is not removable. When the design requirement dictates the need to obtain a dismountable connection, special fittings come to the rescue - driven nuts and leaf springs with a button. Using a nut, we obtain a bolted connection of high reliability and aesthetic appearance. Most often, a flap nut is used for a T-shaped collapsible connection of two pipes of the same or different sections, as well as a T-shaped connection of a pipe with the surface of the bracket. The nut is held in the pipe by plate-like “petals”, without the use of welding - this makes it possible to install it on a pre-painted or chrome-plated pipe. Drive nuts have a wide variety of sizes, which allows them to be used for tubes with a diameter of 10 mm or more and of various thicknesses. Drive nuts with M5, M6, M8 threads are used.
Which is better: purchased mounts or homemade screws
Winter fishing is a fun and leisurely activity that can take all day and even night. Therefore, it is important to take a responsible approach to arranging the shelter and, accordingly, choosing mounts for the tent. Based on the comparisons presented above, we can conclude that homemade screwdrivers are superior to finished products in many respects.
Purchased fasteners are expensive, and their reliability is sometimes questionable. While self-made screwdrivers will allow you to save money and be confident in their quality.
A do-it-yourself screw will reliably strengthen a winter tent
Application benefits
- easy to install;
- provide reliable fastening;
- provide the ability to produce a collapsible T-shaped connection;
- the absence of a flange makes it completely invisible;
- can be installed at the end of both round and square pipes;
- connect pipes of the same or different sections, as well as connections between the pipe and the surface of the bracket;
- used for painted and chrome-plated pipes;
- do not disturb the decorative coating;
Making screws for a winter tent from screws with your own hands
To make basic tent screws, you need to do the following:
- Prepare SHG-10200 screws made of galvanized steel with partial threads and a sharp tip, as well as nails and a drill.
- Make a hole under the screw head.
- Bend the nails used as a crossbar by 2-3 mm on both sides.
- Bite off the sharp and blunt edges of the nail, grind off the burrs (you can use a sharpening wheel).
A method for quickly making a tent screw for fastening a tent
Homemade tent screws are ready. All that remains is to screw them correctly into the ice surface, and you can set up a place for fishing.
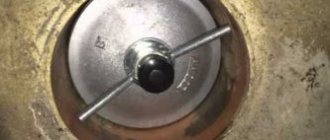
In production
Drive nuts are quite easy to use in production. It is necessary to drive the nut in such a way that the bent edges of the petals face themselves. To do this, it is better to use a mandrel in the form of a sleeve or a pipe of a smaller diameter with dimensions such that the wall of the mandrel falls on the surface of the petal during the subsequent impact. Avoid touching the mandrel and threaded bushing. The nut is usually driven to a depth of 5 to 15 mm. After the nut is driven in, we obtain a thread along the axis of the pipe for further connection to another pipe or any surface. The threaded bushing is guaranteed to be in the center and along the axis of the pipe, which is very important. It is impossible to remove a clogged nut from a pipe without destroying it.
Possible difficulties when unscrewing
Platinum Automotive SZ
Before you unscrew and remove the spark plugs, you need to understand some difficult moments that can happen when unscrewing.
Sometimes car owners who decide to unscrew and remove spark plugs are faced with dismantling problems, which may be due to various reasons, in particular:
- The spark plug is skewed. If the car owner used a spark plug wrench whose design size does not allow for optimal fixation of the spark plug, then this could very well happen.
- Often the cause is the thread, namely its contamination. To prevent such a problem, the spark plug must be cleaned or blown out before installing it in the thread.
- Not so often, but situations still occur when the candle is tightened with more force than necessary.
How to repair a threaded hole while maintaining its original diameter?
Currently, a simple and reliable way to restore threads has been found, which has been used all over the world for quite a long time. In our country, unfortunately, it is slowly gaining popularity, both due to our ignorance and the inability to purchase special spring inserts and auxiliary installation tools in stores.
Many well-known manufacturers are engaged in the development and production of inserts. Products from different companies may vary slightly in name (screws, fittings), design and material, but the principle of operation and installation technology are the same for all. On sale you can find not only sets of screws of various lengths, diameters and thread pitches, but also entire kits for restoring threads, which, in addition to inserts, include drills, taps, an installation device and a mandrel for breaking off the mounting lead. Such solutions are offered by the German manufacturer of metal-cutting tools Volkel and the Russian Delo Tekhniki. Some brands call this technology and tool a “system”, for example:
- V-coil system
- Recoil system
- HeliCoil system
Technology for restoring internal and external threads
Today, thread restorer is used extremely rarely in work. The most commonly used common tools are:
- A drill is used to change the size of a hole.
- The tap and die are designed for direct cutting of turns. They are inexpensive and are often used to cut a new surface, but they can also be used to restore a damaged one.
- Spindle or tool for screwing in the insert. It is characterized by the fact that the working part resembles a threaded one; there is a special hook at the end.
- Repair insert, represented by a diamond-shaped spiral. A leash was made at one end, due to which it rotates due to connection with the spindle.
In addition, some technologies involve the use of epoxy glue, cold welding or other materials. The choice is made depending on the specific case
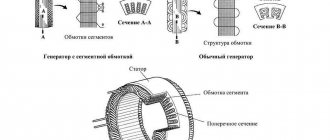
Types of spring threaded inserts
Wire inserts for repairing threaded holes have the shape of an elastic spiral, the turns of which form a high-precision rhombic profile on the inside, which is similar to the thread profile. Most sold screws have a driving tongue that serves to screw them into the prepared receiving thread. After installation, it is easily separated along the cut using a special breaker.
Spring sleeves have a different number of turns and, accordingly, different lengths, which are designated 1d, 1.5d, 2d, etc., where d is the diameter of the spiral. Special types of inserts are also available, for example, for spark plug threads or oxygen sensors. Threaded inserts are made from particularly strong, high-quality steel, mostly stainless steel, which makes it possible to obtain reliable threads that are resistant to wear, deformation and corrosion.
Extending the shank using riveting and soldering
Sometimes the shank has the shape of a small plate with a pair of holes. Quite often, if its length is short, the knife breaks - the handle breaks. The blade itself remains intact. Repairing the knife and lengthening the shank in this case is quite easy.
Riveting method
To do this, you will need a tube made of brass, copper, or mild steel of a suitable diameter. Aluminum is not suitable here - the metal is too soft. The thickness of the tube wall must be at least 0.5 mm so that the shank is strong enough, but no more than 2 mm - otherwise it will be difficult to work with the metal. Usually they take a brass tube from a refrigerator or geyser.
- It is very important that in this case the diameter of the tube and the width of the shank match each other. To determine this, you need to flatten the tube to an ellipse. Its width ratio should be approximately 1:5. The shank should not go into this ellipse, but with further flattening of the tube this can be done. If it is not possible to select the tube by diameter, you can sharpen the shank with a diamond file or simply with emery. Then it will be possible to stick it into a tube that it could not go into before.
- After this, you need to remember the location of the holes on the shank, the distance between them and the diameter, secure the blade in a vice and drive it into a slightly flattened tube using careful blows of a hammer.
- The length of the tube should be left to match the required length. After this, the tube is riveted a little, pulled out so that it tightly hugs the blade, and, if necessary, pulled away from the blade by riveting on an anvil so that it hugs the knife blade more tightly.
- The new shank is almost ready - all that remains is to drill the holes and put steel rivets in them.
There is no need to worry about the strength of the product - to break or bend it, you will need to apply significant force, even though the tube material is copper or brass.
The knife shank is lengthened to add strength.
By soldering
The soldering method is slightly different in that solder is used:
- Take approximately the same tube and flatten it a little as described above.
- Then a blade is inserted into it. There should be a small gap between the blade and the tube.
- After this, the parts are separated, cleaned and degreased, and checked so that in the future they fit into each other more freely.
- Take P-81 solder in rods, soldering acid, a lamp or a gas torch.
- The shank and tube are heated to a temperature of approximately 500 degrees. It’s better to determine it using a thermal imager, but you can do it roughly by eye - high accuracy is not too important here. You need to heat it outside the vice on an asbestos lining or slate lining - this way the metal of the table will not dissipate heat.
- The parts are connected using pliers.
- Then the flame is applied, and a rod is inserted into the gap between the blade and the tube. Having melted, it fills the cavity between the blade and the tube.
- If necessary, the operation is repeated on the reverse side of the tube.
- It is better to completely solder the remaining part of the tube.
- It must be remembered that in this form the shank cannot be riveted - the soldering may be broken. However, you can drill holes in it.
Repair of broken hardware fastening threads - okna-remont.org - MirTesen media platform
When installing plastic windows, you can often encounter various kinds of problems. Since a plastic window consists of many elements that perform their functions and are fixed to the plastic frame using self-tapping screws, there is a problem of thread breakage when fastening the fittings. But how to fix the fastening of fittings with broken threads ? This will be discussed in this article.
Problems you may encounter when installing plastic windows
Quite often the following problems occur that require hardware replacement or repair:
- The window handle may fail, break, and need to be replaced.
- The sash handle may become jammed, making it impossible to open or close the window.
- The hardware lock fails.
- There is mechanical damage to the fittings that requires replacement.
- The window may not open or close well.
- The window may fall off its hinges.
- In a house or apartment, drafts arise through closed windows and strong air blows through them.
- In winter, at low temperatures, a crust of ice may form on the outside of the window.
- The window profile may bend under the influence of various factors.
- Mechanical damage to the glass unit may occur.
In such cases, it is very often necessary to repair the fittings . To do this, you need to remove it and see what is the cause of its malfunction or replace it with a new one. But since plastic is a rather fragile material, thread failure may occur when unscrewing and tightening screws into it.