Welding is a complex, but quite popular technology for working with various metals and alloys. The reliability of this method of joining materials makes welding so common. Knowledge of welding skills allows the performer to implement various projects with his own hands. Important! Training should begin not with joining two workpieces, but with surfacing a bead. Welding a bead is a fundamental process in learning the basics. If a novice performer does not learn how to weld a bead, then it will be very difficult (impossible) for him to weld various products and parts. It is recommended to carry out practical surfacing work on metal residues.
What is a bead in welding
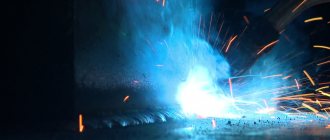
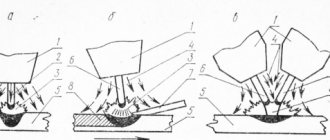
A welding bead is a weld metal deposited as a result of a single movement of a heat source, i.e. as a result of one pass. The picture presented below will help you understand what is called a bead in welding (in vertical and overhead spatial positions).
To obtain a narrow roller, noticeable oscillatory movements of the electrode should be avoided. This type is most often used when welding the root of a seam, when working with thin-walled products, and when welding undercuts.
A widened bead (width does not exceed 14 mm) is obtained when welding is performed by transverse vibrations; used when welding thick-walled parts, as well as fillet and horizontal welds.
A wide bead (more than 14 mm) is used when welding filling layers. So, we helped the novice welder learn what a welding bead is. Now let's talk about the necessary theory of the welding process.
Welding Basics
After becoming familiar with the basic concept of electric welding, it is necessary to study the theoretical foundations of the work process.
A strong connection of workpieces is carried out by exposure to temperatures. An electric arc heats the metal to its melting point. An arc appears due to current: direct or alternating.
The first type of voltage is typical for inverter-type welding machines. This equipment is powered from a 220V network. A DC arc is easier to move and control. Beginners in the field of welding are recommended to use such units. They are characterized by simplicity and ease of use.
Transformer-type welding machines produce alternating current. The use of such equipment complicates the process. Due to alternating voltage, the arc is less stable.
The formation of an arc is made possible by the presence of metal and an electrode.
To clearly understand how the welding process , you need to understand the essence of the following procedures:
- the arc appears through contact between the main product and the electrode;
- where the arc appears, the metal melts;
- together with the metal, the electrode , the particles of which fall into the weld pool;
- coating also burns, resulting in the formation of a gas cloud that protects the bath from harmful interaction with oxygen. This ensures that the temperature required for melting is maintained;
- slag also contributes to maintaining the required temperature ;
- the welding bead is formed when the electrode moves; several movements of the rod guarantee a seam;
- After finishing the work, the slag crust is beaten off with a hammer.
This information allows you to understand the theory of the welding process. You also need to consider the practical side of joining the workpieces:
- the electrode should be placed in a special holder;
- the electrode must be held at an angle of 70 degrees to the surface;
- Having set the optimal angle of inclination, you can draw a quick line on the metal (check for contact). If everything is done correctly, sparks and crackling sounds will appear;
- then leaving the desired angle, you should light the arc (you can touch the metal with the electrode and immediately raise the electrode so that a spark of 3-5 mm is formed, more about igniting the arc will be below). If everything is done correctly, the arc will begin to burn and the metal will melt;
- if the electrode sticks , then it is necessary to swing it and tear it off, and then light the arc again. Electrode sticking may indicate that the current should be increased;
- Once the performer has achieved a stable arc, you can begin fusing the beads.
The clamped arc must be moved smoothly along the weld. In this case, uniform movements with an amplitude of 2-3 mm are made, with which the welder, as it were, rake in the deposited metal. The more measured the movements, the more beautiful the connection will be. [ads-pc-2][ads-mob-2]
Features of pipe welding
Any pipe welding involves the following technological operations - development of drawings, preparation, assembly and welding. If the pipeline is under pressure, then the welding is checked with excess pressure.
The development of working drawings is done by designers of factories, scientific institutes, design bureaus and private firms. To develop pipe welding, the designer must have the appropriate education and a certificate that allows the design of pipelines. Any pipe welding is carried out on the basis of a pipeline diagram, drawings of parts and assembly units, and a technological map.
Preparation for welding work - purchase of pipes, parts and equipment, materials. Delivery to the pipe welding site. Any pipes must have a certificate indicating the brand, quality and material of the pipes.
Before welding pipes, all pipes undergo incoming inspection. They are checked for wall thickness, defects (gaps, cracks, shape). If it is impossible to correct the defects, the pipes are not used for welding. If the pipes arrive covered in grease, they are cleaned. If necessary, pipes are “pressed” in special solutions, this way corrosion is removed and good quality pipe welding is obtained.
Before welding, the pipes are chamfered. After this, the pipes are ready for assembly.
Pipe assembly can be done in two ways: butt and socket. Assembling pipes into a socket means when a smaller diameter pipe is inserted into a larger one and welded. This type of pipe welding is effective for small pipe diameters, since the reverse weld bead does not “eat up” the inner diameter of the pipe. Now they try not to use such welding. For this purpose, transitions are used when assembling pipes.
Methods for igniting a welding arc
The process of igniting a welding arc includes several stages :
- the arc is excited through short-term contact between the end of the electrode and the part being welded;
- the presence of current provides a short circuit, the end of the rod begins to heat up to high temperatures , at which, after detachment of the electrode, ionization of the gas gap occurs;
- the result is an arc.
This information will help performers understand how ignition occurs; performing these processes will help determine, in the language of welders, how to “catch the arc.”
methods of igniting an arc are distinguished :
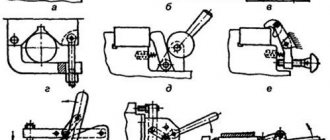
1) Direct tear-off or end-to-end ignition or touch method . 2) The tearing along a curve or the striking method is reminiscent of the movement when lighting a match.
How to properly perform ignition is shown in the picture.
Welders actively use both methods when manual arc welding. The first, arc ignition, is used when working in narrow, hard-to-reach and inconvenient places.
The length of the arc when welding with electrodes has a significant influence on the formation of the joint, its shape, width and scaliness.
When electric welding, very short, short, medium and long arcs are distinguished. The shorter the arc, the higher the quality of the weld metal.
The arc length should be calculated using the formula:
ld = 0.5 (d+2),
where d is the diameter of the electrode.
Or there is another rule : the length of the arc is equal to the diameter of the electrode. In practice, no one measures it, but they maintain it intuitively, from experience.
Welding of a very short arc is done end-to-end.
A short arc implies a distance between the electrode and the base metal equal to approximately 50% of the diameter of the rod; used when making vertical, horizontal and ceiling seams, as well as when working with butt and root seams in the lower position.
The distance when using a medium arc is 1-1.2 electrode diameters. The middle arc should be used when welding and surfacing in the lower position, and in some cases in the horizontal position.
The use of a long arc is undesirable and is not recommended.
It is also important for beginners and home welders to know how to light an arc on an inverter.
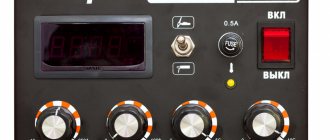
The inverter is a metal box of compact size and light weight. The device produces the current of the required parameters. To do this, the unit converts alternating current from the network into 220V into welding current.
The inverter has two terminals: the performer must place an electrode in the first, and the second is connected to the product (which is which, see about direct or reverse polarity). After current is applied, an electrical circuit is formed. A small break in the circuit - a few millimeters - leads to ionization of the air at the break point, and a welding arc occurs.
It is important to know how to strike an arc with an electrode so that it does not stick. Bar sticking can be caused by several reasons:
- Storing electrodes in less than optimal conditions leads to their dampness. Raw consumables need to be heated, otherwise they will stick.
- Sticking is possible due to incorrect selection of the electrode to the parts being welded. For certain materials (such as cast iron, stainless steel, aluminum and others) you need to use special consumables. To select, use the menu in the right column of the site.
- The use of low-quality or cheap rods , as well as electrodes of unknown origin, can lead to problems.
- The parameters on the welding machine are set incorrectly, low current leads to sticking.
- An uncleaned surface can also cause sticking.
- Lack of experience on the part of the performer sometimes leads to incorrect initiation of the arc.
To avoid problems during welding work, it is necessary to use high-quality electrodes, set the optimal welding mode, carefully prepare the work surface and practice the correct ignition of the arc.
Following all recommendations will allow you to ignite the arc and maintain its combustion throughout the entire working process.
Important! In the event of a break, you need to know where the subsequent arc ignition . The need for re-ignition may also arise if the performer runs out of electrodes. The arc should be excited on the weld metal, at a distance of 12-15 mm. from the crater (place of cliff).
Re-ignition of the arc: 1. excitation; 2. transfer of the arc to the beginning of the crater; 3. continuation of the roller through the crater.
This information will help the contractor analyze the methods of igniting the welding arc, depending on the goals and available equipment.
Bead surfacing technique
Arc surfacing of rollers can be carried out in various spatial positions: bottom, horizontal, vertical and ceiling. Depending on this, there are distinctive welding rules, which we will consider further.
However, it is necessary to highlight general recommendations :
- the best quality of work is achieved with a roller width equal to approximately 2.5 electrode diameters;
- the amplitude of movement of the electrode should be equal to 1.5-2 diameters of the rod;
- each subsequent roller should overlap the previous one by 1/3-1/2 of its width .
After their first practical experiments, beginners have a question: why is the welding bead high? The height of the weld bead depends on the current strength, as well as on the speed of movement of the electrode. The fast movement of the electrode and the low current ensure the production of narrow and high rollers. Such rollers harden faster, but they have one significant drawback - the presence of pores. The welder may also encounter unwelded areas.
Another important parameter is that the recess or recess between the weld beads is a longitudinal depression between two adjacent beads. This parameter should be measured if the height of the rollers varies. The measurement is carried out relative to the roller having a smaller height; performed visually or using a caliper. [ads-pc-3][ads-mob-3]
Surfacing of rollers in the lower position
Surfacing of rollers in the lower spatial position is performed by combining three movements of the electrode simultaneously:
- uniform and continuous supply of the electrode to the part ensures constant arc length and melting rate;
- linear movement is carried out along the axis of the seam, guarantees optimal speed of work and high-quality formation of the joint, the angle of inclination of the rod is 15-30 degrees relative to the axis perpendicular to the working surface;
- oscillatory movements are performed across the axis of the seam in order to warm up the edges; it is used to obtain a roller of the required width; forward movement and crescent movements are distinguished.
Surfacing of beads in the lower position of the weld is carried out in a way that is more suitable for solving the tasks.
Video
Reverse weld bead
Reverse welding bead is a root weld bead formed on the opposite side of welding. To form it, you should perform constant translational movements of the electrode, using a short arc burning from the reverse side (in the picture). In this case, the minimum or average current values should be set.
The electrode metal spreads out in the form of an umbrella. This is how pipes are welded with a reverse bead for butt and corner joints. In this case, the connection of products is mainly carried out in the ceiling position. The force of gravity of the molten metal, the impact of the arc, and the surface tension force of the molten metal on both sides “participate” in the formation of the return roller.
Surfacing of beads on plates
The weld bead can be deposited onto the plate in the following ways: the electrode is moved from left to right or from right to left. The first method is the most convenient for the performer. In addition, there are two directions of electrode movement: toward oneself and away from oneself. Work should be carried out on a thoroughly cleaned surface.
When surfacing a bead onto a plate, general welding rules . Surfacing on plates is most often carried out in the lower position. Therefore, the contractor should take into account the recommendations regarding work in this provision.
Welding of facing rollers
The facing roller is the last seam in multilayer joining technology. the edges should be , which should not have sharp corners. This layer is welded in narrow rolls in two passes: first, the separating layer is welded, and then the main (facing) layer. The performer performs transverse vibrations of the electrode.
In this case, the current strength should be 10-20A lower than when working with previous rollers. You can also use an electrode with a smaller diameter. The upper roller is laid at a higher speed so that it turns out flat, has smooth outlines, without undercuts. The weld bead is performed to improve the external characteristics of the joint.
Welding thread bead
The thread roller is formed by feeding the electrode in the direction of its axis and moving the rod straight along the seam, without oscillatory movements. Thus, the performer receives a narrow welded joint. The electrode must be tilted towards the surface of the product. By changing the angle of inclination, the welder can adjust the depth of metal penetration.
Welding the bead in such cases is ensured by its width, the value of which varies in the range of 0.8-1.5 times the diameter of the rod. The need to obtain a thread bead arises when working with thin metal, as well as when welding the root of a seam and welding undercuts.
Orbital welding of stainless steel pipes
This method is based on the argon arc method, but the welding head moves around the circumference of the pipe, along the joint, creating a continuous seam. Hence the name. The process is fully automated and controlled by the processor. The length of the arc is set by attaching the head to the guides in the desired position.
The program embedded in the processor changes the process parameters depending on the position of the head as it moves along the orbit. To do this, the joint is divided along its length into horizontal, vertical and angled sections. When the head passes through any of them, the parameter values automatically change:
- head movement speed;
- welding current value;
- filler wire feed speed;
- argon consumption.
Since welding conditions are optimal in all areas of the orbit, a uniform, high-quality weld is formed. To connect pipes with a diameter of 8 - 275 mm, an open type head is used. For larger cross-section pipelines pre-filled with inert gas, a closed design is used. The joining of stainless steel pipes with thick walls is carried out in several passes by changing the angle of the head. The duration of the process increases, so a forced cooling unit is included in the equipment set.
It does not matter how stainless steel pipes are welded. The main quality of the seam, on which the reliability and service life of pipelines depends
You can achieve good results manually, but it is better to get a semi-automatic argon arc welding (TIG) machine. It is universal and allows high-quality welding of various metals with a thickness of 1 mm.
Crater filling
Beginning performers often have a question: why is crater welding ? The burning of an electric arc causes the formation of a depression - a crater. An abrupt break in the arc leads to the fact that the crater is not filled with metal. Craters also concentrate stresses that can cause cracks to form. Therefore, it is important to know how to seal a crater.
After completing the seam, careful and high-quality welding of the welding crater is necessary. The crater is welded as follows : the electrode is lifted up in a reciprocating motion, then a break is made. There is also a second method : at the end of the weld, you need to make a break, after a pause, perform additional ignition and break the arc. If necessary, repeat these steps several times. It should be noted that filling the weld crater in this way can lead to contamination of the metal with oxides. These methods are used when welding single and intermittent seams, as well as when performing surfacing.
Welding the seam crater when making a connection in a closed circle is carried out as follows: you need to make a smooth approach to the first roller and achieve the so-called “lock” .
Craters can form not only at the end of a weld joint, but also when replacing the electrode when it is finished. In such situations, the requirements for filling the crater before extinguishing the arc : the defect is filled by gradually withdrawing the electrode and applying the arc to the connection just made. Subsequent arc excitation is carried out on the base metal at 12-15 mm. from the crater (see above about re-ignition of the arc).
This information will help novice performers understand how to weld a crater and apply knowledge in practice.
Regulations
The main document regulating the geometry of welding seams is GOST 5264-80, according to which the main geometric characteristics are calculated using mathematical formulas. The cross-sectional dimensions and lengths according to GOST 5264-80 depend on the type of connection, the thickness of the structural parts, and the geometry of the processing of the end edges. In addition, when calculating the geometric parameters of welding joints, other regulatory documents are taken into account: SNiP II-23-81, instructions and technical regulations. Among all the geometric characteristics of welds, the main ones are the minimum length, width, depth, leg size and some others.