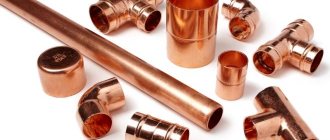
Modern water pipes are rarely made of metal. It has worthy competitors - polymers, which are gradually replacing it in many areas. One such material is low-density polyethylene. Pipes for pressure pipelines, that is, for water pipelines and even gas pipelines, are made from this material. This type of material is becoming increasingly popular, since connecting polyethylene pipes is easy to do with your own hands. You just need to follow very simple rules.
When organizing private water supply, HDPE pipes are often used
Advantages and features of application
Polyethylene pipes are made from low-density polyethylene. This material is abbreviated as HDPE. It is characterized by increased strength and elasticity, and has good performance properties:
- chemically neutral, can be used for transporting food products;
- smooth walls prevent the formation of plaque inside;
- not subject to corrosion;
- small coefficient of thermal expansion - about 3% at maximum heating (up to +70°C);
- They react normally to the freezing of water inside, due to elasticity they increase in diameter, and after thawing they return to their original dimensions.
One point to remember! If you need pipes that are resistant to freezing (for example, for installing water supply in a country house), when choosing, look at the description or technical specifications. Not all types of copolymers used for pipe production tolerate freezing well. So be careful.
The main disadvantage of polyethylene pipes is the restrictions on the temperature of the transported medium: it should not be higher than +40°C, that is, only cold water supply can be made from HDPE; they cannot be used for hot water and, especially, heating.
Polyethylene water pipes are available in different diameters
Another point: polyethylene does not tolerate UV radiation well. When constantly exposed to the sun, the material loses its elasticity and, after some time, breaks (some manufacturers make HDPE pipes that are UV-resistant, but they are more expensive). Therefore, open laying of water supply pipes from plastic pipes is very undesirable. But it is very possible to run a pipe in a trench from a well or borehole to the house, and distribute cold water throughout the house. This is a fairly economical and convenient solution, since the installation and connection of polyethylene pipes is not very difficult. If we are talking about a detachable connection, then it does not require any equipment. All you need is fittings and hands.
Advantages
- low cost;
- chemical inertness - does not react with alkalis or acids; the water does not acquire any foreign taste or smell;
- corrosion resistance; resistance to aggressive environments;
- durability - the first pipes have been in service for more than fifty years;
- smooth inner surface - such pipes do not “overgrow” with calcium salts, like metal ones;
- tolerate freezing with water inside and do not burst like metal ones;
- are not afraid of temperature changes (ranging from - 20 ° C to 40 ° C):
- plastic polyethylene easily tolerates soil movements;
- Manufacturability – easy and quick installation;
- polyethylene is environmentally friendly - its production and disposal do not lead to environmental pollution;
- their low weight facilitates their installation, storage, and transportation.
Which polyethylene pipes are better?
For the production of water pipes, two grades of polyethylene are used - PE 80 and PE 100. The hundredth polyethylene is more dense and durable than the eightieth. For water supply systems in a private home, the strength of PE 80 is more than enough - they can withstand pressure up to 8 atm. If you like a large margin of safety, you can take them from PE100. They work normally at 10 atm.
First of all, you need to choose a manufacturer
What you should pay attention to is the country in which the product was produced. The leaders in quality are European manufacturers. High precision execution guarantees high system reliability. Average quality and prices are from Turkish companies, in the cheaper price segment are Chinese manufacturers. Their quality, as usual, is also much lower. It’s difficult to give advice here; everyone chooses at their own discretion (or what is available in the region).
Why do you need a hydraulic tank?
The hydraulic accumulator is always placed in the individual water supply main; it works constantly and performs the following functions:
- Smoothes out the negative consequences of hydraulic shocks. When the electric pump is triggered, the water flow suddenly stops or accelerates, while the liquid acts on the pipeline and its components with physical force. Connecting the hydraulic accumulator to the water supply system allows you to smoothly accumulate and release water due to the plastic rubber membrane located inside.
- Connecting a hydraulic tank reduces the number of cycles of turning on and off a borehole or sump electric pump due to the accumulation of liquid, which is released into the line during use and maintains pressure in it, preventing the electric pump from turning on.
- Hydraulic accumulators create an emergency supply of water in times of power outages or pumping equipment failure.
- The connection diagram of the hydraulic accumulator to the pump and water supply system normalizes the pressure, allowing it to avoid sudden changes in the event of unstable operation of the electric pump.
Rice. 1 Hydraulic accumulators for water mains
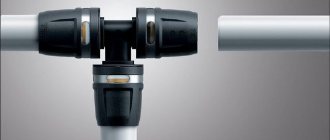
Types of HDPE pipe connections
There are several types of connections for polyethylene pipes:
- detachable (on fittings or couplings);
- one-piece - by welding: using a special welding machine;
- electric couplings - a heater is built into such couplings; when electric current is applied to it, the polyethylene heats up and fuses.
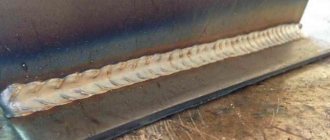
Welding is used more often on large diameters.
Weld mainly pipes of large diameters, which are used to create main pipelines. Pipes of small diameters - up to 110 mm, used in private construction, are mostly connected using fittings. Couplings are used more often during repair work, since their installation takes longer.
Fittings for polyethylene pipes are shaped parts (tees, crosses, angles, adapters, couplings) with the help of which the required system configuration is created. Since independent connection of polyethylene pipes is carried out more often with the help of fittings, let’s talk about them in more detail.
An approximate set of fittings for polyethylene water pipes
Fasteners
For the pipeline to work reliably, it must be secured. This can be done in two ways:
- using fastening hooks – free fastening;
- using special clamps - rigid fastening.
Rules for installing fasteners:
- each joint must be fixed;
- on straight sections, fasteners are installed at a distance equal to 10 pipe diameters;
- rigid fastening is carried out using clamps with a rubber gasket;
- free - either on hooks (you can make your own), or in clamps, but without a rubber gasket.
Note! Loose fastening of HDPE communications will allow the pipes to move in the event of vibrations, water hammer, and temperature changes. This facilitates pipeline maintenance and extends their service life.
Possible installation errors
Errors can occur when connection rules are violated:
- failure to maintain the distance between fasteners;
- incorrect heating time, excessive force during welding;
- rigid fasteners, without taking into account the linear expansion of materials.
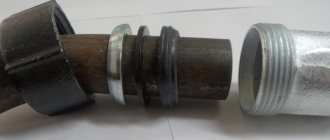
Assembly on compression (crimp) fittings
An entire system is installed on one or two sides of the fitting (sometimes on three) to ensure the connection. The fitting itself consists of:
- housings;
- clamping nut;
- collets - a plastic ring with an oblique cut that provides a tight fit around the pipe;
- thrust ring;
- gaskets, which are responsible for tightness.
What does a compression fitting for polyethylene pipes consist of?
How reliable is the connection?
Despite the apparent unreliability, the connection of polyethylene pipes with compression fittings is reliable. Properly made, it can withstand operating pressures of up to 10 atm and higher (if these are products from a normal manufacturer). Watch the video for proof.
This system is good because it is easy to install yourself. You probably already appreciated this from the video. Simply insert the pipe and tighten the thread.
Summer residents, in addition to the opportunity to do everything with their own lessons, like it because, if necessary, everything can be disassembled, hidden for the winter, and put back together again in the spring. This is in case the wiring is made for irrigation. The dismountable system is also good because you can always tighten the undercut fitting or replace it with a new one. The disadvantage is that the fittings are bulky and internal wiring in a house or apartment is rarely made from them - the appearance is not the most pleasant. But for the water supply section - from the well to the house - it is difficult to find better material.
Assembly order
The pipe is cut strictly at 90°. The cut should be smooth, without burrs. There should also be no dirt, oil or other contaminants present. Before assembly, the sections of the joined sections are chamfered. This is necessary so that the sharp edge of the polyethylene does not damage the rubber sealing ring.
During installation, the connection of polyethylene pipes on the compression fittings is tightened by hand
The spare parts are put on the prepared pipe in this order: the crimp nut is tightened, then the collet, then the thrust ring. We install the rubber gasket into the fitting body. Now we connect the body and the pipe with the parts put on it, applying force - you need to insert it all the way. We pull all the spare parts to the body and connect them using a crimp nut. Tighten the resulting connection of polyethylene pipes with force by hand. For reliability, you can tighten it with a special mounting key. It is not advisable to use other tools for tightening: the plastic may be damaged.
Setting up the hydraulic accumulator when connecting
Before using a water supply system with a hydraulic accumulator in a private house, you need to know what the pressure in the hydraulic accumulator should be for its optimal operation; take a portable pressure gauge to take readings. A typical water line with a standard pressure switch has response thresholds from 1.4 to 2.8 bar, the factory setting of the pressure in the hydraulic tank is 1.5 bar. To ensure that the hydraulic accumulator operates efficiently and is completely filled, the lower threshold for switching on the electric pump is selected at 0.2 bar for a given factory setting. more - a threshold of 1.7 bar is set on the relay.
If during operation or due to a long storage period it is determined that the pressure in the hydraulic tank is insufficient when measured with a pressure gauge, proceed as follows:
- Disconnect the electric pump from the power supply.
- Remove the protective cover and press the hydraulic tank valve in the form of a nipple head at the outlet of the device - if liquid comes from there, then the rubber membrane has been damaged and needs to be replaced. If air comes from the hydraulic tank, its pressure is measured using a car pressure gauge.
- Drain the water from the main by opening the tap closest to the expansion tank.
- Using a hand pump or compressor, pump air into the battery tank until the pressure gauge reads 1.5 bar. If, after automation, the water rises to a certain height (high-rise buildings), the total pressure and operating range of the system are increased based on the fact that 1 bar. equated to 10 meters of vertical water column.
When calculating the required pressure in the hydraulic tank for any range, select its value 10% less than the lower threshold of the relay operation. Selecting this value ensures that the built-in membrane will expand and contract within a small range and accordingly increase the service life of it and the entire expansion tank.
Fig.5 Setting up the hydraulic accumulator
Saddles and their scope
In addition to fittings, there is another interesting device that allows you to make branches from a ready-made pipeline. These saddles are specially designed couplings. This coupling has one or more threaded holes. A tap is usually installed in them, and a new branch of the water supply is connected to it.
Saddles for polyethylene water pipes
The sedeks are put on the pipe and secured with screws. After that, a hole is drilled in the pipe surface with a drill and a thick drill in the branch. When it is ready, a crane is installed and the branch is assembled further. This is how the system is improved with minimal effort and cost.
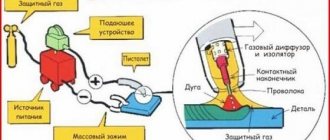
Soldering
The work is carried out in the following order.
- Contaminants are removed from the surface of the pipes. The ends of the line not involved in welding are sealed.
- The soldering iron is placed on a flat, hard surface. It connects to the network, heats up to the desired temperature
- The coupling and pipe are fixed in the heating cups. It is important to ensure the maximum depth of immersion of the elements.
- The heated plastic parts are connected to each other. Excess polymer is squeezed out of the weld joint.
- The connection is checked for leaks.
Upon completion of the work, the nozzles are cleaned of dirt and put into a case along with the welding installation.
Polymer pipes are used in the installation of water supply and heating pipelines. They do not require maintenance or care.
Flange connections and transition to metal
System elements that have a flange rather than a threaded connection can be installed in the water supply system. Usually these are taps or other shut-off or control valves. To connect to such elements there is a special fitting for HDPE. On one side there is a standard compression version, on the other there is a flange version. Installation is standard - using a crimp nut on one side, gaskets and bolts on the flange side.
Fitting for HDPE flange connection
When installing a water supply system from polyethylene pipes, questions may also arise about the connection between polyethylene and metal. For these cases, fittings are used, on one side of which there is a thread. It can be external or internal, depending on the type of device or transition being installed. Such fittings are either straight or in the form of a 90° angle.
Fittings for transition from HDPE to metal
The installation is standard - a thread (with careful winding) on one side and a compression nut on the other.
Preparation for installation
To organize a quality connection you will need.
- Scissors. Cutting tool for working with HDPE pipes. It is recommended to use specialized scissors with special blades. This will ensure an even cut and eliminate the appearance of burrs. When selecting a product, the diameter and wall thickness of the pipe are taken into account.
- Bevel remover. A profile device designed for chamfering.
- Marker. A technical felt-tip pen that produces permanent, visible marks.
The compression module includes a seal, a thrust ring, a collet, and clamping elements. Certified products that are not damaged are allowed for use. Using a deformed or counterfeit product increases the risk of leaks.
Before installing the fitting you must:
- measure the depth of immersion of the pipe into the clamping hole;
- cut a piece of pipe of the required size;
- chamfer the end of the pipe.
Before starting work, the material is cleaned of dirt and burrs.
Installing a hydraulic accumulator
After purchasing a suitable model of electric pump for a well or well and connecting it to the pipeline, calculating the volume and purchasing the required hydraulic tank, you need to install it correctly. If the model has a large volume and is installed on vertical legs, you should use the following recommendations:
- It is better to install a volumetric storage tank at the highest point of the house (attic, second floor) - this will create maximum pressure in the water line.
- The floor in the room must be level, humidity must not exceed established standards in order to avoid corrosion of the galvanized flange and surface of the tank.
- It is better to connect the device using a flexible pressure hose in a stainless steel braid and one-inch diameter union nuts made of brass. Avoid supply hoses with aluminum braiding and mounting couplings made from cheap silumin, a brittle alloy of aluminum and silicon.
Rice. 10 Connection diagram of the hydraulic accumulator to the pump and water supply system
Determination of tank parameters
In most cases of inclusions, hydraulic tanks for water supply are installed according to the principle: the larger the volume, the better. But too large a volume is not always justified: the hydraulic tank will take up a lot of useful space, the water will stagnate in it, and if power outages happen very rarely, there is simply no need for it. A hydraulic tank that is too small is also ineffective - if a powerful pump is used, it will turn on and off frequently and quickly fail. If a situation arises when installation space is limited or financial resources do not allow you to purchase a large-capacity storage tank, you can calculate its minimum volume using the formula below.
Rice. 6 How to correctly calculate the volume of a hydraulic tank in a water supply system
Another calculation method is to calculate the required volume of the hydraulic tank based on the power of the electric pump used.
Recently, modern high-tech electric pumps with soft start and stop, frequency control of the speed of rotation of the impellers depending on water consumption have appeared on the market. In this case, there is no need for a large-volume hydraulic tank - soft start-up and adjustment do not cause water hammer, as in systems with conventional electric pumps. Automatic control units of high-tech devices with frequency control have a built-in hydraulic tank of a very small volume, designed for its pump group.
Fig. 7 Table of calculated values of pressure and volume of the hydraulic tank depending on the operating modes of the water supply line
How to choose a hydraulic accumulator
When choosing a hydraulic accumulator, it is better to give preference to models with a rubber bulb - in membrane types, the liquid comes into contact with the metal body, which can cause corrosion.
The main working element of a balloon hydraulic tank is a pear-shaped membrane, the quality of which determines its service life, while the body material plays a less important role, since it does not come into contact with water. The usual material for making a pear is isobutated food rubber; when choosing a model for external installation, special attention should be paid to the flange to which the rubber membrane is attached. Preference should be given to models whose flange is made of thick stainless steel or galvanized steel - such a product will last 10-15 years without losing its tightness.
Another advantage of a balloon tank is the ease of replacing the rubber membrane. To do this, unscrew several hex bolts securing the flange and remove it along with the shell.
Rice. 9 Vertical hydraulic tanks in the water line