Admiring the beauty of an openwork metal fence or admiring the incredible twisted pattern on the railing of an iron staircase, few people think that they were made using the cold forging method. You can learn to embody beauty in metal without much effort. To do this, it is enough to have minimal skills in working with metal and have special machines for cold forging. What is cold forging? What machines are needed for it? What can be made on these machines? You will find answers to these questions in our article.
It would be more correct to call cold forging - mechanical bending of a metal rod on specialized machines to give it the shape intended by the manufacturer. Bending rods in the machine can be done either manually using levers or using electric motors. In addition to metal rods, cold forging can be used to bend small-diameter pipes, narrow iron strips and fittings. Using the cold forging method the following are produced:
- Twisted fences.
- Decorations for residential buildings.
- Patterned gate.
- Railings for balconies and stairs.
- Metal garden benches.
- Decorations for gazebos and lanterns.
- A large number of grating options.
Elements made by cold forging
Having mastered the cold forging method, you can easily start your own business producing metal products. At the same time, you will only need initial financial investments for the purchase of machines, and if you make the machines yourself, you can get by with minimal costs.
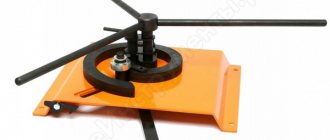
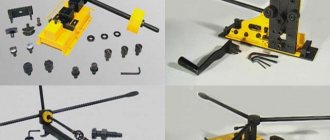
Step-by-step manufacturing of a small-sized manual machine for making curls
A small machine is designed for the production of curls from rolled strip with a width of 20...30 mm. It's easy to make it yourself.
Center
First the center is made. To do this, a small fragment of round timber is sawed off. The workpiece is fixed in a vice and the cutting line is marked. Using a cutting disc and an angle grinder, the workpiece is sawed off.
It has a diameter of 38 mm. The side surface is not further processed.
The center length is 28 mm. A little more is possible, but this is enough to bend a strip 30 mm wide.
A hole Ø 8 mm is drilled on a drilling machine. It is placed eccentrically. This situation is due to the fact that it is necessary to make a clamp for the end of the workpiece.
A profile is drawn, which should be removed using cutting and cleaning discs installed on the grinder. The workpiece is secured in a vice and excess metal is removed.
The flap discs protect the surface so that there is a smooth transition between different surfaces of the clamp.
To make it easier to fix the end of the workpiece in the future, you need to drill a hole. It is placed on the radial surface of the center. A hole is drilled for an M10 thread.
Using a set of taps, the internal thread is cut. A headless screw will be used here. After fixing the workpiece, it will hide inside the metal of the center.
The center is welded to the 4 mm thick base plate. This completes the work of its production.
Making a fixture
To make it easier to work with the device, a shaft is welded to the back side of the plate. By rotating it in a special mandrel, the snail will rotate.
The outer surface must be ground so that the welds do not interfere with the free fit of future workpieces.
The future spiral is drawn on the plate. A contour is created where it will be welded later.
A spiral is bent from a strip 4 mm thick. It must correspond to the project.
After checking the spiral against the template, the excess is cut off, and the spiral itself is welded to the plate and to the center.
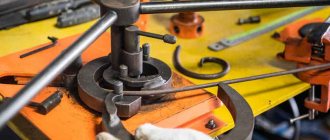
A 40×40 mm profile pipe with a 3 mm wall is used as a stand. Holes are drilled on it for attaching machine elements. Using support platforms, the prepared parts are fixed.
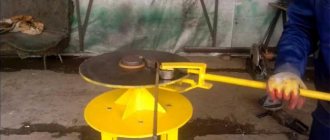
The handle is visible on the reverse side. It was secured to the shaft using a bearing. The prepared “Snail” can rotate.
A performance check is being carried out. The handle turns the spiral around the center axis.
This is interesting: Cyclones for air purification from dust - types, DIY production
Video: homemade electric cold forging machine
Spiral like a spiral
Device for winding spirals manually
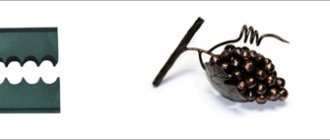
In some cases, ordinary smooth, straight, ascending spirals are used as an element of artistic forging. Making a spring twister machine for this on your own is absolutely unrealistic. But remember: the spirals in a forged pattern do not need to be springy and can be wound from ordinary ductile steel using a simple device (see figure on the right). The pitch (ascent) of the spiral is determined by the horn of the gate (filled in red); By bending the horn up and down, you can get thinner and thicker spirals. A square bar is taken onto the workpiece or a round one, it doesn’t matter. You can also twist spirals from a rod twisted on a torsion bar.
Making a guide for the conductor
For these purposes, you will need an ordinary lathe of type 1K62 or 16K20, which is capable of cutting an Archimedean spiral, and, of course, an experienced turner. The “Archimedean spiral” function in lathes is intended for cutting special threads, but it is also quite suitable for obtaining a groove in the base plate, where the jig guide itself will then be located.
When preparing the machine, the following transitions are performed:
- The small handle of the machine feed box is moved to the “Archimedes Spiral” position.
- The required spiral pitch, which will determine the dimensions of the conductor, is set using a large handle.
- The feed step is fixed by a lever, and the feed amount is determined by the depth of the groove in the plate (how to set this parameter will be discussed later).
- After turning on the machine, the feed lever remains in the same position, and cutting is performed during the reciprocating movements of the spindle.
- After each pass, the support is moved away from the end of the workpiece.
An example of obtaining an Archimedean spiral is presented in this video:
The fact that the frames show not metal, but plastic, does not fundamentally change anything: the spiral is obtained as a result of several successive passes of the cutter, which moves along a given path.
The dimensions of the spiral groove are determined based on the desired dimensions of the conductor and the height of its supporting surface. If in the first case everything depends on the size of the initial workpiece for the plate and the capabilities of the machine, then the depth of the groove should be calculated based on the height and thickness of the guide matrix.
Since in a cold state any metal has increased mechanical strength, then to make a guide matrix with your own hands you should use tool steel: for example, grade U7 steel according to GOST 1435-84. It is not recommended to use high- or medium-carbon structural steel such as steel 45 or steel 60G, since for tall volutes they may crack under the influence of a bending moment.
The dimensions of the guide matrix in plan are selected based on the available range of strip tool steel in accordance with GOST 4405-75. Since the jig must be compact, it is advisable to choose profiles 3×20, 3×25 or 3×30 with a maximum thickness deviation of 0.4 mm. When fitting the guide into the plate according to H11, the width of the spiral groove should be 0.5-0.7 mm greater than the width of the strip. The groove depth must be at least 1.5 times the strip height, i.e. 4.5 mm or slightly more. This parameter, by the way, will determine the thickness of the slab itself: it should be at least 6 mm.
The total length of the guide is determined from the cut groove in the slab (you can use a flexible tape measure or even regular thread to measure). Then they cut the required length of the strip “to size”, insert it into the groove and scald it along the contour (if the jig will produce only flat snails, then along the outer generatrix, and if three-dimensional, then along the inner one).
A support hook is bolted to the center of the conductor. It must have a lead-in section with which the workpiece is fixed at the initial moment of spiral formation (see Fig. 3).
Types and purpose of forging machines
A machine for any purpose is used to facilitate manual labor. For cold forging, various equipment can be used, minimizing the physical effort of the master and allowing the following basic operations to be performed:
Machine for creating a shaped profile using cold forging
- bending the profile at the desired angle or radius;
- making spirals or curls;
- longitudinal twisting of workpieces.
The variety of parts obtained allows you to arrange them in combinations and intricate designs, create a neat artistic canvas for fences and gazebos, symmetrical decor for park benches, as well as other items for various purposes.
Industrial bending machine, which allows you to obtain a workpiece with a given radius
Cold forging machines can be specialized (perform only one operation) or universal. There are the following types of special machines:
- bending machines (bending machines) – allow you to bend a workpiece at an angle or a given radius (wave);
- snails - twist the blanks into spirals and curls;
- torsion bars - help to longitudinally twist a workpiece or several such parts at the same time;
- stamping machines - they are used to make decorative clamps, shaped ends, and waves with fine pitches.
Universal machines include components of special equipment in various combinations.
Devices for cold forging are driven mechanically (manual machines) or by electric drive. Electrically driven equipment is characterized by speed and ease of processing workpieces. A cold forging machine, the price of which can be quite high, is characterized by high productivity. When there is no need for productivity and speed, then a manual machine will be quite sufficient to complete the work, especially if blacksmithing is a hobby.
Bent machine designed for processing pipes using cold forging
Is it possible to make a cold forging machine with your own hands?
You can buy a manual machine for cold forging in a specialized store that sells tools or order it online. The question is the price and solvency of the buyer. An alternative option is to assemble it yourself. The principle of operation will be no different from a product purchased in a retail chain, and the functions performed are absolutely identical to the factory ones. Additional advantages are a reduction in price, confidence that the design will not fail after the first use.
To begin with, it is worth familiarizing yourself with the design features of each type of machine in order to assess the possibility of its self-assembly.
A snail cold forging machine that allows you to create spiral elements
The torsion bar must twist metal rods, so its design assumes the presence of two elements that hold the workpiece. One of them serves as a clamp, and the other contains a rotating spindle, which, in fact, will twist the rod to the desired frequency of the helical wave. The device is quite easy to build yourself, and some craftsmen even make do with a vice and a simple hand crank.
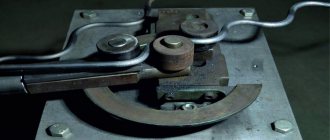
The design of the bending machine is also simple, but it contains several mandatory elements, the assembly of which is impossible without specialized tools. The base is a massive metal plate with a groove in the middle into which a movable stop is inserted, moved by a worm mechanism. The other two cylindrical stops are stationary and are attached to the base on both sides symmetrically relative to the groove. It is the installation of stops that can cause difficulty, since holes for fasteners are drilled only on a specialized machine; such a workpiece made of high-strength steel will not yield to the influence of a drill.
Creating elements using the cold forging method on a homemade gnutik machine
A snail metal forging machine can have two types: with a collar or a lever type. The first option allows you to vary the shape of the bend during operation, however, it has a number of weak points in the design and is very demanding on the strength of the manufacturing materials. The second type is more stable, but less productive. Craftsmen consider the snail to be the simplest machine, the self-assembly of which will not cause difficulties.
Pros and features of the process
Cold forging is a popular type of work due to the fact that it can be used to create unusual parts of various shapes and sizes.
Using a cold forging machine, you can make a fence for a flower bed, a decorative lantern, an unusual fence, railings or handles for a bench and other elements. You can see what the parts created through this process look like in the photo.
Another advantage of cold forging is that it is quite easy to make a machine with which you can create such parts with your own hands. This will help you save on the purchase of expensive equipment.
The cold forging process consists of three main elements: bending, pressing and welding of parts. The equipment needed for this process is quite simple and compact, you can do it yourself and it will not take up much space in your workshop or garage.
You can start learning metal processing with cold forging, because... this process is easier and safer because you don't have to deal with high temperatures like other types of welding.
For this process, a ready-made template is usually used - that is, blank parts.
Of course, cold forging has its own subtleties, they mainly consist in the fact that the part is easily damaged or deformed during the process: forged elements often break, and the defect cannot be corrected, so forging must be done very carefully.
However, using a high-quality machine and a drawing of the future part, you can easily learn how to create products with twisted, wavy and other unusual shapes. You can see the options in the photo above.
The process of processing blanks through cold forging occurs in several stages. The first step is to create a template or drawing of the future design.
It is necessary to calculate the dimensions of the product in order, firstly, to purchase the required amount of material, and, secondly, to properly configure the machine.
Different machines provide different possibilities for creating patterns - this depends on the complexity of making the tool.
For example, the simplest do-it-yourself machines can only bend products, while with the help of more complex models you can create patterns, etc.
After the template or drawing is ready, you need to buy the required amount of material in accordance with your calculations. For cold forging you will need iron rods, you can buy them in the store.
Rods for cold forging should not be too thick, otherwise they will be difficult to bend. The next stage is making the parts yourself.
The most important thing here is to set the settings correctly so that during operation of the machine the parts are not damaged or deformed, because it will be impossible to fix the problem.
Lastly, the completed parts are secured to the frame. This happens by welding.
You need to be especially careful when welding with your own hands with thin-walled tubes, because... It’s easy to burn through them, and then the design will become faulty and you’ll have to do it all over again.
You can watch the entire forging process in the video before you start working on your parts.
But before you start cold forging, you, of course, need to make the machine that is necessary for this. The “Snail” machine is the most common apparatus for processing metal products using the cold forging method with your own hands.
You can see all the stages of creating the machine in the video - there is nothing complicated about it, and almost everyone will be able to cope with this task themselves.
Types and purpose of forging machines
A machine for any purpose is used to facilitate manual labor. For cold forging, various equipment can be used, minimizing the physical effort of the master and allowing the following basic operations to be performed:
Machine for creating a shaped profile using cold forging
- bending the profile at the desired angle or radius;
- making spirals or curls;
- longitudinal twisting of workpieces.
The variety of parts obtained allows you to arrange them in combinations and intricate designs, create a neat artistic canvas for fences and gazebos, symmetrical decor for park benches, as well as other items for various purposes.
Industrial bending machine, which allows you to obtain a workpiece with a given radius
Cold forging machines can be specialized (perform only one operation) or universal. There are the following types of special machines:
- bending machines (bending machines) – allow you to bend a workpiece at an angle or a given radius (wave);
- snails - twist the blanks into spirals and curls;
- torsion bars - help to longitudinally twist a workpiece or several such parts at the same time;
- stamping machines - they are used to make decorative clamps, shaped ends, and waves with fine pitches.
Universal machines include components of special equipment in various combinations.
Devices for cold forging are driven mechanically (manual machines) or by electric drive. Electrically driven equipment is characterized by speed and ease of processing workpieces. A cold forging machine, the price of which can be quite high, is characterized by high productivity. When there is no need for productivity and speed, then a manual machine will be quite sufficient to complete the work, especially if blacksmithing is a hobby.
Bent machine designed for processing pipes using cold forging
Is it possible to make a cold forging machine with your own hands?
You can buy a manual machine for cold forging in a specialized store that sells tools or order it online. The question is the price and solvency of the buyer. An alternative option is to assemble it yourself. The principle of operation will be no different from a product purchased in a retail chain, and the functions performed are absolutely identical to the factory ones. Additional advantages are a reduction in price, confidence that the design will not fail after the first use.
To begin with, it is worth familiarizing yourself with the design features of each type of machine in order to assess the possibility of its self-assembly.
A snail cold forging machine that allows you to create spiral elements
The torsion bar must twist metal rods, so its design assumes the presence of two elements that hold the workpiece. One of them serves as a clamp, and the other contains a rotating spindle, which, in fact, will twist the rod to the desired frequency of the helical wave. The device is quite easy to build yourself, and some craftsmen even make do with a vice and a simple hand crank.
The design of the bending machine is also simple, but it contains several mandatory elements, the assembly of which is impossible without specialized tools. The base is a massive metal plate with a groove in the middle into which a movable stop is inserted, moved by a worm mechanism. The other two cylindrical stops are stationary and are attached to the base on both sides symmetrically relative to the groove. It is the installation of stops that can cause difficulty, since holes for fasteners are drilled only on a specialized machine; such a workpiece made of high-strength steel will not yield to the influence of a drill.
Creating elements using the cold forging method on a homemade gnutik machine
A snail metal forging machine can have two types: with a collar or a lever type. The first option allows you to vary the shape of the bend during operation, however, it has a number of weak points in the design and is very demanding on the strength of the manufacturing materials. The second type is more stable, but less productive. Craftsmen consider the snail to be the simplest machine, the self-assembly of which will not cause difficulties.
Making a simple part on a machine
The strip steel workpiece is cut to the required size. This size is usually clarified by drawing the finished product and its component elements.
The free end is placed in the center of the spiral. The workpiece is secured using an internal screw.
The “Snail” rotation is performed. The workpiece is pressed tightly against the guides. This requires some effort to obtain the desired product profile.
By turning the device further, a curl is made. If necessary, insert the other end of the workpiece and make a closed or open curl.
Usually the other end does not stay straight. It is also bent. Therefore, a distinction is made between internal and external reverse curls. Marks are made on the device itself using a marker or chalk. They are used as a guide when making curls with the required parameters.
As you can see from the step-by-step guide, using a simple set of tools, a homemade curl maker is easy to make. How much does it cost? Its price is determined by the cost of the blanks. Often the price is minimal.
Make or buy?
If you have the financial resources to purchase equipment for developing production or doing cold forging yourself, you can focus on choosing suitable models . There are many domestic and foreign companies offering machines that take into account all the requirements and wishes of customers. The main thing is that the financial capabilities of the buyer coincide with the prices of the equipment manufacturer: manual and electric, of different types: snail, flex, flashlight, twister and others.
Making a snail
Several devices are shown in the figure. This is roughly how it should turn out (basically).
Assembling a snail with your own hands is one of the options for independent design, when it makes no sense to give recommendations indicating the exact parameters of all components. Here you need to focus on your own idea of what will bend and how (radii, number of spiral turns, and so on). But if the essence of the manufacturing process becomes clear, then the assembly itself will not cause any difficulties.
Desktop device
The cold forging process requires a lot of effort. If you already have a ready-made workbench, you may have to strengthen it. When making a snail from scratch, the table frame is made only of metal - a channel, a corner, a thick-walled pipe.
It is clear that the tabletop should also be metal. During the operation of the snail, it will be subjected to both static and dynamic loads. Therefore, ordinary iron sheet is not suitable. Only a plate, and not less than 4 mm.
Marking and installation of “attached” equipment
Perhaps the most creative stage of work. You can do everything with your own hands. But how, taking into account the future or limiting ourselves to the production of similar samples?
Option 1. The simplest. The meaning of the operation is that the outline of a spiral is drawn on the tabletop.
Essentially, this is a sketch of future shaped parts, for example, from a rod. After this, it is enough to cut out several segments from a thick strip of iron, bent along a radius. They are welded to the tabletop, and the bending mechanism is basically ready.
Some may find this design more attractive - with a solid stripe.
But practice shows that it is more difficult to work with such a snail. For example, when removing the finished product from it, certain difficulties will arise.
Option 2. The same, but several contours are drawn. Holes are drilled along each one and threads are cut into them. All that remains is to prepare the templates for the stop segments. They are usually made with your own hands from thick cardboard or plywood.
Overlays are made from metal, in which, after the next marking, holes are also drilled, coinciding with the landing “sockets” in the slab. This design will make it possible to organize the production of spiral-shaped workpieces with different radii on one table. You will only have to, depending on the shape of the bend, install the appropriate segments in certain places. Their fastening to the base is bolted. You can do it differently. Instead of such stops, install cylindrical ones.
For fixation, they are attached with bolts (from the bottom of the slab) or are made immediately with legs (+ thread) and screwed into the tabletop. It's much more convenient with them. And if you have your own mini-lathe, then turning it yourself will take a couple of hours.
Option 3. Prepare several removable modules that can be changed as needed.
Snail assembly
The ploughshare is installed, the levers and the side stop are attached. All this is clearly visible in the pictures.
Everything that is in the shed (garage, attic) will be used - cuttings of pipes, rods, corners, and the like. If the principle of the snail’s operation is clear, then no further hints are required.
Functionality check
This is always implied, so no comment.
In principle, making a snail for cold forging is not so difficult. Moreover, there is no single standard for such devices. Someone will say – isn’t it easier to buy a factory model? Firstly, as already said, you will have to search for a long time. Secondly, it is not a fact that her capabilities will coincide with the fantasies of the master. Thirdly, you will have to lighten your wallet by about 19,000 (manual) and 62,000 (electric model) rubles, at a minimum.
Good luck in making your own snail!
Creation of a machine
The manufacturing process of the machine has several stages, after completing which one after another, you will receive a ready-made tool with which you can create figured products for your dacha or home.
Before you start cold forging, you need to make a template and drawing. It is performed on graph paper, which can reflect the exact dimensions of the future product. On it you need to depict a spiral with increasing turns.
The turns should increase in accordance with the pitch if you want to make symmetrical products, but if this is not important, then the spiral turns may increase unevenly.
Before assembling the machine, you need to decide on the diameter of the workpieces that you will process on it. The step must be selected based on this value: it must be larger than the diameter of the rod that you will be processing.
If the step is not large enough, then you simply will not be able to remove the parts from the machine without damaging it. Thus, all the work will be done in vain.
A homemade working surface of the snail can be made of sheet metal with a thickness of 4 mm. The size of the surface depends on the size of the part you will be processing - you need to first draw up a drawing so that all dimensions are clear.
To make the mold, use strip metal that is at least 3mm thick. This way, the homemade snail will be easy to work with. To make the process easier, you need to fix one of the edges of the workpiece so that it does not slip out.
Sketch of a machine for a snail: Figure 1: 1- driving share of the snail, 2 - main axis, 3 - levers for applying force, 4 - clamp for the workpiece; Figure 2: 1 - volute share, 2 - machine platform, 3 - pressure roller, 4 - lever for controlling the pressure roller, 5 - fastening of the platform, 6 - finger for fixing the volute shares, 7 - groove along which the pressure roller runs, 8 - axis of the pressure roller control lever, 9 - spring for attracting the roller; Figure 3 - operating principle of the device: 1 - the snail rotates; Figure 4 - examples of products made using a snail.
Read also: Concrete m200 proportions in buckets
For the retainer, you can use a cut rod part that is the same size as the strip. During cold forging, you also need to attach the part to the workbench.
Since during cold forging the impact on the part is quite strong, you need to think about fixing separately, because You won’t be able to hold the workpiece with your own hands - it can slip and ruin the whole job.
The remaining parts of the snail are quite easy to assemble - the main thing is to use the drawing and watch the video before starting the process yourself.
The machine you make can be either monolithic or collapsible - decide in advance which design will be more convenient for you, and make a drawing to carry out all the work in accordance with it.
If you want your homemade snail to be monolithic, then weld the machine onto the work platform so that the elements are stationary.
The most important thing with this type of construction is to correctly and securely fasten the end of the part that you will be processing.
If the machine for cold forging is planned to be dismountable, then landing holes must be made on the working platform, with the help of which it will be possible to connect the “body” of the machine with the platform.
The removable design is good because it is more convenient to move it, if necessary, or remove the machine to replace or repair damaged parts - with a monolithic type of structure this will not be possible.
However, with a removable machine, the quality of fixing parts will be worse - you will have to constantly adjust the threaded connections yourself, because with use they will inevitably become weaker.
There are other options for machines for cold forging, but the “Snail” machine is the most functional, and besides, it’s easy to make it yourself. How to make it, as well as other product options, watch the video.
If you decide to use a snail as a hobby tool, you should take into account that, although the device itself will not cost you much (it does not require any specific parts or tools), cold forging still involves some expenses.
Firstly, you will have to spend money on the materials themselves that you will process. And the larger the product is planned, the more money you will have to spend.
To estimate costs, always make a preliminary drawing of the product, which reflects its actual dimensions. For example, to make a small flower stand, you will need to spend at least 2,000 rubles on rods.
You can calculate how much material more complex products will require yourself.
The cost will also depend on the complexity of the pattern that you will create with the help of a snail - the more complex it is, the more expensive the product will cost you.
You won’t have to spend a lot of money on tools for the machine itself, however, if you have not previously made such tools, then it is better to buy ready-made equipment for it - in this case, the machine will last you longer and it will be easier to work on it.
For final processing after forging, you may also need some funds - at a minimum, you will have to buy a primer and paint to give the part a finished, attractive look.
Despite these expenses, snail forging is still an affordable and popular metalworking tool that can be done as a hobby or on a professional basis, but in this case, over time you may need a more powerful tool.
Elements in the form of curls, made of rods, are widely used in the design of local areas and the interior of residential premises. Special devices are used for their manufacture. One of them is a snail. Home craftsmen often construct this device themselves from scrap materials. If you also want to know how a snail is made for cold forging with your own hands, then this article is for you. From it you will learn the operating principle of this device, its advantages and varieties, simple drawings and self-assembly technology.
Do-it-yourself “Snail” forging machine
according to drawings and technology
Before making any devices, hand tools or machines for artistic forging, it is necessary to complete graphic images, templates, sketches, and drawings of the future device.
To make markings more accurately, it is best to use graph paper. Draw a spiral on it, the radius of its turns gradually increasing. The same pitch must be observed between turns. It must be said that this condition must be observed only in cases where symmetry of patterns is required; as a rule, no more than 4 pieces are made.
Also take into account what kind of workpieces you need to work with. The distance between the turns must be made so that it is slightly larger than the diameter of the metal rods, otherwise it will be difficult to remove the finished product from the machine.
To create a full-fledged work process, it is necessary to securely fix one end of the product. Here you will need a piece of rod that is equal to the width of the strips. To fix the working platform you will need a workbench. Often a piece of thick-walled pipe is used as a stand. The main thing is to ensure maximum fixation, since during cold forging the forces applied are quite large.
https://youtube.com/watch?v=rUTdr5Cb9SE
Machine assembly
Along the length of the structure, small pieces of rods can be welded at a distance of 5-6 cm; special holes must be made for them in the working area. Do not forget to carefully secure the ends of the products that you will bend.
Cold forging is especially popular among beginners in blacksmithing. To manufacture products using this method, you do not need a well-equipped workshop (you can get by with a garage or shed), nor much experience, nor do you need special knowledge about the behavior of metals. As for devices, all the necessary machines and tools can be made with your own hands at home.
How to do what you need
To make a cold forging machine with your own hands in the most effective way, you need to start by developing a drawing. It is used to calculate the need for materials and the possibility of replacing them with those available. The technological operations diagram will allow you to determine the necessary tools and equipment for manufacturing the machine.
Homemade sketch drawing of a gnitik machine
Making a simple snail with your own hands
If you settled on a simplified monolithic design, then you know that this device uses simple winding of a rod by hand or using a lever onto a form rigidly welded to the working surface. This machine can be used to create curls on rods of small cross-section (less than 12 mm).
Monolithic non-demountable snail
It is made like this:
- First, a diagram of the future template with the required dimensions is drawn on a sheet of paper (sometimes the template diagram is applied directly to the base of the conductor). This must be approached responsibly, because after welding the finished form, it will not be possible to correct errors. The thickness of the outline of the form in the drawing should be the same as the thickness of the metal strip used for its manufacture. It should be at least 3mm. The coils must be placed at a distance of 12–13 mm from each other, so that a 10 mm deformable rod fits into the groove between them.
- The base of the snail (preferably round) is cut out of a steel sheet with a thickness of at least 4 mm, the diameter of which is determined in proportion to the size of the template spiral and be larger than the size of the snail. Typically the diameter of the base is within 70 cm.
- In accordance with the drawing, the desired curl shape is made from a 3mm thick metal strip. To do this, it is better to calcinate the workpiece so that it is easier to machine. After making the mold, the excess end of the strip is cut off, and the edges of the snail are cut into a cone and cleaned.
- The finished form is welded to the base, which is mounted on the frame. Sometimes a template welded to the base is fixed to the frame using yews installed on it. To do this, a piece of timber is welded to the back side of the base of the form for gripping with a yew.
With the option of fixing the conductor in a yew clamp, you can easily change the templates and obtain different shapes of curls if you make several types, monolithically welded to the base of the devices.
Removable design
On the working base, first draw the contour of the snail with a mark along the contour of the holes for attaching the template.
Based on the sketch, a template is made from a thick steel strip and holes are drilled in it. It is attached to the base with bolts.
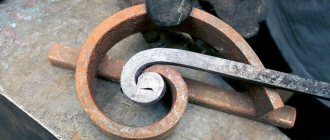
Forging a twisted shape should begin from the central curl. The end of the workpiece is inserted into the groove of the first curl of the form and pressed tightly against it. You can use a small clamping tool to secure the fixation. With force, the free part of the rod is screwed onto the template using a device - a lever. Advanced designs use a lever driven by a moving bearing mounted on it. The lever is made of a rod with a diameter of 20 mm.
You can watch the making of such a device in the video:
Types, structure and principle of operation of the “Snail”
A cold forging snail is a device for creating patterns in the form of curls from metal rods by deformation bending them along the contour of the template. Deformation occurs due to rigid fixation of the working rod to the template. To do this you need to apply force. This is ensured by manual force or electric drive. When making a device yourself, the feasibility of using an electric drive must be determined by the master himself. It is necessary in case of a large volume of work. Mostly manual force is used.
The cochlea (conductor) can have a different design. It can be done:
- in the form of a template stably welded to the working base;
- in the form of dismountable removable parts that are attached to the base.
Manual drive can be organized in different ways.
In the most primitive design, the rod is wound onto a template with simple manual effort or using any suitable device as a lever.
Also, the lever can be included in the structure of the machine and attached to the bed leg and driven by a movable bearing moving along the base of the scroll.
In more complex devices, the conductor itself rotates, which is attached to the shaft axis. It is driven by three levers.
You must determine the design of the machine in advance based on feasibility and ease of use.
A monolithic jig has a specific template shape that serves as the only curl option. This is a disadvantage of this design, but it is not difficult to do it yourself.
The removable design is convenient because this machine can be used to produce curly curls of different sizes and shapes. But the design of the machine itself is more complex. In addition, with a removable device, the reliability of fixing parts of the template is worse than with a monolithic type. You will need to constantly tighten the threaded connections, as they may become loose during operation.