How to make a crane beam for a garage with your own hands - read in detail
Do-it-yourself crane beam in the garage
When repairing large-capacity vehicles and construction, you cannot do without lifting equipment, but its high cost makes you think about the feasibility of this step. In this article you will learn how to make a beam crane in the garage with your own hands.
Required tools and materials
To assemble the structure yourself, you must first prepare a set of tools and materials. In particular, you will need:
- square pipes for racks;
- seamless pipe with a cross section of 100 mm for the cross rod;
- pipes with a cross section of 110 mm for rod supports;
- metal corners 100x100 mm;
- M16 fixing bolts;
- telpher;
- welding machine.
How to make a crane beam in the garage with your own hands
In order to make a garage lift with your own hands, you will need:
- For racks - pipe with a cross-section of 100x100, length 2350 mm - 2 pcs.
- For the cross rod - a round pipe with a diameter of 100 mm and a length of 4150 mm.
- For supports – round pipe with a diameter of 110 mm and a length of 600 mm – 2 pcs.
- For bases and diagonal supports - corner 100x100 mm.
- M 16 bolts for attaching supports to rods.
- Wheels (for example, from a warehouse cart) – 4 pcs.
- Manual winch with a lifting capacity of up to 1 ton.
- Cable and rollers (for example, from an elevator door drive).
Dimensions are approximate and subject to adjustment to suit the size of your garage.
A beam crane is necessary for moving various loads
Crane beam device
The mechanism is a U-shaped structure (bridge) with a lifting mechanism. In large auto repair shops, both parts may be movable. The bridge moves on rails, the lift moves on a span beam. In garages, to save space, rails are not laid, and the bridge is equipped with wheels.
The crane beam device consists of supports, a span beam and a lifting mechanism. The supports are welded from metal pipes and channel bars. A manual or, less commonly, electric winch is used as a lifting mechanism.
Girder cranes are of the "floor operated" type, as opposed to those that are handled from a cab. To make the mechanic's work easier, the garage crane can be equipped with an electric winch .
This will increase manufacturing and maintenance costs, but if it is necessary to frequently dismantle engines and other heavy units, it will pay for itself.
In rural areas where there are power outages, insufficient power or voltage surges, you should give preference to a manual winch. Especially if we are talking about a personal garage and not a private workshop.
Carrying out calculations
To ensure that the design matches the size of the room and functions in the required work space, it is important to carry out calculations before performing installation work. You can prepare a drawing indicating the dimensions of all components yourself or use a special calculator. The standard parameters in the calculations are the following:
- height no more than 2.5 m for repairing passenger cars and carrying out work that requires lifting and moving heavy objects;
- the load capacity depends on the type of hoist used and, as a rule, is 800-1000 kg;
- construction width - from 4 m;
- rack dimensions - 120 cm.
If there is a need to work with larger equipment, the lifting mechanism can be additionally equipped with vertical A-shaped racks. Also, if desired, it is possible to make the structure easily disassembled, which is important in conditions of limited space or in case of rare need to lift loads.
Recommendations for making the device
Above we looked at what a beam crane consists of: supports, a span beam and a hoist. Manufacturing takes place in several stages:
- Weld the vertical supports in the shape of an inverted T with two diagonal supports.
- Weld the span pipe to form a U-shaped structure.
- Install the wheels.
- Weld a winch to one of the side supports.
- Install the lifting mechanism: fix the rollers, stretch the cable and hang the hook.
Ready-made drawings can be found online, but it’s easier to make it yourself by adjusting the product to the size of the garage.
Crane drawing
If for some reason this type of lift is not suitable, you can make a goose garage crane with your own hands - it will take even less time. The gooseneck crane has an L-shape, where the vertical stand is equipped with a jack rather than a winch. It is rolled under the car from the front and the engine is lifted by pumping a hydraulic jack. The boom moves upward and lifts the load.
Another interesting solution that will help save space is a suspended crane beam. Unlike the supporting structure described above, the span beam is attached to the ceiling by means of a rail (I-beam). This option requires sufficient ceiling height and strength of the building.
All devices must be tested with a load 20% greater than the maximum intended load.
How to make a frame for the base of a crane lifting mechanism
In order to make a frame for a small beam crane in a standard garage with your own hands, you will need the following materials:
- I-beam (4 - 4.5 meters) - the required footage depends on the height of the garage;
- pipe (diameter 10-12 cm), length 2.4 meters - 2 pieces;
- one square pipe (10x10 cm);
- corners (10x10);
- manual hoist and hoist;
- bolts (M16) with nuts.
If you plan to build a mobile crane beam, then you need four more rollers and a hoist.
The procedure for making a crane frame with your own hands:
- We weld the legs of the crane - you need to weld the corners on both sides to the I-beam pipe;
- The location of the corner is at an angle of 45 degrees. The result is a kind of stiffening ribs that will firmly fix the stand, which bears the bulk of the weight of the load carried by the crane;
- We weld two triangles and spacers on each crane post.
- if the crane is a mobile beam, then on both sides from the bottom, on each stand, a roller must be welded horizontally - ordinary rollers for metal containers will do, furniture rollers will not withstand the weight;
- At the top, we fix a pipe as a crossbar along which the lifting mechanism will move;
- We weld an I-beam in the center of the pipe to secure the roller along which the steel cable of the crane’s lifting mechanism will move.
- We weld a piece of square pipe on top of the I-beam (to give rigidity to the frame) - 40 cm. The pipe should protrude on both sides by at least 20 cm. It turns out that the side post is located in the middle of the crossbar stiffening pipe;
- We insert the transverse pipe of the frame crossbar into the square pipe;
- We drill through holes for fastening bolts on both sides of the square holder and in the crossbar pipe itself - we need rigid, reliable fixation on both sides of the vertical post.
The result is a U-shaped structure of the crane frame, which is installed on rigid legs with spacers, and a crossbar pipe is rigidly bolted to the top.
Assembling a crane beam for a garage
When assembling a load-lifting garage crane with your own hands, you must sequentially perform a series of actions according to the instructions. By adhering to the installation rules, you will be able to make a structure that will serve you well for many years. The key steps in assembling homemade equipment are preparing the frame and securing the crane beam for lifting, holding and moving loads.
Conclusion
A garage crane is an indispensable assistant in car repair and maintenance.
The simplicity and reliability of the design, the ability to use scrap materials and almost eternal service life make it an attractive option for private auto repair shops.
In the photos and videos you can familiarize yourself in detail with the features of the manufacture and operation of this type of cranes and assemble it yourself.
| Share on social networks: |
How to make a frame for the base of a crane lifting mechanism
In order to make a frame for a small beam crane in a standard garage with your own hands, you will need the following materials:
- I-beam (4 - 4.5 meters) - the required footage depends on the height of the garage;
- pipe (diameter 10-12 cm), length 2.4 meters - 2 pieces;
- one square pipe (10x10 cm);
- corners (10x10);
- manual hoist and hoist;
- bolts (M16) with nuts.
If you plan to build a mobile crane beam, then you need four more rollers and a hoist.
The procedure for making a crane frame with your own hands:
- We weld the legs of the crane - you need to weld the corners on both sides to the I-beam pipe;
- The location of the corner is at an angle of 45 degrees. The result is a kind of stiffening ribs that will firmly fix the stand, which bears the bulk of the weight of the load carried by the crane;
- We weld two triangles and spacers on each crane post.
- if the crane is a mobile beam, then on both sides from the bottom, on each stand, a roller must be welded horizontally - ordinary rollers for metal containers will do, furniture rollers will not withstand the weight;
- At the top, we fix a pipe as a crossbar along which the lifting mechanism will move;
- We weld an I-beam in the center of the pipe to secure the roller along which the steel cable of the crane’s lifting mechanism will move.
- We weld a piece of square pipe on top of the I-beam (to give rigidity to the frame) - 40 cm. The pipe should protrude on both sides by at least 20 cm. It turns out that the side post is located in the middle of the crossbar stiffening pipe;
- We insert the transverse pipe of the frame crossbar into the square pipe;
- We drill through holes for fastening bolts on both sides of the square holder and in the crossbar pipe itself - we need rigid, reliable fixation on both sides of the vertical post.
The result is a U-shaped structure of the crane frame, which is installed on rigid legs with spacers, and a crossbar pipe is rigidly bolted to the top.
Do-it-yourself crane beam: homemade, in the garage, calculation, how to make it, rotating
To repair a car yourself, you need a lift. Therefore, every garage should have an engine lift, but purchasing professional equipment is expensive. In addition, being large in size, it will take up a lot of space in the garage. If you make a beam crane with your own hands, you can save money.
General device
A beam crane differs from an overhead crane in that it has only one main beam part. It consists of:
- lifting device;
- span beam - the trajectory of its movement;
- end beams.
The work cycle consists of several operations:
- lifting the load to a given height;
- its horizontal movement to the place of installation work or laying;
- unloading materials;
- returning to the starting position.
This design is convenient:
- compactness - it can be used in small spaces;
- ease of installation;
- ease of maintenance;
- sufficient load capacity;
- affordable price.
Beam crane design
Assembly instructions
It will take 2 days to assemble a simple or movable structure. The process of making a crane beam with your own hands:
- The main load that the crane will move falls on the stand. To securely fix the structure, you need to make a frame. To do this, legs for the tap are welded from metal corners. The corners are welded to the pipe at an angle of 45° on both sides of the pipe.
- To make spacers, 2 triangles are welded to each rack.
- For a mobile structure you will need rollers. They are welded to a horizontal base, positioned on both sides of each rack. To prevent the rollers from breaking and to withstand the weight, use products that are designed for metal containers. Furniture cannot be used.
- A pipe is installed at the top of the structure. It is designed to move the lifting mechanism.
- The roller for moving the cable is mounted on an I-beam. The I-beam is pre-welded at the central point of the pipe.
- To give the frame additional stability, a pipe with a square cross-section is welded to the beam element. It is placed on top of the beam so that it protrudes forward by 20 cm on both sides.
- The transverse pipe is inserted into a pipe with a square cross-section and through holes for fastenings are drilled on both sides. Bolts are used as fasteners. The homemade frame for a U-shaped crane is ready. The pipe in the form of a crossbar is securely fixed in the upper part of the product, and the entire structure is stably placed on spacers (legs).
- Mechanical lifting is designed to lift parts. It can be manual or automatic. A manual hoist consists of a winch and a cable. The worm winch is mounted on the side of the rack. The movement of the steel cable occurs through rollers.
- The structure can be equipped with a lifting mechanism, which is used in elevators. This mechanism has strong rollers.
- Connecting an electric lift drive will make repair work easier. An engine with a power of 300 to 500 W is suitable for installation. It is mounted on the base of the structure.
Using a garage as a workshop for repair work often requires lifting heavy building materials and car parts. By building a beam crane with your own hands, you can move large objects using an automated mechanism.
Types of equipment
Today, the crane beam market offers two types of such equipment, which have minor differences:
- support crane beam;
- suspended crane beam.
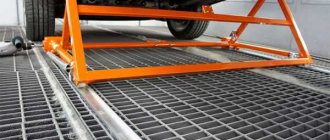
In the first type of model, special rails are used to move the end beams along the crane runway, along which their running wheels move. The support crane can be controlled manually or electrically. They are typically used for warehouse handling or industrial workshops.
Construction of a support crane beam
In a suspended structure, crane tracks do not require additional supports; they are installed in the ceiling, which saves installation time. Suspended crane beams are moved using a control panel.
They are convenient for servicing large materials and industrial equipment. Their main advantage is the expanded work space.
In addition, with the same load capacity, they are much lighter.
Installation of a suspended crane beam
For large working areas, a successful design solution was the use of suspended two-span crane beams. They differ from standard ones only in the length of the bridge.
By increasing its length, the service area is significantly expanded.
To reduce the excess load on the bridge and prevent its deformation, another I-beam track is mounted to the floors as an additional supporting element.
Electrical circuit of an electric hoist
Schematic electrical diagrams of the hoist.
To control electric hoists, reversible contactor circuits are used. Schematic diagrams of Bulgarian electric hoists for the MN and MNM series are presented in the tables below.
| The purpose of contactors is shown in circuit diagrams by applying the following symbols under the designations of the coils: | |
| Symbol | Purpose of the contactor |
| ↑↑ | Contactor for “LIFT UP” movement at main speed – K1 |
| ↑ | Contactor for “LIFT UP” movement at micro speed – K3 |
| ↓↓ | Contactor for “DOWN” movement at main speed – K2 |
| ↓ | Contactor for movement “DOWN” at micro speed – K4 |
| ←← | Contactor for movement “LEFT” at main speed – K5 |
| ← ← ← | Contactor for movement “LEFT” at main and micro speeds – K5 |
| →→ | Contactor for movement “RIGHT” at main speed – K6 |
| →→→ | Contactor for movement “RIGHT” at main and micro speeds – K6 |
| ← →← → | Contactor for movement “LEFT” and “RIGHT” at main speed – K7 |
| ← → | Contactor for movement “LEFT” and “RIGHT” at micro speed – K8 |
L1, L2, L3 – phases of the electrical network
S1 – emergency stop button T1 – transformer for operating circuit Q – main contactor (switch) F1, F2, F3 – fuses
Installation of lifting mechanism
The main element of the crane is the lifting mechanism, which can be manual or automatic. The tefler consists of a cable and a winch installed on the side of the rack. The cable moves due to the rotation of the rollers. Additional fixation of the elements is not required; it is enough to secure the lift to the rack.
A self-made crane can be equipped with lifting equipment that is used in elevators. Such mechanisms are highly reliable and able to withstand massive objects.
To simplify repair work, it is possible to connect an electric drive to the lifting element. To automate the design, a motor with a power of 300-500 W is suitable. The electric drive is mounted to the base of the crane beam.
The design, equipped with an electric drive, is widely used in large-scale garage repairs and car disassembly for spare parts when a complex of work is required. According to the principle of operation, manual and automated cranes do not have significant differences.
How to make a beam crane with your own hands, materials and tools, calculations, assembly and installation
Using a garage as a workshop for repair work often requires lifting heavy building materials and car parts. By building a beam crane with your own hands, you can move large objects using an automated mechanism.
How to make the base frame of a crane lifting mechanism
The main load falls on the equipment racks, so to securely fix the structure it is necessary to build a strong frame . The construction of an element involves the following actions:
- Legs for the faucet are made from metal corners using a welding machine and welded at an angle of 45 degrees on each side of a pipe with a diameter of 110 mm. Metal triangles are welded to the posts to create spacers.
- To ensure the movement of the structure to the horizontal base, rollers are welded on both sides of the racks. It is important to use casters designed for metal containers as they can support a lot of weight.
- A pipe is placed on top of the structure along which the lifting mechanism moves. The length of the pipe depends on the size of the garage and your own design requirements.
- The roller for moving the cable is fixed to an I-beam, which is pre-welded in the center of the pipe.
- For additional stability of the frame, a pipe with a square cross-section is welded to the beam. It is placed on top of the beam so that there is a 20 cm protrusion on each side.
- The cross pipe is inserted into a pipe with a square cross-section and through openings are made for the clamps on both sides. Mounting bolts are inserted into the holes and tightened.
Installation of lifting mechanism
The main element of the crane is the lifting mechanism, which can be manual or automatic. The tefler consists of a cable and a winch installed on the side of the rack. The cable moves due to the rotation of the rollers. Additional fixation of the elements is not required; it is enough to secure the lift to the rack.
A self-made crane can be equipped with lifting equipment that is used in elevators. Such mechanisms are highly reliable and able to withstand massive objects.
To simplify repair work, it is possible to connect an electric drive to the lifting element. To automate the design, a motor with a power of 300-500 W is suitable. The electric drive is mounted to the base of the crane beam.
The design, equipped with an electric drive, is widely used in large-scale garage repairs and car disassembly for spare parts when a complex of work is required. According to the principle of operation, manual and automated cranes do not have significant differences.
Required tools and materials
To assemble the structure yourself, you must first prepare a set of tools and materials. In particular, you will need:
- square pipes for racks;
- seamless pipe with a cross section of 100 mm for the cross rod;
- pipes with a cross section of 110 mm for rod supports;
- metal corners 100x100 mm;
- M16 fixing bolts;
- telpher;
- welding machine.
Making a crane beam with your own hands at home
Servicing equipment often requires moving heavy, awkward objects. For example, the need to remove the engine and gearbox from the car.
The work is complex, associated with the need to move a bulky and heavy unit in at least two planes. The best solution is a crane or crane beam. But the purchase is a costly action, justified if used frequently.
A do-it-yourself crane beam is the best way out of the situation. How to make a beam crane with your own hands will be described below.
Tools and materials
To create this mechanism in the garage, you will need the following tools and materials.
- Rolled metal – angle, channel, I-beam.
- Bearings of different sizes.
- Welding machine with electrodes.
- "Bulgarian".
- Drill or drilling machine.
- Actuating mechanism – hoist, hoist.
- Marking tool (ruler or caliper, tape measure, chalk or marker)
- Bolts, washers, nuts.
The length of the rolled metal is selected based on the size of the room, and its grade is determined from the calculations given below. Bearings can be taken in any suitable size. The quantity is selected according to the principle: 4 pcs. for one slide, 4 pcs. – for the second, plus 4 pcs. for the carriage (lift body). Total: 12 pieces.
The bearings for the slide must be the same size; the carriage can be fitted with bearings of the same size or one size larger or smaller. Bolts for fastening must be selected with large metric threads.
The actuator is selected according to its maximum load capacity and design loads.
Crane beam assembly
The assembly of a homemade crane beam occurs as follows:
- the device supports are attached to the wall or ceiling;
- a carriage is installed on the prepared working beam;
- if the actuator is mounted on a support platform, then it is installed on the lift body;
- the assembled work beam is lifted and placed on supports;
- check smooth operation and adjust operating parameters.
In the case of attaching the lifting mechanism to the support platform, the assembly is complete.
An assembled crane beam with a lift, which is fixed with a fastening hook by the lower bolt.
Making a simple lifting device yourself in your garage is not that difficult. It is necessary to carry out the calculations correctly and boldly get to work.
At the same time, you need to remember about safety precautions - any lifting device is potentially dangerous.
For example, according to the existing requirements of Rostechnadzor, the presence of more than 30% broken threads in a steel rope (cable) makes such a cable unsuitable for further use.
How to make a beam crane with your own hands? — Handyman's Handbook
Using a garage as a workshop for repair work often requires lifting heavy building materials and car parts. By building a beam crane with your own hands, you can move large objects using an automated mechanism.
How to make a beam crane with your own hands?
Car owners who independently repair their “iron horse” periodically ask themselves the question: how to make a beam crane with your own hands? This is a practical and relatively inexpensive lifting device that significantly simplifies heavy and time-consuming work, such as engine removal. In addition, lifting equipment is suitable for low-rise construction: lifting bricks, mortar and other building materials to a small height.
You can make such a mechanism for your garage yourself. Almost any metal is suitable for this, which often lies unattended on the territory of garage cooperatives and construction sites. Homemade cranes can be gantry cranes, with a rotating boom structure, or suspended, moving along a channel in a horizontal plane.
Assembling a crane beam for a garage
When assembling a load-lifting garage crane with your own hands, you must sequentially perform a series of actions according to the instructions. By adhering to the installation rules, you will be able to make a structure that will serve you well for many years. The key steps in assembling homemade equipment are preparing the frame and securing the crane beam for lifting, holding and moving loads.