This article will be of interest to beginners in auto body repair who are interested in the process of stretching a car body after an accident. We will look at some points that are known to professionals, but unclear to beginners.
So, before repairing a damaged car body, it is important to carefully examine and understand the logic of the damage. What has shifted and where, what can be repaired and what needs to be changed. It is necessary to determine whether the geometric parameters of the body have been changed.
Slip drawings for body repair
- Different types of slipways
- What you need to create a slipway in your garage
- How to make a slipway with your own hands
Servicing a passenger car is a very expensive business: you need to change consumables, carry out maintenance, and also have to periodically repair various parts of the car. It is much more profitable to improve your car, change parts and repair anything on your own. Therefore, your garage should have the necessary equipment and tools. Among such devices, an important place is occupied by a slipway for body repair. You can make this device yourself.
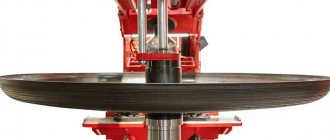
Platform slipway
There are three types of slipways: frame, platform and floor. There are also different devices according to the type of movement: rolling and mobile.
Dimensions for slipway
You can equip a slipway for body repairs in your garage. This only takes a few days and certain skills. In addition, having created such a device, it will be useful to you to repair minor defects in the car body or repair complex damage and restore the geometry of the car.
On the Internet you can find drawings from which it is easy to develop slipways. All sizes are indicated. The most durable construction is made on a metal profile. Additional parts are also needed: racks and corners for gripping car sills.
Slipway diagram
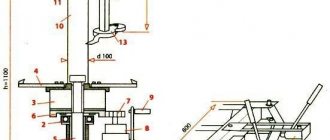
If we talk about sizes, then you should select a metal profile with a cross-section of 4x8 centimeters and a length of 1.5 meters. Such parameters are optimal for a design that can withstand almost any passenger car. The cross-section of the profile for the racks is 2x4 centimeters, and their height is about 25 centimeters.
The slipway consists of two parts: rear and front. The length of the longitudinal bars is 2.8 meters and the width is 1.5 meters. The structure itself is divided into sections. The central one is the largest, of the transverse and longitudinal profiles, forms a section of 1290x950 centimeters. The rest of the space is made up of four more sections, in which there are retractable mechanisms and devices for applying force.
Materials and tools for work
To make a slipway for car repairs with your own hands, you need to immediately take care of the necessary materials and equipment. Then the work process will go quickly. So, before work you must purchase the following materials:
- a channel made of durable metal, the thickness of which must be at least 5 mm;
- several unnecessary but thick pieces of metal to increase structural rigidity;
- electric hammer drill, a set of thick long bolts;
- clamps and clamps for subsequent securing of the car;
- reinforced metal chain, pulling mechanism;
- nuts, welding machine, oil paint, reinforcing columns.
When purchasing materials and tools for work, special attention should be paid to the quality and size of the metal channel. It should be taken into account that you will need strips to decorate the slipway around the entire perimeter, as well as transverse strips, which can serve as additional rigidity fixators. At the same time, we should not forget about the columns.
Platform devices
Such devices are usually used for complex repairs. This is a metal platform with a reliable system of clamps and fastenings located on it. Such slipways may have several power towers. They often have a scissor lift attached to them.
It is especially valuable that the deformed fragment on them can be pulled in all directions. In addition, a reliable fastening system expands the range of repair work.
Stages of manufacturing a slipway
The most popular are platform or frame designs. This is due to the ease of their manufacture, compact dimensions and relatively large functionality. Finding suitable drawings on the Internet today is not difficult. The best option is to measure the finished factory slipway and focus on its design. The main requirement here is the dimensions, which must correspond to the area of the workshop or garage. The recommended dimensions of the slipway are 4.5 × 1.85 m. Externally, this is a structure where one frame is inserted into another.
Required tools and materials
You will need a welding machine, a hydraulic device, an angle grinder, a drill with drills, a spray gun or paint brushes. Materials you need to purchase:
- profile pipe 40×80 mm (calculate the length in accordance with the drawing, taking into account the jumpers) with a thickness of 4 mm;
- metal for making scarves (thickness 4 mm);
- clamping devices (you can buy factory ones, but if this is not possible, then how to make them yourself will be described below);
- bolts, nuts;
- primer;
- regular or powder paint.
Frame making
First, the outer frame is welded from the profile, then the inner frame is attached to the finished structure. It is necessary to boil from above and below, turning the structure over. Don't forget to use gusset reinforcements at the corners of the structure to increase its rigidity. If you have doubts about the strength of the frame, weld a couple of cross beams in the middle. When the frame is ready, legs must be attached to it from below to adjust the horizontal position of the device. To do this, you can use 15 cm long bolts and 24 cm nuts, which are welded at the corners of the structure. If you wish, install wheels instead of hardware - you will get a mobile slipway. This makes sense if you have a perfectly flat floor or if you place the structure on rails that are in a strictly horizontal position.
How to choose the optimal model?
The choice should begin with the installation configuration of the future mechanism. The standard scheme involves the use of a universal set of 4 grips. This option is suitable for most passenger cars, and in this case, all that remains is to evaluate the possible traction potential based on the characteristics described above. But for certain modifications of cars, a body clamp, supplemented with a special fastening system, may be required. In particular, some Mercedes and BMW models require the connection of additional clamps designed to connect to pins installed on the side surface of the body. Honda fixation systems also have their own characteristics. And for machines with cross beams, it is worth using clamping mechanisms with balancers.
Self-production of a stand for body repair
Follow the instructions for making the device frame, which is responsible for fixing the car.
- First of all, draw or download drawings of the device on the Internet.
- For the cross beam, take a metal profile. A stand with grips for car thresholds will be fixed on it. To create them, you will need to weld corners with holes drilled for bolts to the cross beam.
- Make holes taking into account the specific car model. To change the dimensions to fit another car, you just need to drill new holes in the beam.
- The profile should have a cross-section of 40×80 mm and a length of 150 cm. These dimensions are quite sufficient for almost all types of passenger car bodies.
- For the racks, take a steel longitudinal profile with a section of 20x40 mm. Strengthen them with scarves from the same profile. The height of the racks should be 25 cm.
- Weld corners at the top of the racks to grip car sills. For better adhesion, pre-weld the nuts or apply notches. Use fine-threaded bolts and nuts as fasteners.
It is recommended to use fasteners from foreign cars. The strength of such bolts is much higher than those purchased on the market or in a store.
- Now you need to create a protective coating for the device. Clean all its elements first. Then coat their surface with an anti-corrosion primer, preferably epoxy. It will provide reliable protection against rust, because the slipway will be located in a place with high humidity.
- Spray paint over the primer using a wet-on-wet method.
- Fix the posts on the beam with bolts 10 cm long (M10). They are quite suitable for working with hydraulic devices that develop a traction force of up to 4 tons.
- Install the completed slipway at its workplace.
- Now all you have to do is install the chains and grips to secure the vehicle, a coupler or a hoist, creating a force of about 1.5-2 tons.
You can make another exactly the same device and fasten both structures with beams. This way you will get a rolling version of the design. It does not need a rigid attachment to the floor, but it will have to be installed on a rotating column.
Manufacturers
Clamps are produced by many companies, but the best designs come from specialized manufacturers of fasteners and automotive tools. In this sense, we can highlight the companies Jonnesway, JTC and AIST. Also a good premium kit is presented by the FORCE company. Modification 62511 can withstand a 5-ton load and can be used in chain fixation schemes with bolted connections. As users note, this clamp is characterized by high strength and durability. A domestic body clamp from and “Mastak” is also presented on the market. Such models are less technologically advanced and functional, but they are optimally suited for simple straightening work on passenger car bodies.
Materials and tools for work
To make a slipway for car repairs with your own hands, you need to immediately take care of the necessary materials and equipment. Then the work process will go quickly. So, before work you must purchase the following materials:
- a channel made of durable metal, the thickness of which must be at least 5 mm;
- several unnecessary but thick pieces of metal to increase structural rigidity;
- electric hammer drill, a set of thick long bolts;
- clamps and clamps for subsequent securing of the car;
- reinforced metal chain, pulling mechanism;
- nuts, welding machine, oil paint, reinforcing columns.
When purchasing materials and tools for work, special attention should be paid to the quality and size of the metal channel. It should be taken into account that you will need strips to decorate the slipway around the entire perimeter, as well as transverse strips, which can serve as additional rigidity fixators. At the same time, we should not forget about the columns.
Areas of application
Metal bending devices are used in various industries. They are used to create folds from roofing iron, make rectangular air ducts from tin or metal sheets, prepare the edges of products for welding, and parts of geometric shapes. Manual edge benders are actively used for construction and repair work. They are in demand during car repairs.
Among the advantages of this technology, in addition to the small thickness of the resulting edges and the low cost of rolled metal, one should add high resistance to wear.
Tags: body clamp, slipway, do it yourself
Comments 66
Hello. There's no need to waste time here. It’s better to make your own adaptations for the slipway and spotter, etc. Good factory metal lasts for many years. The file won't take it. But if the clamps are g... Then you can even throw the factory in the trash. They are of little use. They bend, the notch is eaten instantly. There are also quality Chinese ones. Now everything is Chinese. You need to look when you take it.
Yes, I later bought a factory one, it coped with its task)
Everyone here advises you to buy it because... metal G, out of idle curiosity I want to ask if it is possible to find high-quality metal or at an expensive price.
you can find it, you’ll just have to mill it from a solid one
Adaptation for a torture chamber?
yeah for a dentist
it would be funnier - for a urologist
The factory clamp solves the problem, this homemade product is complete bullshit, it won’t fit anywhere with scarves later. I use inexpensive tota clamp clamps, maybe you can find them in your region. I use chains from a coal conveyor. I cut one link as a connector, so far I haven’t been able to straighten it, although there are and minibuses and cargo cabins, and there’s a lot of metal there.
IMHO: the wedge should be made sharper...thereby the clamping force will be greater...well, the long sides of the “jaws” could be thicker...
only if you weld the front walls or weld the back mortgages
buy the real ones at the store... you'll suffer with the homemade gun... yes... they're expensive... but they work as expected...
It is advisable to change the operating principle of the clamp. A simple grab breaks the winch with a force of 250 kg. It is necessary with a wedge clamp, the harder you pull, the more the gripping jaws compress.
This one is much weaker than mine, it’s definitely for me to pull out the spar and not a jammed empty seam. rather weak
Mine is tested and pulls 2.5 tons, but yours is drawn and not tested. There is no justification for the assumption of weakness...
what does 2.5 tons mean and how is force measured?
winch 2.5 tons. which he pulled to the limit and tapped with a reverse hammer to relieve the tension... You are too self-confident.
It’s not a matter of self-confidence, the rigidity of the structure is simply not visible, all hope is in the thickness of the metal
It seems to me that the quality of the metal will not allow the idea to be realized. will bend. and if you cook it, it will weaken it even more. dangerous if it breaks
Idk. If it’s filthy ferrous metal, then at least cook it. trying is not torture. If it flies off once, we'll see. I'd rather buy a normal clamp
You can’t heat it, it will tear when jerking...
It seems to me that the quality of the metal will not allow the idea to be realized. will bend. and if you cook it, it will weaken it even more. dangerous if it breaks
What difference does it make what you cook?
The heating area is, firstly, smaller and the properties of the metal are completely different from those of the arc.)
yeah, and if it doesn’t warm up, it won’t cook
The heating area is, firstly, smaller and the properties of the metal are completely different from those of the arc.)
in this case, under such loads, welding is not very reliable. maybe I'm wrong. but taking risks is more expensive for yourself
The heating area is, firstly, smaller and the properties of the metal are completely different from those of the arc.)
not long ago I cooked a “miracle shovel” from 12 rods and a profile. I’ve already tried to pin and strengthen it. I cooked it semi-automatically - one horseradish bends and breaks. I never expected this. and all our construction ferrous metal is like this.
It seems to me that the quality of the metal will not allow the idea to be realized. will bend. and if you cook it, it will weaken it even more. dangerous if it breaks
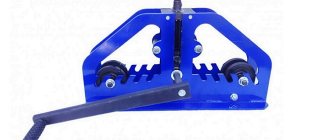
Pneumatic edge bender
Particularly popular among craftsmen are edge benders with pneumatic drive, which work as a “rotary beam”. The pneumatic drive contributes to significant pressure (up to 6.2 bar) on the workpiece. But such equipment can be used when working with sheet metal no thicker than 1.2 mm. In this case, the edge width will be no more than 12 mm.
If you want to make a pneumatic machine with your own hands, you must take into account that its operation requires an air flow of at least 113 l/min.
Pneumatic punch
This is a universal tool model. On one side, the structure is equipped with a mechanism for punching holes, on the other, with jaws for forming an edge.
Thanks to this, you can simultaneously bend the edge and make holes in the metal for fasteners. That is why the tool is often called a pneumatic punch. Its working part is made of high-speed steel. The rubberized handles of the product are equipped with springs. They help reduce pressure on the palm, which facilitates the process of punching and processing.
Any model of hole punch-edge bender works much faster and more efficiently than its manual counterparts, which is why it is intensively used at service stations and car repair shops.
Creating a slipway
Example of a drawing
To make a slipway we will need drawings. Different sizes of cars require different stocks, but for a garage mechanic or for yourself, a universal stocks that you can make yourself will be suitable. Buying a slipway will not pay off for a long time, and since making your own slipway will not take much time and money, it’s easier to make your own. So, how to make a homemade slipway? What is needed for this? In fact, everything is not as complicated as it seems at first glance.
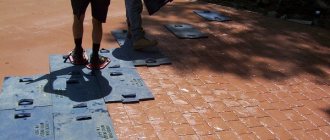
Slipway option
Step-by-step construction instructions
The construction of any home-made structures begins with the design stage. You need to make a slipway that is convenient to use. It is important that it does not take up too much space, blocking free movement.
The second point is always the creation of the structure's frame. The last point is to install fasteners and tightening devices yourself.
Drawings and dimensions
First you need to make suitable drawings. Ready-made options can be found below. The markings are made according to the dimensions of the vehicle. Afterwards the stage of preparation and selection of tools and materials begins. We will also need to make a mounting system large enough to fit our vehicle. It would be nice to cook it with the ability to change the height.
- Once all the drawings are ready and the materials have been selected, you can start working. First you will have to remove moisture from the materials and coat them with a primer. You can paint them right away, or you can leave this step for last.
- Now weld the metal corners to the base profile.
- Weld the profile (this will be the stand). It is secured with bolts.
- Now the chains, hooks and retractable devices are welded.
Frame making
The frame is responsible for fixing the car. Therefore, you need to be careful when creating it.
- Before creating the frame, you need to create the outer frame. It is to this that the frame will be mounted.
- A metal profile is suitable as a material. A stand and grips are attached to it (they are needed to fix the car threshold).
- Now the thresholds are being made. They are created from metal corners.
- Thresholds are installed on beams and secured with bolts.
- After installation, all elements will have to be secured by welding.
Fastening the body to the slipway
Clamps are required for fastening. If you can't buy them, make your own. You will need railway platforms (what the rails are attached to the sleepers). Each of the platforms is cut in half, and metal is welded onto the inside. It is cut into diamonds using a grinder.
You don't need to do anything to the outside. A plate 4 millimeters thick is also welded to the inside. It is important that the clamping device fixes the threshold and does not bend during use.