- August 29, 2019
- Leisure
- Anastasia Moroz
If you start to notice that your child is drumming on everything he can, then it’s time to get a drum. But you don't have to buy it in the store. It's easy to make drums with your own hands from scrap materials. This way you will make your baby happy and get rid of stale junk. You can even involve your child in this process. You will learn how to make a drum in this article.
What is better: lessons at a music school or courses?
You can play a musical instrument not only in a music school, but also in courses.
Each form of training has its own advantages and disadvantages. A child and an adult have their own needs and learn differently. Music school is more suitable for children. It helps develop discipline and responsibility in the child. In addition, children learn faster when communicating with peers, they compete, and competition often helps to move on and develop. Music school is good because students have the opportunity to perform, thereby suppressing uncertainty and embarrassment from childhood. But the most important advantage of this institution is the study of compulsory general disciplines. A good musician must know solfeggio, music theory, literature, and a general piano course. This helps develop an ear for music. And knowledge of theory is necessary when playing any instrument.
But an adult will be more comfortable studying with a private teacher. Especially if there is a specially designated “playing” room with a home environment. It is possible to choose your own lesson time, and in the absence of competition, it is easier for an adult to learn. However, you will have to study the general compulsory disciplines on your own.
Instead of a total
It's so easy to create your own drums. Without a doubt, your little one will love this exciting activity. After all, a child can act as an apprentice at work. And creative activities with the whole family will not only contribute to the development of the child’s imagination, but will also have a beneficial effect on the child’s imagination and thinking. If a child strives to create things with his own hands, then this activity should be encouraged by adults, because spending time like this contributes to the development of children, strengthening various household skills, and simply brings joy.
Ways of learning
There are many articles, books, and videos on the Internet that help you start playing. You can contact the appropriate teacher who will help you cope with this task much faster. The choice is yours.
On your own at home
It is possible to learn to play the drums on your own! This will take much more time and will be difficult at times, but with proper discipline everything will work out.
However, it is worth at least seeking advice from experienced teachers. In some educational institutions you can get a free consultation or take one lesson to clarify unclear points. After talking with the teacher, you will build a course of action for yourself and at least mentally understand which direction to move.
If you are determined to study at home, then most likely you already have some kind of access to a musical instrument. You need to get to know him, get used to the sound of each cymbal and barrel. During your first independent lessons, study the instrument thoroughly: the name of all the attributes, remember the sound of each element, try to reproduce some kind of rhythm.
Don't demand too much from yourself, just enjoy the process.
You need to start learning with theoretical knowledge, and only then move on to practical exercises. Find tutorials or learning channels on YouTube to learn about rhythms, patterns and notes.
Learn to work with a metronome - it is your true friend. With its help, you can measure how you beat the rhythm. Be sure to use it when training.
Online gaming programs
Install simulators as supporting tools. At the initial stage of getting acquainted with drums, they will help you learn anywhere. They are created solely in order to get used to the sound, reproduce some kind of etude, and restore the rhythm in the musical memory.
Common applications are “The Drums”, “Learn To Play Drums game”, “Virtual Drummer of the Month music games online contest” and others.
Virtual VST drums
You should not avoid the opportunity to tap the drums using the keyboard. This develops an ear for music and in the future, when composing your own works, you can use the program to find suitable rhythms.
Some options include: FXpansion BFD3, XLN Audio Addictive Drum, Ezdrummer 2 Toontrack and more.
Master classes
Don't avoid attending master classes. This option is suitable for both those who study independently and students of drum schools. Drums are becoming more popular, and if desired, everyone will find master classes at schools, where they will learn something new and useful.
If you go to a tutor, also try to go and see another point of view from the outside.
With a mentor in a music studio or a tutor
In order to start playing, you need to choose a teacher. It is best to look for a teacher in music schools so that he has experience in teaching and the necessary knowledge. He will be able to immediately track the correct posture, landing and playing technique. A beginner may hold the sticks incorrectly or strike the instrument incorrectly. If you don’t track mistakes at the beginning of your journey, it will be much more difficult to relearn in the future - muscle memory is difficult to correct.
The assimilation of knowledge through personal transfer of experience is more effective. The tutor will help assess the student’s level of proficiency and learning ability, immediately notice and correct mistakes. Try to take at least 2-3 lessons to master the basics.
Music school or courses
Consider school as an option or take a course. The environment affects the ability to develop faster. It's good to have friends and acquaintances with whom you will exchange results.
Individual courses are more suitable for adults than a music school. You can choose a comfortable time for studying, skip the already known moments, and focus on what you are doing poorly.
How to learn to play drums from scratch?
Let's start with the material basis that is necessary in order to receive even the very first drum lessons. A minimal drum kit consists of three “points” (in the future we will use this term without quotation marks, because experts call all the elements included in a drum kit – drums, cymbals, cowbells, triangles, hi-hats, etc.) as points. . So, the minimum kit should include a bass and snare drums, as well as a hi-hat. No less important elements are the drummer's chair and sticks. We especially note that effective drumming and learning this skill largely depend on how correctly you choose a chair and correctly form your seat at the drum set. To many beginners, this seems like something secondary, something that comes “of course” during the learning process. But that's not true. An experienced teacher at the music school Saint-P music begins all drumming courses with a full solution to this issue, which provides an invaluable service to the student, providing him with the opportunity to move most rationally towards the final goal - mastering the instrument.
In addition to the fact that a chair for learning to play the drums should be comfortable and stable, it is also necessary to choose the right drumsticks. This choice is made based on many factors, the main ones being the anthropometric data of the student, density, type of wood, total weight, absence or use of a nylon tip are also very important. Next, you need to correctly determine the “balance point” (the place where you grip the sticks with your fingers and palm), and also choose the type of grip of the sticks – symmetrical or traditional. This is also a task that should be addressed in collaboration with an experienced teacher, especially since only the symmetrical grip has three different options.
Now you see for yourself that, answering the question “how to learn to play the drums from scratch,” already at the very first stages we are faced with many problems that an experienced teacher should help solve. Moreover, we have not named all of the priority problems above. For example, we did not talk about how to correctly position the points of the drum kit in height, at a distance that is rational for you from each other, and so on. Moreover, these problems can only be solved individually for you; no “general cases” can be used here! All this suggests that a drum school is, first of all, an experienced teacher who will provide the necessary foundation, one might say, set the right rhythm for all your subsequent training!
https://youtube.com/watch?v=wGbvxFycsos
The girl plays the drums beautifully
The music school Saint-P music is ready to provide you with an experienced and authoritative teacher, as well as all the necessary conditions for conducting drum lessons!
Required tools and materials
In this case, the basis of the child’s craft will be a simple round tin jar. Other materials needed include:
- hole punch for leather fabric;
- a small piece of brightly colored fabric (can be replaced with colored paper);
- leather flap;
- glue gun;
- leatherette laces;
- glue for fabric elements;
- cotton wool
And also in the process of work it will be impossible to do without wooden sticks.
How to properly learn to drum at home - step-by-step instructions
It’s almost impossible to find step-by-step and brief instructions on the Internet. After all, training takes years. But there are a number of actions to start your journey with:
Get to know your musical instrument, you need to get used to its sound. The correct position of the torso, arms and legs is very important! It will take a lot of time for the body to remember how to hold the sticks, how to press the foot, what the position of the hands should be, what the posture should be. Every musician needs to know the theory. Familiarize yourself with the basics of rhythm, learn rhythmic patterns and durations. You need to download the metronome and familiarize yourself with it
It will help you accurately follow the rhythm, because it is difficult for a beginner to do this. You need to beat the rhythm with your hands first. Speed is not important. The main thing is to maintain the rhythm, duration, follow the metronome, it is not necessary to beat on the drum. Transfer the action to the drums and cymbals. Next comes the hardest part. It is not so difficult to work with the legs separately, but connecting them to the work of the arms will not be easy. The main thing here is to calm down, concentrate, and make movements slowly. Sometimes certain moments need to be played hundreds of times in a row before the musician learns to reproduce them on a subconscious level. It is better to start learning with simple games. To keep your interest alive, play songs from your favorite artists. To learn quickly, just wanting is not enough; regularity and perseverance are the key to success!
Reasons for creating crafts
This question probably worries all adults. Every parent wants to find out the reasons for such a pastime with their child. There can be several examples of reasons for such an activity:
- Getting closer to your child through joint activities.
- An exciting start to the evening for the whole family.
- Development of coordination of movements and sense of rhythm in the baby. After all, with a craft that was invented and created with your own hands, you can participate in an impromptu march.
- The baby may not easily hit the drum with sticks, but try to reproduce an interesting favorite melody from a children's song or cartoon.
- Drums played with hands can be an excellent way to keep your little ones busy for some time at their summer cottage.
- Finally, the drum can become a weapon of revenge against annoying neighbors who constantly do repairs on Sunday mornings.
It is worth considering that an act of retaliation for neighboring apartments can occur without disturbing the peace of adults. To do this, residents of an apartment with a newly minted drummer need to buy earplugs or a pair of headphones in order to muffle the noise in the room.
Assembly Tips
Design development is carried out carefully, as well as assembly. The task is to treat each operation as responsibly as possible. The goal is to complete the assembly with high quality. This will avoid troubles when operating in extreme conditions. Therefore, there is no need to force the work, even if it is really necessary.
Steps to achieve high build quality:
- The work is done slowly and thoughtfully. A raw, unfinished unit cannot be used.
- Follow the drawing.
- Weld seams are treated with an anti-corrosion compound. Welding is done in carbon dioxide to obtain a high-quality seam.
- The electric drive control panel is placed as far away from rotating parts as possible.
- Electrical wiring is carefully insulated. The contacts are protected by additional insulation from moisture and dirt.
Negative results often arise due to hasty actions. The issue of moving cargo in a horizontal plane with its own device will be successfully resolved. To lift loads above the ground, the cable must be pulled over a strong support.
Installation of a garden shredder
Assemble the device as follows:
Before you start building a wood chipper, you need to make a drawing of the device.
Cut knives from car springs. This task is quite complicated, so it is better to turn to a professional turner. The size and shape of the knives are selected depending on the length of the electric planer drum that you will use. For example, for a shaft 17 cm long, four knives are sufficient (2 elements in each of two opposite clamps).
Weld a frame from the corner. The dimensions of the frame depend on the dimensions of the engine.
Install the motor on the edge of the bed, and the drum with knives approximately in the middle. Secure the engine firmly with nuts and bolts. The drum should be mounted on the frame using bearings through bushings. Install the frame itself with the shaft on the frame so that it is possible to move the drum slightly longitudinally to adjust the belt tension.
The drum and motor shaft must be positioned strictly parallel. The distance between them is determined by the length of the belt.
Place pulleys on the motor shaft and drum pin (the smaller one on the drum, the larger one on the motor). They must be located strictly on the same line, otherwise the belt will fly off.
The casing itself, in addition to protecting against injury, serves as a neck where branches are fed for chopping.
Install the starter, chip tank and protective cover on the machine, after which you can start working.
You can install a circular saw on the free end of the drum shaft, then you will have a universal woodworking machine.
You can learn more about how to make a branch chopper at home from the video.
What to make a tool from
Among the mass of useful tips for making drums with your own hands at home, it is worth highlighting one not entirely serious recommendation. It is rather of a comic nature, but every joke has its own piece of truthful meaning. A homemade drum for a child can be used for something other than a matinee. It all depends on the imagination of the parents.
One has only to look around oneself, each person can notice several tin cans or packages that are unlikely to be useful. From these materials you can make a drum for playing with your hands or special sticks.
The simplest DIY drums
Coffee tin
This DIY drum is the simplest craft of all that we will now offer you. A coffee tin with a plastic lid is all you need. To prevent the lid from slipping off every now and then, secure it with film and, to be sure, place it on glue.
The holes in the lid, which will be the striking surface, do not need to be perforated, that is, there is no need to make holes in it. The sound will be dull, but it will be there. And our drum will not break through.
Do an experiment and see what sound the sticks produce. You can use Chinese sushi sticks by wrapping cotton balls around them (tightly). Well, you’ll also have to take care of the string with which your proud drummer will hang the new toy around his neck.
Although for the baby’s delicate neck it is better to take a wide ribbon or a gauze mother’s scarf. Here you will have to be creative: attract dad and tools or tie a tricky wrapping knot around the can.
But this must be done in such a way that the tape does not tear off the lid, which is not very firmly seated. Otherwise there will be no tears.
Cool drum made from a plastic bucket with a lid
A very simple and most successful drum made from a plastic bucket with a lid. (It’s better not to come up with revenge on your neighbors (again a joke...). It can be painted or decorated as your imagination dictates. You need to take a bucket of the same size or make several drums of different sizes to get a whole drum set. Their lids hold firmly and take care that that it won’t have to fly off.
We make sticks from scrap materials; pencils, felt-tip pens, and a design like the one in the photo will do. Even my mother’s silicone brushes for greasing the frying pan will give an interesting sound. Let your child try out whatever sound he wants. Don't nip your future celebrity's fantasies in the bud.
Hanging such a drum-bucket around your neck is not just simple, but very simple. Therefore, this homemade drum is number one in the range of DIY drums in terms of ease of execution, sound volume and time required.
Corrugated cardboard drum
You will have to sit over this drum and it is unlikely to be suitable for a keen drummer. Something tells me that he will not serve his intended purpose for long. More like a decorative option (for show, so to speak), but it has the right to life. The main thing is that it looks good and the drum will be made with your own hands for kindergarten. For check.
Tin
A homemade drum can even be made from a simple tin can. In addition, we will also need:
- brightly colored fabric;
- a piece of leather;
- leather lace;
- hole puncher;
- wooden sticks;
- 2 large beads for knobs;
- glue.
So, cut out such a piece of fabric so that you can completely wrap the jar. We glue it with glue. We make the upper part of the drum from leather. To do this, we draw a circle around the top of the jar. On the skin, we retreat 10 cm from the drawn circle and draw another circle. Using a hole punch, we make holes along the diameter of the entire large circle. We repeat the steps and get two such parts. We pass the leather cord through the holes in the upper and lower circles and tighten them on one side of the can. Use another lace to pass diagonally under the top and bottom laces. Place a bead on a wooden stick and you're done. Now you can safely play music.
Purpose of the device
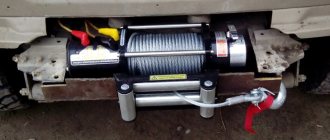
When driving off-road, a driver may encounter an insurmountable obstacle. Then the car will have to be pulled out of the mud or sand with something. A winch is the ideal tool for this. Some vehicles have the device installed on the front bumper from the factory. Purchasing a ready-made winch can cost a lot of money, so it makes sense to make it yourself using improvised materials.
A factory or homemade winch with a manual drive (or with an electric drive from a starter) allows you to pull out a car without a tow. Experienced car enthusiasts prefer home-made devices that fully meet their needs. Factory winches often fail or cost a lot of money.
Using the Auto Clean function
Many washing machine manufacturers equip their equipment with an additional program—auto-drum cleaning.
In LGi washing machines of the Direct drive series, it is called “Drum cleaning”. Its task is to maintain cleanliness inside the SMA by removing small particles that do not dissolve in water (sand, fabric fibers, lint, etc.).
The 1.5 hour program cycle takes place in stages. First, the preliminary cleaning starts, then the main one (in this case, the water temperature is heated to 60 ° C). The third stage is double rinsing and spinning at maximum speed.
How to enable the cleaning function in an LG washing machine? To activate it, you must simultaneously press and hold two buttons for 3 seconds, which are marked with an asterisk on the control panel.
As soon as the corresponding inscription or symbols appear, you need to click on Start/Pause to start the cycle.
The manufacturer recommends using the additional mode at least once a month.
There is a similar function in Samsung branded equipment - “Eco Cleaning”.
The principle of its operation is the same as in LG washing machines. But the manufacturer has provided one interesting additional function - “Notification”. The appearance of a characteristic star icon indicates that the machine requires Eco cleaning. With such a convenient option from Samsung, it is impossible to miss the moment of cleaning.
Beko washing machines also have a self-cleaning program - Self Clean. It ensures hygienic processing of equipment at temperatures above 70 °C.
The principle of operation of auto-cleaning in any SMA is simple - it is a cycle of “idle” washing at high temperature and double rinsing in a large amount of water.
If the automatic machine is in a neglected state, then no amount of auto-cleaning, alas, will help it. This option will only be effective if it is used regularly.
DIY souvenir drum
A paper drum is perfect for decorating the premises of kindergarten groups for New Year's parties. People are often asked to do something New Year's Eve for New Year's decorations with their own hands.
What do parents do most often? That's right, Christmas tree compositions with pine cones. Your decorative drum will stand out against the general background of New Year's crafts and teachers will be sincerely grateful to you. Original jewelry is always in short supply.
Drum made of paper, cotton swabs and gift paper with printed or music notes
Such a paper drum will require rolls of tape, or cardboard cartridges of paper towels. The size of the drum depends on the size of the cardboard cartridge. Twine, wire, beads, and even leftover thread from knitting will come in handy.
You can make a very small paper drum and place it in the paws of a teddy bear or doll. Place under the Christmas tree or hang on branches as Christmas decorations. Can be used in garlands or as an element of a winter composition to decorate a room.
A DIY drum for kindergarten can be either real, performing its musical functions, or symbolic. Listen to the request of the teachers and clarify for what purpose they are asking you to make a drum with your own hands.
Where will it be used and what quality should it be. We have offered you options. Go ahead and be sure to involve children in creativity. They remember such moments for the rest of their lives, unlike watching regular cartoons together.
Benefit or noise?
Many adults believe that a children's drum is of no use. It is simply a source of noise and accompanies the appearance of a headache. Nevertheless, the drum is very often entrusted to parents and their children in kindergarten to make. However, this does not happen for the additional workload of the baby and the parent on the weekend. Most often, a loud attribute is intended for performing at a matinee. And you can’t do without this.
Do not think that making this item is a waste of time. Who knows, maybe the child has acting skills, and already in kindergarten he will decide on his future profession. And such a craft will bring a lot of benefits, even if it is carried out at the request of a kindergarten teacher.
Barrel
The kick drum or bass drum can be open on one side, closed, or have a hole of varying diameters in the resonator head. Open barrels were popular in the 70s of the last century, now more and more musicians are installing resonant heads, but this, of course, is a strictly individual choice, depending on stylistic preferences and the desire to sound in general. Let's consider different options.
- A hole in the front head allows you to get the effect of reflected sound, which seems to “shoot” through this hole, the most commonly used option in modern conditions
- The hole in the resonant head with a diameter of more than 7" allows you to easily install microphones and dampers inside the kick drum, in this case the attack from the beater is clearly audible with minimal timbre coloration.
- Holes with a diameter of 4.5" or 5" (as well as two offset holes) allow you to easily control the beater, the resonance of the drum has greater power, the resonant head has a more significant effect on the tuning of the drum.
- The absence of holes in the heads ensures maximum bounce of the beater, and the sound of the drum is booming. The overall sound is determined by the resonant head.
The question of the openness of the kick drum is a question of the openness of the sound.
As for the “internal contents” of the barrel, let’s call it a “cushion” (various gaskets, muffling materials), you need to keep the following in mind.
- If the pad covers 1/5 of the drumhead, then you have a bright attack without sustain.
- If the pad covers 1/5 of the resonant head, then the attack becomes less noticeable, but bright overtones appear.
- If the pad covers 1/5 of the drum and resonant heads at the same time, then the volume of the drum sound is reduced, but as a result you have an emphasized attack, a collected aftersound and muffled overtones.
- If the cushion covers 1/4-1/3 of the drum head and 1/5 of the resonant head, then you get a hard and emphasized attack at low volume, the absence of overtones and a more concentrated aftersound.
- If the pad covers 1/4-1/3 of both heads, the sound is very concentrated, which is ideal for a microphone that is located close. Very bright attack, reduced volume, after-sound is almost unnoticeable without a microphone.
You can remove excess kick drum noise by loosening the screws of the impact head. And here you shouldn’t overdo it, so as not to lose the reflection of the sound.
The “plastic” sound of the kick drum is ensured by installing a single-layer drum head, which is adjusted as low as possible, then each screw is slightly relaxed.
To get a short, resonant burst of sound, use an EQ damper pressed against one head. Plastics can be damped with felt strips of various widths, placed under the plastic in the middle. You can also use stickers, pillows, blankets, towels, in a word, do not limit your imagination.
For better resonance, you can place the kick drum as high as possible above the floor.
Standard components
With an infinite number of possible combinations that form a set, it is still possible to identify standard components that are present in almost every installation. This:
- Seat – The immediate location of the drummer
- Bass drum (large, or Turkish drum) - the largest drum with a huge diameter, producing a dull and low sound
- Two mounted and one floor tom of different diameters are the main drums, which have slightly different sounds depending on the size
- Snare drum - one of the main drums with a rattling sound timbre
- Hi-hat cymbals - double cymbals with pedal
- Crash and splash cymbals for creating powerful sustain and bright, but short accents, respectively.
- Mounting stands - auxiliary devices for holding drums
- Bass drum pedal - needed to extract sound from a horizontal bass drum
There are a huge number of other elements of the drum kit, especially cymbals, but ninety-five percent of all existing rhythms can be played on the items listed above.
Standard location
The classic arrangement consists of a bass drum mounted together with a pedal in the center with two toms mounted above it. On the right is a floor tom and cymbals, and on the left is a snare drum and hi-hat. For convenience, you can swap the cymbals and hi-hat, or even move all the brass to one side. The same can be done with a floor tom and snare drum.
Brand selection
The most reputable companies are Perl, Sonor, Yamaha and Mapex, which have been producing high-quality products for many years in a row, so a beginner can be advised to start with these companies - the likelihood of getting something of low quality is almost zero.
You shouldn’t get hung up on complete offers from one company, because... Despite some cost savings, a particular component may not suit you and will have to be replaced. Your installation may not have two items from the same manufacturer at all, and there is nothing wrong with that. The only thing that can be said with 100% certainty is that each element of the installation must be listened to by you personally and liked by you personally. The rest is secondary.
Possible additions
If desired or as needed, your drum kit can be expanded. The most popular add-ons are:
- Additional cymbals (rides, swizzles, swishes, pengs, etc.), with the help of which the desired effects are created
- Additional kick drum for playing fast rhythms
- Cardan shaft that allows you to accelerate two bass drums for speeds of extreme genres
- Additional toms of different depths and diameters to create a unique timbre
- Pickups for high-quality recording of rhythms
Paper product
A decorative drum for a little musician can be created from plain paper or cardboard. To do this, you need to cut out two circles of the same diameter. Their size can be any. Then a strip of paper is cut out, which will become the connecting element for the top and bottom of the instrument.
The paper structure can be glued together with glue or connected with tape. You can decorate the craft using paints or pencils, paste it with various paper illustrations, stickers, cover it with bright satin fabric and sew funny pom-poms on the sides. Thus, a children's craft with their own hands will acquire its own individuality. This part of the work, undoubtedly, can be done by mother’s little assistant himself.
Almost any idea of a little dreamer can and should be brought to life. And for this it is not at all necessary to go shopping and spend large sums. Do-it-yourself drums will not only look unusual and original, but will also not require much time to create.
drumeo
Drumeo is one of the leaders in online drum lessons, and their YouTube channel contains tons of education. You don't get everything you would as a Drumeo member, but don't let that stop you!
Just to give you an example of what you'll find, here's a video called "How to Play the Drums - Your Very First Drum Lesson." It will teach you some basics and you will actually play to the beat at the end.
Obviously this video is for those who have never played the drums before, and there are many other videos for beginners. But it goes beyond that. Lots of intermediate and advanced lessons on the channel. For example, you can use the video below to work on getting that hi-hat to open and close smoothly on your beats:
Jared Falk and Dave Atkinson teach many of the classes since they are the founders, but there are a ton of guest teachers as well. In fact, some of the instructors are featured below!
The only downside to Drumeo is that it tends to give you promotional information about Drumeo Edge in its videos. Obviously this is how the company makes money and I admit that the sales worked for me and I signed up. But you can easily ignore them and just enjoy the free content!
Hoops, bottoms and joists
The third step in creating a homemade drum kit is to install wooden hoops. Since it is quite difficult to cut a perfectly round hoop at home (especially if you have no experience in such work), it is recommended to contact a printing house.
However, before placing an order, ask the manager if the printing house is equipped with a laser machine for cutting plywood. If yes, you can safely send them pre-prepared drawings.
After receiving the order, all you have to do is sand, stain and varnish the workpieces
Please note that it may require staining three times to achieve the desired saturation. Metal corners can be used to secure the bottoms
Description
So that after the electronic installation you do not have to get used to the acoustic one for a long time, it is recommended to modify it as much as possible. For example, you can immediately cut off the option with hard pads. Last but not least is the issue of price. But after a long study of the forums, it becomes clear that it is much more profitable to make a drum kit with your own hands than to buy a ready-made one.
The M-Stand company from St. Petersburg is engaged in the production of mobile stands, lightboxes, promotional stands, poster printing, etc. You can order stands on the website https://www.mstand.ru.
Let's get acquainted with all the intricacies of a homemade drum kit.
What are the types of drums from automatic washing machines?
Depending on the model, manufacturer, and type of loading, the containers differ in size and design.
- Front loading washing machine drum
- Top loading washing machine drum
An excellent barbecue with a low roasting pan can be made from the tank of a narrow, front-loading washing machine. The kebab will be well browned on it, juicy, and a minimum of coal will be needed.
Wide and narrow drum from front-loading washing machines of different models
Standard machines are equipped with large capacity tanks. These can be used to make a universal tall roaster for kindling with wood. It is used not only to fry food on skewers or on a grill, but also to cook it in a cauldron. By choosing a tank like this, you will receive a bonus of an original hearth, around which you can sit all night, indulging in romance.
The drum, with virtually no modifications, can be used for cooking meat on skewers and on the grill
A barbecue oven is made from a top-loading washing machine tank, the design of which already includes doors.
Video 2 minutes - oven under a cauldron from a tank with vertical loading
When looking for a suitable sample, you also need to pay attention to the diameter: the wider, the more products can be cooked at the same time
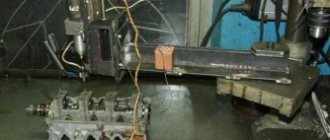
Loading sounds, setting up and flashing the module
To configure module parameters, download sound files and update the microcontroller firmware, use the YogaDrums program. This section describes how to work with this essential drum module software. Drum module for self-production For those who want to assemble a drum module on their own, all information on version 1.00 is in the public domain: in the Radio magazine for September-October 2018, and also a little lower on this page. Initially, I wanted to post a slightly different diagram, but after publishing the article in Radio, in order not to confuse people and myself in different versions, I am posting for everyone to see the same diagram as in Radio, with the same designations of electronic components, as well as with all the changes that the circuit underwent after manufacturing and testing the drum module. All software that is needed for the module to operate in the form described in this section and with the characteristics given there is also open to everyone. Of course, the module is not ideal, but it is quite possible for everyone to play on it, although real drums are, of course, better. The firmware sources are also open, so figure it out, correct it, add your own functions, I have nothing against it.
Module
The main criteria for choosing a module for installation are flexibility of settings, connection to a PC and reasonable price. In this case, the winner is MegaDrum, which requires self-installation.
It is worth noting that on the forum you can get answers to all questions that may arise during installation or operation.
Although it is possible to assemble the MegaDrum yourself, it is not always within the capabilities of a beginning drummer. Therefore, it is best to purchase the All In One v3.2 PCB 56i and Syntex kit. So you can build a 56-input module based on Atmega644. Although it is a little more expensive, this method has its advantages:
- You receive all the details at once. This is very important, because not every store can buy everything you need.
- To facilitate the installation of elements, markings were applied to the printed circuit board.
- Hardwired PIC and Atmega with a protective bootloader.
By assembling the module in this way, you speed up the installation process and reduce the number of potential errors.
After that, you can buy a plastic case, jacks, buttons, additional connectors and pieces with a diameter of 20, 27 and 35 mm. The last step is to download EZDrummer. Since the module is quite easy to install, you will succeed the first time.
At first glance, it may seem that 56 inputs is too much. In this case, you can put aside the 24-input board. Please note: wood feather bits are best for drilling holes in plastic - this way you will get neat and even holes.
Concrete mixer
- This is a rather complex device, which, in addition to mixing concrete, must ensure its unloading. Therefore, when planning to make a concrete mixer out of an old washing machine, first weigh your plumbing skills and knowledge.
- The easiest way to turn a barrel washer into a device for mixing concrete is to replace the standard activator with two U-shaped blades. They can be made from a thick 4-5 mm steel strip. To do this, you need to cut it to size, then bend the two blades and rotate them 90 degrees relative to each other.
- After this, they need to be welded to a shaft passed through the hole for the remote activator.
The drain hole, which is in every barrel washing machine, must be plugged. Next we proceed depending on how much concrete will need to be mixed. If we are talking about 1 bucket, then you can leave the old single-phase motor.
If you need to prepare a large volume of concrete, then in place of the old motor you will have to install a more powerful one (0.75-1.2 kW) with low speeds (1300-1500 per minute).
- In addition, the “original” belt drive must be replaced with a gearbox that reduces the speed (from 1300 to 25-30) and increases the torque on the mixer blades.
- Note that the best mixing quality is obtained when it is not the shaft with the activator that rotates, but the concrete mixer body itself with the blades fixedly fixed in it. However, to create such a design, a deeper and more complex modification of the washer is required.
Plastic bucket with lid
Not every adult knows how to make a drum with their own hands from a plastic country bucket. You can paint such a tool with simple paints; it can also be covered with ordinary colored paper. It all depends on the imagination of the little master. The lid on such a bucket should fit tightly. After all, the tool will be damaged if the upper part of the tool falls off at the most inopportune moment.
A drum made from a plastic bucket can simply be held in your hands, or you can hang it around your neck. This action is very simple to perform. The material has two holes from the handle on the sides. It is through them that you need to thread an improvised strap, securing it with knots.
Sticks for such a plastic instrument can be selected from scrap materials. This role can easily be played by pencils or old felt-tip pens that are no longer used for drawing. So, things will be given a second life and the child will be satisfied. Kitchen brushes, which every housewife has, can also make interesting sounds.