Many car owners, having the appropriate knowledge and skills, are ready to begin repairing the car engine on their own. To do this, the machine engine should be pulled out of the hood and installed back at the end of the work. It’s difficult to do this, and it’s impossible without a special lifting device .
But you can find a way out of every situation. And if you have a garage, you can take advantage of the experience of many craftsmen and make a car lift for the garage with your own hands.
Choosing a design
So, you have decided to rely on your own skillful hands and make a homemade lift for your car garage , rather than purchasing it at a special equipment shopping center. This is an understandable desire: the cost of such equipment may not be much less than the price of your car, and it will be used extremely rarely (only if you do not intend to open a service station in a garage).
The idea and desire have appeared, now it’s time to select the system for the device being created. To do this, you need to focus on industrial lifts demonstrated on the special equipment market, “peek” at their design and imagine whether you can do something like that .
Most likely, the first thing you will come across is a two-post lift, which can be found in almost any auto repair shop. This type of device can be equipped with an electromechanical or electrohydraulic drive .
In the first case, inside any rack there is a threaded shaft rotated by an electric motor with a gearbox. The threaded shaft contains a bearing nut that moves along it and, accordingly, raises and lowers the “legs” on which the car rests .
In a two-post electro-hydraulic lift, the axle is replaced by a drive, the pressure in which is generated by an electric motor. There are other types of similar systems, but with one, three or 4 racks.
Another type of lift is a scissor lift, where the platform has a system of levers (called “scissors”), rises and lowers with the support of hydraulic drives driven by electric motors.
When creating similar systems, you can encounter a large number of problems and difficulties that need to be solved. First of all, this is work safety - no one wants to get seriously injured or damaged due to a broken lift at one not very fortunate moment.
Therefore, it is necessary to select materials and the device system in such a way that it can withstand the weight of the machine with a significant reserve . It is also worth taking care of the production of locking elements that allow you to keep the car on the site in case of emergency situations with the lift. And in order to prevent the latter, you should constantly inspect them. For an electric drive, it is necessary to check the wear of the shaft thread and the bearing nut; for an electrohydraulic drive, it is necessary to monitor the integrity of the hoses and cylinders.
And the main problem faced by those who want to make a two-post or scissor lift with their own hands is the complexity of production and the high cost of the elements. At home, it is almost impossible to form a threaded shaft; selecting cylinders and hydraulic hoses is not an easy task and is not cheap.
But there is a simpler type of car lift , which turns the car on its side at an angle of 45°-60° and is called a tipper. Let's take a closer look at it and take a look at where and how it can be done.
Homemade jack
The most economical option for a household lifting mechanism is a two-post unit equipped with an electric, electro-hydraulic or hydraulic drive. In a lift with the first type of drive, threaded shafts with a moving bearing nut mounted on a lifting steel foot are placed in the racks. There are other models of screw design, which contain 1, 3, 4 racks.
To assemble a cheap but productive device for your own use, you need to understand the operating principle of a factory-made device. You can make a car lift for a garage with your own hands from the following components:
- 3 steel corners 750×750×8 mm;
- worm gearbox;
- steel plate 10 mm thick;
- 2 chains with large thin links made of wire with a diameter of 30 mm;
- hook;
- cable 5 mm thick;
- two star keys.
When choosing the component elements, it should be taken into account that the minimum load capacity of a unit with a gear ratio of 60 kg should be 300 kg.
Simple lift
For several decades now, the most common and durable method of lifting a car has been turning it on its side. In fact, it is not only the engine that needs repair from time to time, but also other components that can only be reached using a test pit . But not everyone has such a pit, and folk craftsmen have constructed an elementary, if not primitive, system.
At least 3 people are required for this lift. This method can hardly be considered ideal, because not a single person wants to tempt fate by scratching a car on a concrete flooring.
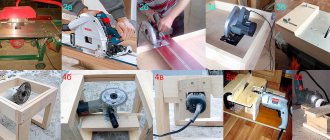
However, if there is no other way out, then such a lift can help you out. His system is as simple as possible, and the production method is clear even from photographs.
An alternative to a lift can be an inspection hole (of course, if the garage system makes it possible to dig it). If you make a hole as tall as you are, you can easily examine the bottom of the car. If it is not possible to properly equip the inspection hole, then you can limit yourself to an overpass (but it will require the presence of quite significant ceilings in the room).
Instructions:
- 1. For the base, embed metal corners into the side walls of the room so that the car hood is located just under them. Next, install a centimeter plate on the corner racks and secure it with eight “M8” bolts. It will not merge with the corners, so in the future you will be able to change its placement above the car engine.
- Fix the worm adjuster on the plate. Next, take the key, put it on the electric drive shaft, and secure it. Then make a 2 cm opening in the tile for the chain, then pass the chain through the finished hole and close it into a ring.
- Place another sprocket on the outgoing shaft, smaller this time, and combine them.
- Make 2 more holes of 3 cm in the slab, pass the chain over the key. The 2nd chain must end with a metal hook capable of supporting the weight of the motor.
The best models of car service lifts by characteristics and prices
Two-post lifts are most in demand at service stations. Previously, foreign products were considered the best.
According to reviews that take into account the pros and cons of lifts, among the best in terms of characteristics and price is the Sorokin 17.1 device, produced by the company of the same name. It is with synchronization arranged on top. It can be used to service passenger cars and SUVs of various sizes weighing up to 4 tons. The lift has telescopic-type rotary levers and is equipped with carriage locking locks and a limit switch.
A more powerful product with a lifting capacity of 5 tons is produced by Sivik. Model name - Ermak 5000. Passenger cars and trucks can be serviced on the lift. Has a higher power engine and is equipped with:
- adapters that can securely mount various vehicles;
- automatic locks that lock cars;
- stoppers that ensure the machine is held in height every 10 cm;
- a safety bar that turns off the lift when touching the roof of the vehicle;
- blocking the control panel in case of unauthorized activation of the lift.
Among the four-rack devices produced in Russia, the AE&T F4D-4 model stands out. It is equipped with a lifting platform, can serve vehicles with low ground clearance, and turntables for wheel alignment control.
Model with 2-leg shoe
To make a car lift with your own hands, you should first tackle the lower support. For this purpose, numerous experts advise preparing a clamp in advance. With its support it will be possible to hold the main pin. But first of all, it is important to secure the frame. To do this, it will be necessary to use a welded inverter . Then, in order to assemble the lift with your own hands, it is important to choose a high-quality hydraulic device for raising the beam.
After its installation, the handle is installed. A channel regulator will do for these purposes. The lift stand can be made from an aluminum plate . The supports for the fixture are formed last. Before this, it is important to check the reliability of the clamp, for which it will be necessary to use a welding inverter.
Step-by-step installation of a lift with your own hands
Having chosen the right car lift, you do not get a guarantee that it will work properly. For comfortable operation, the device must be installed. The main condition for successful installation is the high reliability of the garage foundation.
Installation of a solid base
The area of the garage in which the car lift will be installed using fastenings must have a thickness of concrete material of at least ten centimeters. In addition, when pouring concrete, the layer of material is additionally reinforced. Without reinforcement, the foundation may be pushed through. In such a situation, it will be necessary to dismantle the car lift and re-fill the foundation.
Calculation of the minimum height of paw lowering
When installing the lift, you need to determine the minimum height for lowering the legs. The plane below should be level. The minimum height to which the arms of the equipment can be lowered depends on the specific model of the device.
Assembly of the structure
The equipment must be positioned according to the length of the machine. On average, the bumper of all cars protrudes about two meters from the center of the lift holders.
At the next stage of installing the car lift, it is necessary to install its frame and fix it. Next, the solution is poured. Before pouring, you need to check whether the frame is symmetrical. After the solution has hardened, you need to tighten the bolted connections. This will allow the frame to be securely fastened.
The bolts are installed in the grooves of the risers. The minimum length of bolts is 22 centimeters. After tightening the bolts, tighten the nuts. Attaching the stands to the frame is carried out in accordance with the instructions supplied with the equipment.
Preliminary height adjustment is necessary for screw car lifts. If the lift operates hydraulically, the cable must be pulled. Then all the chains are installed, and the quality of tightening of bolted connections on the frame floors is checked.
If, when tightening bolted connections, the frame is displaced and the symmetry of the racks is disturbed, metal plates are placed under them. Metal plates are usually supplied with the car lift.
Electrical connection
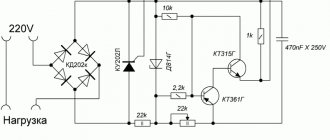
After assembling the structure, electrical cables are connected and emergency switches are installed. To do this, it is advisable to call an experienced electrician who will carry out the procedures according to the wiring diagram. If you know how to build electrical circuits, you can do it all yourself. Whether the lift drives will work properly depends on how correctly the electrics are connected.
Checking operational readiness
Hydraulic lifts must be filled with oil. After this, you need to check the equipment. To do this, lowering and raising are performed several times.
Make sure there are no grease leaks anywhere. It is recommended to check the condition of the equipment at least once every six months.
If you want to create a real mini-car repair shop out of an ordinary garage space, you need to install a lift in the garage, in this case you can carry out almost any repair of a passenger car. Installation of the equipment can be done with your own hands, but first choose the lift wisely, because the rush to purchase will turn the equipment into a set of parts.
Mechanism with 3-leg shoe
It’s easy to assemble a device with a shoe on three supports with your own hands. In this situation, a U-shaped base is prepared. After this, it will be possible to secure the pickup. For this purpose, numerous experts advise using a clamp. The hydraulic mechanism can be directly determined on the screws. However, it should not cover the supports.
Next, to make a car lift with your own hands, you need to fix the regulator. To do this, a small plate is cut from an iron sheet. It should be welded at the top beam. The distance from the edge should be at least 2.2 cm. After this, the shoe is strengthened. The first base is installed at the hydraulic device. At this time, 2 other supports should be placed at the front edge of the model.
Automotive lift-tipper
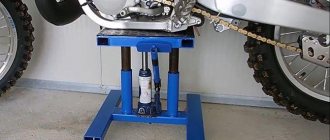
If it is not possible to equip an inspection pit with a lift in the garage, mechanics recommend building a tipper-lift for the car with your own hands. It is better to order installation drawings from a professional. The device is made from sheet metal and a square profile by welding. The lifting structure is durable, safe and easy to operate.
As the main working unit, the car lift-tipper contains a rack, hydraulic or worm jack. The heel of the device with large stiffening ribs can tilt a car weighing 2.5 tons by 45°. For strength, the platform of the device with movable mechanisms is equipped with stiffening ribs with a metal thickness of up to 7 mm, corners and a square thick-walled profile. The support bent corner, the lower platform and the support beam are also made of metal.
This is interesting: Internal CV joint diagram for Ford Connect, Scorpio, Mondeo
You can make a mechanical tipper from a set of necessary components:
- thick-walled square pipe 0.5×0.5 cm or corner with shelf;
- two fingers;
- four bushings;
- metal fragments for scarves.
The parts are fastened together by welding, the brackets with hinges are connected to the platform, after which the lift is ready for use.
Device with U-shaped rear beam
In this case it will be difficult to make the base. To do this, it is necessary to cut a large number of long plates of iron sheet. In such a situation, experts advise identifying a metal type shoe. In this case, the hydraulic mechanism must be located at the lower beam. Then, to select the lift, you need to assemble the regulator . To do this you need to use a clamp.
The first base is welded only after the nut is secured. The support must be marked on the machine. In this case, the distance between its corners must be at least 230 mm. Certain modifications to the approved lifting device require the use of pumps. In this case, they are necessary to lubricate the hydraulic device. To determine this part, it is important to attach an auxiliary support to the rear beam.
How to install a lift in a car service center
They start by choosing the location and location of the device. This takes into account:
- lift dimensions;
- dimensions of vehicles serviced on it;
- the need for free space around for the car mechanic to move;
- possibility of free access;
- required distance from car washing and painting areas.
Sufficient room height is required to place the device. At the same time, it must ensure free placement of not only the lift, but also the car at maximum lift. With low ceilings, you can save on height by installing a lift and making a service area in a recess.
Installation of the mechanism requires a high-quality foundation. The strength and evenness of the foundation determines the correct placement of racks, support frames, operational safety, and the service life of components and the entire structure.
When installing a lift with 4 racks, the thickness of the foundation is taken to be at least 15 cm; concrete M300 and higher is used for pouring. The same is done for two-column units, which have lower synchronization, and with upper or no synchronization, the minimum grade of concrete is M400, the layer thickness increases to 30 cm.
To save room height, scissor lifts are mounted in a recess placed in the floor.
L-shaped rear support device
To assemble a model of this type, first of all, prepare the base. For this purpose, the plates are selected from steel. Their thickness must be at least 2.2 mm. Then, to assemble the lift, you need to secure the side supports. It is not necessary to use a clamp for this purpose.
The support is welded at the appropriate step. To make it without help, you will need 3 sheets of metal of the same size. Their length should be 120 millimeters. After welding them, the upper support is fixed. In this case, it is more expedient to use a compact hydraulic mechanism. In a similar way, the gearbox can be placed next to it.
Why can you increase it?
In addition to the dimensions of the transport, the size of the room for it is influenced by the presence of various equipment and additional premises. If you want to install a lift or crane in the garage to remove the engine, then the optimal height of the garage for a passenger car should be 3.5 m, and for a jeep - 4 m.
The length of the garage can be increased by 3-4 meters by adding a platform for repairs or other work related to metal or wood, or by adding a utility room. If you consider yourself a lover of comfort, then it makes sense to add a relaxation room.
Its size depends only on your budget and preferences - you can make either a small closet or a large place where you can sit with your friends after a successful renovation. It would not be a bad idea to equip the garage with a basement and an inspection hole, but in terms of dimensions they will only increase the depth, by about 1.8-2 meters.
All the above dimensions are not mandatory; they are based on accumulated experience in the construction and operation of garages. The main criterion that you must follow when planning is your comfort and the comfort of your family.
If the car is big
Sometimes it is necessary to repair engines of not only passenger cars. In this case, you will need at least 2 assistants - they will pull the motor hanging on cables to the table, which you must first move to the car’s bumper. At the same time, you will use the chain to rotate the gearbox, but only in the other direction.
Once faced with this kind of situation, you will probably start thinking about upgrading your own design. Alternatively, you can provide the metal plate with wheels, which will make it possible to pull it towards the side wall in order to further lower the dismantled motor onto the table. Moreover, you can go further and equip the lift with an electric motor with a reduction gearbox.
Which is better: assemble the lift yourself or buy it?
People often assemble the lift themselves because a new factory design is expensive. It should be borne in mind that making a homemade lift is not always an easy task. In addition, if the structure is assembled incorrectly, its use can be dangerous.
The installed car falls from the device if:
- the weight of the car shows the load that a homemade lifting unit cannot support;
- The locking mechanism does not work well;
- the supporting device cannot withstand the existing load;
- The homemade device has incorrectly installed supports or they are loosely secured.
Also, difficulties in creating a device arise because some design elements cannot be completed without special equipment. For example, it is difficult to produce long-length lead screws. Therefore, it is quite difficult to carry out this design on your own. Many craftsmen make a tipper for a car instead of this device, since it is easier to manufacture.
When creating a device, most of the parts will need to be purchased in stores, so the final cost of the finished device can be considerable.
In addition, you will need an accurate calculation of all components, which can only be done by an engineer with experience in performing such work. If you do not have such knowledge, you will have to order a project with all the calculations from a special organization, which will require financial costs. If an error is made in the calculations, the device will not be able to withstand a large load.
Therefore, if you are not confident that you can make such a complex project a reality, it is better to create a vehicle tipper that is safer.
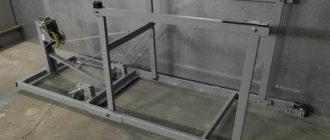
For repair work on a car engine, a lifting device was needed, a craftsman from Novosibirsk decided to make a homemade crane with his own hands.
As planned, the crane should be collapsible so that it does not take up much space in the garage. Lifting will be carried out using a hydraulic jack.
The photo shows the homemade design.
Using a lift
The worm system should be operated in the following manner. Move the car about one size deeper into the room to make room for the table.
The operating principle is not particularly complicated:
- Be sure to remove the bolts holding the engine and frame of the machine.
- Place loops of steel rope under the motor and throw the ends onto the hook.
- Start searching the chain. Over time, the movement will transfer to the drive shaft, it will force the loading shaft to move and tension will occur in the cables. The engine must be lifted slowly and carefully.
- After pulling out the motor using a lift, stop operating the crane. The weight of the lifted load will now be securely held by the regulator.
- Move the car and install in its place a strong table that can withstand a significant load from the motor.
Note! Use a durable table that can withstand heavy loads. It is preferable that it be on wheels for more convenient movement in any direction.
Optimal dimensions and height
Not every garage will be able to install a car lift. For example, if you are the owner of a minibus, which almost touches the ceiling when entering the garage, there is no question of any single/two-post lift. The garage space must have appropriate dimensions.
Next, you can familiarize yourself with the minimum garage dimensions required for a certain type of car. Add to the height of the garage the value of the height to which you plan to raise the car. This way you will determine what minimum height the garage ceiling must have to install a car lift.
The length of the garage should be three meters greater than the length of the car, and the width should be the same. The optimal height is three meters.
For jeep
The length, width, and height of the garage space for a jeep or other SUV should be eight, five, three meters, respectively.
For minibus
If you own a minibus, the garage should be large. The optimal length is seven and a half meters, width is five meters. The minimum garage height for a minibus is three and a half meters.
If you have a Gazelle cargo truck with an extended platform, the length of the garage space should be ten meters. The minimum height here increases to four meters.
Video tutorial
Be that as it may, design and technological engineering calculations must be taken very seriously. Thus, it will be necessary to calculate the minimum cross-section of beams, calculate the axes of hydraulic cylinders, select hydraulic cylinders based on performance and rod length, select the correct hydraulic pump and control system
When designing, special attention is paid to safety and emergency mechanisms for raising/lowering the car
The task is quite difficult, but solvable. If you have the materials and knowledge, you can assemble a small scissor lift that will be useful not only to you, but also to your friends and neighbors. Happy designing!
No auto repair shop is complete without a car lift. The equipment is available on the market in a wide variety of models from local and foreign manufacturers. A car lift installed in a car service will pay for itself quickly, but purchasing a car lift for personal needs is a stupid expense. Moreover, it is possible to build a car lift with your own hands.
Hydraulic garage crane drive
There are several types of hydraulic drive:
- with hydraulic cylinders;
- with hydraulic cylinders and manual winches.
When the operator increases the pressure level in the cylindrical block, the oil fluid acts on the piston part, pushing out the telescopic rod, at which time the boom equipment rises.
Based on the nature of the movement of the output link of the hydraulic power unit, the following types of drives are distinguished:
- Rotational movement. The design of such a mechanism includes a hydraulic motor equipped with a driven link with unlimited rotational movement.
- Forward movement. In this case, a hydraulic cylinder is used with a reciprocating movement of a driven type link (piston rod, plunger).
- Rotary movement. The crane mechanism is equipped with a rotary hydraulic motor, the driven link of which makes a reciprocating movement at an angle of less than 270°.
- Adjustable. In this case, the speed of the output type link can be adjusted by changing the crankshaft speed of the power unit, which activates the high pressure pump.
- With a closed circuit of working fluid circulation. This means that the fuel is returned to the suction hydraulic line of the pump mechanism. This drive is lightweight and provides high rotor speeds without the risk of air getting into the system.
Blueprints
To make a crane, first of all, draw up a project diagram and drawings of the main components. Consider the manufacture of a manually operated crane structure. It would be possible to make a device powered by electricity, making it possible to move a load using a device on a long cable, as happens in factory designs. But then the complexity of manufacturing units increases, this will entail an increase in the cost of the finished product and an increase in the time for its creation. Therefore, we will focus on making a manual model.
Types of manual taps
All construction cranes are classified into:
- self-propelled;
- stationary;
- tower;
- special purpose.
This equipment is equipped with a boom extension mechanism, a cargo trolley, and a rotating support.
By type of movement they are divided into:
- stationary;
- adjustable;
- self-elevating;
- mobile.
According to the type of control, these devices are electrically driven and manual (mechanical).
This is interesting: The principle of operation and the difference between a crane beam and a hoist - let’s introduce the issue