The current rating of burning equipment should start with the device Uzor-10K, which is average in price and capabilities. Among its differences are a shock-resistant plastic body, two heating modes for painting on wood and the main image, and shadows or gradient.
The burner tip heats up in just 1 minute, allowing you to start working almost immediately. And the simple switching of buttons and convenient design make the device suitable even for 6-year-old pyrographs. Another plus is good strength and long service life - on average, devices operate for at least 3 years.
A small disadvantage of the domestic device is the need to separately purchase a burning board and a minimum number of attachments. You will also have to turn off the device every 15 minutes - otherwise its handle may get too hot.
The cord is quite long, but does not spin easily, there is no holder, and the needle is relatively thick. However, the device still burns out well, without requiring strong pressure and cooling quickly after being turned off.
Where to begin?
Using a burner is simple, but to get beautiful drawings you need to have talent and skills. The main recommendations are the following:
- Before directly applying the design, you should choose the right tree. There are a large number of different breeds, all of which react differently to temperature. It is recommended to give preference to soft hardwood: aspen, poplar, linden.
- Some wood can withstand a single point temperature of +250°C, while others ignite at 120°C. The softness of the surface layer simplifies the movement of the sting.
- The surface on which the design is burned must be pre-treated. Even minor defects can cause the tip to accidentally wobble.
- Contour lines are drawn using a stencil and pencil. Artists can apply the sketch by hand. Complex designs are applied using carbon paper.
To place the tool, a stand is made of non-flammable material. A ceramic plate or glass is often used. Ceramics can withstand high temperatures for long periods.
TOOLS FOR WOOD BURNING
We, as aesthetes and great lovers of unusual things, will continue to engage in pyrography, and for this we will need the following tools:
Pyrograph with a wire pen - a device with a nichrome loop that heats up within 15 seconds is suitable for more experienced artists. The device allows you to burn complex patterns with many shadows.
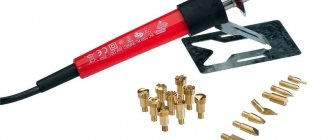
A pyrograph with a hard pen is an exact copy of a classic soldering iron, but with a lightweight handle. Allows you to change attachments, thereby complicating and making simple designs visually more voluminous.
Heating of a metal pen takes longer than a lavalier type electric burner. You can change the attachments only after they have completely cooled down (on average after 7-10 minutes). One of the disadvantages is the lack of power control.
The choice of an electric burner depends only on personal preferences and financial capabilities. But it is not recommended to save too much on the tool. Craftsmen are aware of, to put it mildly, the unacceptable quality of cheap pyrographs: over time, the handle begins to melt, the device heats up for a long time and unevenly, and often burns out after a week of operation.
In addition to the pyrograph, we will need:
- Wooden board or plywood;
- Graphite (copy) paper;
- Simple pencil;
- Fine-grit sandpaper;
- Finish coating.
Burning methods
You can begin burning work after selecting a sketch after the working part of the tool has been heated to the required temperature. If the tip heats up unevenly, this indicates the appearance of defects and the need to replace it. You can eliminate the possibility of the device overheating by periodically disconnecting it from the network. When considering the main burning methods, you should consider:
- Once drawn, the lines cannot be erased. Therefore, before starting complex drawings, you need to gain experience with easy ones.
- Beginners are advised to use stencils. They can be made in a variety of ways or purchased online.
- Three-dimensional drawings are obtained by combining lines of different shades. When you move the tool quickly, you get a thin light line, but by holding the tip you can get a dark line.
- An experienced craftsman takes into account how the fibers are arranged. The easiest way is to guide the tool along the grain.
When using various techniques, you can obtain complex drawings that are practically indistinguishable from paintings. At first, it is recommended to use the simplest methods.
How to work correctly?
First of all, it is necessary to ensure good and proper lighting. If the work will be done on the street, then properly installed street light poles will help with this.
The working tool resembles a simple pencil with a wide working part. Therefore, the work carried out is practically no different from drawing on paper, except that the working part is heated before use. The whole process is divided into several main stages:
- Preparation. It involves choosing the wood on which the design will be applied. The surface should be smooth and even. It is possible to make the board smooth by sanding it.
- Drawing. For those who create pencil drawings, the task will be simple. In the absence of appropriate skills, a suitable design is printed and then applied to a board using stencil paper.
- Burning out. After warming up the working part of the tool, you can begin burning. The handle of the tool, if it has a small thickness, is taken like a pencil. Simple drawings begin with drawing contours, straight lines are created with quick movements without applying strong pressure. If several lines are located in close proximity, they should be applied with some delay, which is required for cooling. The hue changes by setting the appropriate power. Also, to obtain complex patterns, the nozzles are changed.
Many people leave the product after applying the design without carrying out final processing. This may lead to a reduction in the service life of the product.
How to choose a tool?
In order to learn how to work with a tool, you should choose it correctly. Recommendations for selecting a suitable burner:
- The volume of work carried out and its complexity are determined. Small burnt designs with fine lines look attractive, but they can be almost invisible on larger pieces.
- Beginners often purchase a tool from a low price category. This decision is justified by the fact that in the absence of experience, mistakes can be made, due to which the device will cease to function.
- The most important parameters include power, tip dimensions, the possibility of using attachments and their number, heating time, etc. All required information is indicated in the operating instructions.
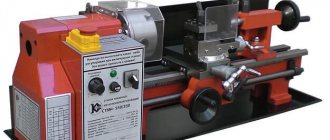
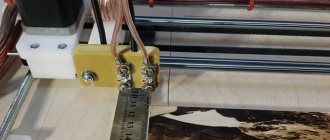
- The classic version of the tool is represented by a combination of a step-down transformer, a handle and a working part. There are also sophisticated burning machines on the market that can be used to produce complex images.
- It is recommended to give preference to products from popular manufacturers, as they can last for a long period.
Only over time will the master, based on personal experience, be able to select the most suitable tool. The choice of design is often made depending on the available options for burners and attachments for them.
PYROGRAPHY AND ITS ADVANTAGES
Wood burning can be easily combined with both furniture restoration and carving .
The unusual paintings created with a soldering iron will open up endless options for creativity and inspiration in the process. Let's try.
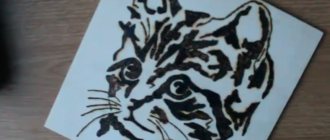
Burning (pyrography) is the creation of a design using a hot metal pen. And although there are quite a lot of materials used in the burning technique (leather, felt, plastic, fabric), wood is considered the main one. This is what we will talk about.
Using a pyrograph, they create original patterns on boards, boxes, and furniture, turning everyday things into unique masterpieces.
Burning is closely related to folk crafts, however, in recent years this decorative processing has become an independent technique in the interior.
What is the secret of the popularity of this activity? We came to the following conclusions.
Take a break and dream Have you heard amazing stories about how the greatest writers created their works without knowing fatigue and without feeling time? This happens with any business you like. A favorite hobby inspires and replenishes vital energy resources, and, without exaggeration, can bring happiness to a person. Finding something you like, something in which you feel significant, with complete freedom of action - what could be better?
Change boring things A person receives the first information visually. What surrounds us, what we see every day, leaves an imprint on our worldview. If you are tired of everyday life, but that brown cabinet is annoying you more and more each time, maybe you should try changing something? You and I already know how to restore furniture, carve entire paintings on wood, and very soon we will learn about burning methods. Using these skills, it will not be difficult to make beautiful accessories for a room, change a boring interior, or give friends something that they won’t buy in any store.
Make money on burning
As with any skills in decorating, designing furniture and interior design in general, wood burning, with due effort, can become an independent form of income. If you are looking for a vocation, have not decided on a profession, or want to change your place of work, it is quite possible that this material will interest you as a way to gain first experience. Later, if you wish, you can monetize your hobby and turn it into a main or additional source of income.
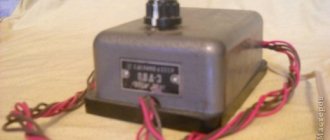
Choosing a transformer from a microwave oven
To make a Lichtenberg apparatus with your own hands, you use a high-voltage transformer from a microwave oven. Please note: a transformer from a welding inverter will not work.
To burn Lichtenberg figures onto the surface of wood, high voltage and low current are required, which is provided by a high-voltage transformer.
While a transformer from a welding machine, on the contrary, generates low voltage and high current. For this reason it is not suitable.
As for the choice of power source, absolutely any transformer from a microwave oven will do (their characteristics in different models of microwave ovens do not differ much). The main thing is that the transformer works.
We recommend watching a video that outlines the process of assembling a homemade “lightning generator”, as well as the principle of its operation.
https://youtu.be/E4b79ah4gG4
Final processing
After receiving the image, the surface is treated with sandpaper. You can protect wood from the negative effects of the environment as follows:
- The wood is varnished. This substance significantly extends the life of the product. At the same time, the drawing does not lose its contours, remains bright and rich.
- If necessary, partial or complete coloring of the space that is formed between the drawn lines is carried out.
Final processing of the product can be carried out using a variety of protective substances. The choice is made depending on what result needs to be achieved.
Safety precautions
You should work with the burner carefully. The main recommendations are as follows:
- When using the tool, you need to use a special stand, which is made using heat-resistant material. In its absence, ceramic dishes or other products made from this material are used.
- The tool should not be left on the surface being treated for a long time. This is due to the fact that prolonged exposure to high temperatures leads to fire of the material.
- No flammable materials should be located near the work table. Even short exposure may result in a fire.
- Drawing should be done carefully. Clumsy and quick actions can lead to burns.
- Even a high-quality tool can overheat. Therefore, it is recommended to monitor the heating level of the working part.
At the time of burning, unpleasant smoke may appear, which is not recommended to inhale. Work must be carried out in a prepared workplace. Distractions lead to mistakes being made, and the work will have to start all over again.