Classification of lifts
Like other designs, these devices come in several types. They are classified according to the method of lifting the car (platform, scissor), and by the type of working mechanism (chain, hydraulic, screw).
The most common are fork-type screw lifts. They are able to withstand and lift cars weighing from 2000 to 3000 kilograms. At the same time, they are the most difficult to manufacture, and making them yourself is almost impossible. But at home you can make a platform lift.
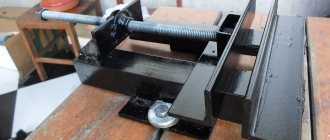
The components of such a mechanism are two beams laid on the side. They are attached to two screws for lifting, which is carried out by means of two pairs of shafts.
Types of car lifts
There are three types of lifting units for vehicle repair:
- Screw lifts.
- Chain mechanisms.
- Hydraulic devices.
According to the method of lifting the machine, lifts are divided into:
- Fork devices.
- Platform mechanisms.
- Scissor lifts.
The most common type of car lift is fork screw devices. Their base is a shaft made of tool steel that can withstand a force of several tons. But making such a device at home is almost impossible due to the complexity of the design of the plugs. Therefore, for self-production, it is better to use screw platform devices.
They are made in the form of two channels, located parallel to each other, and located with the ribs down, attached to screw drive devices, ensuring the lifting of the entire structure. In such units, the requirements for shafts are not too strict, since lifting is provided by four shafts instead of two. Their significant disadvantage is the need to use a jack to perform suspension repairs, since the car’s wheels are not suspended, but are located on channels.
Buying or making your own?
A person who is faced with the need to get a car lift has several options for solving this problem. New lifts of all types can be bought in a store or a suitable used device can be purchased second-hand. There is a third option - do it yourself.
At first glance, a self-made car lift should cost much less than a new one, since its price does not include the salary of the worker who worked on it. But it seems so only at first glance. New Chinese autolifts will cost 90-100 thousand rubles, while materials for your own lift will cost from 100 to 120 thousand.
On the other hand, used car lifts from expensive companies can be more expensive than new Chinese lifts. Thus, the main selection criterion remains the reliability of the mechanism.
When making a lift yourself, you take as a basis a load diagram developed by someone, which you have to rely on when operating the lift. Before deciding to buy a lift and make it yourself, everyone must answer the question, who does he trust more: himself or the factory workers and the technologies that created this or that car lift?
Video: DIY car lift.
Do-it-yourself car lift at home
Like other designs, these devices come in several types. They are classified according to the method of lifting the car (platform, scissor), and by the type of working mechanism (chain, hydraulic, screw).
The most common are fork-type screw lifts. They are able to withstand and lift cars weighing from 2000 to 3000 kilograms. At the same time, they are the most difficult to manufacture, and making them yourself is almost impossible. But at home you can make a platform lift.
The components of such a mechanism are two beams laid on the side. They are attached to two screws for lifting, which is carried out by means of two pairs of shafts.
Buying or making your own?
A person who is faced with the need to get a car lift has several options for solving this problem. New lifts of all types can be bought in a store or a suitable used device can be purchased second-hand. There is a third option - do it yourself.
At first glance, a self-made car lift should cost much less than a new one, since its price does not include the salary of the worker who worked on it. But it seems so only at first glance. New Chinese autolifts will cost 90-100 thousand rubles, while materials for your own lift will cost from 100 to 120 thousand.
On the other hand, used car lifts from expensive companies can be more expensive than new Chinese lifts. Thus, the main selection criterion remains the reliability of the mechanism.
When making a lift yourself, you take as a basis a load diagram developed by someone, which you have to rely on when operating the lift. Before deciding to buy a lift and make it yourself, everyone must answer the question, who does he trust more: himself or the factory workers and the technologies that created this or that car lift?
: DIY car lift.
What will you need?
If you decide to make a lift for your car yourself, then first of all you will need a drive mechanism and a stopper. These design elements can be found in specialized stores that sell similar equipment, or in enterprises that are discarding old but working machines.
If you decide to make a scissor lift, then you should select two hydraulic cylinders of appropriate power and length. Autolifts of this type are very difficult to equip with a reliable and safe locking system. Otherwise, their production is easier than the creation of lifts of alternative designs.
It is worth noting that installing stoppers on platform or fork lifts is much easier than on scissor lifts. To do this, an oblique steel strip and a retainer with a thickness of 2-3 centimeters are enough.
When starting to manufacture or operate a homemade lifting mechanism, remember that you are relying on the reliability of the structure you created yourself, so carefully check the functionality and integrity of all its parts!
For small spaces, garages, and auto repair shops, many install a hydraulic lifting mechanism. Now some craftsmen make scissor lifts with their own hands.
Making a tipper yourself
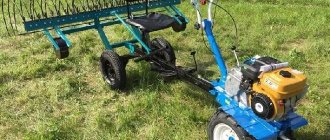
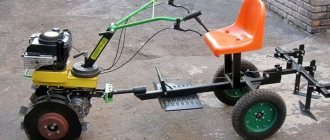
The tipper is used to raise one of the sides of the car to the required degree. A simpler option that does not require special devices like a gearbox and chains.
Homemade car tipper
The process of making a do-it-yourself tipper includes several stages.
- The shoe is made to work as a support for the future jack. It is important to follow the dimensions prepared according to the drawing so that the movement is free.
- The lifting stand is made from 1.5 meter long corners, assembled in the form of squares, fastened with a welding machine. The racks are used in the amount of two pieces; it is important to take into account the distance through which the beam will travel.
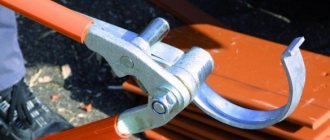
- Holes are drilled to attach the support pipe, also required for the locking mechanism.
- The platform for the beam is made from a sheet of steel, the edges are bent, then the result is a box to which the sides are welded.
- Supporting the car on the opposite side by raising it is done using a self-made structure made of beams. The square profile is made from a long corner corresponding to the car.
If you don’t have time, you can contact specialists who will make a tipping mechanism in the garage if it meets the requirements.
Simple lift for turning the car over
For use in open spaces, it is possible to make a simple lift for turning over a car. The chassis of the car requires maintenance and repair in a timely manner; in the absence of a lifting device or inspection hole, this is not possible, and work will be stopped.
Using a mini lift in a garage will require the efforts of several people, which can result in the side of the car being damaged. Few dare to repair a car at a strong angle, but in the absence of other options, there is no way out. It can be made by using corners with a cable mechanism from an old winch.
Homemade lift for the engine part 1
This video shows the process of making and assembling a homemade engine lift. The lift is equipped with an electric winch with a lifting capacity of up to 500 kg. and a hydraulic jack 10 tons.
The parts used were: I-beam No. 10 for the boom; channel for the frame, pipe for the support mast.
The purpose of building this lift was: versatility of use (lifting engines and more), prefabricated design, simplicity and speed of assembly.
This video shows the process of manufacturing and assembling a self-made lift for the engine. The hoist is equipped with an electric winch with a carrying capacity of up to 500 kg. And a hydraulic jack of 10 tons.
Of the parts were used: I-bar 10 for the boom; A channel for a support, a pipe for a supporting mast.
The purpose of the construction of this lift was: universality of application (lifting of engines and not only), collapsible construction, simplicity and speed of assembly.
0:08 Intro; 0:21 Assembly; 02:03 Platform for a jack; 03:11 Installing a jack; 05:18 Crane boom; 05:56 Installed an electric winch; 06:13 Lifting mechanism assembly; 07:07 Test lifting of the load; 07:33 to the upbuild channel
Homemade lift for the engine part 4 Final
Lift-tilter
To avoid costs and a lot of complications, you can give preference to a simple garage lift-tipper. The device will allow you to tilt the car to one side, and the tilt angle can vary from 45° to 60°. This is quite enough for most repair work.
To build such a unit, you will have to create and connect a number of parts: the front pillar, beams (top, bottom, rear), shoe. Various connecting elements will also be required.
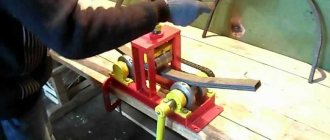
You will need to work a lot with metal, so you must have a special tool - welding, a grinder and a drill with a set of metal drills.
The main material for work is 4 mm steel sheets, angles and bushings.
The manufacture of a jack should start from the base - the shoe. It must be made of steel and in full accordance with the drawing. It is important to ensure free movement of the shoe along the front pillar in a vertical plane.
The stand consists of two squares, which are welded from 32 corners with a length of at least 1500 mm. They are combined by means of segments of corners, and the distance between them should not interfere with the free movement of the upper beam.
Then you need to drill holes for the support pipe and fingers - metal clamps of the upper beam and shoe.
Creating a Top Beam
Next, proceed directly to creating the top beam. For this, take two 1.5 m corners and weld them into a U-shaped profile. It is also necessary to weld a metal insert in the middle, which will ensure the fixation of the jack.
The beam will be ready when you weld a plate of the appropriate length and height to the profile. The result is a rectangular beam.
One end of it must be welded tightly - the bushing will be attached to it, and the guides for the jack are welded to the other end.
The platform for the beam is created from a steel sheet. You can bend its sides to get something like a box, or weld the walls of this very structure. Inside the site there will be a piece of wood of the required size, which is fixed with fasteners, and rubber is mounted on top of the wood. The platform is attached to the beam using a pre-welded eye.
Final stage
To ensure that the machine is securely supported on the opposite side of the lift, a rear beam is required. It is welded from 4 corners 32, 1500 mm long, so that in the end you get a square the length of a car.
The beams are connected to each other through a special unit on the rear beam. The lower beam is also created from the corners and is connected to the rack and the rear beam. All that's left to do is to make the stud pins and install the jack.
As a result, you will have an effective tipper.
What will you need?
If you decide to make a lift for your car yourself, then first of all you will need a drive mechanism and a stopper. These design elements can be found in specialized stores that sell similar equipment, or in enterprises that are discarding old but working machines.
If you decide to make a scissor lift, then you should select two hydraulic cylinders of appropriate power and length. Autolifts of this type are very difficult to equip with a reliable and safe locking system. Otherwise, their production is easier than the creation of lifts of alternative designs.
It is worth noting that installing stoppers on platform or fork lifts is much easier than on scissor lifts. To do this, an oblique steel strip and a retainer with a thickness of 2-3 centimeters are enough. When starting to manufacture or operate a homemade lifting mechanism, remember that you are relying on the reliability of the structure you created yourself, so carefully check the functionality and integrity of all its parts!
Source
Autolift 3000 how to make your own drawings
Vehicle repairs and maintenance often require a lift. This design is designed to fix the car and lift it to a certain height, which provides access to the suspension, chassis and many other elements of the vehicle. A similar design is often found at service stations, less often in private garages due to its high cost. If you wish, you can make a homemade car lift. It will cost relatively inexpensively and is practically in no way inferior to purchased models in terms of performance.
Choosing the most suitable design
First you need to decide what type of structure will be created. To do this, it is enough to pay attention to factory-made lifts - they become the main basis when creating a home-made structure.
The most widespread are:
According to the method of lifting the car, the following types of construction are distinguished:
The force can be transmitted from a screw, chain or hydraulic drive.
A homemade car lift with your own hands should be created taking into account the fact that the structure must be safe and securely fix the vehicle. Do not forget that when performing almost any work, the master is under a vehicle that weighs more than a ton.
Difficulties in making a lift
An installed car may break down for the following reasons:
Difficulties in manufacturing arise due to the fact that some structural elements cannot be made with your own hands. An example is long-length lead screws. Therefore, they rarely make a scissor lift with their own hands. Drawings of homemade structures often include the creation of a tipper, which is much easier to manufacture. If necessary, do-it-yourself scissor lift drawings can be downloaded on the Internet, but it is worth considering that most of the parts will have to be purchased, due to which the cost of the finished structure will not decrease. In addition, you will have to calculate the strength of all elements used.
Such work can only be performed efficiently by an engineer who has extensive experience. If errors are made at the time of calculations, there is a possibility that the lifting mechanism will not withstand the applied load. Therefore, if there is no confidence that the skills and knowledge will be enough to implement a complex project, it is best to create less complex mechanisms that will be more reliable.
Which is better: assemble the lift yourself or buy it?
People often assemble the lift themselves because a new factory design is expensive. It should be borne in mind that making a homemade lift is not always an easy task. In addition, if the structure is assembled incorrectly, its use can be dangerous.
The installed car falls from the device if:
- the weight of the car shows the load that a homemade lifting unit cannot support;
- The locking mechanism does not work well;
- the supporting device cannot withstand the existing load;
- The homemade device has incorrectly installed supports or they are loosely secured.
Also, difficulties in creating a device arise because some design elements cannot be completed without special equipment. For example, it is difficult to produce long-length lead screws. Therefore, it is quite difficult to carry out this design on your own. Many craftsmen make a tipper for a car instead of this device, since it is easier to manufacture.
When creating a device, most of the parts will need to be purchased in stores, so the final cost of the finished device can be considerable.
In addition, you will need an accurate calculation of all components, which can only be done by an engineer with experience in performing such work. If you do not have such knowledge, you will have to order a project with all the calculations from a special organization, which will require financial costs. If an error is made in the calculations, the device will not be able to withstand a large load.
Therefore, if you are not confident that you can make such a complex project a reality, it is better to create a vehicle tipper that is safer.
You can make a car lift with your own hands so that you can carry out maintenance and repair of your car yourself if there is no inspection hole. Not every pit can be equipped with a pit, so many car owners are thinking about making a lift themselves.
Despite the reliability and durability of the car, many of its elements are subject to severe wear and tear. It happens that the car does not start and you need to find out what the reason is. To lift the car yourself without external help, you cannot do without a lift. But the cost of car lifts is high, and not all drivers can afford to purchase one. Also, many drivers use the jack a couple of times a year. Therefore, to avoid unnecessary costs, it is better to make a car lift yourself.
Here we will tell you how to make a car lift yourself, and what you need for this.
Creating a lift
a car lift in the garage with your own hands as follows:
This design is most suitable for lifting engines and other heavy units. It is less suitable for lifting a vehicle.
In conclusion, we note that it is almost impossible to create a classic lifting device, which is found at service stations, using scrap materials. To work with the chassis or underbody of a car, you can create a tipper.
Many car enthusiasts have faced the need to repair or inspect a vehicle on their own. This can be done using special inspection holes or lifts. Not every driver is able to make a hole in the garage, and it is not always possible to get to it with a broken down car. It is in this case that a car lift comes in handy, which you can make with your own hands or purchase in a store.
Classification of lifts
Like other designs, these devices come in several types. They are classified according to the method of lifting the car (platform, scissor), and by the type of working mechanism (chain, hydraulic, screw).
The most common are fork-type screw lifts. They are able to withstand and lift cars weighing from 2000 to 3000 kilograms. At the same time, they are the most difficult to manufacture, and making them yourself is almost impossible. But at home you can make a platform lift.
The components of such a mechanism are two beams laid on the side. They are attached to two screws for lifting, which is carried out by means of two pairs of shafts.
What types of lifts are there?
Lifts come in various designs, differing in the method of lifting the car and the type of drive. For vehicle repairs, three types of drives are mainly used:
- chain mechanisms;
- screw;
- hydraulic systems.
The method of lifting the car plays an important role in the design; a garage lift can be a fork, scissor, or platform design. The most popular are fork screw units, the basis of which is a long threaded shaft made of tool steel. The parts of the unit are able to withstand the load of an average car; it is almost impossible to make the mechanism with your own hands, due to the complex design of the forks.
Types of lifts for car repairs
The easiest way to make a platform lift with your own hands is using a screw mechanism.
Parallel beams attached to the mechanism are capable of lifting a car weighing up to 3 tons.
Buying or making your own?
A person who is faced with the need to get a car lift has several options for solving this problem. New lifts of all types can be bought in a store or a suitable used device can be purchased second-hand. There is a third option - do it yourself.
At first glance, a self-made car lift should cost much less than a new one, since its price does not include the salary of the worker who worked on it. But it seems so only at first glance. New Chinese autolifts will cost 90-100 thousand rubles, while materials for your own lift will cost from 100 to 120 thousand.
What will you need?
If you decide to make a lift for your car yourself, then first of all you will need a drive mechanism and a stopper. These design elements can be found in specialized stores that sell similar equipment, or in enterprises that are discarding old but working machines.
If you decide to make a scissor lift, then you should select two hydraulic cylinders of appropriate power and length. Autolifts of this type are very difficult to equip with a reliable and safe locking system. Otherwise, their production is easier than the creation of lifts of alternative designs.
It is worth noting that installing stoppers on platform or fork lifts is much easier than on scissor lifts. To do this, an oblique steel strip and a retainer with a thickness of 2-3 centimeters are enough. When starting to manufacture or operate a homemade lifting mechanism, remember that you are relying on the reliability of the structure you created yourself, so carefully check the functionality and integrity of all its parts!
Quite a few car owners, having gained experience in this matter, want to carry out repairs and maintenance of their iron horse themselves, without going to auto repair shops.
If you are reading this article, then most likely you are also one of these car enthusiasts. Let this begin with equipping your own garage with the necessary equipment, and the first item on the list of necessary things is a car lift.
Choosing a design
So, you decided to rely on your skillful hands and make a homemade garage lift, rather than purchasing it at a specialty equipment store. This is an understandable desire: the cost of such equipment may not be much less than the cost of your car, and it will rarely be used (only if you are not going to open a service station in the garage).
The idea has arisen, the desire too, now it’s time to choose the design of the device being created . To do this, you should pay attention to factory-made lifts presented on the special equipment market, “peek” at their design and imagine whether you can do something similar.
Most likely, the first thing you will see is a two-post lift , which can be found in almost every auto repair shop. This type of device can be equipped with an electromechanical or electrohydraulic drive.
In the first case, inside each rack there is a threaded shaft rotated by an electric motor with a gearbox. There is a bearing nut on the threaded shaft, which moves along it and accordingly raises and lowers the “legs” on which the car rests.
In a two-post electro-hydraulic lift, the shaft is replaced by a hydraulic drive, the pressure in which is created by an electric motor.
There are
other options of a similar design , but with one, three or four racks.
Another type of lift is a scissor , where a platform with a system of levers (called “scissors”) is raised and lowered using hydraulic actuators driven by electric motors.
When creating such designs, you may encounter many questions and problems that need to be solved. First of all, this is work safety - no one wants to get seriously injured or disfigured due to a broken lift on one unlucky day.
Therefore, you should choose the materials and design of the device so that it can withstand the weight of the car, and with a significant margin .
It is also worth taking care of the manufacture of locking mechanisms that allow you to hold the car in place in emergency situations with the lift.
And the main problem faced by those who want to make a two-post or scissor car lift with their own hands is the complexity of manufacturing and the high cost of parts. It is almost impossible to create a long threaded shaft at home; selecting cylinders and hydraulic hoses is a complex matter, and they are not cheap.
Best device design
Your future homemade car jack must have a certain design. A two-post mechanism (there are options with an electromechanical or electrohydraulic drive) is used throughout. The first consists of a threaded shaft with a supporting nut. The shaft rotates via an electric motor with a gearbox.
In the second case, the shaft is replaced with a hydraulic drive. And also the scissor lift has proven itself well in business. Special levers act as “scissors” . The load is lifted by hydraulic drives with electric motors. Each design may be suitable for your specific use conditions. Any installation considered turns out to be quite difficult to build such a car lift for a garage with your own hands. After all, even when creating a motorized lift, difficulties arise, and here the task becomes much more complicated.
Important Safety Points
You must be prepared for the fact that creating a useful system (a homemade garage lift) will be associated with significant financial costs and difficulties in manufacturing. But the main thing is the need for strict adherence to safety rules. Among them:
- eliminating the risk of injury during device manufacturing;
- ensuring reserve load-bearing capacity of equipment;
- creation of locking mechanisms.
The last point deserves special attention, because such devices will protect against the consequences of emergency situations. It is better to anticipate them and regularly check the condition of the shaft and nut with an electromechanical drive, and for electrohydraulic equipment it is important to check for damage to the cylinders and hoses.
Making a tipper yourself
How to make a lift in the garage with your own hands? The lift-tipper consists of several parts : the front pillar, the shoe, the platform, the upper, lower and rear beams and the connecting elements between them.
For manufacturing you need steel sheets 4 mm thick, angles, bushings, fasteners and tools for welding, cutting and drilling metal.
The first stage in the manufacture of a tipper is the shoe, which serves as a supporting surface for the jack. The shoe should be made of steel sheet as shown in the drawing, and it is very important to maintain the dimensions of the “eye” so that it moves freely up and down the front pillar.
itself is made of 32 angles, 1500 mm long, which are assembled into “squares” and welded. We will need two such “squares” connected to each other by segments of corners; the distance should be such that the upper beam can move between the “squares”.
In their lower part, make a hole for the support pipe, then you need to make several holes at certain intervals - they are necessary for the metal fingers that will fix the shoe and the upper beam.
The second stage of creating a tipper with your own hands is creating this beam and a platform for it. The platform is assembled from a steel sheet, the edges of which must either be bent to form a “box”, or its sides must be welded to the lid of the “box”.
In our case, the length of the platform is 350, width is 150, and depth is 20 millimeters. Inside the “box” you should put a piece of wood cut to its dimensions; it is fixed with fasteners inserted into pre-drilled holes in the side sheets of the platform. Rubber is attached to the top of the tree, an eye is welded to the metal below for fastening to the top beam and stiffening ribs - and that’s it, the site is ready.
The upper beam itself is assembled from two corners 1500-1700 mm long, welded together into a U-shaped profile. A metal insert needs to be welded inside approximately in the middle, which is necessary for better fixation of the jack. Next, you need to weld a plate of the same length and height to the U-profile so that at the end you get a rectangular beam.
One end of it is tightly welded with a small plate, to which, in turn, a bushing is attached for connection with the rear beam; guides for the jack and bushings for the metal stopper pins are welded to the other end.
The next step is the manufacture of a rear beam, which is necessary to support the car on the side opposite to the one being tipped over. The length of the beam should be approximately equal to the length of the car, so they take four corners 32 with a length of 1500 mm and weld them two at a time into a square profile.
In the middle of the rear beam it is necessary to weld a connecting unit made of sheet metal. It is necessary to connect the rear, upper and lower beams to each other.
The latter is made from metal corners welded into a square profile and then attached to the rear beam and the front pillar. All that remains is to make stopper pins, install a jack and that’s it - the homemade car lift-tipper is ready.
How to make a car lift for a garage with your own hands
There are so many garage gadgets that don’t exist at the moment. Every experienced car owner knows about the need for such a device as a lift. But since a garage lift is a fairly expensive tool, it is mainly entrepreneurs who can afford it.
And most owners of iron horses prefer a jack, which is enough to replace a wheel and additional maintenance.
In fact, these devices are used no more than 5 times a year, which means that an expensive garage lift can simply replace another tool made with your own hands.
How to make a garage lift with your own hands: a step-by-step guide
One way or another, this type of work is not carried out very often, and a car lift is not a cheap thing, so not everyone will see the feasibility of purchasing such expensive and little-used equipment. You can, of course, spend money on a supported unit - it will be a little cheaper than assembling a lift yourself, but the reliability and level of performance of this machine may be much lower than that of a new one.
WATCH THE VIDEO
Making a car lift with your own hands is quite difficult, but if you do everything according to a certain logic (installation location, materials and parts of the lift, assembly and installation of parts), and also pay attention to the details and performance of the final result, then everything can work out.
Find the exact diagram and it’s best to call a professional, because work of this level is inaccessible to an ordinary car enthusiast - any mistake in assembly, fastening or selection of parts can lead to dire consequences. For a better understanding, we recommend watching the video.
WATCH THE VIDEO
Choosing an installation location
Before moving on to collecting the necessary materials that will be required in order to assemble a garage lift with your own hands, you need to determine the installation location of the car lift.
In some cases (for example, when making a book lift that tilts a car by 45%), it will be much more rational to place your homemade lift near the garage.
If you want to make a homemade scissor lift for a car, you need to think about a reliable foundation (it is not enough to simply fill the base with a layer of concrete), not forgetting about the mounting points.
The process of assembly and subsequent installation of all parts of the lift
- “Shoe” - this part will secure the jack. A pin with a diameter of 10-12 millimeters is welded to a metal sheet so that in the future it can easily “walk” along the rack;
- Rear beam - using welding, we assemble a square from four corners, into which a metal pin is then placed and welded;
- Upper beam - we assemble the part from two corners, a strip of metal and a sheet of metal. We fasten the two corners together into a kind of “letter P”, to which we weld a sheet on one side and a plate on top so that we get a rectangle. We weld two jacks with holes for bolts to the rectangle. This part will act as a stopper;
- Let's start creating the platform - we bend the sides of the steel sheet, to which we subsequently attach a strip with holes on which the rubberized board will be fixed. We make guides and stiffening ribs from the bottom of the platform and attach it to the upper beam;
- Two connecting units - front (two pipes, an angle and a rod) and rear (two sheets of metal connected by a perpendicular metal strip).
- Lower beam - four corners are welded into a rectangle and fastened using a bolt with an M16 nut and welding, after which you need to fasten the connecting unit and the lower beam;
- Stand - four corners of 154 centimeters each are welded and assembled into a square using potholders. Half a centimeter after each of the fastening points, we drill holes with a diameter of two and a half centimeters. Then you need to make three more holes so that the upper beam and the “shoe” pin pass freely between the profiles.
- The final touch of our car lift is the “fingers”, which are curved metal rods.
Here's a video about a do-it-yourself car lift for a garage.
Another video about a DIY garage lift.
- How to make a car lift with your own hands: step-by-step instructions
- Principle of operation
- Types of car lifts
- DIY garage lift
- Materials for work
- Step-by-step instruction
- Installation
- Correct operation
- Car lift diagram
A lift is sometimes needed to inspect or repair the underside of a vehicle. Of course, you can go to a service station, but craftsmen who repair their cars themselves can make a lifting mechanism for their garage. We will learn the principles of operation of lifts and their design features, as well as how to make a lift yourself and operate it correctly.
Blueprints
Without a doubt, a do-it-yourself car lift needs to be made according to a strict plan.
The design of the future lift should be carried out either independently, then be careful and careful with all the calculations; or with the help of a professional car mechanic.
Of course, you can also rely on the experience and engineering abilities of network users - download and print the diagram/drawings of any lift you are interested in. One of such schemes will be attached below as an example.
Types of car lifts
Depending on the installation method, lifts are:
- stationary;
- mobile (mobile);
- portable.
By drive type:
- manual;
- electrical;
- powered by a car engine.
Let's look at the main types of car lifts:
- Single post. It is based on 1 supporting post. The main positive factor from using such a device is the relatively small area it occupies. It can be permanently fixed or mobile. Stationary ones have the ability to lift loads up to 2.5 tons, and mobile ones - up to 0.25 tons. The vehicle is lifted by 2 brackets located on one side.
- Two-post . It is only stationary and is attached to the floor using anchor bolts. Serves to raise the car to the required height for repairs and maintenance. It consists of 2 racks with brackets that allow you to lift a load of up to 5 tons or more.
- Four-post. Contains 4 racks to which the platform is attached. The work occurs due to hydraulics. The platforms can be different - with additional micro-lifts, smooth, with movable plates for the wheels at the back. The lifting capacity of such a lift is up to 20 tons. Excellent for heavy transport.
- Scissor, or parallelogram . This technique allows you to save space when not in use when installed with recessed drains. It is equipped with hydraulic drives, which makes operation silent and more reliable. The sides of the scissor lift are synchronized by an electric motor or hydraulics.
- Plunger . It has the simplest design. Brackets are attached to the vertically mounted hydraulic cylinder plungers. Such a lift can be of 2 types, depending on the installation of hydraulic drives - ground-mounted or with a depth below the floor level. The second option saves space well. This lifting equipment provides access to the machine from all sides.
Correct operation and maintenance of the lift (autolift)
In order to maintain the garage lift in working order both during operation and when idle, you must:
- periodically inspect all the main elements of the operating system - fasteners and fusion points, drives and the condition of the racks, in order to track an impending breakdown at any time;
WATCH THE VIDEO
- Do not violate the permitted weight of the vehicle under any circumstances - do not exceed the carrying capacity;
These two tips are the main ones, because all lift failures are related to the lifting capacity, the breakdown of the locking device (due to a violation of the lifting capacity or improper assembly), and insufficiently reliable fastening of the apparatus supports.
Assembling the lifting device
A homemade lift for a car service workshop is assembled quickly and easily. The workflow consists of 8 steps:
- bent steel corners must be secured to opposite flat walls of the room so that the hood of the car is under them;
- a steel plate must be installed on the corners and secured with M8 bolts;
- install the gearbox on the plate;
- secure the key to the drive shaft gearbox;
- drill a hole in the plate and pass the chain, close it in the shape of a ring;
- secure a smaller key to the output shaft of the gearbox;
- drill two holes in the plate, pass the second chain;
- Fix the first end of the drive chain on a small key, and equip the second with a hook.
Using professional drawings, a DIY scissor lift can be made very easily and quickly. A homemade garage lift has a lever transmission system in the form of scissors. Operating torques are carried out by a hydraulic drive powered by an electric motor.
As the main working unit, the car lift-tipper contains a rack, hydraulic or worm jack. The heel of the device with large stiffening ribs can tilt a car weighing 2.5 tons by 45°.
For strength, the platform of the device with movable mechanisms is equipped with stiffening ribs with a metal thickness of up to 7 mm, corners and a square thick-walled profile.
The support bent corner, the lower platform and the support beam are also made of metal.
You can make a mechanical tipper from a set of necessary components:
- thick-walled square pipe 0.5×0.5 cm or corner with shelf;
- two fingers;
- four bushings;
- metal fragments for scarves.
The parts are fastened together by welding, the brackets with hinges are connected to the platform, after which the lift is ready for use.
Types of car lifts
There are three types of lifting units for vehicle repair:
- Screw lifts.
- Chain mechanisms.
- Hydraulic devices.
According to the method of lifting the machine, lifts are divided into:
- Fork devices.
- Platform mechanisms.
- Scissor lifts.
The most common type of car lift is fork screw devices. Their base is a shaft made of tool steel that can withstand a force of several tons. But making such a device at home is almost impossible due to the complexity of the design of the plugs. Therefore, for self-production, it is better to use screw platform devices.
They are made in the form of two channels, located parallel to each other, and located with the ribs down, attached to screw drive devices, ensuring the lifting of the entire structure.
In such units, the requirements for shafts are not too strict, since lifting is provided by four shafts instead of two.
Their significant disadvantage is the need to use a jack to perform suspension repairs, since the car’s wheels are not suspended, but are located on channels.
Often platform and fork-type lifts for transport are produced with a chain drive.
In terms of their parameters, they are no worse than screw ones, but they are much more complicated to manufacture; joint synchronous operation of electric drives and braking devices is required.
To make scissor-type lifting devices, a hydraulic drive is usually used, but some craftsmen are experimenting with a screw and chain drive.
Types of lifts
Do-it-yourself lifts can be:
- screw;
- hydraulic;
- chain
Screw platform lift
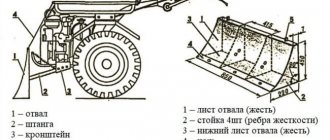
In this case, it is recommended to give preference to the screw type in the form of a platform. To make a lift for a car of this type, the structure is made in the form of rolled elements placed parallel to each other with the ribs down. They are attached to a drive mechanism that ensures the platform is raised.
In these types of lifts, the requirements for shafts are significantly lower. This is explained by the presence of four of them (not two). The main disadvantage of such lifts is the need to use a jack to repair the suspension. This is explained by the fact that the wheels of the car do not hang in the air, but are on the surface of the channels.
Screw car lift - operating principle
Other popular types of lifts
Very often, forklifts and platform lifts for cars are made with a chain drive. In terms of their performance characteristics, they are not inferior to screw ones. But it is quite difficult to make such a design on your own. This is explained by the need to ensure coordinated operation of engines and braking devices.
Chain car lift - diagram
The scissor type of lifting mechanisms most often operates using a hydraulic drive. But many craftsmen decide to equip them with a screw or chain mechanism, which they most often do with their own hands.