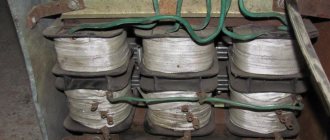
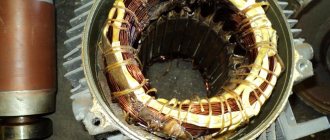
When a welding machine breaks down, or often just sits there unnecessarily, sometimes there is a desire to simply sell it for scrap. It is important to understand that the attractiveness of such equipment in terms of acceptance for scrap lies precisely in the presence of an impressive amount of non-ferrous metal, in particular copper and aluminum. But in order to decide whether to scrap the unit or not, it is suggested to find out how much copper is in each welding machine, which may or may not be beneficial for the owner.
Welding rectifier VD-121 U2 “UNIVERSAL”
Catalog of electrical equipment > Electric welding equipment > Power sources for electric arc welding, cutting and surfacing > Welding rectifiers > Welding rectifier VD-121 U2 “UNIVERSAL”
General information
The VD-121 U2 “UNIVERSAL” rectifier is designed for surfacing welding and electric arc cutting of steel parts during repair and manufacture of various structures. The rectifier can additionally be used for: starting a cold car engine in cold temperatures down to minus 30°C, providing reliable and fast starting, as well as increasing battery life; power supply for various electrical appliances designed for a constant voltage of 12 V. For welding, piece welding electrodes with a diameter of 2 and 3 mm of all brands are used. The straightener provides a penetration depth during welding of up to 5 mm and cutting of steel up to 4 mm thick inclusive.
Symbol structure
VD-121 U2 “UNIVERSAL”: VD - rectifier for arc welding; 12 - rated welding current, tens of A; 1 — modification number; U2 - climatic version and placement category according to GOST 15150-69; "UNIVERSAL" is a trademark.
terms of Use
Altitude above sea level no more than 1000 m. Ambient temperature from minus 45 to 45°C. Relative air humidity no more than 98% at a temperature of 25°C. Avoid exposure to rain or snow. The rectifier does not require protective grounding, since its design uses a double insulation system. When working with a rectifier, no more than one condition of increased electrical safety is allowed: Dampness (relative humidity more than 75%). Conductive floors (earth, metal, reinforced concrete and brick). High temperature (more than 30°C for a long time). The possibility of simultaneous human contact with a metal object connected to the ground on one side and metal parts of the rectifier housing on the other. The rectifier meets the requirements of TU 16-93 DSHIB.435211.006 TU.
Regulatory and technical document
TU 16-93 DSHIB.435211.006 TU
Specifications
Supply voltage, V - 220+10% Supply frequency, Hz - 50 Rated welding current, A, at stages: 40 - 40 60 - 60 80 - 80 125 - 125 Rated load duration (LOD), % - 20 Cycle duration welding, min - 5 Range of regulation of welding current, A, in steps: 40 - 35-45 60 - 55-65 80 - 80-100 125 - 110-140 Operating mode - Intermittent-short-term Voltage XX, V, no more than - 50 Rated rectified current during the starting period, A - 200 Starting mode, s: work, s, no more than - 10 pause, s, not less than - 60 Rectified voltage at stage P (no load), V - 12-14 Equivalent current consumed from the network, A, no more than — 15 Average power consumed from the network, kW, no more than — 1 Electricity consumption for 1 hour of operation, kWh, no more than — 1 Overall dimensions, mm — 480x220x340 Weight, kg — 29 Warranty period operation - 1 year from the date of sale of the rectifier.
Design and principle of operation
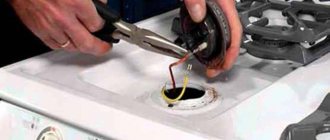
The rectifier control panel (Fig. 1) contains a plastic switch block for the type of work and welding stages, a contactor, a signal lamp and a terminal block.
Control panel of the rectifier VD-121 U2 “UNIVERSAL”: 1 - terminal block; 2 — signal lamp; 3 - contactor; 4 - plastic switch block The rectifier is turned on by an automatic switch located on the rear panel of the rectifier. The welding or starting mode is set by a plug-in type switch. The contactor is inserted all the way into one of the sockets of the plastic switch block and thus the corresponding circuit is connected to the output terminals of the terminal block. The rectified voltage is removed from the terminal block with three screw terminals. The “+” clamp is common for all types of work. The cap of the electrode holder has a hole for the electrode, which is secured and released by rotating the cap. The rectifier converts alternating mains voltage into reduced rectified voltage and current with special characteristics necessary for welding, as well as for powering the starter and 12-volt electrical appliances. The electrical circuit diagram of the rectifier is shown in Fig. 2.
Electrical circuit diagram of the rectifier VD-121 U2 "UNIVERSAL": QF - automatic switch; M - fan; C1-C6 - capacitors; TV - transformer; SA - plug-in type switch; HL—signal lamp; VD1, VD2 - rectifier blocks; L - throttle; XP - fork; XT - terminal block; RU - varistor; BK1-BK5 - terminals of the large transformer coil; MK1-MK5 - terminals of the small coil of the transformer To carry out welding, the cables from the electrode holder and the clamp are connected to the “+” and “-” (“Welding”) terminals of the terminal block. The alligator clip is attached to the part being welded. The electrode is fixed in the electrode holder. The contactor is inserted into the switch socket in accordance with the selected welding stage. Next, the rectifier is turned on, and the signal lamp should light up. The diameter of the electrode is selected depending on the thickness of the edges of the parts being welded according to the table.
Edge thickness, mm
Electrode diameter, mm
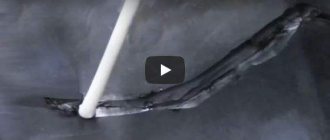
When welding parts that require large heating of the edges, deep penetration, when cutting, as well as when welding with graphite and carbon electrodes, the electrode holder is connected to the “-” clamp of the welding circuit of the rectifier, and when welding and surfacing thin-sheet structures (1-2 mm) and stainless steels - to the “+” terminal. The arc is ignited in one of two ways. You can touch the workpiece to be welded with the end of the electrode and then remove the electrode from the surface of the formed arc. You can also touch the workpiece to be welded with a quick lateral sliding movement and then move the electrode away from the surface of the workpiece to the same distance. To obtain a dense and even seam when welding on a horizontal plane, the electrode must be inclined from the vertical in the direction of the seam by 15-30°. If it is necessary to obtain a wide seam, then when moving along it, transverse oscillatory movements of the electrode are simultaneously performed.
When welding thin metal 1-3 mm, in order to avoid through burns, transverse movements of the electrode are not made; welding is used with periodic interruption of the arc. Electric arc cutting is the process of melting metal from the cutting zone. The arc is ignited at the edge of the sheet being cut so that the molten metal can flow freely. Cutting is performed with an electrode with a diameter of 2 mm at stage 125. Surfacing is used to restore worn surfaces of parts. Separate rollers are applied parallel to each other. Each subsequent roller melts part of what has already been applied. Surfacing is carried out with an electrode with a diameter of 3 mm at stage 125. The inclination of the electrode from the vertical should be increased to reduce the depth of penetration. The continuous burning time of the welding arc must be limited to avoid overheating and failure of the rectifier and, above all, rectifier diodes. Therefore, periods of welding must alternate with mandatory breaks in work (pauses). When the switch operates automatically, you should pause for 5-10 minutes. To increase the service life of the rectifier, continuous operation in the modes indicated in the table should last no more than 4 hours, after which it is necessary to take a break and cool the air temperature of the rectifier. When starting the engine, the rectifier is connected to the vehicle battery via two cables with alligator clips. One cable connects the “+” screw terminal on the terminal block to the positive terminal of the battery (the alligator clip attaches directly to the battery terminal and the wire extending from the terminal to the starter, without any reconnections in the car circuit). The other cable should connect the “-” (“Start”) screw terminal to the negative terminal of the battery. The contactor is installed in socket “P” of the plug-in switch. The rectifier is connected to the network. After charging the battery for 3-4 minutes, start the engine with the starter. The duration of operation of the starter should not exceed 10 s with pauses between starts of at least 1 minute. The total number of such start-up cycles is no more than 10 in a row. 12-volt electrical appliances are powered from the “+” and “-” (“Start”) terminals when the contactor is installed in the “P” socket on the plug-in switch. Electrical appliances powered at the same time should not have a total power of more than 360 W (30 A) (safety lighting, electric vulcanizer, washing pump, compressor, fan, vacuum cleaner, etc., excluding radio equipment that requires additional filters).
How to cook copper
A guaranteed connection is obtained by using various methods of connecting nodes. For docking the following is used:
- gas apparatus;
- inverter;
- semi-automatic;
- tool for manual arc welding.
The connection is made with consumable and non-consumable wire electrodes, automatically or manually using flux. When working with materials of large diameter, the electroslag method is used.
The inverter connection method implies the presence of a high-quality metal melting device. The construction trade aisles offer a wide range of products, allowing you to choose the right tool for the appropriate site. Among others, it is worth noting graphite electrodes, which allow the production of crafts at different temperature conditions.
Inverter
The tilt angle is selected within 20 degrees, the process is carried out intermittently. The inverter device produces direct current, so welding occurs in small sections up to 4 cm long. During breaks, the treated area cools down naturally. Arc welding requires the use of an electrode coated with a protective sheath; in case of deviation from this parameter, the seam will oxidize and pores will appear.
The rods are used in the form of wire, a copper alloy with the addition of manganese or silicon. The protective coating plays the role of arc stabilization, protection against oxidation and slag formation. The welding mode is produced by constant voltage of reverse polarity. The productivity speed is up to 15 m/hour, depending on the current strength and wire diameter.
Copper products of large thickness are welded using several approaches. The layers must be cooled and cleaned before surfacing the next weld. It is advisable to connect small and medium-sized materials in one approach; this increases the speed of creation and the quality of the connection. To avoid the risk of cracks, a reverse-step seam technology is used. A third of the length is processed after fusing is completed on the other side.
The process is performed in a lower position, at an angle forward, opposite the welding side. When working, it is applied mechanically, using a hammer or sledgehammer. For reliable installation in place, steel pads are used. Welding copper with an inverter ensures a reliable connection; the materials used in the form of wire increase the requirements for strength, but have a negative impact on ductility.
Semi-automatic
Industrial enterprises, for large volumes, use automatic or semi-automatic welding machines. The process can be carried out using robotic technology or manually at semi-automatic hose stations. The small thickness of the areas to be soldered will require the use of a non-melting device and a special flux.
Before welding copper, the edges are cleaned using a semi-automatic machine. The bevel remover is used for large parts, the processing shape corresponds to a V-shape, the opening angle is 60 degrees. A technological gap is necessary when joining thin mechanisms; large ones are processed without gaps. In the first case, a backing should be used, otherwise molten metal will flow out through the seam.
Semi-automatic copper welding
Large parts cannot be properly connected without preheating; the temperature of the entire cavity should not be lower than 250 °. Local heating is allowed in small pieces, which significantly saves time. When working with semi-automatic installations, thin welding wire is used. The strength of the fastening depends on the chosen flux and welding wire, as well as the component of the base material.
Argon
Professionals who have worked with copper products for a long time identify the argon method as one of the highest quality. A neat seam can be made on decorative elements. With direct current, welding is performed with a tungsten tool; with alternating voltage, aluminum bronze alloys are processed. Welding of copper with argon is carried out in accordance with certain parameters:
- Thick materials can be joined without the use of filler wire.
- The burner is driven by oscillations, i.e. zigzags, thereby ensuring reliable welding of the metal. In cases where an additive is used, it should be located above the burner flame.
- To avoid burns, thin elements are welded with short seams. The burner should be gradually withdrawn at the end of the seam.
With the exception of argon, nitrogen, helium and other gases can be used in their composition. Argon is most often used when joining copper, using various filler wires. At home, the role of rods can be ordinary wires, degreased and stripped of the sheath.
Gas welding
Gas welding technology involves the use of boron-containing fluxes. Obtaining a durable seam is achieved by consuming a large volume of gas, up to 200 l/hour. The process is carried out at an accelerated pace to avoid the appearance of cracks and other unfavorable conditions.
When exposed to a gas torch, the filler wire must have a melting point below the material; when soldering wide areas, several torches can be used. The filler wire used must consist of identical material to be welded.
Carbon electrode
The process of manual work with carbon-type tools is used in low-impact structures. A carbon electrode is used to process parts up to 15 mm thick; if large parts are to be produced, graphite additives are used. The process occurs with constant voltage in a long arc, with straight polarity.
Carbon electrodes for welding
The additive is located at a short distance from the bath, without immersion in it. The angle of action of the electrode for welding copper is 30 °; boron flux with a 95% content of the substance is responsible for creating a protective bath. If the thickness of the metal is exceeded by more than 5 mm, the joining occurs by separating the edges.
Carbon electrode inverter
Carbon-type electrodes melt at a temperature three times higher than conventional products. Instant heating and low tool consumption allow you to save significantly when using an inverter. Operation occurs at low currents, so appropriate experience is required.
In most cases, thin areas are processed, the seam is of high quality, smooth and resistant to oxidation processes. The mobility of the inverter device allows it to be used in various conditions and to connect electrical wiring.
Welding nichrome with copper
Nichrome parts are usually joined using graphite electrodes. The arc burns in a stable manner, the length varies depending on the current voltage parameters, reaching up to 55 mm.
Melting of the electrode is excluded, the tip is able to heat up to the temperature necessary for melting copper. The structure is such that a thermionic reaction occurs, allowing action to be performed by a heated device at a power of 10A or more. The advantages include ease of use due to the lack of sticking, as well as cost-effectiveness.
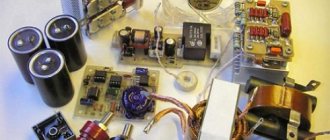
welding rectifier from the times of the USSR Anode VSB-81UZ
Today they gave me a welding rectifier from the times of the USSR, or to be more precise, a 1970 release in working condition. [
]( ) Anode VSB-81UZ, maximum current 100A. Haven't tried it yet. It will be necessary to cook small things, a fence at the dacha, and all sorts of small things. So I’m wondering whether it will be okay to cook such a unit. What can knowledgeable people say?
ZeRRon wrote: Today they gave me a welding rectifier from the times of the USSR, or to be more precise, manufactured in 1970
Issue 04 month 87. 160 rubles. That’s half the salary at that time. Carry out an inspection with pulling connections, attach a cooling fan (if not) and go ahead with songs.
ZeRRon wrote: So I’m wondering whether it would be okay to cook such a unit.
Well, why not, F2 and F2.5 are not in short supply now, as they were 40 years ago. Almost my first device, only I had 125 amperes. And he plowed until retirement, be healthy. From 1986 to 2004. Maybe still alive now. Only I added a few turns there and installed a fan. Oh yes, I also replaced the diode bridge with industrial diodes, the old ones began to burn out one by one.
Will F3 electrodes fail? There is no fan, but I’ll install one (I’ve already found one).
Well, take a couple of pieces to try, but in my opinion it won’t work. There definitely won’t be any penetration, you’ll just be able to screw it up, and that’s in doubt.
It will handle even a three, but we assume that the rectifier is a household one, the load duration is 20%, the cycle is 5 minutes - therefore the continuous welding time is 1 minute (that’s 1 electrode) and then we smoke for four minutes. When you turn it on for the first time, while it’s cold, it shreds a couple of electrodes, but if you need to cook more, you’ll have to do forced cooling.
nevermind. everything is there in reserve. You can cook with confidence, especially with airflow.
After reading all night shift about welding, when the lady arrived, the first thing she did was measure the open circuit voltage of 76.8 Volts. This is fine?
ZeRRon wrote: I measured the idle voltage of 76.8 Volts. This is fine?
This is actually very good.
What cable section do you recommend for this welder? Is 16mm2 enough?
ZeRRon wrote: What cable section do you recommend for this welder? Is 16mm2 enough?
Finally, the Zachepatelsky rectifier, our Uzbeks had one, I wanted to buy it from them, but they clamped down, in general, it’s a pleasure for them to cook. Only the Uzbeks ****** burned it, what a pity.
I still can’t get out to the garage and try it out, today I ran out of patience and tried out the (now mine) welder a little in the apartment, or rather on the landing. Of course, I’m still a welder; before that, I only welded in alternations with a Nordic welder and also some kind of old Soviet industrial one. At this point (the Anode) the feeling is that it holds the arc better and somehow cooks more softly (I don’t know how to explain). In general, as soon as you have time, go straight to the garage and get your hands on it. In the meantime, at home I’ll work on wiring all the contacts and arranging forced cooling.
The tests were carried out successfully, the F3 cooks perfectly at a temperature of -7 degrees after 2 electrodes, one might say it didn’t even heat up at all. Now it’s time for a little modification, or rather the creation of forced cooling. So the question is, what is the best way to install fans for blowing or blowing? The side walls and top in which the factory holes are now will soon be replaced, that is, the air outlet (or inlet) can be arranged anywhere. There are also now holes for heat removal in the bottom of the welder. I plan to install two 0.75 m3/min fans on the rear wall for injection and make the air exhaust through the bottom. What do you say to this? And another question is which part of it heats up the most, the transformer itself, the throttle, the diodes. To whom is it best to direct the air flow?
The best methods for welding copper. How much copper is in a welding machine
Dear conference participants. The topic is a survey - who uses what and comments on it according to the template:. The survey will be replenished with models that users indicate, so please: accurately indicate the markings and brand. You will be able to vote in the survey based on several models and several times. The moderator will daily enter into the questionnaire the models that will be discussed in this topic. In the poll they will be listed in alphabetical order.
If the model was assembled on your own, then indicate so - your own assembly. Adjustment of the network winding taps. There were LATRs and a tire. When I bought it, I invited a professional welder I knew to try it out, and the feedback was positive.
Constant, electronic current regulation. Cooks the 4th without much effort. I think it will do 5. Then it turned out that the diode on the board simply fell off. Starting the auto starter, charging the battery. Issue of the year. I rebuilt the diode bridge and turned on the cooling fan. Merged with a later post from Found the label on my welder today. I took it off during the remodeling. RUN the starter. Polarity adjustment. It eats electrodes up to 4mm, but at normal voltage in the network. I’m not complaining about the network - we have a stable voltage.
There is an airport radio beacon on our feeder. So at the first whistle the energy drinks arrive. It works best at .2 mm. Of these, 2.6 and 3.2 - Jap - are excellent electrodes. The device does not make noise, you can only hear the whistle of the self-made built-in fan. High current according to the passport. After 2 years, the fan impeller fell off, I put it on with super glue, the holder and mass clamp are very convenient, but I think it’s the same as on other devices.
I cook mainly with a 2mm electrode; my network B is bad - 3mm doesn’t work. On a good network B, with a high current, without interruption, you can burn 4 3 mm electrodes, then the thermal protection is triggered. I don’t think I tried it again on B. I'm assembling a rectifier and they say it works much better - I want to try it. I use a Nordic product from the leader in the production of welding equipment, Telvin, as indicated in the advertisement, although I would replace the letter l in this word with p advantages: the voltage xx is higher than that of the Chinese who have filled everything 53v Disadvantages of luminium in the 2nd winding, short weld wires, awesome weight I often have to carry around the unreliable fan mount, which I used to glue, I’m going to change it to a homemade converter according to the description in the “Radio” magazine, which is on KUA.
Sometimes the short sleeve failed, I had to change it to Euro. It would not hurt to increase the area of the transformer iron and replace the diodes, too much falls on them.
The weight of 50 kg takes its toll, I had to put it on wheels. In addition to the mounts, it was possible to put at least a mass crocodile. The electrodes ignite well, the arc is stable, and the metal hardly spatters. Confidently pulls the four, I haven’t tried the electrode again yet. Surely it is planting a network, but since it was always powered by the switchboard, I could not check. IMHO, it’s not worth plugging such a unit into a household outlet, unless you’re cooking with two.
Even at low voltage. At the dacha in With a three-ruble note it ignites normally. The wires are short, I installed them right away. In the summer, a specialist cooked my heating, and when he ran out of gas, he finished cooking it with mine - he praised me. Relatively old Rusich, who has paid for himself many times over. There are no special complaints. Ideally, the primary skill is B. The best thing for beginners is to learn how to cook. The “flight of the fan impeller” is typical for all Nordic.
I also glued it. At low currents in semi-automatic mode it works worse, fine adjustment is needed, depending on the voltage in the network. In May. There is MMA welding on board, a starter charger for cars, heating of metal for straightening, a connector for a Euro-torch. Durable and simple broaching mechanism. Stepwise adjustment of welding voltage is inconvenient. MMA mode is weak. Thanks to the people who made it. A wide range of currents for this level of devices is not whimsical.
Time of purchase: year. Advantages: I cooked it in three batches at a time, about five, warm. I saw a welder welding like this on a small construction site. Disadvantages: Short cables. Service calls: None. Rating: 4 on a 5-point scale.
Just right for a dacha home. Mine weighs 25 kg; in principle, it’s not hard to carry it to the car and move it around the dacha. I bought it for 7 tons. After that I wondered how much we were overpaying if it cost 22 tons in our store. And they obviously gave it to me not at cost. It cooks normally, although of course a smooth adjustment of the current would not hurt, maybe someday I’ll get the hang of it and install a thyristor regulator. I equipped it with 10m of bulk wire and 20m for the holder. But it didn’t “burn out,” but the insulation on the secondary part was worn away due to vibration.
Normal price. The rest is typical for all transformers. Low price, then I took it for r. Nice design, made neatly and simply, but at the same time very reliable. I'm thinking of installing terminal blocks like on an inverter. Weight and dimensions are not the most tolerable. Three cooks almost without interruption. In the heat, when the power is on, almost at maximum, there are actually two electrodes at once and protection, in minutes it is ready for work.
There is a semi-automatic device and an inverter, but I left this device as a reserve, so it definitely won’t work. This is its undeniable advantage, and also the price and repairs. Quite light kg for a transformer. A good holder for electrodes is included. When the device heats up to the maximum temperature, the overheating protection turns on and the light on the front lights up; after cooling, you can safely continue working.
I bought it for the garage. I cooked it a lot, tried it with 4 koy and it cooks well. But I still cook the third one. Disadvantages: Like many welders, there are short PVC wires, although the main one for the holder is rubber! Sometimes I had to put the welding machine on a stool to reach the parts to be welded! But this can be fixed; you can extend or replace the wires!
Under heavy loads, the overheating protection often triggers and the welder turns off along with the fan. No, the fan would continue to blow, thereby cooling the winding, but no, it should also turn off. But in principle, this overheating protection will extend the life of the device for many years!
Just redo the fan and it's fine. Calls to service: In theory, there’s nothing to break.
Comments • 0
The cooler can be sold for 50, but this is a matter if you want
I have a package of computers lying around, no one even took 40 rubles
Who writes better, sell it. You will have your own and will cut it
I lit a candle so that this one would die and buy something human. We can’t stand to use the case, tin can, diode bridge, it’s a shitty shooter. There were also two-guard heavy ones. And the starting currents were such that they cut out the rating of 100 A machines. We bought 350 A from the Chinese industrial series and forgot about repairs.
@Vovan Recycler The Chinese are not from the market And industrial equipment is cheaper than famous European household equipment
Cool. By the way, the Chinese have begun to do good work.
There is no copper in it, 2 kg in total
And those in the cable were