Free Weaving Pattern for Beginners | Loom
Earlier this week I talked about finding your own artistic style. But if you're thinking right now,
Ok, you showed me how to get started with a loom, you showed me a lot of different weaving techniques and I would like to find my own style... but I just don't know what to do next.
Well then you're in luck because I've spent weeks putting together a beginner weaving pattern just for you!
This pattern will guide you step by step with images from the beginning of weaving to the very end. It will cover the following weaving techniques:
- Weaving fabric
- Weave stitch hem
- Weaving Sumac
- Forming a triangle
- Rya nodules
And the best part is it's FREE!
All you have to do to receive it is join my mailing list. When you get on my mailing list, you'll receive this template along with my new email alerts, store discounts, and more.
Register!
Don't miss out, sign up for blog notifications sent to your inbox.
Already on my mailing list? Big! Then this template will be waiting in your mailbox!
Happy Weaving!
Kate
For more fun, follow me here ->.
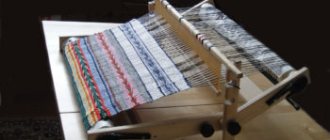
DIY loom wall decoration
A home loom opens up a number of possibilities for the needlewoman, from creating unique woven decorations to unusual wall decor that your guests will appreciate. The best thing about this process is complete freedom of action. Combine different types of yarn, alternate patterns and thread tension, decorate the canvas with spectacular tassels - in a word, feel like a real artist. Well, if you still doubt that weaving might interest you, just try it. We assure you that it will be difficult to stop!
You will need:
- a prepared loom with warp threads stretched (we recently told you how to make a loom with your own hands)
- yarn of different colors and types
- tapestry needle
- scissors
- fork
- branch or wooden slats (on which the finished product will hang)
Step 1
In the first part of our material, we made and prepared our handloom for work. Now we have to pull the weft (cross thread) through the already stretched warp threads. The length of your working thread should be 6-7 meters. Stepping back a few centimeters from the bottom, pass the needle under the second warp thread, skipping the first, and then drag the wefts in a checkerboard pattern - that is, over the first warp thread, under the second, over the third, under the fourth, and so on.
Step 2
Having reached the last warp thread, pull the yarn so that at the beginning there is a tail 10-11 centimeters long. Pull the yarn by the free right end - the pulled weft should take the shape of an arch.
Step 3
Using a fork, bring the yarn down to the bottom rail of the frame - start from the middle of the "arch", then left and right until the thread is aligned in one line. This method will allow you to maintain the desired tension along the entire length of the weft, which will affect the quality of the final product. Align each subsequent row using the same method.
Step 4
Having completed the first row, bring out the working thread and start the second row in the reverse order - that is, under the first warp thread, above the second, below the third, above the fourth, and so on.
Step 5
Using a fork, gently press the second row into the first, then move on to the third.
Step 6
After several rows, you can cut the yarn, leaving a tail 4-5 centimeters long, or continue as long as you deem necessary.
Step 7
To add tassels, take the desired amount of yarn (the number of threads will determine the fluffiness), twice as long as the future tassels, and wrap it around the first two warp threads.
Step 8
Insert your finger between the warp threads and pull out the loop.
Step 9
Insert the “tails” of the tassel into the resulting loop and tighten tightly.
Step 10
Lower the brush down. Make as many brushes as you see fit.
Step 11
The length of the row depends only on your desire and imagination. The only rule is to remember that you make each new row by passing the needle through the warp threads in the reverse order of the previous row!
Step 12
You can diversify your fabric using different types of yarn. For example, use roving - fluffy and soft fibers used to make yarn. Work with the roving in the same way as if it were an ordinary thread.
Step 13
Having finished the product, turn the machine over with the wrong side facing you and carefully hide all the “tails” in the canvas.
Step 14
Cut the warp threads from the loom to remove the finished product, and hide the resulting “tails” on the wrong side in the same way as in the previous step.
Step 15
You can attach the finished decoration to any suitable rail, board or even branch.
Photo: honestlywtf.com Material prepared by Nika Bazhanova
Self-production of the machine
Many people are faced with the task of how to make a loom? Moreover, to spend less materials. So how to make a loom with your own hands? First of all, you need to adhere to the manufacturing scheme, which contains successive steps:
- A quadrangular frame is selected.
- Round openings are made in two slats.
- Slats with the smallest circumference are placed in the openings made at the ends of the bar and secured with wedge parts.
- There are grooves in the middle part of the side bar to accommodate the comb.
- The equipment has a solid bottom for stable standing.
- Nails are driven into the nearest round block at a distance of 5 mm to tighten the threads.
- At the rear of the installation, a rail is used to wind excess fabric.
The comb can be made from thick plywood. Its height reaches 15 cm. The length of the comb should be greater than the distance between the frames, which are located on the side. The number of nails driven in must be divided by two to obtain the number of teeth. Select the height of the teeth to be approximately 70-100 mm, and the width 5-7 mm. The interdental space is 5 mm.
The comb is located in grooves on the side bars. The length of the comb is a distance less than the distance inside the installation. A necessary part of a loom is the weft. The thread is wound on it. It is a movable element. The weft can be made as a spool device or as a separate piece from plywood.
On the near shaft there are nails to which threads of equal length are tied. Then the threads are divided into even and odd. Behind the comb there is a moving shaft where the odd threads are attached. And the even threads are on the comb, namely, they are wrapped around the nails of the teeth. A homemade loom works according to the rule of winding the remaining amount of thread on a bar, and the base of the product is made.
Next comes the winding of the threads onto the wefts. The end of the thread is attached to the left side of the frame, which is located in front of the drive rack. When the bar is raised, the weft is pushed into the shed. Movement occurs from left to right. By alternating multi-colored threads, you can get designs on the product (checkered, striped).
Video: how to make a loom?
Wrap weaving
This technique was known in Rus' even before the Tatar-Mongol invasion. It is distinguished from mortgage weaving by the relief texture of the fabric. When performing this technique, a special rod or board was used - a scoop. With its help, some threads were selected from the warp, creating an additional shed. The result was a pattern superimposed on top of the background, either on the front side or on the back. Therefore, the design applied to the surface of broken tablecloths and linens looks like a negative from the inside. Typically the main background of the woven pattern was horizontal and could be red or blue. However, in some regions, products of the same color were often found, where the pattern stood out due to the contrast in the thickness of the threads and the play of chiaroscuro.
Loom movements
weaving
tkachestvo-2
Weaving is the most basic process in which two different sets of yarns or threads are woven together to form a cloth or cloth. One of these sets is called the warp yarn, which is the longitudinal yarn running from the back to the front of the loom. Another set of cross-threads is the filling, which are called weft yarns. Therefore, the mechanisms of the loom can be broadly classified as follows:
Primary mechanisms for producing woven fabric:
- Yawning;
- Throwing the shuttle;
- Surf the weft thread to the edge of the fabric.
Secondary mechanisms:
- Base supply;
- Twisting the thread;
- Duck selection.
Auxiliary mechanisms:
- Stopping mechanism;
- Prevents the base from coming off when the shuttle is jammed in the shed;
- Weft thread observer;
- Replenishment duck.
Read about: what is mercerization: the functional purpose of fabric processing.
Rip guards are only needed on looms that use free flying bodies to insert the weft, such as a shuttle or micro shuttle. The loom is stopped before the weft beat occurs if the shuttles do not get into the correct position after crossing the loom.
After preparations, the warp yarn is “pulled” through the heald, mounted on the required slings.
Secondary mechanisms
- Feeding the base. It is a mechanism that delivers the warp to the weaving area at the required speed and at a suitable constant voltage, pushing it away from the flange tube, also known as the weaving beam.
- Positive delivery. A mechanism for controlling the rotation of the beam on a weaving or other fabric-forming machine when the beam is driven mechanically.
- Negative feed. A mechanism that controls the rotation of the beam on a weaving or other fabric-forming machine, where the beam is pulled by the frame against a braking force applied to it.
- Twisting the thread. It is a mechanism that removes fabric from the weaving area at a constant speed. It ensures that the required spacing is maintained between picks and then rolled onto the cloth roller.
- Positive spin. This is a mechanism in which the take-up roller is driven by a gear, shift wheel or pawl to provide the required speed, which allows the distance between the jaws to be determined.
- Negative twist. This is a mechanism in which the lifting roller is rotated by a weight or spring, this roller rotates only when the force applied by the weight or spring is greater than the tension of the warp in the fabric. The speed of the grip is controlled by the amount of force applied by the weight or spring and/or the tension of the base.
- Auxiliary mechanisms. To obtain high productivity and good quality fabric, additional mechanisms called auxiliary mechanisms are added. Assistive mechanisms are useful, but not entirely necessary.
Read about: natural cellulose bast fibers: natural textiles.
They are listed below:
- Deformation protection mechanism. The anti-strain mechanism stops the loom if the shuttle is tied between the top and bottom layers of the shed. Thus, it prevents excessive damage to the warp threads, cross threads and the shuttle
- Warp stopping mechanism (mainly in automatic looms). The purpose of weft stopping is to stop the loom when the weft thread breaks or becomes exhausted. This movement helps avoid cracks in the fabric.
- Shparutki. The function of the cords is to grab the fabric and hold it at the same width as the weft before it is picked up.
- Brake. Braking stops the loom immediately when needed. The weaver uses it to stop the loom to repair broken ends.
- Weft stopping mechanism. This is to stop the loom immediately if the warp thread breaks during weaving.
What does a beginning weaver need?
This ancient craft has been known to mankind since the late Neolithic period. The very name of this type of small handmade production speaks for itself. By hand weaving we mean the process of making fabric on a loom or using simpler devices (reed, reed, planks) by interweaving 2 systems of threads that are located perpendicular to each other.
To start weaving at home, you will need a minimum set of tools: thread or yarn, a loom. When creating one fabric, several types of raw materials can be used simultaneously: regular, art and textile yarn, floss, silk threads, viscose and wool fibers, roving.
It is better for novice craftswomen to give preference to simple projects, the creation of which will require 2-3 skeins of colored thread. You can buy them or discard old unnecessary things. It is desirable that they be of different shades.
This is interesting: Twill weaving: types, properties, assortment
Weaving in Rus'
Spinning and weaving in Rus' were a compulsory occupation for women. Regardless of social status, every girl was taught to weave, spin, knit and embroider from early childhood. The nickname “not a weaver” was considered the most offensive for a teenage girl, because each one had to prepare her own dowry - sheets, tablecloths, bedspreads, towels and other elements of everyday life and home decor.
During great holidays and special occasions, when there were many people in the house, each room was decorated with the best woven works: beautiful curtains were hung on the windows, the table was covered with the best tablecloth, and the walls were decorated with various towels. This spoke not only about the skills of the housewife, but also testified to the wealth of the family. Therefore, every woman, and especially an unmarried girl, trying to show herself as a skilled craftswoman, tried to weave the best work for such occasions. That is why family craftsmanship was carefully preserved, improved and passed on from generation to generation. The secrets of Russian weaving accumulated over centuries have survived to this day.
Of course, in Rus' there have always been many talented craftsmen and skilled craftswomen. Therefore, despite the complexity and labor intensity of the primitive process, weaving techniques were constantly improved.
Archaeological research by modern scientists indicates that many examples of clothing and household items dating back to the 10th–11th centuries have high artistic merit and are distinguished by a harmonious coloring with balanced proportions and a successful scale of ornamentation. This testifies to the high level of weaving skills in Rus' at that time.