A self-propelled plow is usually used to plow the land with a motorized winch.
. While moving, the plow itself stays in the furrow; little support is required during the first furrow and when plowing heavy and virgin soils.
The design of the plow allows you to adjust the working width and plowing depth. Using the extension of the furrow (large) wheel, the working width is adjusted, and the plowing depth is adjusted by adjusting the height of the wheels. A normally adjusted self-propelled plow holds itself well and firmly in the furrow and produces an even turn of the formation along the entire length of the furrow.
When plowing light sandy soils, the working width can be set to 20cm, when plowing loam it is 5-15cm. Plowing depth is usually about 20cm.
When plowing a plot with a motorized winch using a self-propelled plow, the earth over the entire area of the plot is transferred to one side, so the next time you plow, the winch must be placed on the other side of the plot. This can be difficult, so plows with a left moldboard are used. With each subsequent plowing, a plow with an opposite mold is used, then the earth remains in place. Usually in practice they plow with one plow in the spring and another in the fall.
Transporting a plow for a motorized winch
to the beginning of the furrow by the handle, while the ploughshare is raised above the ground and the plow rolls on wheels.
The length of the handle should be such that the plowshare does not hit your legs; it is better when the handle is long. But when plowing from the fence (and before lunch), the handle does not allow you to get close and also interferes with transportation, so often the handle is also made adjustable. Previously, there were specimens of titanium plows; their weight made it possible to simply carry them in your hands. Most of the plows available on farms for motorized winches are homemade plows. successful homemade plow
, but those who do this constantly have their own drawings and patterns, and the plows turn out to be quite functional.
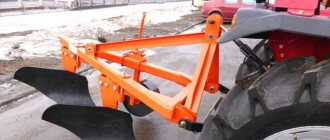
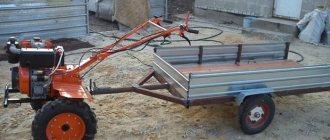
The photographs (photo 1 - photo 4) show four right-hand plows. They differ slightly in the design of the blades, the attachment of the plowshare to the blade and the adjustment of the wheels. The layout of the units themselves is approximately the same. On the first plow (photo 1) there is an adjustment for the length of the handle; it can be seen that there used to be an adjustment for the height of the ploughshare stand, but it was welded in as unnecessary.
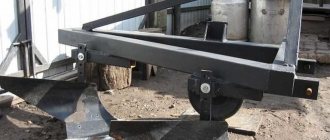
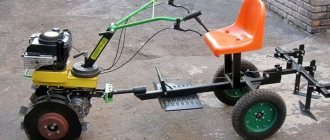
The photographs (photo 5 - photo 6) show the left plows. Their design is similar, only mirrored to the right. Hillers for motorized winches are used for hilling potatoes and cutting rows
(photo 7, photo 8). On light soils, hand hillers are practiced, where the strength of one person is enough to move it. On heavier soils, the hiller is pulled through using a motorized winch, and for hilling, two people are required, one stands on the winch, the other works with the hiller.
Photo 9 shows
a potato digger for a motorized winch
.
When moving along a row of potatoes, she digs them out, letting the soil pass through her. Some gardeners adapt to digging up potatoes using a hand plow, tipping them a little when passing through the row. Basically, in their gardens, potatoes are dug by hand with a shovel or special pitchfork. Very interesting devices for cultivating land
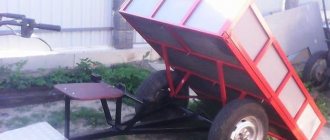
are presented in photographs 10-12. The hiller under the motorized winch (photo 10) can be replaced with a disk hiller (left) or a flat-cut ripper (right). On the vertical stands of the flat cutter there are flat triangular knives at the bottom. For harrowing, a heavy harrow (photo 11) with wheels for easy transportation, or a light harrow of an original design with chains for breaking up lumps (photo 12) is used. When the harrow is turned over, it is used as a grab to level the ground. This complex is used in one of the private households together with an electric winch (photo 7a, b) from the previous article. It is possible for one person to work as a hiller with an electric winch only if there is a remote control for the winch, and most of the work, as a rule, has to be done alone.
A plow is a very convenient device for those who are actively involved in their gardening. With its help you can plow, loosen, plant potatoes or carrots, etc.
Assembling a plow for a mini-tractor or walk-behind tractor with your own hands is quite a feasible task. The main element of its design is the wedge. It enters the soil at a certain angle and splits the soil layer.
Advantages of a homemade plow
Firstly, a homemade plow will most accurately meet your requirements regarding the blade angle, layer depth, and soil type.
You can also take into account the engine power and assemble a structure that does not overload the walk-behind tractor.
Negotiable. The shape of their plowshare resembles a feather. Such machines are used for heavy and dense soils. They are installed on mid- and heavy-duty walk-behind tractors.
Rotary. The design of these models is fundamentally different from the others. The plowing element is curved blades mounted on an axis.
On the Internet you can often find examples and photos of plows assembled independently, all of them are carried out according to the following principle.
Construction
In order to make a homemade plow you need tools: rollers, a grinder, a gas cutter, fasteners, a hammer and a welding machine.
The components of the simplest model: on the field board there is a ploughshare with a knife, an adjacent blade, all this is fixed on a vertical stand.
Before assembly and manufacturing, you need to make an accurate layout from thick cardboard. The dimensions of your unit must be adjusted along three guide planes: the horizontal running board; the vertical edge of the skid and the inclined moldboard.
Attach it so that the lower edge of the share is 10-20 mm below the edge of the running board, and the share and blade with their side edges should lie on the same straight line and protrude 8-10 mm beyond the vertical of the skid. Make sure that the working plane of the cutting wedge is adjacent to the blade without a gap.
Manufacturing
The ploughshare is best made from 9ХС alloy steel. It is made with a small release, because it will have to be removed and sharpened.
The easiest way to make a blade is from a steel sheet (3.0-4.0 mm). You will need a template to cut out a piece of sheet metal of the correct shape, and then you need to bend it with bending rollers.
A steel pipe with a diameter of 550-600 mm and a thickness of 3-4 mm is also suitable. To do this, place a cardboard pattern on the pipe, and the angle between the bottom edge and the horizontal of the pipe should be 20-30 degrees.
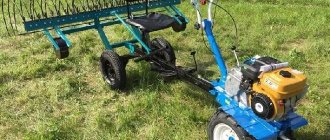
Motor winch Dacha
The Dacha motor winch is designed for moving loads. Complete with a plow and hiller, it can be used for plowing the soil and hilling in subsidiary and gardening farms.
The most important advantage that will determine the choice of many summer residents is the ability to transport the winch in the trunk of a car.
The device of the motor winch "Dacha"
Fig1
frame 1, handrail 2, backup ignition switch 3, engine 4, engine start handle 5, spark plug 6, oil dipstick 7, muffler 8, air filter 9, carburetor 10, gas tank 11, drive pulley 12, driven pulley 13, tension roller 14 , V-belt 15, protective cover 16, final drive chain 17, drum 18, cable 19, pressure roller lever 20, drum pedal 21, step with lug 22.
You can fully familiarize yourself with the operating manual for the Dacha motor winch by downloading it here
Technical characteristics of the Dacha motor winch.
| Characteristics | Meaning | |
| Dry weight, kg | 45 | |
| Overall dimensions in working condition, mm: length width height | 850 400 840 | |
| Rope | diameter, mm | 5,1 |
| length | 40 | |
| GOST | 2288-80 | |
| Engine | type | Gasoline, four-stroke, 1 cylinder |
| Power, hp | 6,5 | |
| Weight, kg | 17 | |
| Fuel tank capacity, l | 5 | |
| Fuel | AI-92 | |
| Chain PR 12.7-18.2-1 | number of links, pcs | 64 |
| GOST | 13568-97 | |
| V-belt | profile | A |
| length, mm | 1280 | |
| GOST | 1284.2-99 | |
Exploitation. When working to move cargo, plowing and hilling, the motorized winch must be serviced by two people: a mechanic and an assistant. The motor operator controls the winch and moves it, the auxiliary attaches the load being moved, and moves the tool during plowing, hilling and other work.
Operations for working with a motorized winch must be carried out in compliance with the rules specified below, in the following sequence: 1. install the motorized winch opposite the object or plow being moved. 2. The mechanic must press the step so that the lugs are completely inserted into the ground, the motorized winch takes a stable position and continue to stand on the step while performing all other actions. 3. unwind and hook the rope. To do this, the mechanic presses the drum pedal, and the assistant unwinds the rope. Moreover, the end of the drum should be pressed against the brake shoe located on the right side. Thus, the mechanic slows down the rotation of the drum a little so that the rope does not get tangled. 4. if the rope is attached, then the assistant signals to the mechanic that he is ready to move, and he himself leaves the zone of movement of the rope in order to remain safe in the event of its breakage. 5. Having received a signal of readiness from the assistant, the mechanic releases the drum pedal and checks the position of the pressure roller lever in the farthest position from the handrail.
Then, the mechanic switches the main and backup ignition toggle switches to the “ON” position and starts the engine (see page 3 “RD”). A duplicate toggle switch is installed for convenient operation of the motorized winch. Therefore, in the future it is enough to switch only the backup toggle switch, and the main one can remain on. 6. After warming up the engine at idle speed for 3-5 minutes, the mechanic switches the pressure roller lever towards himself so that the rope is wound onto the drum, moving the fixed object or plow. 7. The rotation is stopped by switching the pressure roller lever to the farthest position from the handrail simultaneously with pressing the drum pedal or switching the backup ignition toggle switch to the “OFF” position.
CAUTION: when moving a load or plow, do not allow it to come into contact with the motor winch frame to prevent the rope from breaking. 8. To move the motor winch, you need to turn off the engine, switch the backup ignition switch to the “OFF” position, remove your feet from the step, remove the lugs from the ground and move the motor winch to a new position. 9. upon completion of work, disconnect the rope from the load or plow, wind it on the drum (see paragraphs 5-7) and secure it to the hook on the frame, drain the fuel from the gas tank, lower the handrail all the way, raise the step.
Possible malfunctions and repairs of the Dacha motor winch
| Malfunction | Causes | Determination method | Elimination methods |
| Chain slippage | Chain stretching, chain wear, bearing wear, sprocket tooth wear | Visually | Shorten chain, replace bearings, replace chain, replace sprockets |
| Motorized winch cannot move load | Chain or V-belt slippage | Visually | Replace V-belt |
| Spontaneous drum shutdown | The drum spring is weakened, the edges of the drum segments are worn | Visually | Replace the drum spring, correct the edges of the drum segments with a file |
Photo of the motor winch “Dacha”
Rotary plow
This model is easier to operate and control, but assembling a rotary plow with your own hands is much more difficult.
To begin with, we manufacture a torque mechanism (you can take the Ural motorcycle gearbox as a basis), and connect it to the working unit with a GAZ-53 kingpin.
You can use a simple tube as a frame; weld the cardan shaft to it. Working shares can be cut from a large diameter circular saw blade; their approximate size is 38x13 cm.
From a 40mm square pipe and metal bars we make a cross to which we attach the working blades.
Photos of homemade plows
A do-it-yourself plow is a universal invention that is suitable for both plowing the land and planting potatoes. You can make a plow yourself from available materials. The proposed plow model consists of a control unit and a device designed for plowing (plow). The control unit is a stand, which consists of the main control elements and accessories. Namely: 1 – rectifier bridge (power supply). 2 – electric motor. 3 – gearbox combined with a gear. 4 – cable – 5 mm, acting as a winch. 5 – anchor (working part of the shovel).
A plow, which is intended for plowing the land, consists of the following elements: 1 – steering wheel (plow control lever). 2 – ploughshare. 3 – base with fastenings.
Installation and connection of the plow. 1. The anchor must be installed at an angle for better support.
2. After which the anchor should be deepened into the ground up to the connecting strip.
3. Then the anchor is connected to the control device using a piece of reinforcement.
4. In front of the barrier bar, near the cable, reinforcement is also driven in. It will additionally hold the control unit in place during operation.
5. In the working position, the gearbox is in the engaged position.
6. The control unit is ready for operation.
7. After installing and securing the control device, attach the plow to it. To do this, the free end of the cable is attached to the base of the plow.
Operating principle and operation. 1. The plow is carried to the required distance. 2. The ploughshare is driven into the ground to the required depth.
3. The left foot is placed on the ploughshare, and the right foot rests on the ground.
4. Thus, while moving the plow along the ground, the tiller pushes off with his right foot and controls the plow using his weight.
5. During operation, the plow steering wheel should not exceed the level of the plowman’s belt.
6. When the plow reaches the end of plowing, the control unit is turned off and the plow is again taken to the opposite side of the site. A plow made according to this principle is capable of plowing land that has been left without care for a long time.
A horse-drawn, tractor-mounted or walk-behind plow is an indispensable thing in a homestead. The plow plows the ground, turning over the top layer of soil, which reduces the number of weeds and makes the soil softer and more pliable. You can not only buy a plow, but also make it yourself. To do this, in addition to tools and materials, you need to have an understanding of the structure of the plow and its geometry.
It is possible to make a plow correctly only when you have an idea of the plowing process, as well as the purpose of each of the plow parts.
When plowing, the plow wedge cuts into the ground at a certain angle, depending on the softness and moisture of the soil. The wedge separates the layer, lifts and compresses it, while simultaneously dividing the layer into several parts. The angle of entry determines how many parts the earth layer will be split into: the larger the angle, the larger the split. But if the angle of entry is more than forty-five degrees, then the soil stops sliding along the working surface of the arable device and begins to accumulate in front of it, making further work difficult. A vertical plow, that is, with a sharper leading angle, separates the soil from the edge of the plow furrow and compresses it horizontally. A plow with a horizontal leading angle works differently: it deflects and turns over the soil layer.
A typical working plow consists of:
- The ploughshare that cuts the soil,
- dump,
- Knife,
- Field boards,
- Racks,
- Skimmer.
Additionally, the plow can be equipped with:
- More durable metal frame,
- With wheels,
- A mechanism that corrects the operation of the plow relative to the tractor,
- hydraulic mechanisms,
- Pneumatic hydraulic system.
The blade can have several types of working surface:
- Screw,
- Cylindrical,
- Cylindrical.
The cylindrical grinds the soil perfectly, but does not form a layer well. This is not always convenient. A cylindrical work surface is usually used for working with soft soil. The most convenient and practical to use is a cylindrical surface, which crumbles and turns the soil well, and also copes with both dry and wet soil.
HARNESS..WINCH
A winch working in tandem with a plow is not new.
Especially for owners of small plots of land, on which these fairly simple and reliable nonstrings have already proven themselves to be excellent. Unlike a mini-tractor, the winch does not compact the soil. And it doesn’t slip like a walk-behind tractor. And almost all the traction power of the motor here goes to useful work - plowing the nursery land with a towed plow. The winch itself is securely held in place by an anchor, the arms of which, having the appearance of bayonet shovels, easily penetrate into the ground. Plowing is carried out by two people, making furrow after furrow. Moreover, the partner, whose duties include returning the plow to the beginning of the furrow, can be a 10-year-old child. High plowing quality is guaranteed even on extremely inconvenient sites (slopes with a “washboard” profile) and heavy soils. The proposed homemade plow-electric winch (see illustration) has a number of additional advantages associated with the relative cheapness of electricity, ease of acquisition and long life (over 30 years) of trouble-free operation of the electric motor, ease of start-up and operation of the entire structure. The gearbox speed control lever is located in close proximity to the unit with electrical equipment (capacitors, magnetic starter, “Start” and “Stop” buttons). Next to it is a coil of cable on a reel. So the electric winch can be anchored anywhere on the land plot at a distance of up to 100 m from its connection to the power grid (with a longer cable length, line losses increase). And the built-in remote control with a “Stop” button allows you to control and plow, even working together with a disabled person.
When a boulder or tree roots get under the plow, the force on the rope increases sharply. And when it becomes the maximum permissible (330 kgf), the winch electric motor stops, preventing the rope from breaking (as well as breaking the chain transmission mechanism).
And one more feature. Thanks to the modular design, if necessary, you can easily remove the engine and the unit with electrical equipment from the electric winch (it is enough to unscrew 4 M10 bolts) and, installing them on an electric sawing machine, start preparing firewood, slats, timber, etc. By rearranging these same block units onto the grass cutter, we obtain valuable, vitamin-rich feed for livestock and poultry. Well, having replaced the plow with a towed cultivator-hiller, the same electric winch can be used not only for weeding and hilling, cultivating row spacing, but also, say, for digging potatoes.
Kinematics? The proposed home-made design is so elementary (and therefore reliable) that it is unlikely to cause anyone any difficulties when “incarnating it in metal.” From the electric motor shaft, the torque is transmitted (a sleeve coupling is used for this) to the gearbox (taken from the Riga moped with subsequent minor modifications). And from there (thanks to a chain drive with a pitch of 12.7 mm) - onto a drum with a 10-mm nylon rope wound onto the last one, to the end of which a towed plow or cultivator-hiller (aka potato digger) is connected.
The frame is based on a welded structure made from sections of 34x50 mm steel angle with a tubular spar and brackets for mounting the electric motor, gearbox and drum. Moreover, the rope guide, made from a suitably bent section of 22×3 steel water and gas pipe, is welded after installing the drum. And in the brackets of the latter, boring holes are provided for the shaft with the possibility of some movement of the shaft to ensure proper tension of the PR-12.7 drive roller chain.
Single-sided plow
The easiest option to manufacture. A one-sided device can be made either integral, in the form of a single body, or collapsible. The collapsible version is convenient because it allows you to remove the plowshare for sharpening. The ploughshare can be replaced with a disk from a circular plate. The dump is usually done in two ways. The first of them requires the use of a pipe cut about five millimeters thick and fifty centimeters in diameter.
A workpiece is cut from the cut and, using an angle grinder, brought to the required size. The second method of manufacturing a dump involves the presence of a steel sheet four millimeters thick, or a cylinder with the same wall thickness, but with a cross-section of about 50 cm. Using a welding machine or metal scissors, a shape is cut out and bent into the form of a cylinder. If there are deviations from the required dimensions, you can use a hammer for finishing.
Any drawings provide six constituent elements:
- Metal disk or ploughshare,
- The basis,
- Spacer plate
- Side shield,
- Pipe section for the shield,
- Field work board.
The ploughshare is usually installed using a sheet of metal and several wedges beveled at an angle of twenty-five degrees. They are fastened by two-point welding, and it is also used to connect the rack and the side shield. It is advisable to make the shield one centimeter higher than the lower edge of the plowshare, and the edges of the shield should overlap the edge of the blade by five or six millimeters.
The plowshare and blade are fastened by welding so that they are a single whole, without gaps or irregularities. The angle formed between them should not exceed seven degrees. A welded plowshare and blade are attached to the side stand, and the stand itself is welded first to the base and then to the spacer plate. Finally, the corners of the ploughshare are welded to the base. All weld marks and seams are cleaned, and the blade and plowshare are ground.
This type is more effective for plowing large areas of land. Manufacturing requires a strong steel frame made of a round or rectangular profile with a thickness of at least two millimeters. The size of the frame depends on the number of working parts and control element required. In the working body, the ploughshare must be placed at the bottom, since its role is to move the layer of earth towards the dump. The blade turns the soil, cuts and moves it, forming a furrow.
The stand is necessary for attaching working tools to the frame and holding the knife. Several adjustable holes are made in it, which will allow you to change the depth of plowing. Usually the rack is welded from a metal plate, at least a centimeter thick, and attached to the frame with bolts.
The frame with all the working tools is attached to a mini-tractor or walk-behind tractor with a homemade drawbar or hitch. The drawbar must have a handle and be straight or V-shaped. The second form option is more effective because it makes the plow much more stable. Also, for greater stability and straightness of movement, you can install field wheels. They are attached to the frame using an adjustable bracket.
Gas winch made from a chainsaw and gearbox
Hello everyone, in this instruction we will look at how to assemble a chainsaw-based winch with your own hands.
Such a useful device can be used for various purposes, because it is mobile and runs on gasoline. The author uses it to drag logs from the ravine. This is very convenient and useful when preparing firewood, building materials and other things. Also, such a winch can easily be used as a lift, which will be convenient during construction work. For example, you need to lift several buckets of cement, this winch will easily cope with the task. The author used a chainsaw as a motor. You will also need to obtain high torque for the winch. For these purposes, an old worm-type reduction gearbox from some equipment was used. All other materials are easy to find or make. So, let's look in more detail at how to make such a winch.
Materials and tools used by the author:
List of materials:
- chainsaw; — reduction gearbox; - bicycle spare parts; - Sheet steel; - corner; - steel pipe; - screws, nuts, etc.; — cable for control; - cable for winch.
List of tools:
- lathe; - drill; - Bulgarian; — welding; - screwdrivers, wrenches, hammer and so on.
The process of making a homemade winch:
Step one. Disassembling the chainsaw
Let's start by preparing the chainsaw.
First of all, we need to remove the clutch and sprocket. To unscrew it, the engine needs to be fixed; for these purposes we need to remove the top cover and unscrew the spark plug. Insert a cord, a piece of leather or something similar into the spark plug hole. Now the engine will rest against the skin with the piston and will no longer turn. Using a special wrench, unscrew the clutch and remove the sprocket. An angle grinder wrench will do if the clutch is not tightened too tightly. Step two.
Installing the drive sprocket The author decided to use a bicycle sprocket as a drive sprocket.
For these purposes, disassemble the cassette of the rear wheel of the bicycle and select the desired sprocket. It is welded to the outside of the clutch. The author had to adjust the internal holes of the sprocket on a lathe so that it would fit accurately on the ebb. Well, then we carefully weld the star using welding. First, it is advisable to grab it in a circle and make sure that there are no distortions. As a result, after installing the structure on the saw, we have a drive sprocket equipped with a clutch, which is very convenient. Step three.
Installing the driven sprocket The driven sprocket is also made from a bicycle sprocket; it has a larger diameter than the drive sprocket in order to increase torque.
To install it, the author decided to use a pulley from the selected gearbox. We drill holes in the sprocket, we will fasten it with screws. We also drill holes in the pulley and cut threads for the screws. The author fastens the pulley itself with three screws, two of them secure the pulley from turning in a circle, and another one is screwed in so that the pulley does not come off the gearbox shaft. Step four.
We install the chainsaw on the gearbox. On the gearbox, the author installed a base of two steel corners.
It is secured with bolts, since the gearbox housing is most likely cast iron. We will attach the chainsaw to the place where the toothed stop is installed. You need to unscrew it, it won't be needed. Instead, we screw a steel plate. Well, then we weld this plate to the base of the corners. Before final welding, install the chain and make sure that everything is installed smoothly and the chain does not fly off. Step five.
Protective guards The chain drive must be protected, since branches will get here, and if clothing or a hand gets caught, everything can end tragically.
There are two shields here, one is original from a chainsaw, it is installed opposite the drive sprocket. If the handbrake gets in the way, you can remove it. As for the shield, which is installed opposite the driven sprocket, the author makes it with his own hands. For these purposes you will need sheet steel. Using a homemade machine from a grinder, the author cut a circle out of steel, and then welded a rim to it, making an excellent shield. All that remains is to weld a few plates to secure the shield to the device using screws. Step six.
Making a winch pulley The winch pulley is needed so that the cable can be wound on it and the desired work can be done.
To make it, we first take a piece of steel pipe of a suitable diameter so that it can be put on the gearbox shaft. Next, drill holes and cut threads for the screws. Using screws we will secure the pipe to the shaft; there is a groove there. The ends of the screws will need to be ground to the diameter of the groove. Now you need to make two “plates”. To do this, we cut out two circles from sheet steel, and then use a grinder to make cuts. As a result, you can now bend the edges and get two parts of the pulley. The cuts need to be welded, and then carefully clean the welds, otherwise they will tear the cable. We weld the plates to the pipe at the required distance. The author additionally secured this part with another screw, which is screwed inside the gearbox axis. Step seven.
Base Make a base for the device so that the winch can be placed on the ground without it falling. For these purposes, the author used a piece of square pipe. We weld it to the base or fasten it with bolts.
Also attach a cable to the winch, with which you can tie it to a tree, car, and so on.
At the end of the cable, install a hook for quick attachment. Step eight.
Control handle All that remains for you is to install a handle to control the speed of the chainsaw. You can make such a handle yourself, or you can find a ready-made one, for example, from a bicycle, and so on. We install a steel clamp on the chainsaw handle and use it to connect the cable. We make a loop around the “trigger” so that when you press the handle, the loop tightens and puts pressure on the gas. Place the control knob itself in a convenient place. It is desirable that the handle can be locked in a given position, so you can adjust the desired speed once and constantly use this mode. Also be sure to make an emergency ignition switch and place it in an accessible place so that you can quickly turn off the engine if something happens. Finally, paint the metal parts of the structure. When working in the forest, moisture will quickly cause the metal to rust.
Step nine. Tests
You can start testing the winch!
We tie it to a tree, car or other reliable support. We tie one end of the cable to a log that needs to be pulled out of the ravine. Well, we wind the other end onto the winch and turn on the machine! Slowly adding speed, we ensure that the log begins to crawl towards you from the ravine. The author has made quite a few columns this way. In any case, it will be much easier than carrying them by hand, after which you get very tired and your muscles hurt. And to prevent a forester from catching you doing this, it would be useful to install a muffler on the chainsaw.
The author used synthetic rope as a cable; it is quite strong and durable. A steel cable will be stronger, but it is inconvenient to work with, and the winch’s capabilities are far from unlimited. That's all, I hope you liked the project and found something interesting for yourself. Good luck and inspiration in making your own crafts! Don't forget to share your experiences with us!
Source Delivery of new homemade products by mail Receive a selection of new homemade products by mail. No spam, only useful ideas!
*By filling out the form you agree to the processing of personal data
Become the author of the site, publish your own articles, descriptions of homemade products and pay for the text. Read more here.
Assembly and installation of the plow
To assemble a plow with your own hands, you need to adhere to one very important rule: all parts of the device are first welded by spot welding, and only when all the parts are in place and fastened correctly are they finally welded. It is easy to check the quality of workmanship - to do this, you need to remove the blade with the ploughshare, and place the plow itself on the table. Pressing the plow tightly, check the coincidence of the table surface with the horizontal surface of the skid. If there are no deviations, everything was done correctly.
You can also determine a good assembly by the following signs:
- The sharp edge of the share is located two centimeters below the skid,
- The plowshare and blade do not protrude beyond the vertical edge of the skid by more than a centimeter,
- There is no gap between the skid and the blade.
Mount the homemade device on a walk-behind tractor next to the plowing area. They start by installing steel wheels - they prevent the walk-behind tractor from slipping in the soil. Next step: secure the plow, but do not tighten all the fastening nuts completely. With their help, the device will be adjusted, which begins on a special stand. The height of the stand should be equal to the plowing depth. After installation and checking the fastening of all components, the plow is placed on the ground.
Testing the quality of work is carried out on three-furrow plowing.
This is sufficient for measuring depth and checking overturned formations. If the furrows overlap one another, or the distance between them is more than ten centimeters, it is necessary to adjust all the components again.
When purchasing a mini-tractor for cultivating a small plot of land, the package often does not include all the elements of attachments, so they have to be purchased separately. And the retail price of any spare parts is much higher and depends on the manufacturer and quality.
Equipment that meets all the requirements of a business owner is not always available on the market. Therefore, the best option is to make a homemade plow, which will be much cheaper than factory equipment, sometimes of dubious quality.
To make a plow yourself, you need to know its design and the functions of its individual elements well. Typically, general-purpose arable attachments are used on private land. The design of such a plow can be divided into two main parts: working and auxiliary.
Operating equipment items include:
- A housing that includes a stand and field board. The blade and ploughshare are attached to the stand.
- The knife is the main cutting element of the tiller.
- The skimmer is an additional cutting element of the attachment designed to cut the top layer of soil (turf).
Auxiliary structural elements:
- The frame is the base on which all other parts of the plow are attached. Its design includes longitudinal bars, spacers, and stiffening beams.
- Support wheel (its mounting height can be adjusted).
- A hitch is a special device with which attachments can be attached to an MTZ tractor or motor cultivator.
Winch for plowing land with a plow
For personal plots, it has become popular to use a homemade winch when plowing. Do-it-yourself homemade products are preferable. Let's consider a winch for plowing as a donor, which was the Minsk motorcycle.
The engine with a displacement of 125 cm3 is not too heavy and the power is quite enough. Anyone who has used a Minsk motorcycle knows that the engine starts very easily and without fail. Reliable in operation, repairs are not expensive.
Spare parts are available and there are no problems with them.
Plowing winch drum
The drum is the main part. A cable is wound around it and how this happens depends on the work of the homemade product. The first time we made guides for winding. After a short time of operation, they refused because, when the cable came into contact with the guides, it quickly wore out and broke.
You just need to install the winch during operation directly in the direction of the unwound cable. The cable began to be wound exactly ring to ring and lasted many times longer. The dimensions of the pipe on which the cable is wound are 108 mm in diameter. Pipe width 100 mm.
The pipe is driven by a bolted sprocket.
The parts from which the plowing winch drum is assembled: 1. The base is welded from pipes and two flanges; 2. flange for sprocket installation; 3. driven sprocket from the Voskhod motorcycle; 4. bolts with nuts and engravers for fastening the sprocket; 5. washer for securing the cable; 6. bolt for securing the cable; 7. bearings 204;
8. spacer between bearings;
9. an axis that holds all the parts together; 10. axis engraver; 11. axle nut; 12. fasteners for fastening to the frame; 13. spacers between the bearing and the strut, welded to the strut; 14. stands on which the winding pipe is held and secured.
15. bearing seats.
Installing the cable
A consumable material when plowing the land is, of course, a cable. The entire main burden falls on him. At the first break in the cable threads, you need to think about replacing it. Therefore, two holes are made on one flange of the drum base: 1 - a hole with a 10 mm thread for a bolt. 2 - hole for passing the cable.
We take the end of the cable, pass it through the drilled hole, twist it around the bolt, under the washer and press it firmly to the drum body.
Drive sprocket installation
There are several options for fixing the star on the flange. The first and fastest is, of course, done by welding. But not the most practical. After welding, the metal may become softer. Yes, and you have to work with the earth, which ends up on the chain and sprockets. As a result, wear and tear occurs intensively. Replacing a welded star is quite difficult.
You need to choose a method in which the replacement should be convenient. For this purpose, a third flange is installed (welded) on the drum base. Holes with a diameter of 8 mm are drilled on the flange, onto which the sprocket is fixed. The drive is carried out by a motorcycle chain.
Plow with skimmer for walk-behind tractor
The skimmer is designed to remove the top layer of soil when plowing a plot of land. He turns over the layer of soil with weeds, places it at the very bottom of the furrow, made by a body equipped with special devices. He cuts and turns some of the soil on the side of the furrow. At the same time, the body with the equipment loosens the soil and distributes it evenly over the layer of weeds laid by the skimmer. To level the wall of the furrow, the plow is equipped with a special knife, which is mounted in front of the outer body of the attachment.
Types and structure of the case
Plows are divided depending on the number of bodies into single-, double-body and multi-body devices.
The housing design includes the following parts:
- rack;
- field board;
- ploughshare;
- dump
The type and quality of plowing of the land plot depends on the last two elements of the structure. The ploughshare cuts the soil layer, which then rises along it towards the dump, then turns over and crumbles. The angle of rotation of the earth layer depends on the design of the dump. A field board is mounted at the bottom of the body, which prevents the plow from moving in the direction of the plowed land.
If you are interested in how to make a plow with your own hands, you should select drawings of its design based on the type of soil being cultivated with this attachment for an MTZ tractor or motor cultivator.
Plow body options:
Important!
If you plan to make a plow with a support wheel for a walk-behind tractor at home, it is recommended to select the body design depending on the type of soil.
The choice of housing depends on the type of crop being grown. Root crops need thoroughly loosened soil, for which none of the above listed options for agricultural attachments is suitable. In this case, it is recommended to use a combined design. The body is equipped with a shortened blade, a plowshare and a rotor, which further crushes the soil during the cultivation of the land.
Blade design
Dumps can be:
Important!
When choosing a plow design, it is necessary to take into account a significant point: the ploughshare and blade must be almost the same thickness (1 mm is the permissible “step” value, no more than 0.5 mm is the gap between the blade and the ploughshare).
Share shape
To make a plow with your own hands, drawings of a plow for a mini tractor need to be selected according to the type of soil being cultivated and the complexity of the device itself. First you need to decide on the design of the ploughshare.
A ploughshare is a part of a plow that cuts a layer of soil. Along the ploughshare, the soil further rises to the dump. For the manufacture of this structural element of the plow, high-strength hardened steel is used. You can make such a structural element of a plow field at home from an ordinary steel pipe.
Shapes of ploughshare:
Of the listed ploughshare options, the most popular is a chisel-shaped product for a reversible plow. They are considered the most stable during operation; the plow can be freely buried to the required depth.
Before you make a handmade plow for a walk-behind tractor, you need to choose the right design diagram for the attachment. If you have an old tool, you can make new parts based on it. If the old plow is missing, you can use Zykov’s drawings to make it. But it is imperative to take into account the parameters of agricultural machinery on which further use of independently manufactured attachments is planned.
DIY plow drawings
After I got a self-made agricultural winch, which is used for plowing the garden, the question became: should I buy a plow or make it myself? Walking through the shops and bazaar of Smolensk, you get a strange feeling that the plows produced by the industry for walk-behind tractors are a sad sight.
And these industrial creations are suitable only for “picking” and not for plowing the land, and even with the rotation of the layer, and regarding the depth and width of plowing, we can conclude that for planting potatoes with a distance between rows of 60 cm, not one of the proposed ones is suitable in the plow trade. Either our manufacturers are saving money, or the power of the most popular walk-behind tractors is not enough to work with a normal plow with a working width of 30 cm. When planting potatoes, you shouldn’t plow one furrow three times. And the price wants to leave the best - under 2 thousand. rubles (for a couple of pieces of iron from a scrap metal collection point).
The next step to find something useful is to search the Internet. To my surprise, there are 3-4 original descriptions with drawings floating in the vastness of the Russian-language network (this fact surprises me very much). The next step is to look at what those around you are using. It was not possible to buy a suitable plow; the decision was made to make a plow with our own hands. Based on the fact that the plow was supposed to be used for planting potatoes with a winch for plowing, the following requirements are imposed on it:
1. Plowing width – up to 30 cm.
2. Plowing depth -10-20cm.
3. The plow must hold the furrow itself, without digging in or jumping out of the furrow. The geometry of the plow must ensure movement with the specified parameters without the help of a plowman.
4. Possibility of adjusting the depth and width of plowing.
5. Minimum weight and sufficient strength.
My uncle has been using his homemade motorized winch for plowing for more than 10 years and has tried several options. For the last few years, he has settled on an option optimized for a homemade motorized winch for the garden, namely for planting potatoes with a distance between rows of 60 cm. There is also a homemade hiller for a motorized winch and a homemade potato digger, all this can be viewed on the corresponding pages of the site.
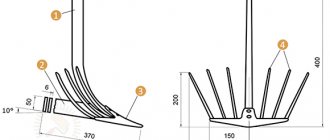
Plow drawing
Field board drawing.
The blade is bent according to this template until the two profiles coincide and then welded at an angle.
Using a drawing of a homemade plow, you need to draw a template for the plow pattern on thick paper, and then transfer the picture to metal and cut out the blank with a grinder. Personally, I used stainless steel material with a thickness of 1.8 mm. Many often use a sheet of 2-3 mm. The cutting part of the plow is reinforced with a strip of thicker metal. Someone suggests using a disk from a circular machine for these purposes, or a spring from a “Muscovite”. From personal experience, if you plow a summer cottage plot for a family of 4 people in the spring and fall, cultivating six acres, you shouldn’t strive for super-strength. It is more profitable to make a plow that is light but strong enough for its tasks. It’s better to repair or replace something after 10 years, and only if necessary, than to carry around the heavy structure of a homemade plow for 10 years. There is no need for excess weight.
This is what the plowing width adjustment system looks like. By rearranging the large wheel, you can change the plowing width within significant limits. When I plant potatoes, I set the grip to 30 cm, in two passes the distance between the rows is 60 cm. For autumn plowing of the garden or when plowing virgin soil, I use a smaller grip. The small wheel is made so wide that the plow does not press into the ground.
Having looked at the pictures below, you can imagine the basic principles of operation of a homemade plow, or rather a guide system that allows the plow, without the participation of a plowman, to move strictly in a straight line at the established plowing depth and width. The plowing width is regulated by moving the large wheel, which, when the point of application of the traction force is shifted as shown in the figure, is pressed against the furrow, which allows the plow to repeat the direction of the previous furrow. The plow turns slightly, which increases the plowing width. In fact, the width of the nose in the direction perpendicular to the axis of movement of the plow is less than 300 mm, however, the specified width is available for plowing.
The plow wheel runs along the bottom of the plowed furrow and this situation is observed from the previous furrow to the next. As a result of the application of traction force, a force is exerted to deepen the plow until the plow is aligned with the axis of the wheel, as shown in the figure, as a result, all forces are balanced, and the system operates very stably. Rough adjustment of the plowing depth is carried out by selecting the appropriate difference in wheel diameters, and smooth adjustment is carried out by adjusting the tilt of the plow. At this stage, there was no longer any need to use handles to control the plow, except for some special plowing conditions.
Plows not only loose soil as in the video, but also virgin soil