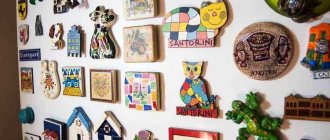
Magnets on the refrigerator add coziness and color to the kitchen interior. They tightly hold notes to loved ones, children's first drawings and important reminders. Masks enamel defects and signs of age on the door. Magnetic souvenirs are sold on every corner, but it is much nicer when such decoration is created with your own hands. We have collected the TOP 10 coolest ideas that will give your kitchen a special charm. And at the end we’ll tell you how to create magnets for crafts yourself.
- How to decorate a refrigerator to match your interior style
- DIY making
- Options for refrigerator magnets
- Fabric magnets
- Glass drop magnets
- Polymer clay magnets
- Live magnets
- Photo on vinyl refrigerator magnet
- Magnetic clothespins
- Magnets from caps
- Coffee magnets
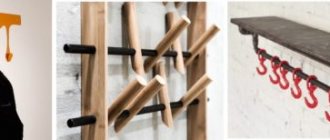
- Wooden magnets
- Flower bouquet
- Materials for self-production of magnets
Method one: image
Material you will need:
- interesting drawings (pictures cut out from magazines);
- glue;
- magnets in the shape of a circle with a diameter of 1.25 to 1.75 cm;
- glass circles (must match the size of the magnets).
All you need to do is glue a picture to the magnet and a glass circle on it. Glass circles are sold in craft stores.
If a magnet is visible through the picture, it would be advisable to add another detail. Namely: prepare a circle of the required size from white cardboard and glue it under the drawing.
Selecting magnets to match your interior style
Neutral options are suitable for any interior solution:
- photos of loved ones or favorite vacation spots;
- monochrome drawing;
- geometric shapes;
- clothespins;
- magnets with the same pattern.
For rooms with basic styles, a different approach is taken. Choose iconic elements, colors and materials that complement your kitchen decor.
- Classic: clear lines, gilding, silvering, expensive fabric (satin, silk).
- Shabby chic: light colors, small forget-me-nots.
- Country: wood, burlap, unbleached linen, animals.
- Archaic: clay, painting.
- High-tech: metal, glass, plastic, geometric pattern.
- Eco-styles: natural motifs, flowers, herbs, clay jugs, house.
- Minimalism: laconic lines, round, rectangular, square, oval shapes.
- Indian: beads, bright colors, gold.
- Provence: small floral decor, bleached colors, lavender.
- Art Deco: bright, geometric pattern.
By choosing the right decor direction, refrigerator magnets will not become alien parts.
Method two: they are alive
A DIY refrigerator magnet can be a living creature. To make this, you should prepare:
- magnet;
- hot glue gun;
- screwdriver
- cortical plugs;
- small plants;
- some land;
- knife.
Manufacturing stages and features:
- Make a hole in the cork.
- In depth - up to the middle of the cork. It is important not to damage the edges.
- Using a glue gun, you need to glue the magnet to the cork.
- Immerse the soil in the resulting void and plant the plant.
- As a result, you got a kind of pot.
Don't forget to take care of the plant you planted. After all, it will grow up and ask to be moved to a new house, and in the existing one you can grow a new flower.
SubliMaster
In this article I want to tell you how you can make a cute magnet with a photo for your refrigerator. And not only produce it, but also sell it profitably.
My site was originally dedicated to sublimation printing. But this does not mean at all that you can make money only by selling mugs, plates, puzzles and other sublimation products. There are a lot of ideas! This includes thermal transfer and the production of watches with a photographic portrait and the printing of various calendars and much, much more.
In this section I will talk about all the ways of making and selling products that are NOT made using sublimation.
The first article is about magnets.
What attracts me most about making vinyl magnets is the simplicity (no equipment needed) and the amazing price tag. Judge for yourself - a magnet measuring 65 x 90 mm costs me less than 5 rubles. I sell it in kindergartens for 120 rubles!
Do you want too? Read on and find out everything, I have no secrets from you!
There are different magnets - plastic, metal, sunset ones. We will make a magnet based on magnetic vinyl. It looks like this:
In a nutshell, this is the most ordinary photograph pasted onto magnetic vinyl.
Choose any photo frame and insert a photo of the child. You can draw a photo frame yourself or download it from the Internet. Just don't forget about copyrights. Not all authors allow you to make money from their frameworks and templates.
To make a magnet we need the simplest tools:
This is a small piece of glass, a stationery knife and a metal ruler. And it's all? - you ask! Yes, this is enough to make good money. You don't even have to have your own printer. You can always order photo printing on the side. And your magnets will not become much more expensive. We'll calculate everything later.
A few words about magnetic vinyl. It is sold in rolls, usually 30 meters. Such a roll is not only quite expensive, but also very heavy. And this increases the cost of delivery for those who order vinyl by mail or through a transport company. Those who have the Zenon company nearby are luckier - they will sell at least half a meter of magnetic vinyl. Agree, this is very convenient.
Magnetic vinyl comes in different thicknesses. I recommend purchasing vinyl no thinner than 0.7 mm to make magnets. Magnets made from thinner vinyl look cheap and not solid.
Magnetic vinyl also comes with an adhesive layer and without an adhesive layer. With an adhesive layer it has a protective film and, with equal thickness, costs a little more.
All you have to do is choose a link:
— magnetic vinyl with adhesive layer + regular photograph on paper
or
— magnetic vinyl without adhesive layer + photo on self-adhesive photo paper.
I'll use the second option. I have 0.75mm glueless and inkjet vinyl on hand from Privision.
So, let's start making our magnets.
I think finding a cute photo frame won't be too difficult for you. We will assume that you already have it. Adjust the photo frame to the size you need - mine is 65 x 90 mm. With this size, 9 magnets fit on an A4 sheet. Of course, you can choose absolutely any size.
You also photographed the children. All that remains is to insert the photos into the frame. This can be easily done using Photoshop or Paint.Net.
By the way, a large section will soon appear on the site about how to photograph children in kindergartens and schools and process photographs. Don't forget to subscribe to the news so you don't miss the announcement.
The photos have been inserted, now they need to be placed on a sheet of paper and printed. You can use Photoshop for this, but I like CorelDraw. I import one photo frame at a time and place it on A4 sheet. If they order more than one magnet, I duplicate it the required number of times.
All photo frames are placed, self-adhesive photo paper is inserted into the printer. We send the sheet for printing! We print with regular water-based ink.
Now we will stick the photo paper onto the magnetic vinyl. I first cut it into A4 sheets. More precisely, they turn out a little smaller - 20.5 x 29 cm. The width of the magnetic vinyl roll is 61.5 cm. I cut it equally into three parts. And I deliberately reduce the length a little; with my size of magnets this is quite enough. You also try to calculate everything so that there is less waste.
To ensure that the photo paper lays flat on the vinyl without bubbles or creases, just watch me do it and repeat.
First, turn the sheet face down and bend the backing paper about 15mm along the short edge of the self-adhesive.
Now we turn the sheet over and, holding the edge with the folded paper (not letting it stick), place the sheet exactly on the magnetic vinyl.
Having positioned the sheet as needed, carefully glue the edge of the sheet to the vinyl and iron it well with a dry soft cloth.
Now our sheet is securely attached to the magnetic vinyl and will not move anywhere. We place our left hand under the sheet, grab the edge of the protective paper and begin to smoothly pull it to the side, exposing the adhesive layer, and with our right hand, using a rag, smooth the sheet to the vinyl with progressive movements up and down.
So we smooth it to the end.
Set the resulting sandwich aside for 15 - 20 minutes so that the adhesive layer sets well. Now the magnets can be cut. A reciprocating cutter is ideal for this purpose, but you can do just fine without it.
A metal ruler and a utility knife are what you need. To ensure that the knife cuts rather than tears the vinyl paper, keep the angle of the knife as small as possible to the surface.
Renew the knife blade by breaking off the dull part. I usually do this after cutting the next A4 sheet.
Here are the first nine magnets ready.
I put each magnet in a separate bag. I have them 75 x 120 mm. This bag costs pennies, and parents really like the individual packaging.
That's the whole process. As you can see, nothing complicated. Now let's do some math.
I bought magnetic vinyl without glue 0.75 mm thick for 310 rubles per linear meter (width 0.61 cm), which is 504 rubles per square meter or 30.3 rubles per A4 sheet (rounded to 31 rubles).
I bought self-adhesive for 100 rubles for 20 A4 sheets. This means one sheet costs 5 rubles.
31 + 5 = 36 rubles.
36 rubles: 9 magnets = 4 rubles per piece!
Let me remind you that I sell them for 120 rubles. I know that some people sell similar magnets for 150 rubles.
Now a few words about quality. Water-based ink has a serious drawback - it fades quite quickly. Particularly compatible inks. If your customers' refrigerator is located near a window, the magnet on its door may fade within a year. In this case, I will advise you to print the photos in a darkroom and glue them onto vinyl with an adhesive layer. In this situation, the cost of your magnet will increase by 2 - 3 rubles, but it will not fade over the years.
Alternatively, the magnet can be covered with a thin cold laminate (laminating film). This makes the process a little more complicated, but the magnet looks great!
You can also purchase an inexpensive corner cutter and beautifully trim the corners of your magnets.
In a word, I gave you an idea. How you put it into practice is entirely up to you. Now you know how to make a magnet with a photo. Take my word for it, such magnets are in constant demand in kindergartens and schools!
I wish you success!
Did you like the article? You can subscribe to the news and be the first to know about new articles and lessons on the SubliMaster .
How to cut a picture into equal parts
Fighting marriage during sublimation
Inserting a Photo into a Frame Using Photoshop
How to convert cdr format to jpeg
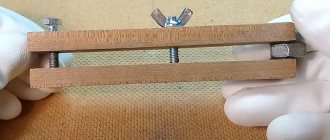
Method three: magic clay
Making refrigerator magnets will not be difficult if you have the following materials at your disposal:
- magnets;
- polymer clay;
- ink;
- hot glue gun.
And these are the tools:
- Bakeware;
- rolling pin (or any other object that can be used to roll out clay);
- sandpaper (you can use a manicure file);
- stamps.
To make a souvenir, you need to roll out the clay to make a sheet approximately 5 millimeters thick. The pattern is applied to the material with stamps, and individual shapes must be cut out using clay molds.
Next, the workpieces must dry. This requires a day. You can use the oven. Next, polish the figures with sandpaper and glue magnets to them.
Salt dough magnets
Salt dough is as flexible as plasticine, but after baking or being in a warm environment it becomes hard. Products made from it can be coated with paint and varnish.
We take flour, salt and water in proportions 4:2:1. Mix the dough. Roll out the layer 1 cm thick and cut out any shape using a cookie cutter. You can cut it out with a knife using a paper pattern.
Now you need to place the figurine in a warm place for 24 hours. After drying, the figurine can be painted with gouache or acrylic paints and varnished.
The magnet itself needs to be glued on the reverse side with good glue, for example, “liquid nails”.
Instead of cutting out figures from salt dough, you can mold them. Kitchen themes are especially popular: dishes, food, delicacies, fruits, berries. After painting, such sushi or cakes look very natural.Method four: magnet in a bag
If you're worried about scratches on your refrigerator, you can easily prevent them by making a fabric magnet. A simple manufacturing technique will allow you to change the so-called pouch whenever you want.
All you need for this little masterpiece is:
- magnets;
- colored rags;
- threads;
- needle;
- scissors.
First you need to create blanks for magnets from a flap. The size of the workpieces should be approximately 3 times the size of the magnet. The edge of the fabric must be folded and stitched so that the stitches lie as close to each other as possible. As a result, you got a bag like this. Place a magnet inside, tighten the thread, tie it and cut it.
You can put a little cotton wool or foam rubber between the magnet and the fabric on the front side. Then the product will gain volume.
DIY making
Some people bring magnets from their travels, many collect refrigerator souvenirs given by friends, and some create refrigerator decorations themselves. Making them is quite simple, just purchase the necessary materials, get inspired by ideas and start creating.
You can create ordinary compositions from artificial flowers or plant a living plant in a small homemade pot. Those who are especially skilled will be able to mold a whole set of kitchen magnets from polymer clay.
Method six: oh, this is amazing Lego
To make a bright, colorful and functional souvenir, select your favorite parts from the construction set, prepare the required number of magnets and a hot glue gun.
The creation process is simple: you need to glue the part to a magnet. However, it is worth considering 2 important factors:
- DO NOT use magnetic tape. She is weak to hold the cube. Such a magnet will not last long.
- Hot melt glue can be replaced with super glue.
Legal and accounting assistance for your business- The magic of photographs.
- Unusual and successful table setting using a table setting
It should be said that this product must dry for at least 24 hours. Such a bright magnet can be used not only by adults, but also by children.
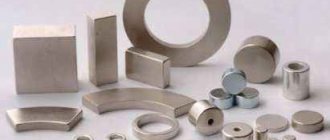
Production of sunset magnets
The main difference that sunset magnets have is the iron base. The manufacturing technology for magnets of this sample is as follows:
- Purchase of a specialized machine. It is a not very large press with which you can roll the edges of iron blanks.
- Printing elements must be available - images, bases, magnetic vinyl and inner insert.
Making sunset magnets also has its downsides. The disadvantages include the high cost and the not very wide range of types and shapes of the magnets that were manufactured.
Positive features include the ability to produce fairly large quantities of goods in a very short period of time and the ease of organizing a business idea. In addition, using the machine you can make not only magnets, but also badges.
Method seven: they also chip
To create a magnet that will not only magnetize, but that can also be pinned, you need:
- magnetic tape;
- wooden clothespins;
- acrylic paint;
- thin brush;
- sparkles.
Now that you have everything ready, get to work. First, decorate the clothespin. Secondly, you can simply paint it. Thirdly, glue the tape on the other side. Everything ingenious is simple!
You can also buy souvenirs in the online store https://www.tex-tile.ru/8march_souvenirs/
Souvenir magnets - how to make them and who to sell them to
It’s not difficult to make flat souvenir magnets; you just need to choose the right direction of activity so that there are no problems with the sale of products:
- There are a lot of holidays in the year when you want to please your loved ones and friends with some inexpensive souvenir: New Year, Christmas, Valentine's Day, Defender of the Fatherland Day, March 8, Easter, etc. Magnets with original wishes, heart magnets, calendar magnets, sets of magnets for the holidays - there are just a ton of different ideas!
- Sets of vinyl magnets for decorating wedding cars. Hearts with rings, swans, flowers, wishes of love and happiness, etc. - stylish accessories for a wedding, which can be played in a lottery at the celebration or simply given to guests.
- Magnetic games and/or magnetic puzzles. It’s a good idea to keep the child busy so that he doesn’t interfere while mom is preparing lunch or dinner, and at the same time he’s nearby.
- Educational magnets.
- Magnetic bookmarks for books. You can make entire thematic sets of bookmarks that will become an original gift for people who love to spend time reading.
- Magnetic boards on which you can leave messages to each other without fear that the recipient will not notice it.
- Advertising magnets. These products can be made for various companies to advertise their products. If you can come up with an original idea and develop a good design, you will not lack clients.
Photo of refrigerator magnets
Cold steel weapons of Germany for connoisseurs and collectors- The journey through Crimea continues. And so far no accidents.
- Finding inspiration by the sea in a minibus
Rental of premises and personnel
There are several different technologies for producing magnets, which differ in their complexity. The simplest products can be made with your own hands right at home. For other magnets, you will need a garage or a small room where you should install a machine and a special printer.
Hired employees, as well as a separate premises, are required only for complex production or large volumes of products. Of course, if you produce hundreds and thousands of magnets daily, then you will need several workers, a loader or driver, an accountant and a sales manager. Otherwise, all these functions can be performed by the entrepreneur himself.
Financial calculations
An enterprise for the production of magnets or products made from them can have a variety of sizes. When producing souvenir and advertising magnetic products, the most profitable will not be home production, but at least a minimum-sized workshop, organized in accordance with all the rules of doing business and producing about 20,000 products per month. A small plant for the production of permanent magnets can produce an average of 1000 kg of products monthly. As an example of financial calculations, we consider such an enterprise for the production of neodymium magnets.
Starting investments
To organize a business, you will need special equipment, the cost of which will make up the bulk of the initial investment.
The production of neodymium magnets requires the purchase of the following equipment:
| Name | Cost, rubles |
| Induction oven | 110500 |
| Ball chopper | 19500 |
| Linear/isostatic press | 325000 |
| Sintering furnace | 35000 |
| Grinding machine | 30000 |
| Annealing furnace | 25000 |
| Induction unit | 55000 |
| Coating Device | 100000 |
| Total | 700000 |
To produce magnetic products you will need:
| Name | Cost, rubles |
| Laptop | 20000 |
| Inkjet photo printer | 30000 |
| Vinyl cutting machine | 30000 |
| Magnet rolling machine | 12000 |
| Laminator | 25000 |
| Laser engraver | 15000 |
| Metal detector | 25000 |
| Total | 157000 |
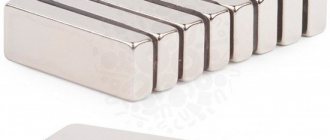
The next cost item is the purchase of raw materials and supplies. To produce 1000 kg of neodymium magnets, 1450 kg of NdFeB powder is required, the wholesale cost of which is 400,000 rubles.
The monthly requirement for consumables for magnetic products will be as follows:
| Name | Unit price, rubles | Quantity | Total cost, rubles |
| Color cartridge | 3000 | 1 | 3000 |
| Photo paper, sheet A4 | 10 | 50 | 500 |
| Vinyl magnetic tape, 30 m roll, 0.6 m wide | 5000 | 1 | 5000 |
| Lamination film, sheet A4, thickness 125 microns | 5 | 100 | 500 |
| Wood (plywood), sheet 1 sq. m. | 500 | 10 | 5000 |
| Disc-shaped magnets CMD-02 Mr.Painter ferrite | 10 | 300 | 3000 |
| Consumables (varnish, glue) | 1000 | ||
| Total | 18000 |
The total costs of starting a business will be:
| Cost item | Amount, rubles | |
| Magnets | Magnetic products | |
| Preparing the premises: warehouse and office equipment rent for the duration of the work | 200000 100000 100000 | 40000 10000 30000 |
| Equipment purchase | 700000 | 157000 |
| Purchase of a month's supply of raw materials | 400000 | 18000 |
| Advertising and marketing campaign | 50000 | 10000 |
| Unexpected expenses | 50000 | 20000 |
| Total | 1400000 | 245000 |
Monthly expenses
The production of magnets requires large monthly investments. In addition to purchasing raw materials, it will be necessary to spend considerable sums on labor costs. For the specified staffing table, the payroll will be:
| Job title | Salary, rubles | Number of units | Payroll, rubles |
| Director | 40000 | 1 | 40000 |
| Chief technologist | 35000 | 1 | 35000 |
| Purchasing Manager | 30000 | 1 | 30000 |
| Sales manager | 30000 | 1 | 30000 |
| Accountant | 35000 | 1 | 35000 |
| Line operator | 35000 | 4 | 140000 |
| Helper workers | 20000 | 2 | 40000 |
| Total | 350000 |
The production of magnetic products has low operating costs. When hiring three employees and provided that the entrepreneur takes over the functions of the manager, the wage fund will be:
| Job title | Salary, rubles | Number of units | Payroll, rubles |
| Accountant | 40000 | 0,5 | 20000 |
| Specialist | 25000 | 1 | 25000 |
| Manager | 25000 | 1 | 25000 |
| Total | 70000 |
In general, monthly expenses for both types of businesses will be:
| Cost item | Amount, rubles | |
| Permanent magnets | Magnetic products | |
| Rental of premises | 100000 | 30000 |
| Purchase of a month's supply of raw materials | 400000 | 18000 |
| Payroll | 350000 | 70000 |
| Advertising and marketing campaign | 20000 | 2000 |
| Unexpected expenses | 30000 | 10000 |
| Total | 900000 | 130000 |
Planned profit
Using the specified equipment and the amount of raw materials, it will be possible to produce 1000 kg of magnets or 20,000 magnetic products per month. The calculation of financial results will be as follows:
| Index | Value, rubles | |
| Permanent magnets, 1000 kg/month | Magnetic products, 20,000 pieces/month | |
| Average selling price of 1 unit | 2000 | 20 |
| Revenue for the month | 2000000 | 400000 |
| Profit before tax | 1100000 | 270000 |
| Tax (USN, 6% of income) | 66000 | 24000 |
| Net profit | 1034000 | 246000 |
Based on the indicated performance indicators, the invested funds in both options for doing business will conditionally pay off in 1–2 months of full-time work. But if we take into account that any enterprise will reach the full volume of production and sales of its products in six months at best, then the payback period will be approximately 7–8 months.
The main condition for successful work is reliable sales channels. Therefore, it is necessary to engage in an advertising campaign and establish cooperation with potential buyers at the stage of organizing a business. Then it will be truly profitable and promising.
Master class No. 9
Let us remind you that magnets can be placed on any metal surface - be it a refrigerator, a gas water heater, or simply a magnetic board hung on the wall. In addition, the magnet caps of this lesson and those given above can be changed - for example, you can select pictures that correspond to the theme of the New Year, Easter or your family holiday.
You will need:
- glass bottle caps;
- pictures (use the ones we offer or choose and print your own);
- transparent glue;
- white spray paint;
1: Wash and dry the lids, paint them white and leave to dry. Print and cut out the pictures (You can use the pictures we suggested or find any other images on the Internet). Apply glue to the lids and glue the pictures, apply another layer of transparent glue on top.
2: Insert and glue magnets on the back of the covers.
Tip: if the magnets you have are too thin and “sink” into the lid, then you can place a piece of cardboard under the magnet.
Ready:
Equipment
To produce the most cost-effective vinyl magnets, it is enough to have:
- PC with a graphic editor for creating and processing images;
- special printer;
- cutter (for cutting finished products);
- laminator
There is a wide variety of domestic, Chinese and Japanese-made equipment on the market. Prices for machines range from 13 thousand to 1 million rubles, but the best options can be purchased for about 30 thousand.