SHARE ON SOCIAL NETWORKS
FacebookTwitterOkGoogle+PinterestVk
Do-it-yourself cold forging is a method of forming metal products under pressure. This method consists in the fact that the metal is not heated before deformation, but is bent using special machines. Forged patterns will decorate garden fences, stair railings, windows or entrance doors. Simplicity and low cost will allow anyone to quickly master the process and independently bring their ideas to life.
Using the cold forging method you can create incredibly beautiful products
Products: gates, benches and others
Cold forging technology is ideally suited for the production of large-scale products , i.e. differing in medium and large sizes. This is due to the fact that it takes a blacksmith a lot of time , which ultimately negatively affects the final cost of the item .
To work with metal using cold technology, equipment is used that reduces labor costs and saves time , which guarantees affordable solutions. Thus, the cold forging method most often produces:
- gates, fences and gates;
Transparent fence, cold forging. Photo Integral
- fencing;
Wrought iron lawn fencing. Company Favorit
- awnings and canopies;
- porch;
- benches and benches;
- stairs and other products.
Basic patterns
Since iron can change shape during heat and physical treatment, there are various examples of forged patterns. All of them can be divided into three main groups:
Undoubtedly, the most popular of them are floral forged ornaments. The artful interweaving of branches, flowers and leaves has always inspired artists to create fantastic works. Blacksmiths are no exception in this series. They also often use plant motifs in their work.
For cold working, metal rods are most often used as the main material. They are bent, twisted, flattened, minted, milled and forged. The end result is magnificent works. Here are the main elements and techniques for this type of metal work:
- Curls. The most popular element. It has a huge number of different options and modifications.
- Spirals. Single, double, spatial and others. This is also a very popular technique that makes patterns for forged products memorable and original.
- Cool. Twisting iron bars can be the most incredible experience. The imagination of some authors is amazing.
- Top. A decorative insert or special atypical treatment of the ends of the rods can greatly diversify and decorate any ornament.
- Coinage. The use of chisels and hammers for decorative inserts in forging patterns is a long-proven and often used way to add creativity to a future creation.
- Headings. Cylindrical, cone-shaped, spherical elements made of rolled metal, attached to the end of a rod.
These are not all the techniques in the arsenal of a good master. By skillfully combining them, craftsmen create real masterpieces from ordinary iron.
Elements
Cold forging also produces elements of various shapes and sizes. Often, to manufacture or decorate a metal object, a large number of identical parts . In such cases, the cold method is the best solution.
Overlay, stamping. Photo ArtMetal
The workpieces are given the desired shape through bending and pressing . Such decorative elements, called stamped ones, are characterized by low cost and standard design . However, with their help it is possible to assemble (weld) interesting compositions that perfectly complement various products.
What can you do yourself?
Many believe that it is impossible to create a high-quality forged product with your own hands, others believe that there is nothing particularly difficult in blacksmithing, since our ancestors were successfully engaged in it in ancient times. Both of them are wrong. In order to forge even a small element yourself, you need not only tools and skills, but also knowledge of the properties of metals. Hot forging is hard work in conditions that are very far from office conditions. What to do?
If you don’t want to build a forge and master the technology of blacksmithing, you can limit yourself to an analogue of artistic forging. We will create a welded structure from metal profiles and rolled metal, which can be decorated with ready-made artistic forging parts. For this we will need: a source of electricity; a flat surface for assembling the product; grinder with metal brushes, cleaning and cutting wheels; non-stretch rope, marker; hammer, two pins; welding machine with mask, gloves and electrodes.
Even without a forge, you can eventually learn how to make real masterpieces
We will use metal profiles and rolled metal as materials. It is better to take the latter with a smaller cross-section, since then we can bend it without resorting to special heating conditions.
- Select a drawing. Do not complicate the sketch that you will have to draw, because this is your first product and metal is not a particularly plastic material.
- We buy metal. It should be assumed that the length of a standard rod is six meters. You need to calculate your need for metal and take it with a small reserve.
- Treatment. It is better to immediately clean the delivered material from rust. Then it will be more difficult to do this. To do this, we use a metal brush placed on the grinder.
- Frame assembly. On a flat surface (building berth, workbench, table) we make a frame for the product. Its dimensions are taken into account based on external surfaces. Each of the 4 corners of the frame will have a weld. To prevent the frame from warping, we first grab one of the sides. It doesn’t matter which one comes first. Apply a few drops of welding agent to the upper and lower corners, and then level the diagonal by tapping on the unwelded corners. Then we weld the two remaining corners.
- Measurements. We apply the future drawing on a scale of 1:1 to the surface (table, chipboard, asphalt). To measure its elements we take a rope. We apply the rope to the elements of the drawing, as if to a stencil. This is how we find out the length of the segments into which we cut the rods.
- Deformation. To deform the workpieces, you need to create a device: on a flat surface, weld two studs 2-3 cm from each other. Using them and a hammer, we gradually bend the rods, constantly comparing the result with the stencil.
- Assembly and welding. We lay out the elements on the stencil, assembling the design and trimming the excess. Carefully weld the product on one side and then on the other.
- Cleaning. We clear out everything unnecessary.
- Finished parts. We buy ready-made forging elements that will serve as decoration for the base. We weld them to the places intended for them, and clean the welding points.
- Primer and painting. White primer is used so that imperfections can be seen when painting. The properties of the paint should be compatible with the primer.
- Chic and shine. Special aging or gilding will add attractiveness to the product.
The resulting product will differ little in appearance from a forged one, and with certain skills that are developed with experience, you can learn to create real masterpieces.
Equipment
To process metal workpieces, equipment of various technical characteristics, as well as tools and devices, is used.
The most popular among craftsmen are manual machines for cold forging: snail, twister, wave, globe, bend . Each of these mechanisms is designed for the manufacture of certain elements and bending of workpieces with a cross-section of specific shapes. For example, a device for forging profile pipes is especially in demand among performers, since the frame of many products and structures is made from this material.
Snail-type machine PROMA, Photo VseInstrumenty.ru
The machines do not have a complex structure, so such devices are often assembled independently. Depending on the needs, the performer produces with his own hands a snail for curls, a torsion bar for twisting strips and rods, a globe for bending volumetric parts, etc.
Machines with electric drives are characterized by greater productivity, which makes it possible to produce a fairly significant number of elements. Therefore, such devices are used in production in small companies . Electric machines are also often assembled by hand.
Globe (volumetric) machine for cold forging. Photo ForgingPRO
However, not all craftsmen have the free time necessary to independently produce machines. Some performers do not have enough knowledge to assemble devices with their own hands. In such cases, it is better to purchase a factory-made mechanism: with manual or automatic control, a snail or other machines.
Universal equipment has an even greater degree of automation - units with manual (lever) control or installations supplemented by a control panel.
Universal forging machine Blacksmith UNV2. Photo VseInstruments.ru
Tools and devices, among which conductors are especially in demand, are hand-held objects and mechanisms, respectively, which in most cases are produced independently.
The availability of equipment, tools and devices allows you to produce cold forging products with your own hands, without turning to specialists for help.
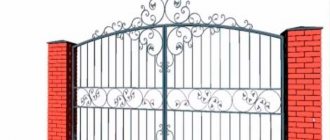
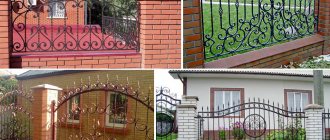
Ornament on gates made of metal profiles
Patterns on metal gates, made from rolled sheets and iron rods, look original and strengthen the gates. Such ornaments increase the inaccessibility of the fence.
Corrugated sheet construction
The openwork ornament installed above and below the metal profile creates the illusion of airiness of the heavy metal structure. Elements of a contrasting tone against a background of colored fabric add volume and an aesthetic appearance. You can decorate the entrance to the site entirely or partially with your own hands. Artistic forging is mainly used:
Patterns on metal profile doors
For land owners who do not have a forging workshop, stores sell ready-made decoration elements. First, you should familiarize yourself with their assortment, and then draw up a life-size drawing of the ornament. After which you need to divide everything into simple elements and perform each one twice, if the gate is swinging and there are two leaves.
Read also: Metal with the highest density
The pattern is laid out and welded on the ground, then attached to the canvas or to the frame. When decorating with metal ornaments, the age of the gate does not matter.
The photo shows a metal entrance group.
Decorative embossed sheet metal decoration
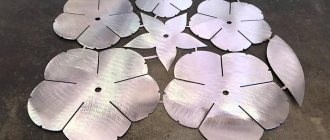
Decorating with forged elements made of sheet metal allows you to create three-dimensional images and even paintings. Beginners are recommended to assemble a pattern from simple elements.
For example, make a border around the perimeter of small flowers, leaves and curved stems. The petals are formed in a special die and made by embossing. The elements are connected to each other by welding and attached to the leaf panel.
Using three-dimensional forging from sheets, specialists create entire paintings that depict:
Forged patterns and embossing
Painted in golden or silver on a dark background, forged designs turn the area into a fairy tale and give the fence a luxurious look.
Photos of patterns on metal gates demonstrate the unlimited number of options and beauty of the entrance to the yard.
Leaf ornaments
A thin sheet 0.8–1 mm thick turns into an ornament in skillful hands. Small fragments of the pattern are attached in the area of loops and locks, strengthening the panel. Two-color designs create a beautiful look. The background is the gate material. The image is cut out from the sheet.
Sheet metal and forging patterns
A design is applied to thin metal, the dimensions of which coincide with the gate leaves. The holes must have a closed contour. Then everything is cut out and cleaned with a grinder and other tools. The finished decoration, made by yourself, is attached to the frame of the doors by welding or bolts.
The topic can be anything. The gates look original, decorated with trees, fantastic plants, and complex patterns. Drawings made from sheets that protrude beyond the metal profile at the top look especially unforgettable.
They make an openwork arch and a simply airy, original finish. The number of small elements depends on the owner’s ability to work with metal. The less experience the performer has, the larger the holes and the larger the radius of the part.
Gate compositions that include volumetric elements make them unforgettable.
For example, the crown of a tree, assembled from individual leaves, slightly curved near the stem. Purchased flowers and buds are suitable. The main thing is to place them correctly on the finished canvas.
The photo below shows metal doors on a summer cottage.
Metal doors with patterns
You can cut out an ornament from the strips and decorate with it individual parts of the doors, for example the bottom, or create vertical patterns on metal gates with your own hands. Located along the edge of a thin metal sheet, they will strengthen it around the perimeter.
Cold forging patterns
Forged gates are durable and beautiful. Rolled lace seems airy and light. Disadvantages of such gates:
- heavy weight;
- high price;
- transparency.
Metal doors
To prevent curious passers-by from looking into the yard, a background made of polycarbonate, plastic or metal profile is installed behind the forged ornament.
Patterns created from rods using artistic forging will decorate gates and the entire metal fence. Fragments that partially cover the canvas will reduce the cost of the fence while increasing strength.
Options for partial and complete decoration of gates can be seen in the photo below.
On metal gates in a rustic and historical style, hinges with decorative plates are appropriate. Large, with curls and rivets, they will strengthen the canvas in weak places and create an antique look.
Sketches of metal sections for DIY production
Read also: Do-it-yourself blade for a walk-behind tractor, photo drawings
The doors look original with openwork at the bottom and top. A solid metal sheet, cut into shapes, complements the composition, while simultaneously shielding the house and yard from the curious. Separate elements are located against the background of the metal profile. The ornament outside the background demonstrates its openwork.
Metal fence with polycarbonate
The luxurious image of the gate is created from three-dimensional ornaments painted in different tones. The main interweaving of black vines and golden flowers will not leave anyone passing by indifferent. Photography is not able to convey the volume and play of shapes of such patterns, their charm.
In addition to the contrast of colors, the play of shadows from the relief elements of the decor is very organic.
Sketch for making sashes with your own hands
Not only a blacksmith can create fairy-tale gates by decorating them with ornaments from forged fragments. It is enough to buy all the necessary elements. The parts, laid out in the drawing in full size, are welded at the points of contact. After cleaning and painting, the ornament is attached to the canvas or sash frame.
The photo shows a metal structure with patterns.
At the summer cottage
Where to buy, order
Cold forging products made by professionals are of higher quality and reliability. You can purchase a finished item from employees of companies present in the “Where to buy or order forged products” section. Specialists offer various design solutions for interior, building architecture and landscape.
Buyers of companies that are presented in the “Where to buy forged elements” section are most in demand for stamped leaves, volutes, curls, overlays and other parts.
Types of artistic metal forging
To carry out artistic forging, the material of the part must be taken into account. The type of forging depends on this, which can be:
- Hot.
- Cold.
Hot method
Elements of artistic forging with complex patterns require pre-heating of the material in order to obtain a certain level of plasticity.
Low-carbon steels are heated to temperatures of 1000-1150 degrees. If the metal contains a large amount of carbon, then forging is carried out at a lower temperature. Usually it is in the range of 800-900 degrees.
Features of cold forging
Cold forging elements, which can be purchased in specialized stores, are manufactured in several ways:
- The operation is performed without heating, cold.
- The part heats up to 200-250 degrees.
The main advantage of cold forged parts is the high accuracy of the finished product. There is no scale on the surface of such forged parts. Cold forging makes it possible to produce relief elements using sheet blanks. This technique is used for processing non-ferrous metals.
To obtain an artistic composition, the finished elements must be combined. With conventional welding, the result is an unsightly appearance, the seam has reduced strength, and the parts have to be cleaned. Professionals use forge welding to connect parts.
The finished elements are heated to a temperature of 650-700 degrees, at which the metal becomes plastic. The ornament is then crimped during assembly.
Cold metal working concept
The cold process mainly processes rolled metal in the form of rods, squares, circles, strips or sheets.
Special devices and tools are used for production, and they are often highly specialized and not suitable for work in other areas.
Heating blanks to forging temperature is not provided for by technology, which uses one of the main properties of metal - plasticity. Heating is only possible partially in places where some products are bent (for example, when the metal of the starting material is too thick).
Cold forging of metal is used for the manufacture of grilles, fences, gates, wickets (and individual elements of their decorations), furniture frames and various decorative details.
Moreover, during the production of these products, the metal can be pressed and bent, which makes the product even stronger than with hot forging, since the properties of the metal do not change, and the crystal lattice, on the contrary, is strengthened due to compression.
Cold forging at home is quite simple, but at the same time, it is a complex technological process that requires experience. What do you need to know about such metalworking, and also what is required to manufacture products without heating the materials?
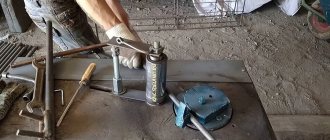
Equipping a torsion bar cold forging machine with an electric drive
In order to increase not only the efficiency of work on a cold forging unit, twisting rods into a helical wave, but also to increase the speed, as well as ensure stability and not be subject to overfatigue, you can install an electric type drive.
Working by hand, it is quite difficult to make all the decorative elements made of metal rods the same, since the uniformity of the rotational moment in such a situation will vary greatly. In order to avoid errors in the manufacture of products, you can use:
- axle shaft from the car, which is installed on the drive axle;
- you will also need a differential gear pair;
- For protection it is worth using a casing.
From the listed devices you can build an electric drive for a torsion bar machine. It is better for such an engine not to exceed power ratings of 900 rpm and 3 kW.
Assembling the device
This version of the machine is used as an example because of its simplicity. Knowing the basic principles and sequence of equipment design, you can upgrade it at will. To assemble all parts of the equipment into a single whole, you will need to use:
- drill with carbide type drills;
- welding machine;
- a saw cutting metal or a hacksaw;
- metal sheet of the selected size;
- round metal pipe;
- metal rod;
- bearings of different sizes;
- bolts size M8.
To assemble a cold forging machine with your own hands, you need to use a proven sequence of actions:
- Initially, you need to assemble a stand that will serve as a support. To do this, all its components (pipe sections of the same size and the joints between them at the top and bottom edges) must be connected into a single whole. The design may resemble a stool in appearance. The connection is made using a welding machine, and the sections are cut with a saw.
- The next step is cutting the metal sheets. You should get circles of equal diameters and four triangles with equal sides. Triangular-shaped elements must be welded to the bottom of the connected pipe structure in such a way that something similar to a pyramid is formed. The base, which has a wider area, must be welded at the central point of the cut circle.
- Four strips that are located horizontally must be attached to a circle with an already welded element. This should be done using bolts; for this you will need a drill to make the holes.
- The next step is the construction of the handle. To do this you need to use two rods of different lengths. Their sizes can be determined by correlating them with the diameter of the circle. One rod should be commensurate with the diameter, the other should slightly exceed its size. When bending the first rod, you should maintain an angle of 30 degrees. Then weld both rods to each other, and then weld another rod into the lower part. There should also be a jumper between the first two sections, to which a lever is attached by welding, which should maintain the direction towards the structure made of rods.
A bearing for future directional variability in the device must be attached to the end of the attached lever, as well as to the segment located at the bottom of the structure. The upper section serves as a mount for a metal coil, which must be installed horizontally - it makes it possible to bend the metal. On the lower side of the segment, where there is a free end, a hole should be made equal in diameter to the size of the pipe section.
The last step in the algorithm of actions when constructing a machine for cold forging with your own hands will be the connection of the designed handle with a part of the device similar to a “pyramid”. These elements are fixed after putting on the handle with a wide-diameter nut, to which it is first necessary to weld a metal circle, which will allow the template itself to be attached to the machine. Next, the “snail” template is attached by welding.
Conclusion
Anyone who decides to take up forging seriously and make a cold forging machine with their own hands should be very scrupulous at the stage of creating drawings and calculations. Otherwise, the creation process is quite simple, and once you understand the principle of equipment design, you can come up with various variations of it that will help improve the product.