What is a miter saw?
A crosscut saw is a mechanism with a cutting disc designed for sawing wood and composite materials at right or other required angles.
Designed to work on a flat surface. Allowed to be moved and installed in a temporarily equipped workplace. Their appearance resembles machines for cutting pipes, fittings, and stone. There are several types of miter saws:
Pendulum - a horizontal frame with a turning circle. A lever (pendulum) is attached to the reverse side of the circle, which is where it got its name. The saw blade is mounted on this lever. The workpieces are fed along the guide bar. To make a cut, a lever with a rotating disk is recessed into the board.
Combined - everything is the same. Thanks to the hinges, the ability to rotate the lever relative to the horizontal plane has been added.
With horizontal stroke. It resembles a pendulum saw, but allows you to cut wider parts by moving the mechanism with a rotating disk along the runners back and forth.
As an addition to all trims included:
- dust bag;
- laser illumination;
- pipe for connecting a vacuum cleaner.
Engine Installation
To make a homemade circular saw, you need to think in advance about what device will be used to transfer the force from the motor to the cutting disc. Small equipment can be placed directly on the engine axis. However, this will not have the best effect on the power of the circular machine
made with your own hands.
An ordinary bicycle spindle can act as such a transmission mechanism, without which the operation of any circular saw is impossible. This is often called the housing in which the shaft with bearings is located. To cut it off the bike, you can use a hacksaw. In this case, you will not need the sprocket, since in this case it is best to take it from the D6 or D8 engine. In order for this sprocket to fit securely on the new shaft, you will need to make an adapter sleeve. Before you install the circular saw on your bicycle spindle, you need to make sure that it has the size of the mounting hole you need. Now, taking this information into account, it is necessary to establish the outer diameter of the bushing intended for the transition mechanism. The bushing should be attached to the spindle in several places at once. Next, a plate with a thickness of at least 5 mm should be secured to the spindle assembly body.
Now take an asterisk, approximately 2-2.5 times larger in size than the one that was previously installed on the spindle, and install it on a homemade circular saw. And at the end of making a saw with your own hands, when all its parts are well secured, put on the chain and you can use it for its intended purpose.
READ How to Use a Makita Screwdriver
How to select capacitors for a three-phase motor using it in a 220V network.
The first thing you need to know is that the capacitors must be non-polar, that is, not electrolytic. It is best to use containers of the brand ― MBGO. They were successfully used in the USSR and in our time. They perfectly withstand voltage, current surges and the damaging effects of the environment.
They also have mounting eyes that help you easily place them at any point on the device’s body. Unfortunately, getting them now is problematic, but there are many other modern capacitors that are no worse than the first ones. The main thing is that, as mentioned above, their operating voltage is not less than 400V.
Calculation of capacitors. Working capacitor capacity.
In order not to resort to long formulas and torture your brain, there is a simple way to calculate a capacitor for a 380V motor. For every 100 W (0.1 kW) 7 µF is taken. For example, if the motor is 1 kW, then we calculate it like this: 7 10 = 70 µF. It is extremely difficult to find such a capacity in one jar, and it is also expensive. Therefore, most often the containers are connected in parallel, gaining the required capacity.
Starting capacitor capacity.
This value is taken at the rate of 2-3 times greater than the capacity of the working capacitor. It should be taken into account that this capacity is taken in total with the working capacity, that is, for a 1 kW motor, the working capacity is equal to 70 μF, multiply it by 2 or 3, and get the required value. This is 70-140 µF of additional capacitance - starting. At the moment of switching on, it is connected to the working one and the total is 140-210 µF.
Large homemade circular saw
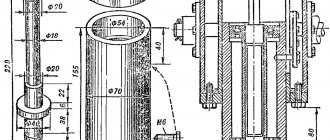
When making a frame for the top of the saw, it is best to use a metal corner 25 mm wide. In this case, the rectangle, which will represent the frame of the upper part of the homemade circular, should have dimensions of 600x400 mm. Next, four pipes are welded in the corners of this quadrangle, the diameter of which should be 17 mm and the height should be approximately 2.2 m.
After this, it is necessary to strengthen two corners on the frame, on which the bearings will later be fixed. The distance between these corners directly depends on the length of the shaft. To fix bearings, as a rule, clamps are used. It is best if the bearings installed on a homemade circular are closed. This way you won’t have to worry about wood chips getting into the space between the balls, rings and separator. Don't forget to also cut a thread at the very end of the shaft so that you can install a cutting blade on it later.
Circular saw device.
The lower part of the circular saw should be made much more massive, which will provide it with the necessary stability and reliability. Therefore, when making the lower frame, you need to take a corner with a width of at least 40 mm. Next, across the frame it is necessary to secure two additional corners, which will later support the motor of the homemade circular saw. The most suitable motor for a DIY circular saw is an asynchronous three-phase motor with a power of at least 1.5 kW and 1500 rpm. The pulley groove should be quite large, approximately 80 mm, and it should be mounted directly on the shaft itself. In addition, you will need to weld a fairly small metal platform to the frame on which the starting device will be placed. Large pipes 2.2 m long, which you previously welded in the corners of the frame, are necessary for high-quality tension of the belt so that the metal wings press the thin pipes.
Electric motor for circular saw 220V 4kW 3000rpm.
Measuring with a mechanical tachometer requires direct contact with the surface of the object.
Now you need to insert both the lower and upper parts of the homemade saw into the finished supports made of pipes, and then tighten and tighten the belt with metal wings. You can start the motor in this model of circular machine yourself using starting capacitors. In order to additionally load the motor and increase its torque, you can use a 220/36,400 W transformer.
How to connect an electric motor from 380 to 220V without a capacitor?
As noted above, to start an electric motor with a squirrel-cage rotor from a single-phase network, a capacitor is most often used.
It is this that ensures the device starts at the first moment after the single-phase current is supplied. In this case, the capacity of the starting device should be three times higher than the same parameter for the working capacity.
For motors with a power of up to 3 kilowatts and used at home, the price of starting capacitors is high and sometimes comparable to the cost of the motor itself.
POPULAR WITH READERS: Phase and voltage control relay - what it is intended for, device and principle of operation
Consequently, many are increasingly avoiding containers used only at the moment of start-up.
The situation is different with working capacitors, the use of which allows you to load the motor at 80-85 percent of its power. If they are absent, the power indicator may drop to 50 percent.
However, capacitorless starting of a 3-phase motor from a single-phase network is possible thanks to the use of bidirectional switches that operate for short periods of time.
The required torque is provided by the displacement of phase currents in the windings of the IM.
Today, two schemes are popular, suitable for motors with power up to 2.2 kW.
It is interesting that the start-up time of the IM from a single-phase network is not much lower than in the usual mode.
The main elements of the circuit are triacs and symmetrical dinistors. The first are controlled by multi-polar pulses, and the second by signals coming from the half-cycle of the supply voltage.
Suitable for 380 Volt electric motors up to 1,500 rpm with delta windings.
The RC circuit acts as a phase-shifting device. By changing the resistance R2, it is possible to achieve a voltage across the capacitor that is shifted by a certain angle (relative to the household network voltage).
The main task is performed by the symmetrical dinistor VS2, which at a certain point in time connects a charged capacitance to the triac and activates this switch.
Suitable for electric motors with a rotation speed of up to 3000 rpm and for motors with increased resistance at start-up.
Such motors require more starting current, so an open star circuit is more relevant.
Feature - the use of two electronic switches replacing phase-shifting capacitors
During the adjustment process, it is important to ensure the required shift angle in the phase windings
This is done as follows:
- Voltage is supplied to the electric motor through a manual starter (it must be connected in advance).
- After pressing the button, you need to select the starting moment using resistor R
When implementing the considered schemes, it is worth considering a number of features:
- For the experiment, radiatorless triacs (types TS-2-25 and TS-2-10) were used, which showed excellent results. If you use triacs on a plastic case (imported), you cannot do without radiators.
- A symmetrical DB3 type dinistor can be replaced with a KP. Despite the fact that the KP1125 is made in Russia, it is reliable and has a lower switching voltage. The main drawback is the scarcity of this dinistor.
POPULAR WITH READERS: Is it worth buying an induction cooker, advantages and disadvantages
Source
Pendulum circular saw with electric motor
Scheme for testing the functionality of a circular saw.
You can make a homemade circular saw quite easily to cut logs and pieces of wood, the thickness of which corresponds to the strength of the electric drive installed on it. If you intend to work with large and very thick pieces of wood, then you should equip your homemade saw with a truly powerful electric motor, as well as install a shaft and belt drive on it. The best solution in this case would be to install a special pendulum frame.
When making a pendulum circular with your own hands, only very strong steel corners should be used as the material for the frame. Next, on the finished steel frame you will need to place all the mechanisms necessary for the normal operation of a homemade circular saw. With this design, you can personally set the flight altitude of the cutting blade without any special effort, while avoiding excessive design difficulties.
What is a circular saw for?
Before starting work, it is necessary to determine the main tasks of the sawing machine. If you just need to cut firewood for the winter, or do basic carpentry work like making a fence, a strong table with a slot for a saw blade is enough. These options are popular in rural areas.
Circular for working with logs
Some of these “models” have a shaft for securing the knives of a plane or jointer. As a rule, a frame is welded from a corner or channel, an electric motor from discarded factory ventilation is mounted on it, and with the help of a pulley the torque is transmitted to the disk. It makes no sense to describe in detail the manufacturing technology of such a machine.
It's another matter if you want to do carpentry work. In this case, you need a coordinate table with guides that are fixed at different angles.
Since such a stationary saw can work with small-sized workpieces, it is necessary to take care of the operator’s safety. It is advisable to provide adjustment of the rotation speed and the ability to easily change disks with different diameters.
Circular on the motor from the washing machine
You won't miss in an accident
Assembly instructions
Using the washing machine engine, you can assemble a circular machine not just “for beauty”. Such a device will be useful for installation, sawing or construction work. For example, using a circular saw you can easily unravel a 10*10 block. Isn't this an indicator?
How to connect the motor?
Connecting the motor is the main stage in building a circular saw.
If you fail to connect the motor from the washing machine correctly, the device simply will not work.
The difficulty is not in connecting the engine, but in ensuring stable speed control.
As already written above, without this the saw will simply tear the material. To ensure regulation, you can use a voltage regulator instead of a tachometer, which is equipped with washing machine motors.
When connecting, some masters get confused, since the commutator motors that are installed on automatic machines have several outputs at once. Therefore, it is not clear how to make the connection.
The connection occurs as follows:
- First, the motor must be cranked several times in order to find the excitation coil or shoes. There should be 2 or more wires coming from them.
- Using an ohmmeter set to minimum resistance, we ring each output in turn. Here you need to find two with the highest resistance out of all the available outputs. This is the case if there are more than two wires.
- After this, you need to find the motor commutator and brushes, from which there should also be two wires.
- After this, you need to find the tachometer outputs. Often these wires can be found directly on the housing. If they are not there, then they are hidden in the housing, then you will have to disassemble the engine a little.
- Now you need to take one wire from the collector and connect the wire from the coil to it.
- The other collector wire must be connected to a 220 V network.
If necessary, you can change the direction of rotation by simply swapping the wires. We do a test run, having previously marked the wires of the coil and tachometer.
If the engine starts without problems, then everything was done correctly. Separately, you can consider the process of connecting the engine using a speed controller:
- We connect one of the coil wires to one of the armature wires.
- We connect the other one to the network.
- We connect the second armature wire to the dimmer.
- We connect the other output of the dimmer to the network.
- Let's try to start the engine.
Moving parts
After the motor is connected, you can proceed to creating the circular. The next step is the assembly of the moving elements, since it is they that bear the load, namely:
- Motor shaft.
- Saw shaft.
- Drive belt.
- Motor pulley from the washing machine.
- Circular saw pulley.
Motor selection and connection
It all depends on the power of the unit. Belt-driven motors are best so that the speed is transmitted directly to the saw. If you plan to install a 35 cm disk on a circular machine, then 1 kW of energy will be required to start it. The saw, whose diameter is 17 cm, operates from 500 W. This means that motors from old Sibir or Oka washing machines are quite suitable. All that remains is to adjust the engine speed, because unstable rotation will cause the saw to “tear” the wood.
The tachometer, which controls the control module, is responsible for the number of engine revolutions in the washing machine. But since the module will not connect to the circular circuit, it is recommended to install a voltage regulator.
Connecting the electric motor is considered an important working step, and if everything is not done correctly, then you can’t expect normal operation from the circular saw.
Designs of homemade machines
There are three main elements at the heart of any circular, two of which cannot be made by yourself:
- engine.
- shaft, with jointing knives or the simplest, without them.
Third, the bed (table) is easy to make on your own.
You can make such a stand with your own hands without any problems.
Additional elements are also required:
- starter, switch for the electric motor;
- electrical wire;
- drive belt;
- pulleys on the shaft and motor.
Main types of structures:
- The disk is mounted directly on the engine, without a belt or gear drive.
- The disk is mounted on a shaft with a belt drive.
- The shaft is the simplest, only for the disk.
- Shaft with jointing knives.
The first option is the simplest, but with a big drawback. The height of the engine “eats up” most of the working diameter of the disk. If the engine has a diameter of, for example, 200 mm, then a disk with a diameter of 200 mm will protrude above it by only 100 mm. Another part of this distance is reduced due to the motor mounts, connection box, and the thickness of the desktop.
As a result, only the outermost part of the disk diameter, where the greatest “lever” of resistance to engine rotation will actually work, will work. Even with a large blade, the cutting depth remains small, since the blade protrudes little.
If you install the motor with the blade on the side of the table, with the motor elevated relative to the table, the width of the cut will be limited. The wide piece will rest against the engine housing. It is impossible to extend the motor shaft with attachments, since the disk must be located as close as possible to the bearing. In another case, decentration of the shaft, beating and wobbling of the disk are possible.
The second option, the simplest shaft, also inevitably “eats” the working height of the disk, but much less. Only to the height of the bearing carriage from the center of the shaft. Therefore, when choosing a finished shaft, the height of the carriage matters. For powerful shafts this is 80-120 mm (40-60 mm from the center of the shaft). For thin shafts with small bearings 60-80 mm (30-40 mm).
The option with a shaft and belt allows you to select the number of revolutions of the saw blade due to the size of the pulleys on the motor and shaft. The belt can also act as mechanical engine protection. If it is not tightened, when the disk gets stuck in the workpiece, the belt slips along the pulleys, but the engine does not jam.
The simplest option is also possible, without an adjustment platform. In this case, the planing depth is set by the position of the knives in the shaft itself. This option is suitable for rough processing. For example, on jointing knives with a planing depth of 3-5 mm, you can plan one surface lightly. Then, having one flat plane to move along the table, cut the workpiece on the remaining sides with a saw blade.
How to choose a trimmer
An electric sawing tool is selected based on your needs. But the best, of course, would be one with a power of at least 1.5 kW.
Based on the power, you can select a cutting disc. The more powerful the machine, the larger the disk you can install on it. The most common disc is 250 mm in diameter.
Even under favorable operating conditions, discs lose teeth, become dull, and wear out. Therefore, the moment comes when you have to select the disk again. If you bought a saw with discs with a diameter of 250, 260, 300 mm, then there will be no problems buying a new one. Having a different standard may create a problem. Therefore, in the store you need to find out whether there are similar ones for sale.
Read also: What is the best way to connect a motor with a star or delta
An important factor is the number of revolutions of the disk rotation. Even in production, machines from 4000 rpm are used. Also, when choosing for yourself, pay attention to the fact that the passport indicates 4500 rpm.
The next point is the type of engine. Motors can be asynchronous and commutator. The first of them works silently and lasts longer. But the trouble is that it is not found on all models. The second type of motor will force you to change brushes often, but the price will be cheaper.
Next, look at the design as a whole and the turning system in particular. Each change in angle must be reliably recorded.
And the last, but no less important factor in the choice is safety. The casing must securely cover the disk. See how the sawdust ejection works. The machine must be equipped with a protection system against overheating and disk jamming.
Of course, you need to pay attention to all this at any retail outlet. But if Leroy Merlin is nearby, it will be much easier. Firstly, there is always a large selection of trims. And secondly, sales consultants will always provide the necessary assistance. Plus, all products have a warranty period.
What characteristics you need to pay attention to: power, speed
The main characteristic of an electric motor is power. The following power ranges are selected for circular saws:
- up to 800 W - low-power saws for cutting small wooden workpieces;
- from 800 W to 1200 W—saws with engines in this power range are mounted in small carpentry and furniture shops with continuous production;
- over 1200 W - very powerful circular saws that ensure uninterrupted production in large woodworking shops.
The rotation speed of the circular saw blade directly depends on the number of revolutions of the engine shaft. As a rule, electric motors are selected in the range from 3000 to 6000 rpm. In this case, the optimal value is considered to be 5000 rpm, which allows:
- Easily cuts through hardwood.
- produce a more even cut line when using discs of different thicknesses.
- Avoid jamming the saw blade in the wood.
It should be noted that the temperature of the working surface during prolonged contact with the saw also depends on the rotation speed. The higher the speed, the stronger the heating.
Mini circular saw: manufacturing instructions
Mini-circular base
To make such homemade products you will need:
- two metal plates;
- wooden beam;
- spindle from a bicycle;
- star;
- chain.
Circular saw device with a separate motor.
The mini-circular saw should be placed on a strong and stable table, since any rocking can pose a danger to human health and also interfere with normal operation of the saw. Before you start making a machine from a hand-held circular saw, you need to make a special table. In this case, you can use metal sawhorses and a regular old kitchen table as a bed. To begin, you will need to connect the trestles to each other with a wide wooden board at least 50 mm thick, and then secure the kitchen table to this base.
Read also: Miracle jigsaw cutting out drawings with a jigsaw
You can make the tabletop itself from two metal (preferably steel) plates with a cross-section of about 4 mm. In addition, you can use thick wooden blocks for this purpose.
It is important not to forget to leave a small gap between the metal sheets, the size of which is usually 10-12 mm. In this case, you need to ensure that the edges of the metal plates are perfectly parallel to each other
Now that the table is completely ready, you can begin attaching the circular saw itself to it. It is important to note that it should be fixed from below, and in such a way that its cutting disc is directly in the gap between the two sheets of the tabletop
In this case, you need to make sure that the edges of the metal plates are perfectly parallel to each other. Now that the table is completely ready, you can begin attaching the circular saw itself to it
It is important to note that it should be fixed from below, and in such a way that its cutting disc is directly in the gap between the two sheets of the tabletop
Engine Installation
To make a homemade circular saw, you need to think in advance about what device will be used to transfer the force from the motor to the cutting disc. Small equipment can be placed directly on the engine axis. However, this will not have the best effect on the power of a handmade circular saw.
An ordinary bicycle spindle can act as such a transmission mechanism, without which the operation of any circular saw is impossible. This is often called the housing in which the shaft with bearings is located. To cut it off the bike, you can use a hacksaw. In this case, you will not need the sprocket, since in this case it is best to take it from the D6 or D8 engine. In order for this sprocket to fit securely on the new shaft, you will need to make an adapter sleeve. Before you install the circular saw on your bicycle spindle, you need to make sure that it has the size of the mounting hole you need. Now, taking this information into account, it is necessary to establish the outer diameter of the bushing intended for the transition mechanism. The bushing should be attached to the spindle in several places at once. Next, a plate with a thickness of at least 5 mm should be secured to the spindle assembly body.
Now take an asterisk, approximately 2-2.5 times larger in size than the one that was previously installed on the spindle, and install it on a homemade circular saw. And at the end of making a saw with your own hands, when all its parts are well secured, put on the chain and you can use it for its intended purpose.
A simple circular saw made from a grinder or circular saw with your own hands
The design of a simple machine made from a hand-held circular saw or grinder allows you to use ready-made tools with a disk mounting unit and a motor. There is no need for a belt drive here, which means the number of technological operations will be less. The big advantage of this model is that the design will use a ready-made lifting mechanism for a circular saw, this will allow you to adjust the depth of cut of the workpiece.
At the same time, this scheme also has a number of disadvantages. So, a circular saw wheel in a tool based on an angle grinder will have a high rotation speed, about 7000 rpm, on the one hand, this is a big advantage, since high speed allows you to do the work better. But on the other hand, when working with hard wood or if the saw jams, there is a high probability that the motor will simply burn out. In addition, it is necessary to take into account that the grinder shaft cannot be moved closer to the working plate; the gearbox will interfere, so the depth of cut in such a tool will be small.
But there are also positive aspects - the gearbox housing of the angle grinder has ready-made holes for handles and, when used as mounting holes, for fastening to the machine body. In this case, there will be no need to remodel the angle grinder by making changes to the design of the tool; it is enough to make brackets and fix them on the body.
You can do the same with the power buttons - using electrical tape, simply fix them in the on position, and connect the wire to the starter connector. You can use an old switch with a large key as the main button; this will save time when assembling the machine and increase safety - in the event of an emergency stop of the tool, the large key is easier to find.
Isolux
Isolux is a well-known online store that has been selling quality tools for many years. We have hand tools, durable building materials, insulation, heating and a reliable roof. The customer can filter the product by brand, price, power, cartridge, cable length and battery type.
Popular among buyers are construction tools under 3,000 rubles, equipment from DWT, Bosch brands and goods made in Germany. Each item in the store has a detailed description indicating characteristics (weight, country of production, type and size), customer reviews of the product and reliable photographs.
Which engine to choose to make a circular machine
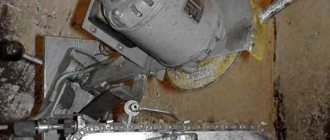
Every owner would like to have a device for working with lumber in a garage, in a country house, in a private house or when renovating a city apartment. But even a hand-held circular saw costs from 10,000 rubles. In this article we will talk about how a circular machine is made from an engine from a washing machine that has served its life. This homemade electric saw, assembled with your own hands at home, is capable of unraveling boards five centimeters thick. At the same time, it weighs just over 20 kilograms and is easily transported in the trunk of a car.
https://www.youtube.com/watch?v=5sBGdbhsLps
A circular saw is always useful on the farm: at the dacha or in a private house. But not everyone can afford a good expensive tool, and a cheap analogue quickly breaks down. The way out of the situation is to make a circular saw with your own hands. For example, you can make it from an engine from an old automatic washing machine, which is a shame to throw away and takes up space.
The working motor from an automatic washing machine should not gather dust in the garage. Even a home craftsman can find a use for it. We will tell you how to make a homemade circular from a washing machine engine.
This tool will help you cut wood and master carpentry.
However, be careful: careless use of a homemade machine can lead to unpleasant consequences. Therefore, before you take on a job, you must be completely confident in your abilities.
A 350 mm disk will require 1 kW of energy to start. A disk with a diameter of 170 mm will require about 500 W. Therefore, you can install a motor from an old washing machine.
In the washing machine, the speed is controlled by a tachometer, which is controlled by a control module. But it is impossible to connect a module to the circular, so install a voltage regulator. Use the wiring diagram to correctly install the motor.
You have figured out which motor is needed and how to connect it. Now consider the design diagram of a circular saw.
The main load will be on the moving elements. This:
- saw and electric motor shaft;
- motor pulley and saw shaft;
- drive belt.
Let's look at the features of each of them:
- The drive belt does not have to be taken from the washing machine; other belts can be used. The main thing is that they have serrations, like a V-belt.
- Flow grooves need to be made on the small pulley. The belt will cling to them during operation, which will prevent slipping.
- A larger disc is welded onto the large pulley, which will prevent the belt from slipping off.
- To fasten the circular saw, use a shaft into which it is mounted, as well as a washer and nut, which are used to secure it. It is recommended to select or take this kit from the factory to ensure the drive is secured as securely as possible.
When creating a design, you need to take into account that it is designed for a three-hundredth disk. Of course, a self-made circular machine is only suitable for household use. Therefore, try not to overload the engine.
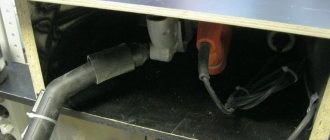
Often such machines are stored in the yard, on the street, so protect the electrical part from moisture.
The frame is made of metal sheet 3 mm thick. Before making the frame, prepare a 30 mm metal corner.
As shown in the photo above, the craftsman installed the frame into homemade pipe racks. Now it is possible to adjust the height of the device. However, it is recommended to make a solid frame by welding pieces of corner together. Strong vibration over time loosens the fastenings of bolts and other elements.
We suggest you read: Zanussi washing machine does not turn on reasons
Please note that the mini circular saw varies in size. It is much smaller than usual and can fit into a pantry when stored.
A washing machine is a useful thing in the household. However, over time the device breaks down. There is an element in the washing machine that should not just be lying around in the garage - this is the motor. It makes an excellent circular saw.
"Circular from a circular"
Among self-taught carpenters, it is believed that turning a hand-held circular saw into a machine tool is the simplest method of getting “three birds with one stone”, namely:
- high cutting quality guaranteed by high saw rotation speeds;
- a shaft installed in a commutator motor on bearings that can withstand radial load with flying colors;
- ideal (cantilever) mounting of the disk, it makes it possible to relatively quickly replace the cutting tool, so disassembling the circular saw is not required.
The main advantage of manufacturing such a machine is the “native” engine, which guarantees maximum performance thanks to ideal rotating torque and optimal speed. Other advantages of this solution:
- Relatively simple fixation, allowing you to quickly remove the saw in case of great need.
- Powerful motor that provides long-lasting performance due to its ability to withstand significant loads.
- Normal thermal conditions, which are guaranteed by forced ventilation of this hand tool.
- Ability to obtain sufficient cutting depth using large diameter discs. 60-75 mm is a value that gives a good chance to make high-quality blanks for various products made at home.
Bed and table top
Converting a hand saw into a circular saw begins with the manufacture of a table (or a case-box), on the back of which a hand-held power tool will then be attached so that part of the cutting edge protrudes above the surface of the table top.
The shape and size of the table are chosen based on the dimensions of the future lumber. If you plan to make small-sized workpieces, then a length of 1500 mm and a width of 600-700 mm will be enough. A steel corner with a shelf width of 25-30 mm is suitable for the manufacture of a circular table frame. The structure is reinforced at the top and bottom with spacers made from the same angle or reinforcement. This option is optimal to provide the machine frame with maximum rigidity.
For the countertop, they often choose laminated chipboard or OSB, some craftsmen opt for plywood, the thickness of this material is 15-20 mm, but you can take a thinner material and then join 2 sheets together. The elements that make up the tabletop do not necessarily have to be the same size or have a symmetrical arrangement relative to the frame. The main thing is that the structure does not run the risk of capsizing.
A notch is made in the tabletop designed to pull out the disk. That part of the table surface that will be adjacent to the cutting tool is often covered with tin, metal sheet (aluminum, steel), textolite or plastic. This solution makes it possible to make the movement of wooden lumber as easy as possible.
Saw control modification
Such operations can be performed only in one case: if the instrument has expired the warranty period. For ease of control of the circular machine, the contacts of the button and trigger (lever) are connected to an external electrical switch, which is mounted on the body in a convenient place, but where accidental pressing is completely excluded.
If the owner envisages the possibility of periodically removing the hand tool in the future, then the contacts are secured with electrical tape or a clamp. In this case, the circular cord is included in a carrier equipped with a switch button.
Guide ruler
It is necessary for precise cutting of material of different widths, so this ruler (stop) must be able to move parallel to the cutting edge. This element is also made from steel angle. Slots are made in the tabletop into which the ends of the guide are secured using screws.
A simpler option is a pine board. Its width is 40 mm, its length is 200 mm longer than that of the table. First, nuts are pressed into the lower part of the protruding edges, and the L-shaped hooks are secured with screws. After installing the board on the tabletop, the circulars are tightened with screws, thanks to which the hooks rise and securely fasten the ruler. It can also be easily moved to any place.
How to make a circular saw drive
What engine does it need? It depends on what kind of automatic washing machine you have gathering dust in your storage room. It is better to take an engine, of course, with more power.
Although for a mini-circular, which is assembled in a similar way, a less strong one will do. Its difference is its light weight and the installation of the mechanism not on a stationary base, but on a wooden box. It serves as both a bed and a chip storage.
Preparing the motor
The collector motors of washing machines have several outputs. How to determine and connect the ones you need? We use an ohmmeter to test the second coil, selecting the one with the highest resistance.
We check other connections at the commutator and brush outputs.
We also find, measure and mark the speed sensor wires. They may be located inside the case, then disassemble it.
We connect the first output of the collector and one from the coil. The second one, with the remaining coil contact, is connected to the network. We are doing a test run.
To enable reverse rotation, the contacts are swapped.
Adjusting the speed
In order for a circular saw to process materials of different sizes, a device is needed to add or reduce the number of revolutions.
In the device from which we removed the motor, this function is performed by a tachometer operating through an electronic module. The latter will not work with our device.
The simplest thing is to use a dimmer or trigger from a hand-held electrical appliance to control the voltage supply and, accordingly, the shaft rotation speed. The connection goes like this:
- one coil terminal is terminated with the armature terminal;
- the second - for mains power;
- the remaining armature output through the dimmer is the same;
- Having checked the connection, we test it.
A more complicated option is using a tachometer. It will allow you not to lose electric drive power during operation. It must be connected through a microcircuit, which will equalize the power as the load on the shaft increases. If it is impossible to buy a ready-made one, using the TDA 1085 board diagram and the list of necessary parts, you can assemble it yourself.
Motion module
It consists of:
- Shaft for attaching the cutting disc.
- Motor shaft.
- Transmission belt.
- Motor pulley.
- Saw pulley.
To simplify things, you can assemble the device without bearings.
Through a drive belt placed on a pressed-in smaller pulley, the shaft transmits rotation to the saw blade. The pulley must have notches so that the serpentine belt does not slip on it.
A small protrusion is welded onto the edge of the larger pulley to prevent the drive loop from slipping.
The disk must be securely fastened to the shaft, otherwise it will come off and cause injury.
Bore the holes for fixing the engine to adjust the belt tension.
Starting device
You can choose a switch for a household electrical appliance for it. It’s better to install a push-button one from a Soviet washing machine.
Its connection diagram is as follows:
- At the input it is powered by two contacts, and inside one wire bifurcates.
- Of the three outputs, one will be phase, the second zero.
- The third, through a capacitor, will give a shifted phase.
This connection will provide better launch. But after it it is necessary to disconnect the capacitor.
bed
For a welded frame, a rectangular twenty-millimeter profile is suitable.
The drive and motion module are securely attached at the bottom. This design leaves the upper platform free.
According to the testimony of the craftsmen who made such machines, they spent about six months on it. But we are quite satisfied with the equipment. So go for it too!
Video:
Bad 6
Interesting 15
Super
Moving parts
Having finished connecting the engine and making sure that it normally increases and decreases speed, you can proceed directly to the circular device.
Let's figure out which moving units that bear the main load we will need:
The drive must operate in this manner. The engine transmits rotation to a shaft on which a small pulley is pressed. The last one is wearing a belt that sends revolutions to the second pulley. At first glance, everything seems simple, but when the circular is being installed, many difficulties arise that must be resolved.
The small pulley must be sharpened. Three to four transverse grooves are placed on it so that the belt has the opportunity for a good hook.
You don’t have to use the belt from an old washing machine; just take an analogue from another unit. The main thing is that it is durable and has teeth.
A disc of a slightly larger diameter is welded to the edge of the large pulley to create a protrusion that prevents the belt from slipping during operation. It is not necessary to sharpen the serrations on this pulley; the clutch with the belt will be quite sufficient.
The shaft holding the circular saw, fastenings in the form of a washer and a nut must be reliable so that at maximum speed the saw does not become deformed and does not jump off, injuring workers. It is recommended to use the shaft and fasteners from a factory-made circular saw.
The procedure for constructing a circular saw is described for a saw with a three-hundredth blade. Many will say that the SMA engine will not pull such a saw and will stop. But here you should remember a few rules:
- you need to be able to operate a circular saw correctly;
- household saw, designed to work with small volumes of materials;
- the successful operation of such a saw is confirmed by numerous reviews.
Simply put, the saw should not be overloaded, and it is better not to operate it at idle speed.
Options for making a woodworking machine
Today, there are a large number of ways to make a stationary circular saw. Angle grinders, hand drills, screwdrivers, and many other tools are used as drives for them.
The most common drive options are:
- drive from a hand-held circular saw;
- machine with a motor from a washing machine.
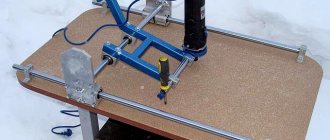
How to make a stationary sawing machine - step by step guide
When manufacturing, you will need a small amount of material and hand tools, which, as a rule, are in everyday use of every owner. This includes:
- wooden blocks;
- OSB or plywood sheet;
- fastening hardware;
- drill with a set of drills;
- hand-held circular saw.
A sheet of plywood or OSB with a thickness of at least 20 mm and dimensions of 1100 x 880 mm will be used as a desktop. To make a stationary machine for cutting wood, you must perform the following steps:
- Place the hand-held circular saw in the intended installation location and trace the outline. After this, make a recess of about 12 mm.
- Drill holes along the contour of the recess for the M8 mounting bolts and use them to fix the hand-held circular saw on the back base of the table.
- Install a socket next to the saw and connect the saw to it, make a groove in which the saw blade will be located.
- Make a frame for the perimeter of the table and legs of the required length from a wooden block. Install a folding box at the place where the saw is attached, constructing it from thin plywood. Install a power button at the end of the table, having previously connected it to a socket.
- Make a hole in one of the corners of the box to connect a vacuum cleaner. To fix the hose, you can use a plastic fitting with a diameter of 50 mm.
- The box is fixed to the table using metal corners and screws.
- Then, across the table it is necessary to cut 2 longitudinal grooves to install a 150x100x10 mm channel. Since the work table will be covered with 4 mm thick PVC sheets, the depth of the grooves under the channel should be 6 mm.
- After this, you can begin making pushers. Hardwood slats are used as guides. The pusher frame can be made of laminated chipboard with a thickness of 16 mm.
After watching the video, you can familiarize yourself with detailed step-by-step instructions for making a stationary circular saw from a hand-held circular saw.
Homemade cutting machine driven by a washing machine
Another common option is to use an asynchronous motor from a washing machine as a saw blade drive. For domestic use, a low-power electric motor is suitable, for example the engine from an old Malyutka washing machine or any modern automatic machine.
Sawing machine from a drill at home
You can also make a good circular saw using a hand drill. The costs for materials are minimal, and almost everyone in the house has a drill. You will find more details about all the nuances and a step-by-step algorithm for making it yourself in our article on how to make a circular saw from a drill.
Petrovich
User selection
The Petrovich construction tools store was founded in 2003. They are known as a trading house for building materials, plumbing, workwear, doors and electrical equipment. The cost of delivery within the country starts from 150 rubles to the point of delivery of orders. A competent support service will help you with any questions you may have.
Petrovich sells construction tools from popular world brands: Bosch, DeWalt, Black & Decker, Hitachi and Karcher. There is a wide selection of tools for beginners and professionals on store shelves. Drills, grinders, spray guns, circular saws and planes - low prices with the ability to order online with home delivery.
Petrovich guarantees the quality of the goods and provides the necessary certificates. If the purchase is not suitable, you can return the product to the online store within 180 days. With the arrival of summer, garden tools become relevant: lawn mowers, trimmers, chainsaws, welding equipment and generators for work in the country house or garden.