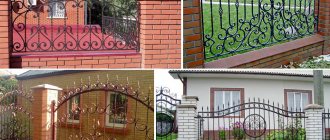
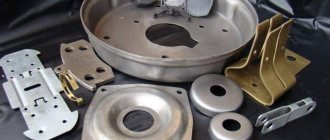
Looking at the fences, gates and gates, as in the figure, in houses that are clearly not of the elite class, a person who has some idea about the equipment of the forge and the nature of the work there may think: where did they get so much money? Those more knowledgeable in blacksmithing will not have such a question: these beauties, as well as the metal decor of furniture, light garden buildings, swings, benches, etc., are created by cold forging.
Samples of artistic cold forging
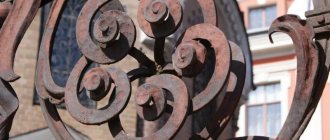
Forged flower stand
Prices for cold art forging are affordable because production costs and initial equipment costs are low, and labor productivity is not bad for artisanal conditions. Consequently, an individual blacksmith specializing in artistic cold forging can count on a fairly quick start and good profitability. Perhaps one of the owners of the samples in Fig. I made my own: cold forging with your own hands can be done in a garage or barn without experience, and forged parts for small pieces of furniture, balusters, barbecues and all sorts of other metal utensils (see, for example, the figure on the right) can be done even at home conditions.
The basis of a “cold forge” is a cold forging machine. For a full production cycle, capable of satisfying any conceivable fantasies of your own or the customer, you will need 5-7 types of machines, 3-5 main ones of which you can make yourself. However, in the beginning, before spending money on a machine or materials for it, it is highly advisable to master the basics of blacksmithing. Therefore, further we will also consider some techniques for making artistic forging parts without a machine and equipment for them, which can be quickly made from scrap materials.
Stamping, forging and bending
So what is cold forging? It differs from stamping in that the metal hardly flows or flows weakly under the influence of the working element. Take a look at a beer can or, say, an aluminum or tin kettle. They are extruded with one blow of the punch of the stamping press; kettle, etc. products of complex shape - with a composite sliding punch. It is impossible to obtain the working force necessary to create such a high pressure at home, except in one case, see below.
Cold forging differs from hot forging, of course, in that the workpiece is not preheated. Actually, cold forging, which is forging, is the hardening (hardening) of a part with a long series of regular blows of a certain force. In this case, the structure of the metal changes significantly: the hardness of the surface layer increases, and the core provides overall toughness and fracture strength. Handicraftsmen - toolmakers and gunsmiths - literally hunt for buffers and wheel tires of railway cars, pieces of rails.
Steel hardening is carried out with a mechanical hammer.
You can do it yourself, and it’s even easier than some types of machines for cold artistic forging. But this publication is devoted specifically to the latter subject, and cold artistic forging is essentially bending (bending) metal: its structure in the part does not undergo significant changes, and changes in the physical and mechanical properties of the metal are not significant for the quality of the final product. Therefore, let’s leave cold forging, which is forging, until a suitable opportunity, and let’s deal with forging, which is bending. For brevity, we will simply call it artistic forging, and where it is necessary to mention hot forging, this will be specially discussed.
History of metal forging
It is known from legends that Hephaestus, who was considered the most skillful god of Olympus, was represented as a blacksmith. According to legend, it was he who created the scepter for Zeus and the shield for Achilles. He forged a rod for Dionysus, and a weapon for Hercules. Hephaestus was often compared to the pagan god Svarog, who turned into the blacksmiths Kuzma and Demyan.
Historically, metal forging, in particular copper and bronze, was practiced back in the 3rd millennium BC in Egypt, Mesopotamia, and Iran. A dagger made of iron was found in the tomb of Pharaoh Tutankhamun. Until the 16th century AD cold forging was revered by the American Indians.
In the Middle Ages, metal was processed at a high level. Tools, plows, firearms and bladed weapons were forged. As well as doors, locks, fences, chests and other products that could be supplemented with the finest elements. Objects were decorated with expressive patterns, notches, and thin-layered sheets of gold leaf.
Nowadays, in addition to forged vases, tables, fences, barbecues, doors and stairs, exclusive artistic products are popular. In their production, even in small companies, manual labor is combined with 3D modeling.
Machines and equipment for cold forging
The main equipment for artistic forging with your own hands consists of several types of hand-operated machines and devices. The electric drive is used infrequently, because the resulting increase in productivity is not always equivalent to the complexity of manufacturing and the cost of electricity. However, we will still remember about the electric drive for home forging machines while we are working on the “handbrake”. Almost all elements of the products in Fig. at the beginning can be done on the following types of machines:
Types of manual cold forging machines
- Twisters (twirlers), pos. 1 in Fig. – form flat spirals and other curls with a narrow core (core).
- Torsion bar machines, pos. 2 – allow you to obtain a helical twist of a rod and elements from volumetric spirals, the so-called. filaments: baskets, lanterns, bulbs.
- Inertial stamping machines, pos. 3 - on them the ends of the rods are splashed into shaped ends (item 1 in the figure below), decorative clamps are stamped to connect the details of the pattern (item 2 in the same figure), a small wave and relief are squeezed out on long parts.
Rod ends and artistic forging clamps
- Bending machines are push, broach and combined, pos. 4 . The first ones allow you to get only waves and zigzags; lingering - rings, curls and spirals with wide cores, and the latter - all these types of products.
Note: in technical literature, especially in English, all machines that form parts by torsion or winding are often called twisters. Initially, a twister is a machine for winding springs. But in relation to artistic forging, it would be more correct to consider winding machines as twisters, and torsion machines as torsion bars.
What are flexes?
Bent device for cold forging
In technical vernacular, bending machines are called benders. However, in amateur and private metalworking, the name “gnutik” was established for a table-top device for producing waves and zigzags, see fig. on right. By changing the roller or wedge in the bend, you can vary the pitch and height of the wave or the zigzag angle within certain limits.
A bend for rods/pipes up to 12-16 mm is relatively inexpensive, but it is difficult to make it yourself at home: it requires precise processing of special steels. Try using a regular electric drill and a regular metal drill to drill through a regular open-end wrench. And in a bending machine, the workloads are much higher than on its jaws. Therefore, it is better to buy a bend; in addition to forging on the farm, it is useful for the manufacture of elements of welded metal structures, as a pipe bender for small thick-walled durable pipes and in other cases.
DIY machine
Machine for bending rods.
A homemade tool for cold forging is a very real thing, but its production will take a lot of time and effort. Therefore, the decision must be balanced, and the preparation, including drawings, must be serious and complete. The most suitable place may be a garage shed or outbuilding. The design of the machine depends on only one factor: what are you going to do, what products to produce?
We must not forget that many forging elements can be performed without special devices. For example, using a regular pipe bender, which is quite suitable as a version of a simplified machine for cold forging - you can do a lot with it.
You also need to understand that a universal cold forging machine that would make at least three different elements does not exist in nature. Most often, they make a snail with their own hands: it is popular, allows you to make a wide variety of curls and, in the end, is easy to make. The second most frequently used tool at home is a homemade bending machine.
It is also simple and inexpensive to implement. When you search for “how to make cold forging machines,” you will receive a huge number of links to videos with tips from “experienced people.” Most of them are to the point and from the heart, they will greatly help in making final decisions.
Twisters
Since ancient times, blacksmiths have cold-formed curls according to a template-mandrel using a horn lever grip, pos. 1 in Fig. This method is low-productive and not for wimps, but it allows you to quickly and easily make various bending mandrels from an ordinary steel strip: the end (thrust) horn of the lever prevents the template from yielding under the pressure of the workpiece. It is advisable to make the middle (bypass) horn sliding with fixation: the work will go slower, but, especially in inexperienced hands, more accurately.
The simplest devices for cold artistic forging
Another simple device for manual shaped bending is a strong board with support pins - spacers, pos. 2; Ordinary M8-M24 bolts are suitable. Depending on how friendly you are with your home exercise machine, you can work with a strip of up to 4-6 mm. They bend the strip by eye, the work goes slowly, but you can draw patterns up to Ilya Muromets on a horse in full armor or Buddha in a lotus flower. The latter, perhaps, is completely handmade: people who have fully mastered hatha and raja yoga are able to curl steel reinforcements into a pattern with their hands.
Advantages and disadvantages of cold forged products
The advantages of products made by cold forging are much greater than the disadvantages. In addition, the importance of the pros is higher than the importance of the cons.
Table. Advantages and disadvantages of forged products
| Advantages of forged products | Disadvantages of forged products |
| The workpieces do not require pre-heating at high temperatures | Cold forging requires special, sometimes powerful, machines |
| Parts are machined with high precision, fine adjustment available | When processing metal, significant physical effort is required |
| Finished products are stronger than analogues obtained by hot forging | Surfaces to be treated must be clean |
| Elements after manufacturing do not require additional processing to increase strength | It is impossible to work with very strong and hard workpieces |
| There are no traces of combustion products on the surface of finished products | |
| Due to the lack of an expensive furnace and related equipment, products become cheaper | |
| Patterned products can be mass produced |
Due to the lack of an expensive furnace and related equipment, the products become cheaper. The only thing is that it is impossible to produce all types of forged products using the cold method. But beautiful products of the same type can be created in large quantities at a low price.
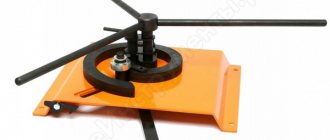
Snails
The snail twister machine is the most popular among those involved in artistic forging: its capabilities, in comparison with the simplicity of the design, the ease of making it yourself and the ease of operation, are amazing. Actually, the snail machine is a slightly mechanized and improved bending lever, but this “little” made it possible for beginners to work on it. Snail machines are, in turn, divided into machines with a collar and a rotating plowshare and lever machines with a fixed template and a deflection roller.
Snail with ploughshare
The device of a bending scroll with a plowshare is shown in the diagram below; The technology for working with such a machine is also described there.
Schematic diagram of a snail machine for cold forging
The advantages of this type of twister bending machine are as follows:
- It is possible to work on a scroll with a rotating share and a collar in an unequipped room: the vertical component of the workload is negligible, and its horizontal components are partially transferred to the support.
- Due to previous point, the supporting structure can be quite simple and light, welded from ordinary steel profiles.
- We can carry out the work process alone: turning the gate with one hand, we press the rod or strip against the template plowshare with the other. As its links bend, they will fall into place on their own.
- Using a cold method, you can twist spirals of up to 5 turns on a snail with a rotary plowshare.
Drawings of a snail machine for artistic forging with a specification of parts are given in Fig. We’ll talk about the dimensions of the links (segments) of the folding share later, but for now pay attention to the steel grades: the share bears heavy loads. If you make it from ordinary structural steel, the template will lead to the middle of the gate or fence section.
Drawings of a snail machine for cold forging
Note: for more detailed drawings of a snail machine of a similar design with description and detail, see the link: https://dwg.ucoz.net/publ/osnastka/instrument_dlja_kholodnoj_kovki/5. There you will also find drawings of a homemade bender and a device for bending rings.
The material for the folding rotary share, as well as the complexity of its manufacture, are not the only weak points of the snail machine with a collar. An even more serious problem is the articulation of the ploughshare links (shown by red arrows in the figure on the right). The joints of the share segments must:
Design of folding ploughshare of snail cold forging machineBe accurate enough to maintain the shape of the manufactured parts;
- When pressed from the outside, the joints of the segments should become dead center, creating a stable configuration;
- Upon removal of the working load, the joints should self-weed;
- The design and material of the joints of the rotary share must ensure repeated repetition of the cycle according to paragraphs. 1-3 under significant alternating operating loads without the appearance of significant backlash.
It is difficult to fulfill all these conditions together in a well-established and equipped industrial production, so the resources of folding templates for cold forging are generally much less than their material would allow on its own. Poor use of material properties is a serious drawback. In addition, for the same reasons, another weak point of the snail-type machine with a collar is the eccentric clamp of the part. Therefore, novice homemade blacksmiths work more successfully with homemade snail machines for artistic forging, made according to a lever design.
Snail with lever
The lever volute for cold forging is designed similarly to the well-known pipe bender. A homemade lever-type snail machine with a fixed template is significantly inferior in performance to a snail with a collar. The working load in it is more fully transferred to the base, so a strong frame made of special steel or a thick plate of ordinary steel, securely fixed to the supporting surface, is required. As a result, a workshop or outdoor production area is required. Work on the lever scroll progresses slowly: after turning the lever until it jams, you need to move the pressure roller. It is possible to curl up to 3-4 turns on a lever volute. Nevertheless, the advantages of a snail lever machine for home craftsmen are significant, especially when working for yourself:
- All parts, except the pressure roller, can be made of ordinary steel.
- It is possible to use a standard roller bearing as a pressure roller.
- The use of the material properties of the parts is almost complete: the template and frame made of ordinary steel can withstand more than 1000 working cycles.
- You can bend either according to a template (pos. 1 in the figure below) or using spacers, pos. 2 there.
Snail cold forging machines
- When bending along spacers, you can quickly change the shape of the resulting part and create reverse bends, which is basically impossible when bending along a plowshare.
- Securing the end of the workpiece in a cold forging machine
To obtain products of the same quality, the manufacturing accuracy of parts of a lever volute can be an order of magnitude lower than that of volutes with a rotary share.
- The end of the workpiece can be secured by simply inserting it into the recess of the template, see fig. on right. The end to be fixed is widened by welding or bending in half.
In addition, the snail lever machine allows the use of a technological technique that is considered the prerogative of industrial twister machines: the template is shifted to the side, and a spacer is placed in the center, pos. 3 in Fig. This creates a small reverse bend in the core of the curl. The part looks more impressive and, when working for sale, the product is more valuable.
Flat bending of steel strip
The lever snail has another rather fat plus: on such a machine you can bend flat curls with a small core from a strip laid flat. The snail with a collar and a rotating plowshare gives up completely here: the workpiece will go in a vertical wave. Wide curls and rings from the strip can be bent flat on a broaching machine with rollers in which grooves are machined, see fig. on right. But the drawing speed, so that the workpiece does not lead, requires a significant one, so you won’t get a narrow curl core.
On a snail lever machine, this problem is solved by installing a pressure roller with a height equal to the thickness of the strip and with a flange (edge), like a railway wheel, only wider. Bending using this method takes a lot of time: the lever must be applied a little at a time, otherwise the inner edge of the workpiece will wrinkle; The flange does not help from this. But it is impossible to obtain a curl from a flat strip with a narrow core in a handicraft production in any other way.
In general, at the start of blacksmithing and artistic activities or when making a forged fence, gate, gate, bench, swing, gazebo, etc., arranging a garden for yourself, it is still better to use a lever-type snail machine for cold forging. Moreover, it can be made from scrap materials without accurate and detailed drawings, see for example. next video.
We just bend metal - a bender helps
In principle, to obtain an arc with a certain radius from a bar, you can use a conventional pipe bender. But sometimes you need to get an angle of about 90 degrees or even acute. In this case, you will need special equipment - a bender. As a rule, this machine, consisting of two fixed rollers and a bar with a wedge moving between them, is oriented horizontally. The central unit moves translationally on a screw fixed under the base using a knob. It is such a device that is quite difficult to make on your own. But it can be replaced with just two stops. For example, two very thick bolts screwed into a metal tabletop or a thick workbench board. We insert a rod between them, focus on one rod, bend through the second, however, only “by eye”.
A more affordable version of the machine for self-production is vertical. A narrow rectangular frame is installed on a strong, massive stand; two guide rods are rigidly fixed in it with a frame placed on them, in the center of which a threaded hole is drilled. The same is located coaxially in the top bar of the frame. Next, a long threaded shaft is screwed through the frame and bed, at the upper end of which the gate is rigidly fixed.
A steel wedge is welded or bolted to the side of the frame, which is much more convenient. On the side posts of the frame, two rollers are fixed horizontally at the same level. Now, by rotating the screw, you can lower or raise the frame with a wedge, which will increase or decrease the pressure on the rod laid between it and the rollers. A removable wedge for bending, with several additional attachments of different shapes, will allow you to change the bend angle of the metal workpiece.
How to build a curl?
There are plenty of sketches of curls for artistic forging on the Internet, but when you try to adjust their sizes to those required for yourself, it often turns out that the product loses spectacularly due to a seemingly insignificant violation of the proportions. Therefore, it is also desirable to be able to construct forging patterns of curls that obviously have aesthetic advantages.
Templates for cold forging of artistic curls - volutes - are built on the basis of mathematical spirals. The most commonly used is the logarithmic spiral; it is one of the widespread natural forms expressing the fundamental laws of nature. The logarithmic spiral is found in the shell of a snail, in our hearing aids, and in the form of a treble clef in musical notation; in the neck of the violin itself too.
Construction of forming templates for cold forging based on spirals
The principle of constructing a logarithmic spiral by points is that when the radius that forms it is rotated, starting from a certain initial R0, by a fixed angle φ, its length is multiplied by the divergence index of the spiral p. For volutes p, as a rule, take no more than 1.2, because a logarithmic spiral diverges (unwinds) very quickly; on pos. In Fig. a logarithmic spiral with p = 1.25 is shown as an example. To make it easier to build a spiral at points with sufficient accuracy for forging work, take φ = 45 degrees.
In the case when a denser arithmetic spiral is required, when the radius forming it is rotated by the same 45 degrees, 1/8 of the spiral pitch S is added to the previous radius, pos. B. In both cases, R0 is taken equal to or greater than the diameter d of a workpiece of uniform cross-section, pos. A. If the initial end of the workpiece is pointed, R0 may be less than d, up to the plasticity limit of the metal.
It remains to decide how to lay a visually harmonious spiral with a given opening size a. To solve this problem analytically, i.e. using formulas with any precision specified in advance, you will have to solve cubic and higher-order equations. There are no computer programs for numerical technical calculation of volutes on the Internet, so we will use an approximate method that allows us to get by with one working and, possibly, one test graphical construction. It is based on the assumption that for small p the sums R2+R6 and R4+R8 do not differ much. The step-by-step algorithm for constructing a volute for a forging template follows from here:
- Based on the available material, we determine R0;
- we take the number of turns of the volute w according to the principle: as God puts it on the soul of the left hind paw of a beloved cat;
- Using the data from the table in Fig., we calculate the diameter of the volute b such that it is slightly smaller than the width of the opening under it a, see pos. G;
- We calculate the working initial radius R using the formula for pos. G;
- we build a volute profile on a scale point by point;
- if necessary, we accurately adjust R using the same formula and build the profile of the working template completely.
Note: if you calculate intermediate values from the table, do not forget - they must be taken in geometric proportion!
Waves - bend the rod along a sinusoid
There is nothing complicated about this element. All you need are two metal pulleys, with two holes for bolts and one center for the lever. We will also prepare a base from a thick steel sheet with perforations made at regular intervals on the same line. The distance between the drilled through sockets should be slightly larger than the diameter of the pulleys, so that when laid and secured side by side, they have a gap between them for the free passage of the rod.
You can make many holes on a steel sheet with a pitch that is a multiple of the distance between the fasteners. You will also need a lever with two round side bars, the outermost of which will be inserted into the central socket. The second one must press the bent rod against the pulley, therefore it must be removed from the outermost one at an appropriate distance.
We install the pulleys on the base, firmly securing them with bolts. We insert a rod between them, now one of them will serve as a stop, and the second as a template for bending. It is into this that we insert the lever with which we draw the arc, forming the desired diameter of the first wave. We unfold the rod so that the resulting wave covers the thrust pulley. We trace the second bend and unfold the workpiece again. And so on until the rod is completely transformed into a sinusoid or a segment of the required length is made, which we saw off and use in the pattern.
You can make rings in the same way, if you take thicker pulleys, in the form of low cylinders, as well as curls called chervonki, S-shaped. To make the lever crossbar slide better around the pulley, it is better to supplement it with a bearing or roller, taking into account the required gap for the rod.
Torsion bars
Torsion twisting of a rod without a machine
You can twist rods with a screw for artistic forging without a machine at all, see fig. on right. To prevent the workpiece from bending at the root (clamped in a vice) end, you need to place a wooden block or something like it with a V-shaped cutout at the top under the end of the guide pipe farthest from them; It is better to secure the pipe to this support with a clamp, and secure the stand to the workbench. The pipe should be shorter than the workpiece and approximately 1.5 times wider inside than its largest diameter, because When twisted, the workpiece contracts and expands in width.
A torsion cold forging machine allows you to increase productivity and improve the quality of the resulting parts. The working force in it is transferred to the support to a significant extent, so a strong frame is needed, in the form of a spinal frame made of an I-beam from 100 mm or a pair of welded channels of the same size; the corrugated pipe will apparently be deformed. The frame must be securely secured to the supporting surface using paws from the same profile welded to its ends, pos. 1 in Fig.
Homemade torsion bar machines for cold forging
The workpiece - a square rod - is held by mandrels-chucks with sockets also of square cross-section; they are visible there in pos. 1. Because When twisted, the rod shortens in length; the chucks in the spindle and tailstock must be securely fixed with screw clamps. For the same reason, the tailstock is made sliding. To allow twisting of individual sections of the workpiece, a sliding stop with an insert with a square hole is also used.
If you only need to make a fence for yourself or something smaller, you can quickly build a torsion bar machine from scrap and scrap materials, pos. 2. On both machines, in principle, it is possible to obtain filaments by placing a bundle of 4 rods half the size into the cartridges. But don’t think that you can make a good lantern or basket by simply pushing the tailstock with a lever. You will get something like the one in the inset in pos. 1 and 2. Blacksmiths call such incidents a word that is generally known, but not used in literary speech. The branches of the filament, when twisting it in a simple torsion bar machine, must be spread out in width with a hand tool, which is difficult and does not ensure the proper quality of work.
Beautiful filaments (pos. 3) are twisted on torsion bar machines with a fixed tailstock and a screw feed spindle, pos. 4. Now let’s return briefly to Fig. with types of machines at the beginning, to pos. 2 on it. See the thing marked with a green exclamation mark? This is a replacement spindle. There are 2 of them in the set: smooth for spiral twisting along the long axis of the workpiece and screw for twisting filaments. In this design, the frame is welded from a pair of channels with a longitudinal gap, and a shoe with a threaded hole for a locking screw is welded to the tailstock. A shoe is needed with a sole from 100x100, because The tailstock fixation in filament mode is frictional and only partially jammed: the locking screw provides only an initial clamping force.
About the electric torsion bar drive
Electric drive of a homemade torsion bar machine
Working on a torsion bar machine with a manual spindle drive is tedious. But the main thing is stable quality of products such as in pos. 3 fig. with torsion bar machines, it is even more difficult to achieve. The reason is that it is difficult to create a uniform torque in a circle with your hands, like with any other lever drive. Therefore, a torsion bar machine for cold forging is exactly the case when the use of an electric drive is justified no matter what. The best option from available materials is the axle shaft of the drive axle of a rear-wheel drive car with a gear pair from the differential from the same place, see fig. on right; Just don't forget about the protective casing! Motor - 1.5-3 kW and no more than 900 rpm. Other design options are also possible, see eg. video clip:
Torsion bar or basket - making a complex decorative element
A machine for making such a part is somewhat more difficult to create than a twister, but even a beginner can do it. As a basis, we take the same base from a channel or square profile as described above, and do everything the same, with the exception of one detail. The pipe should be quite long and pass through both frames. On a movable one made of a thick metal plate, 4 holes are drilled, arranged in a square (it is better to equip them with side screw clamps).
In the center there should be a through socket for the pipe along which the frame should slide. The assembly with a collar looks different; a plate with 4 holes (also with screws) is drilled in the middle, after which it is mounted and welded onto a pipe, which must rotate in the frame socket using 3-4 handles.
The device can also work differently - the gate moves freely along the pipe, and the main frame holds the rods. The result will be the same. We install the holes arranged in squares so that they align with each other. We pass the rods through the far plate and clamp them. Then we do the same in the gate frame, which, after fixing the workpieces, we begin to slowly rotate. The rods will wrap around the pipe as the number of revolutions increases. Therefore, the far frame should be a short distance from the gate, about 20 centimeters. The further you initially move it, the more turns you get, the more complex the basket will be. But, as a rule, more than two full turns are rarely made. A basket is assembled and welded from the resulting blanks.
Video: homemade electric cold forging machine
Spiral like a spiral
Device for winding spirals manually
In some cases, ordinary smooth, straight, ascending spirals are used as an element of artistic forging. Making a spring twister machine for this on your own is absolutely unrealistic. But remember: the spirals in a forged pattern do not need to be springy and can be wound from ordinary ductile steel using a simple device (see figure on the right). The pitch (ascent) of the spiral is determined by the horn of the gate (filled in red); By bending the horn up and down, you can get thinner and thicker spirals. A square bar is taken onto the workpiece or a round one, it doesn’t matter. You can also twist spirals from a rod twisted on a torsion bar.
Wave and zigzag
Now we have tools and equipment for wave and zagzag bending of long workpieces. The bending machine and push-pull bending machine mentioned at the beginning cannot be reproduced with your own hands. In addition, the first allows you to adjust the pitch and profile within relatively small limits, while the second is expensive. However, you can still make a universal wave bending machine with your own hands, similar to the one on the left in Fig. You only have to order rollers; they must be made of chromium-nickel or tool steel; the rest is made of simple construction; for the staples and arch, a sheet (strip) of 8 mm or more is needed. Limiters are installed in the arc to accurately maintain the wave profile, but the workloads are transferred to it to a significant extent; in fact, the arc provides lateral rigidity of the structure.
Equipment for wave bending during cold forging
You can bend only smooth, but very diverse, waves by adding a gate for waves to a snail machine with a rotating plowshare, on the right in Fig. The same handles are used, because they are screwed into threaded sockets on the head of the gate. It is advisable to make the main (central) roller separate and fasten it to the frame with bolts with countersunk heads. In this case, by placing rollers of different diameters (diameters), it is possible to form waves of variable and asymmetrical profile. And if the deflection roller is made adjustable (for which a number of holes are checked in its carrier), then the wave pitch can be changed within a fairly wide range.
About connecting elements and painting
Forged parts need to be assembled into a single composition. The simplest method is welding and subsequent smoothing of the seams with a grinder with a grinding wheel: it is thicker than a cutting wheel (6.5 mm) and can withstand bending forces. But connections with shaped clamps look much more impressive; they are stamped from a strip of 1.5 mm on an inertial stamp; You can also hot-forge quite quickly and without experience, see below. The clamp blank is made in the form of a U-shaped bracket on a mandrel to the size of the parts to be connected, and its wings are bent from the rear in place with a large plumber's hammer or a 1.5-2 kg sledgehammer when cold. The finished product is usually painted with blacksmith enamels or acrylic paints for metal. Enamels with pigment from forge patina are more expensive, but better: when dried, they have a noble, somewhat antique color, do not peel off, do not fade, are wear- and heat-resistant
Step-by-step instructions for forging
All forged items can be made with your own hands right at home. It will not be possible to make special patterns, however, you can make all the basic elements yourself. It is important to follow all stages and technology.
There are several technological stages:
- Checking all calculations. Even minor inaccuracies can spoil the entire final result. Correcting errors will be very difficult, and often impossible.
- Assembling a decorative composition.
- The elements are fastened together by welding. However, it is important to remember that it can cause damage to small decorative elements.
- Processing of the resulting product - by sanding and painting the entire resulting product.